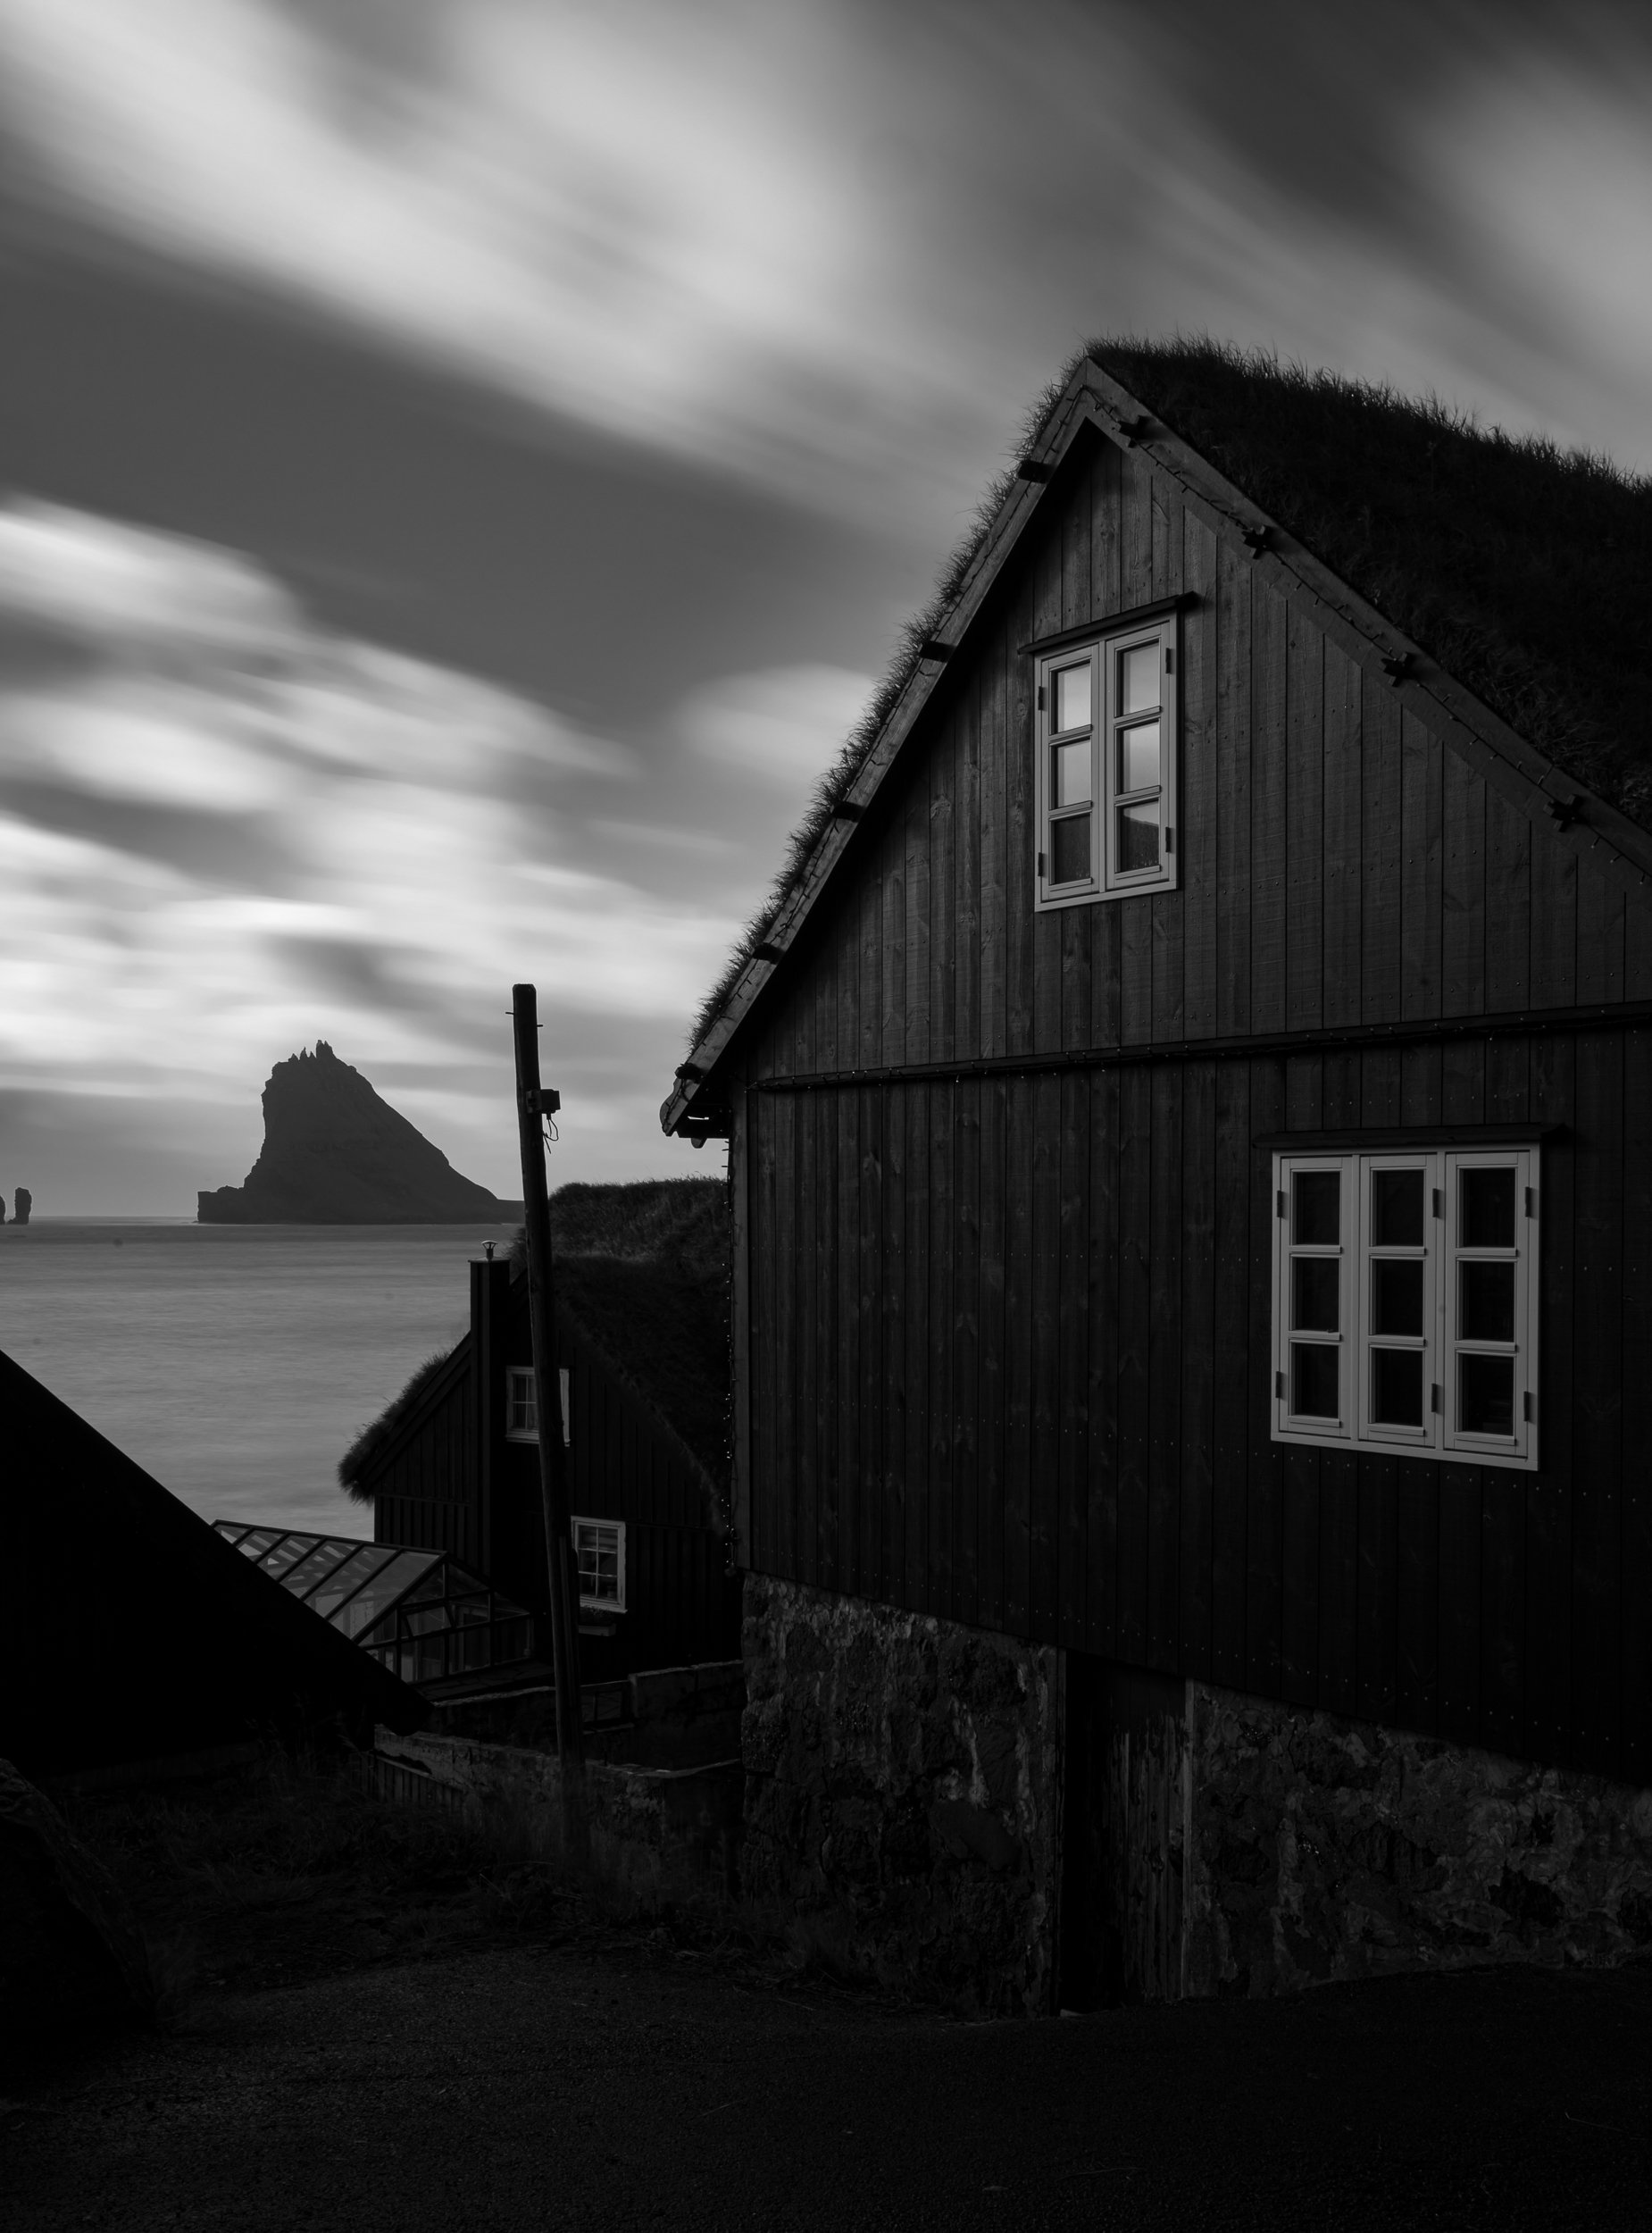
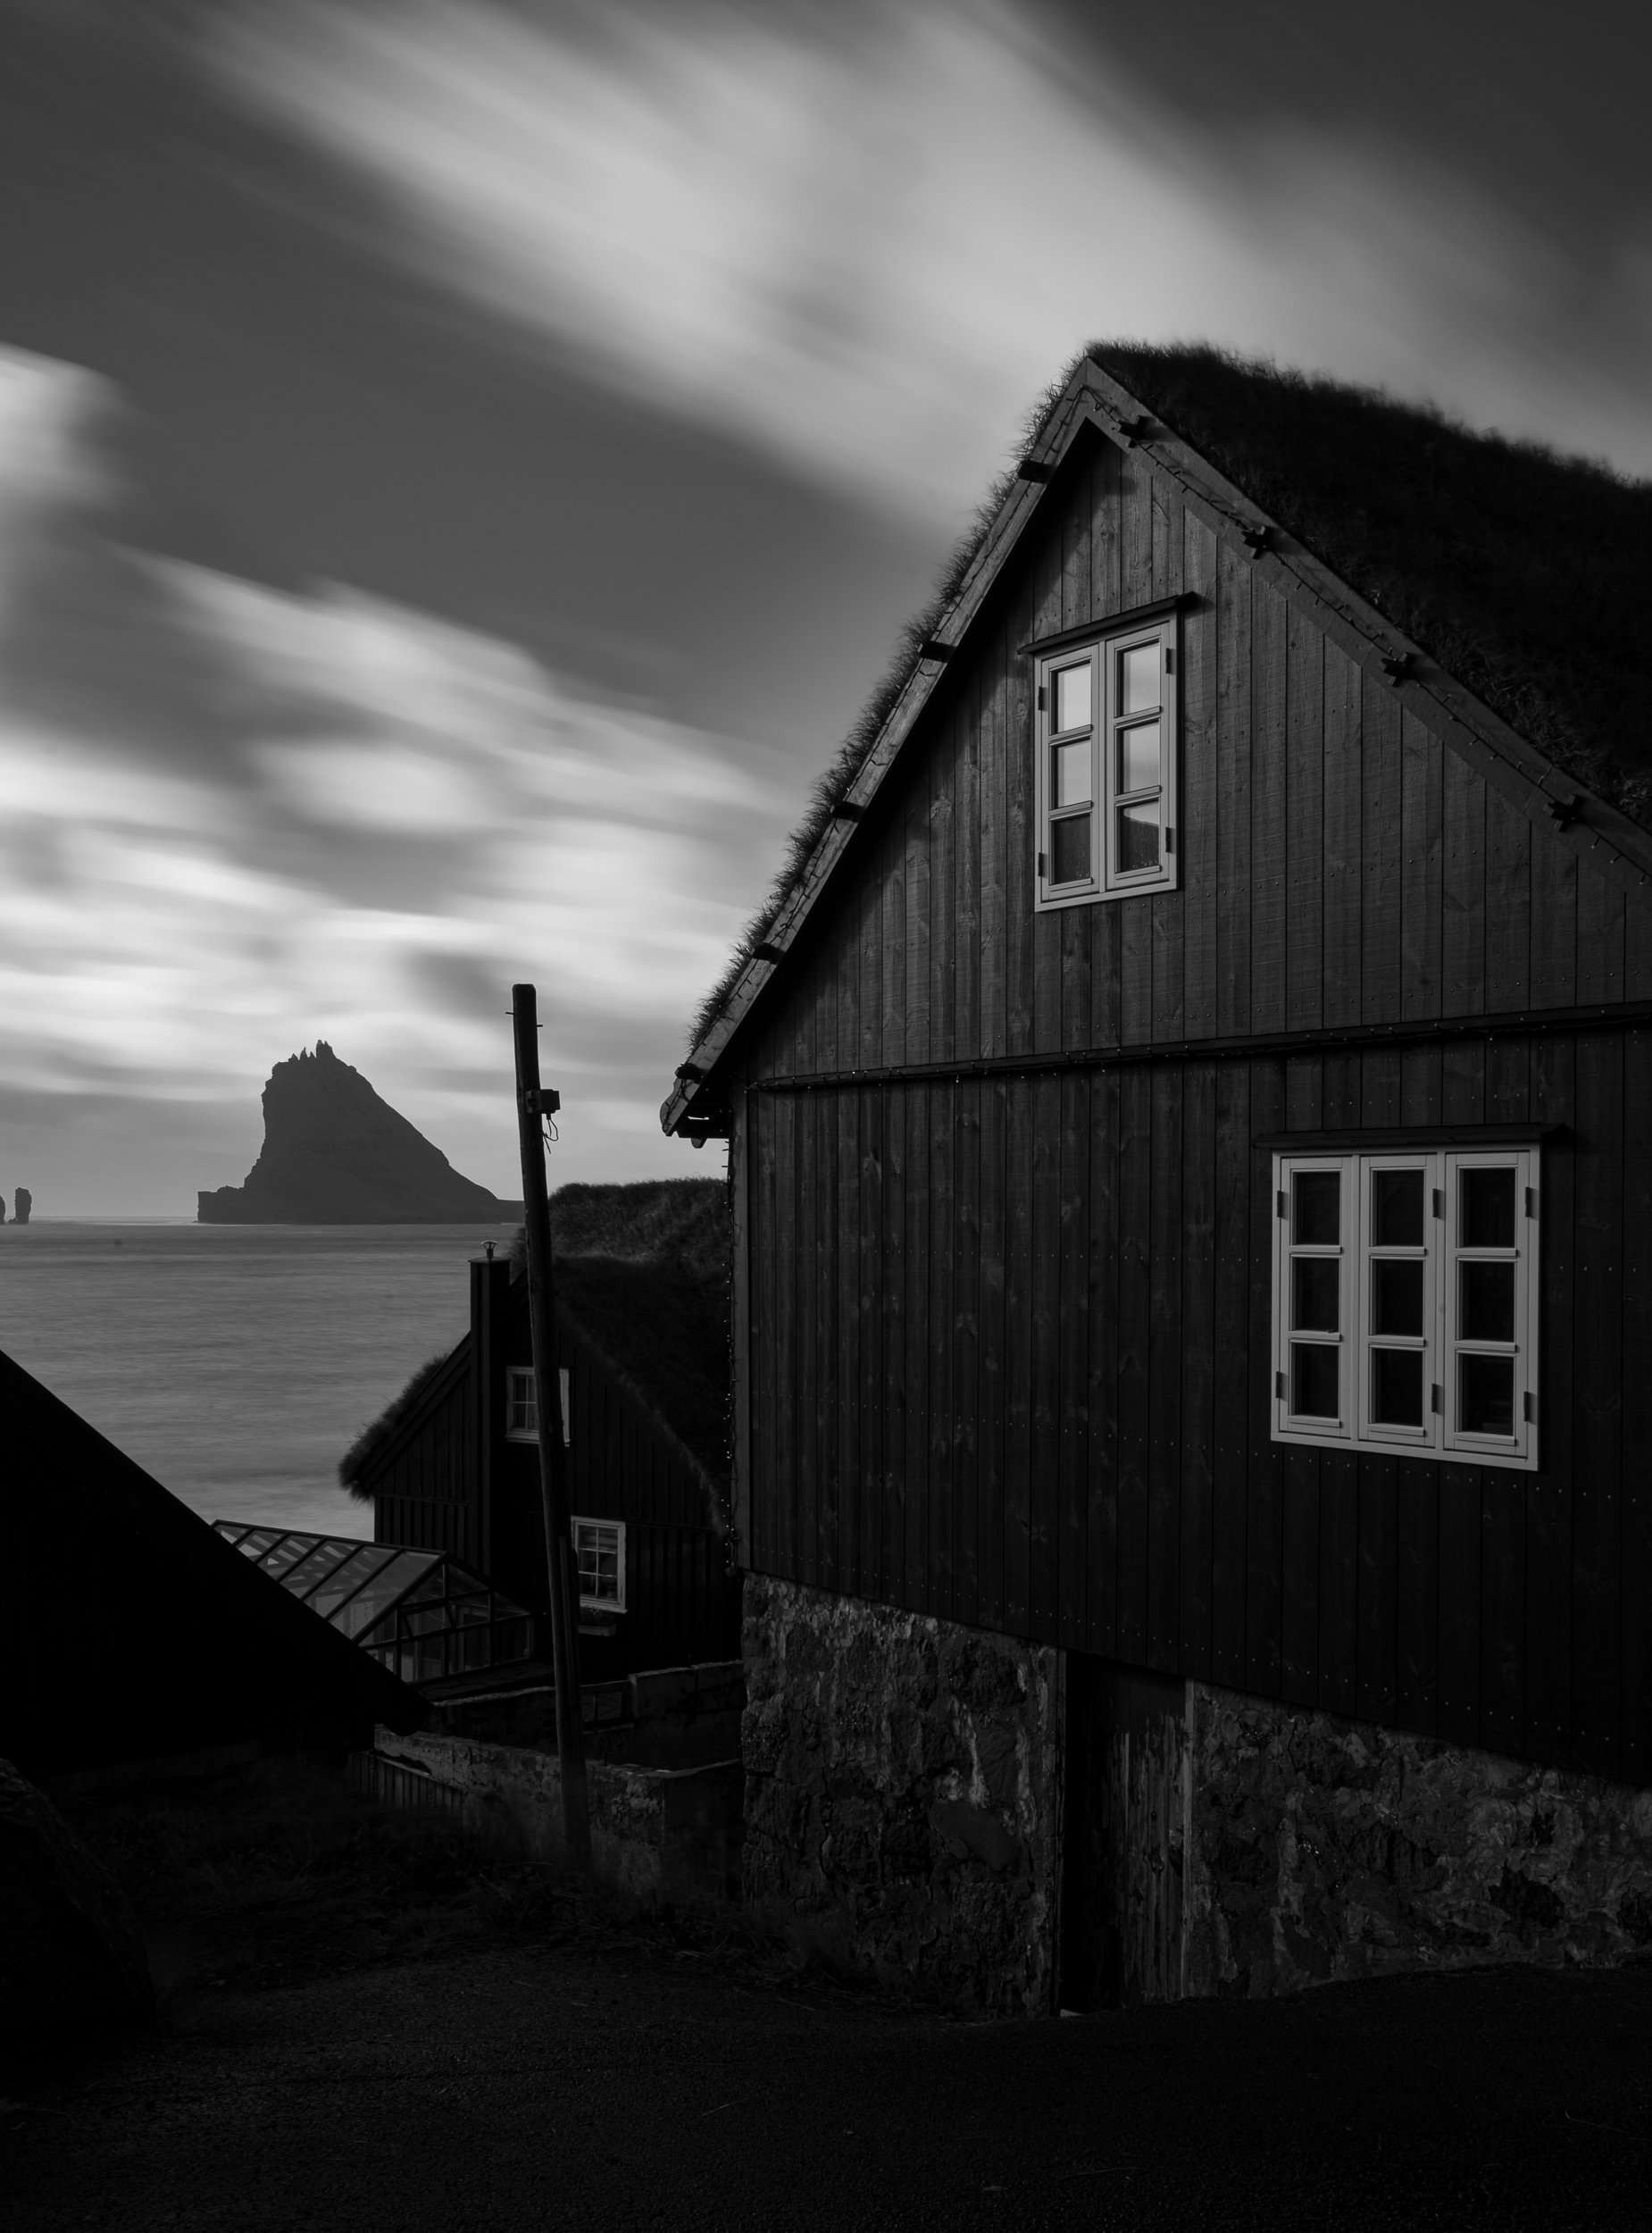
Embracing Clouds in the Night Sky

­­Everybody loves a clear night sky. It can be existential to feel the draw of an endless dome of stars, take in a brilliant Milky Way or be fortunate enough to catch a dazzling display of northern lights. Across the globe, photographers and non-photographers alike marvel at the magic of the night.

What then do we do when clouds move into our star-filled nights? Give up and go home? Heck no. We can change our approach. Embrace the clouds! They can be every bit as magical as the Milky Way or a display of auroras.

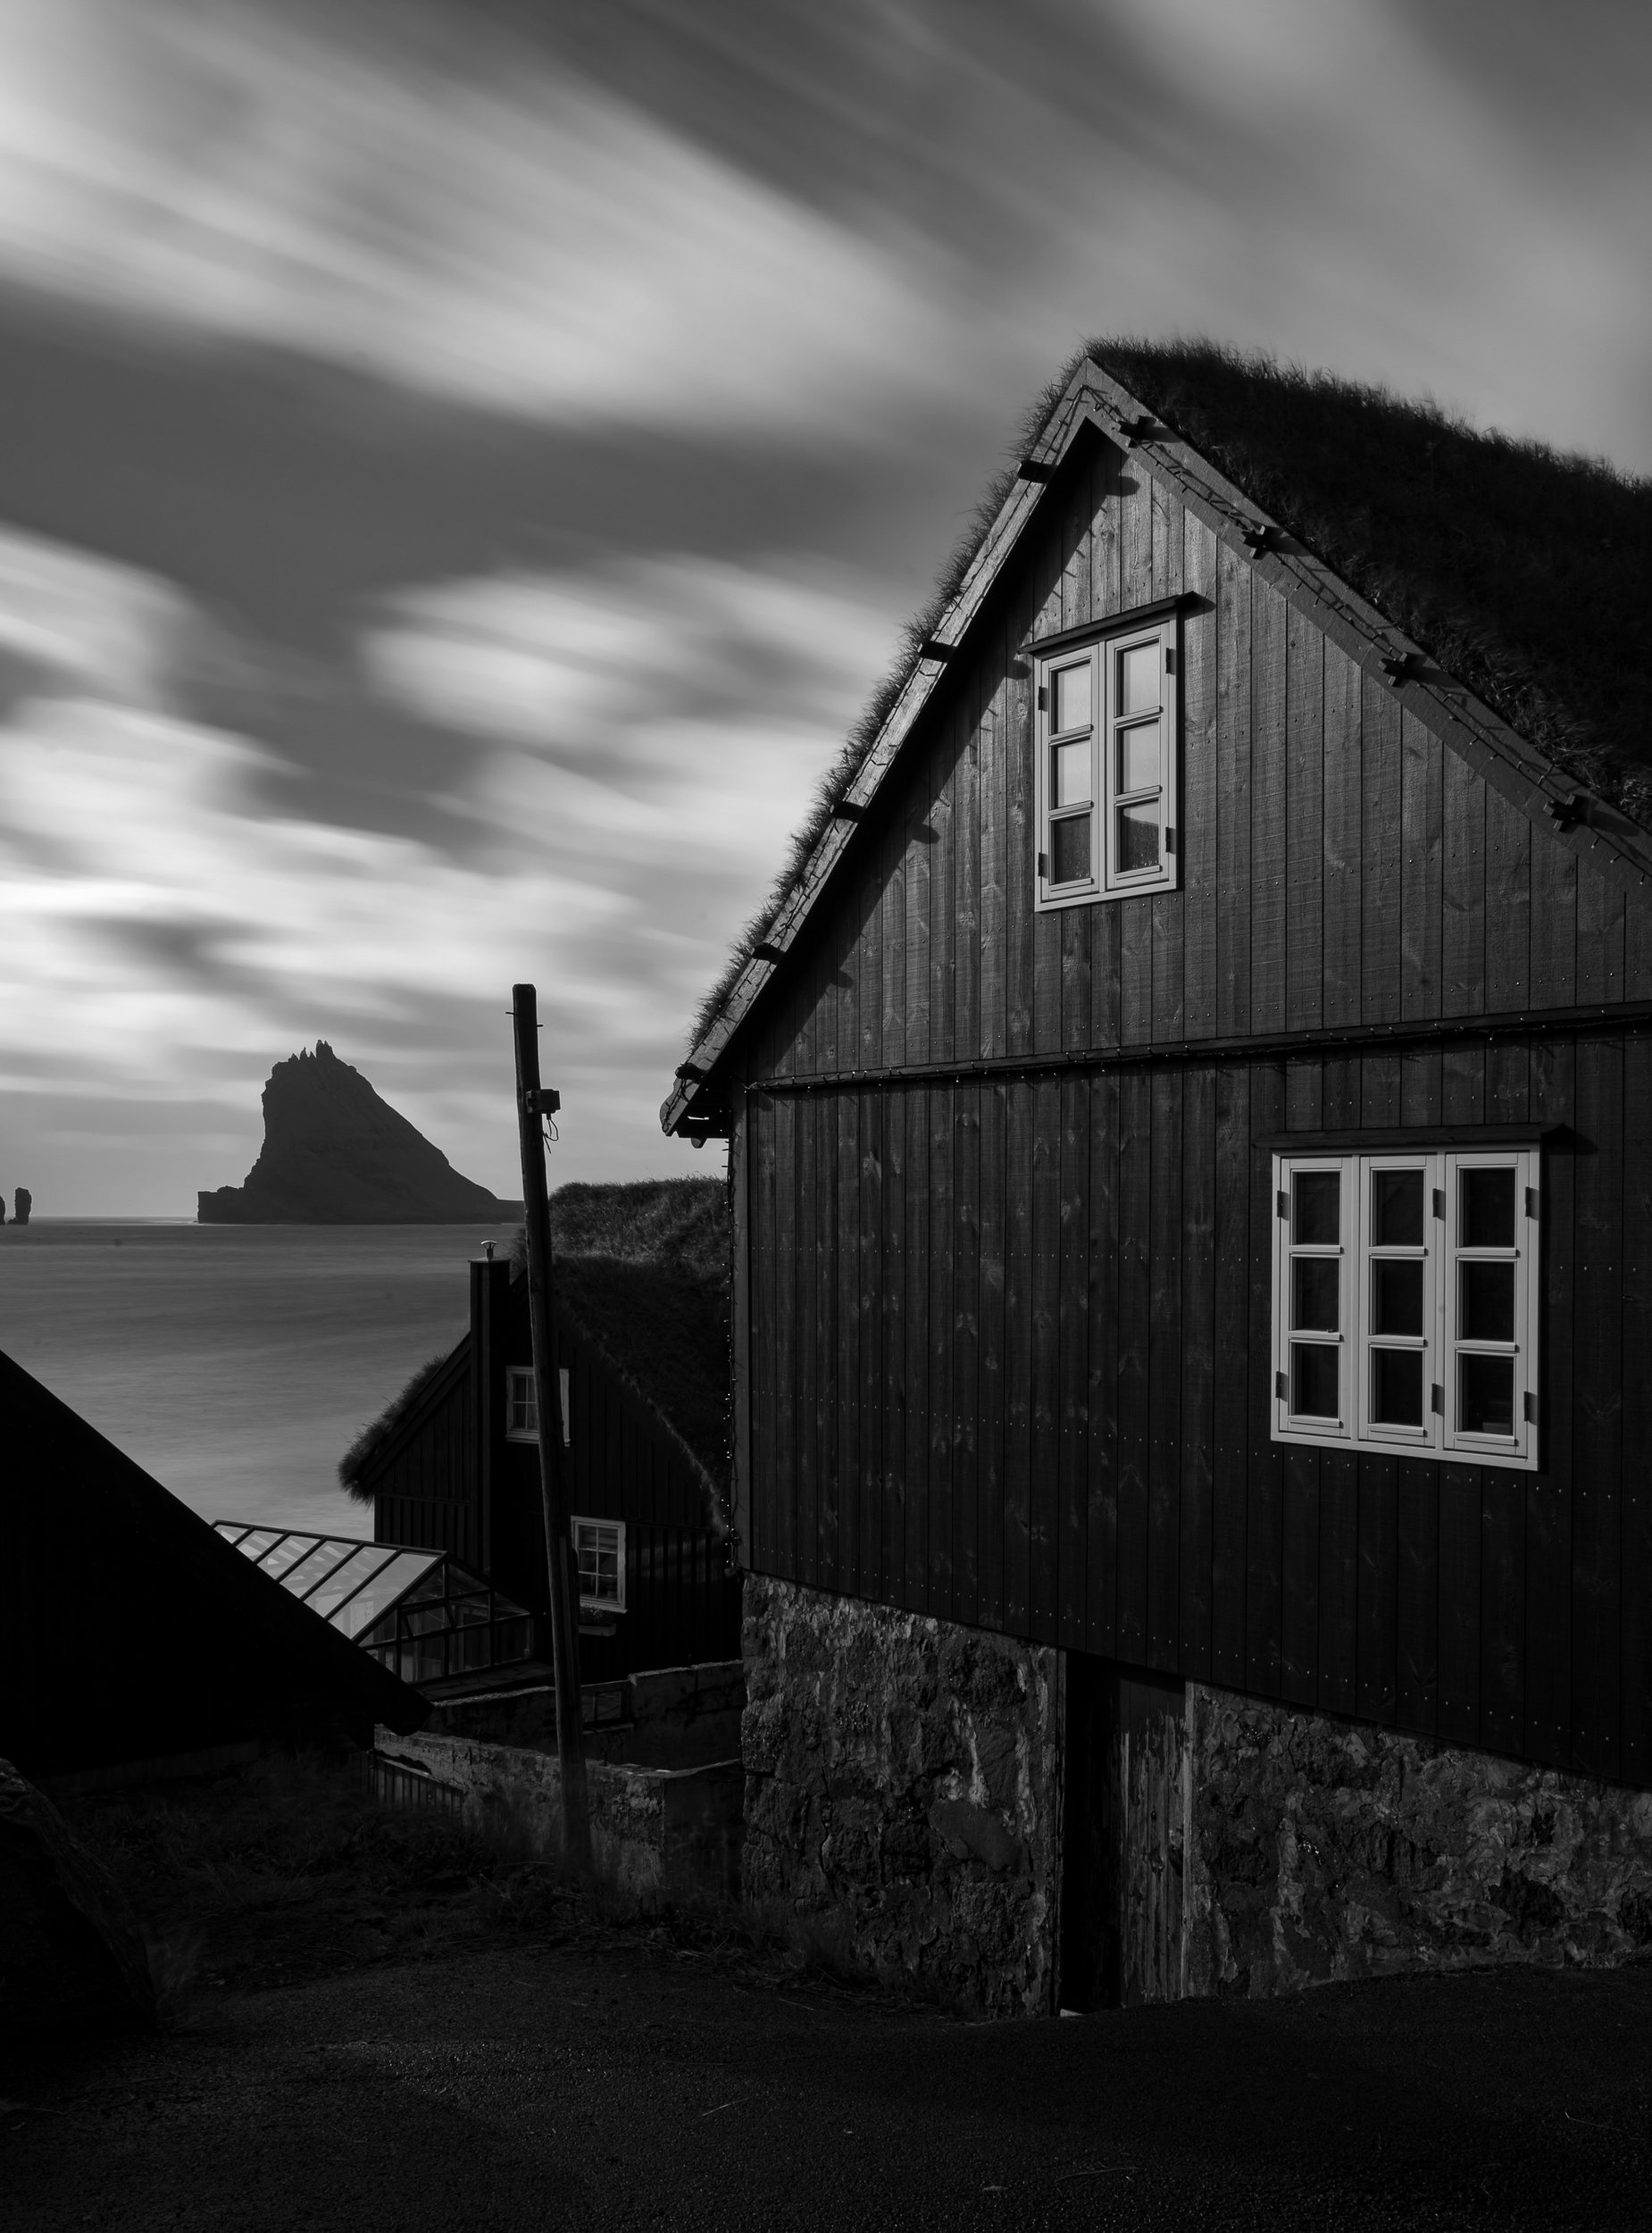
Faroe Islands. Nikon Z 6II with a Nikon 24-70mm f/2.8 lens at 27mm. 2 minutes, f/22, ISO 80.

Shifting Gears

One of the greatest pitfalls of landscape and astro-landscape photography is getting stuck on pre-conceived ideas. You may enter each night with an idea of exactly what you’ll see and how you’ll photograph it. This comes from being flooded with imagery from the most iconic places across the world captured under the most perfect conditions. So as we are getting ready to head out, we have already envisioned how our shots will look, and that is exactly what we expect and hope to happen.

So when the clouds roll in, obscuring our beloved stars, it’s time to shift gears. It’s really just a simple matter of moving your mindset from needing to capture a clear night sky to allowing yourself to experiment with the conditions above you. Don’t get caught in “I have to recreate this scene as I have seen it before”—instead embrace “What would it look like if I tried this?”

This mindset could be applied to most types of photography, and indeed it’s a worthwhile consideration for many situations. But for now, let’s focus on clouds at night. Once you pivot from preconceived notions, it’s easy to begin to experiment.

I was expecting to capture circumpolar star trails over Park Avenue in Arches National Park when the clouds set in. Shifting gears, I exposed for 5 minutes instead of a full hour, which would have resulted in very few stars and blanket of clouds. Nikon D4S with Nikon 16mm f/2.8 fisheye lens. 5 minutes, f/2.8, ISO 400.

Knowing that the clouds were sticking around all night, I chose to spend my time light painting this scene in Big Bend National Park rather than concentrating on the sky. Notice that the light-painted foreground dominates the scene while the sky is relegated to being the secondary subject. Nikon Z 6 with a Nikon 14-24mm f/2.8 lens at 14mm. 3 minutes, f/8, ISO 800.

Creating Cloud Trails

You can use clouds moving across a dark sky during a long exposure to create a very dynamic image.

For starters, try different shutter speeds. In some cases a 30-second exposure might do the trick, while in others you might need a 3-minute exposure to achieve the desired look.

Stopping down to f/10 from our typical wide nighttime apertures of f/2.8 or f/4 allowed me to expose for 2 minutes. This in turn provided time for me to light paint the moai of Rapa Nui (Easter Island). Nikon D4S with a Nikon 24-70mm f/2.8 lens at 60mm. 2 minutes, f/10, ISO 200.

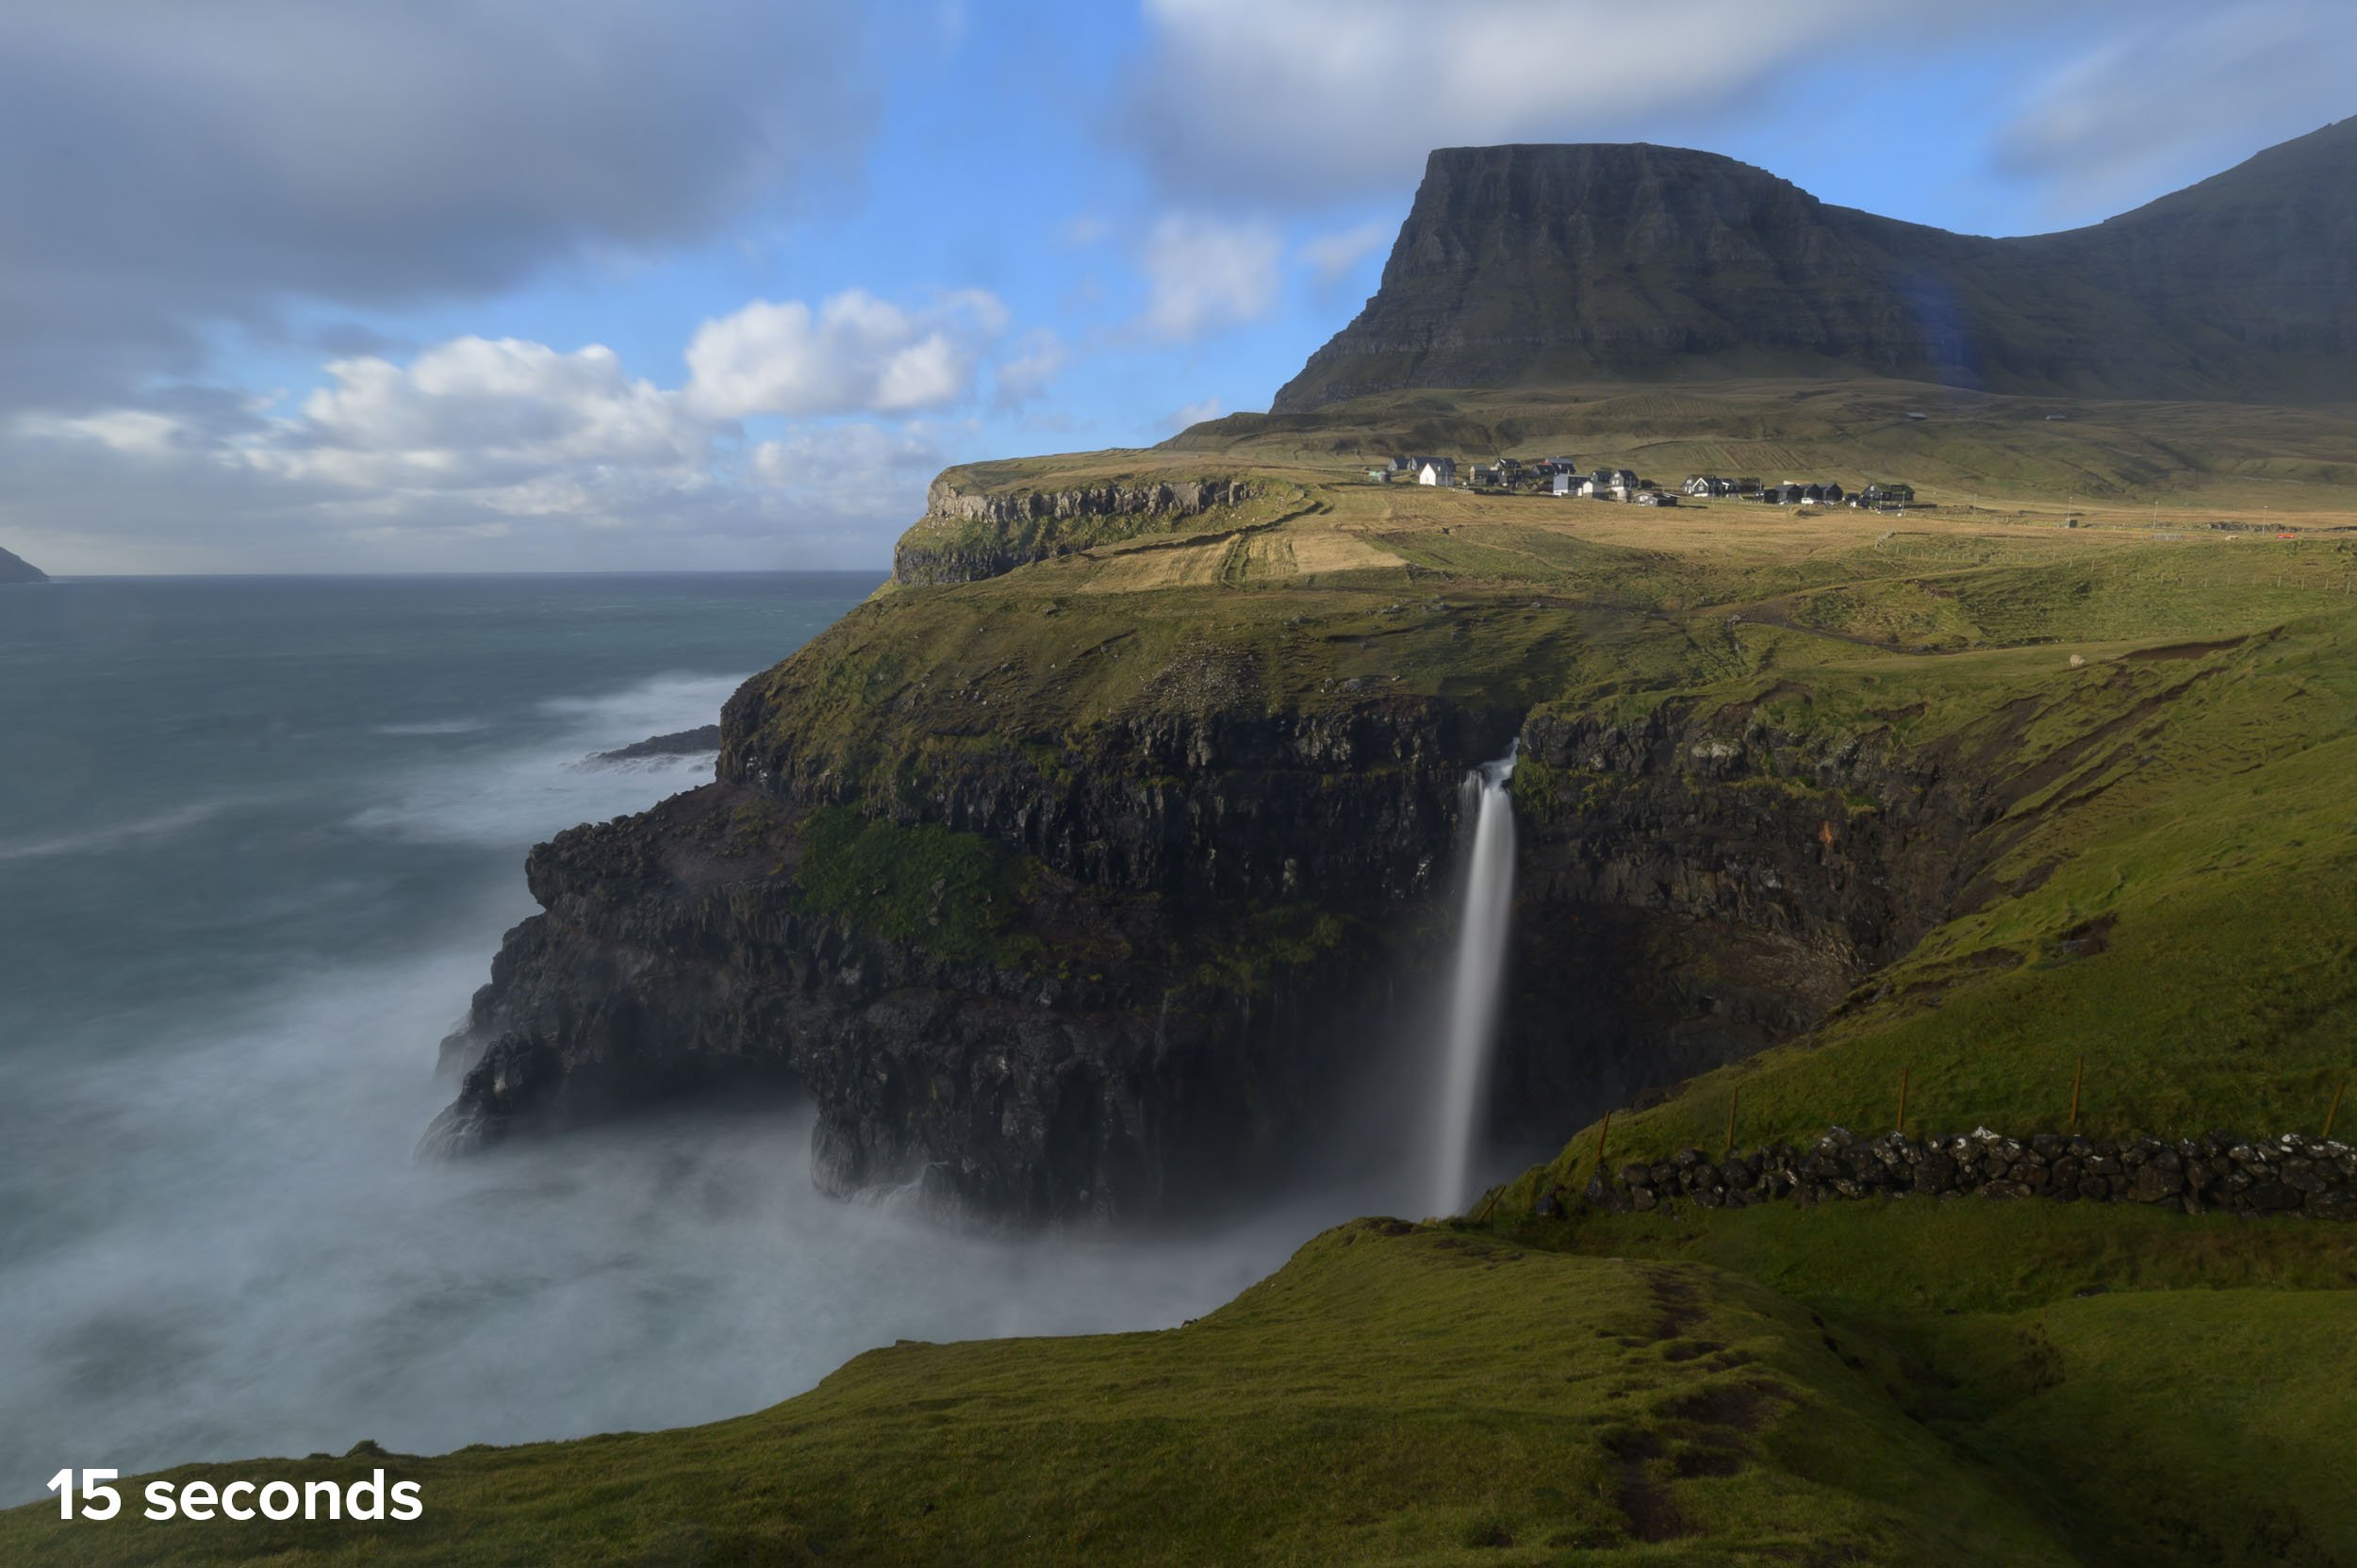
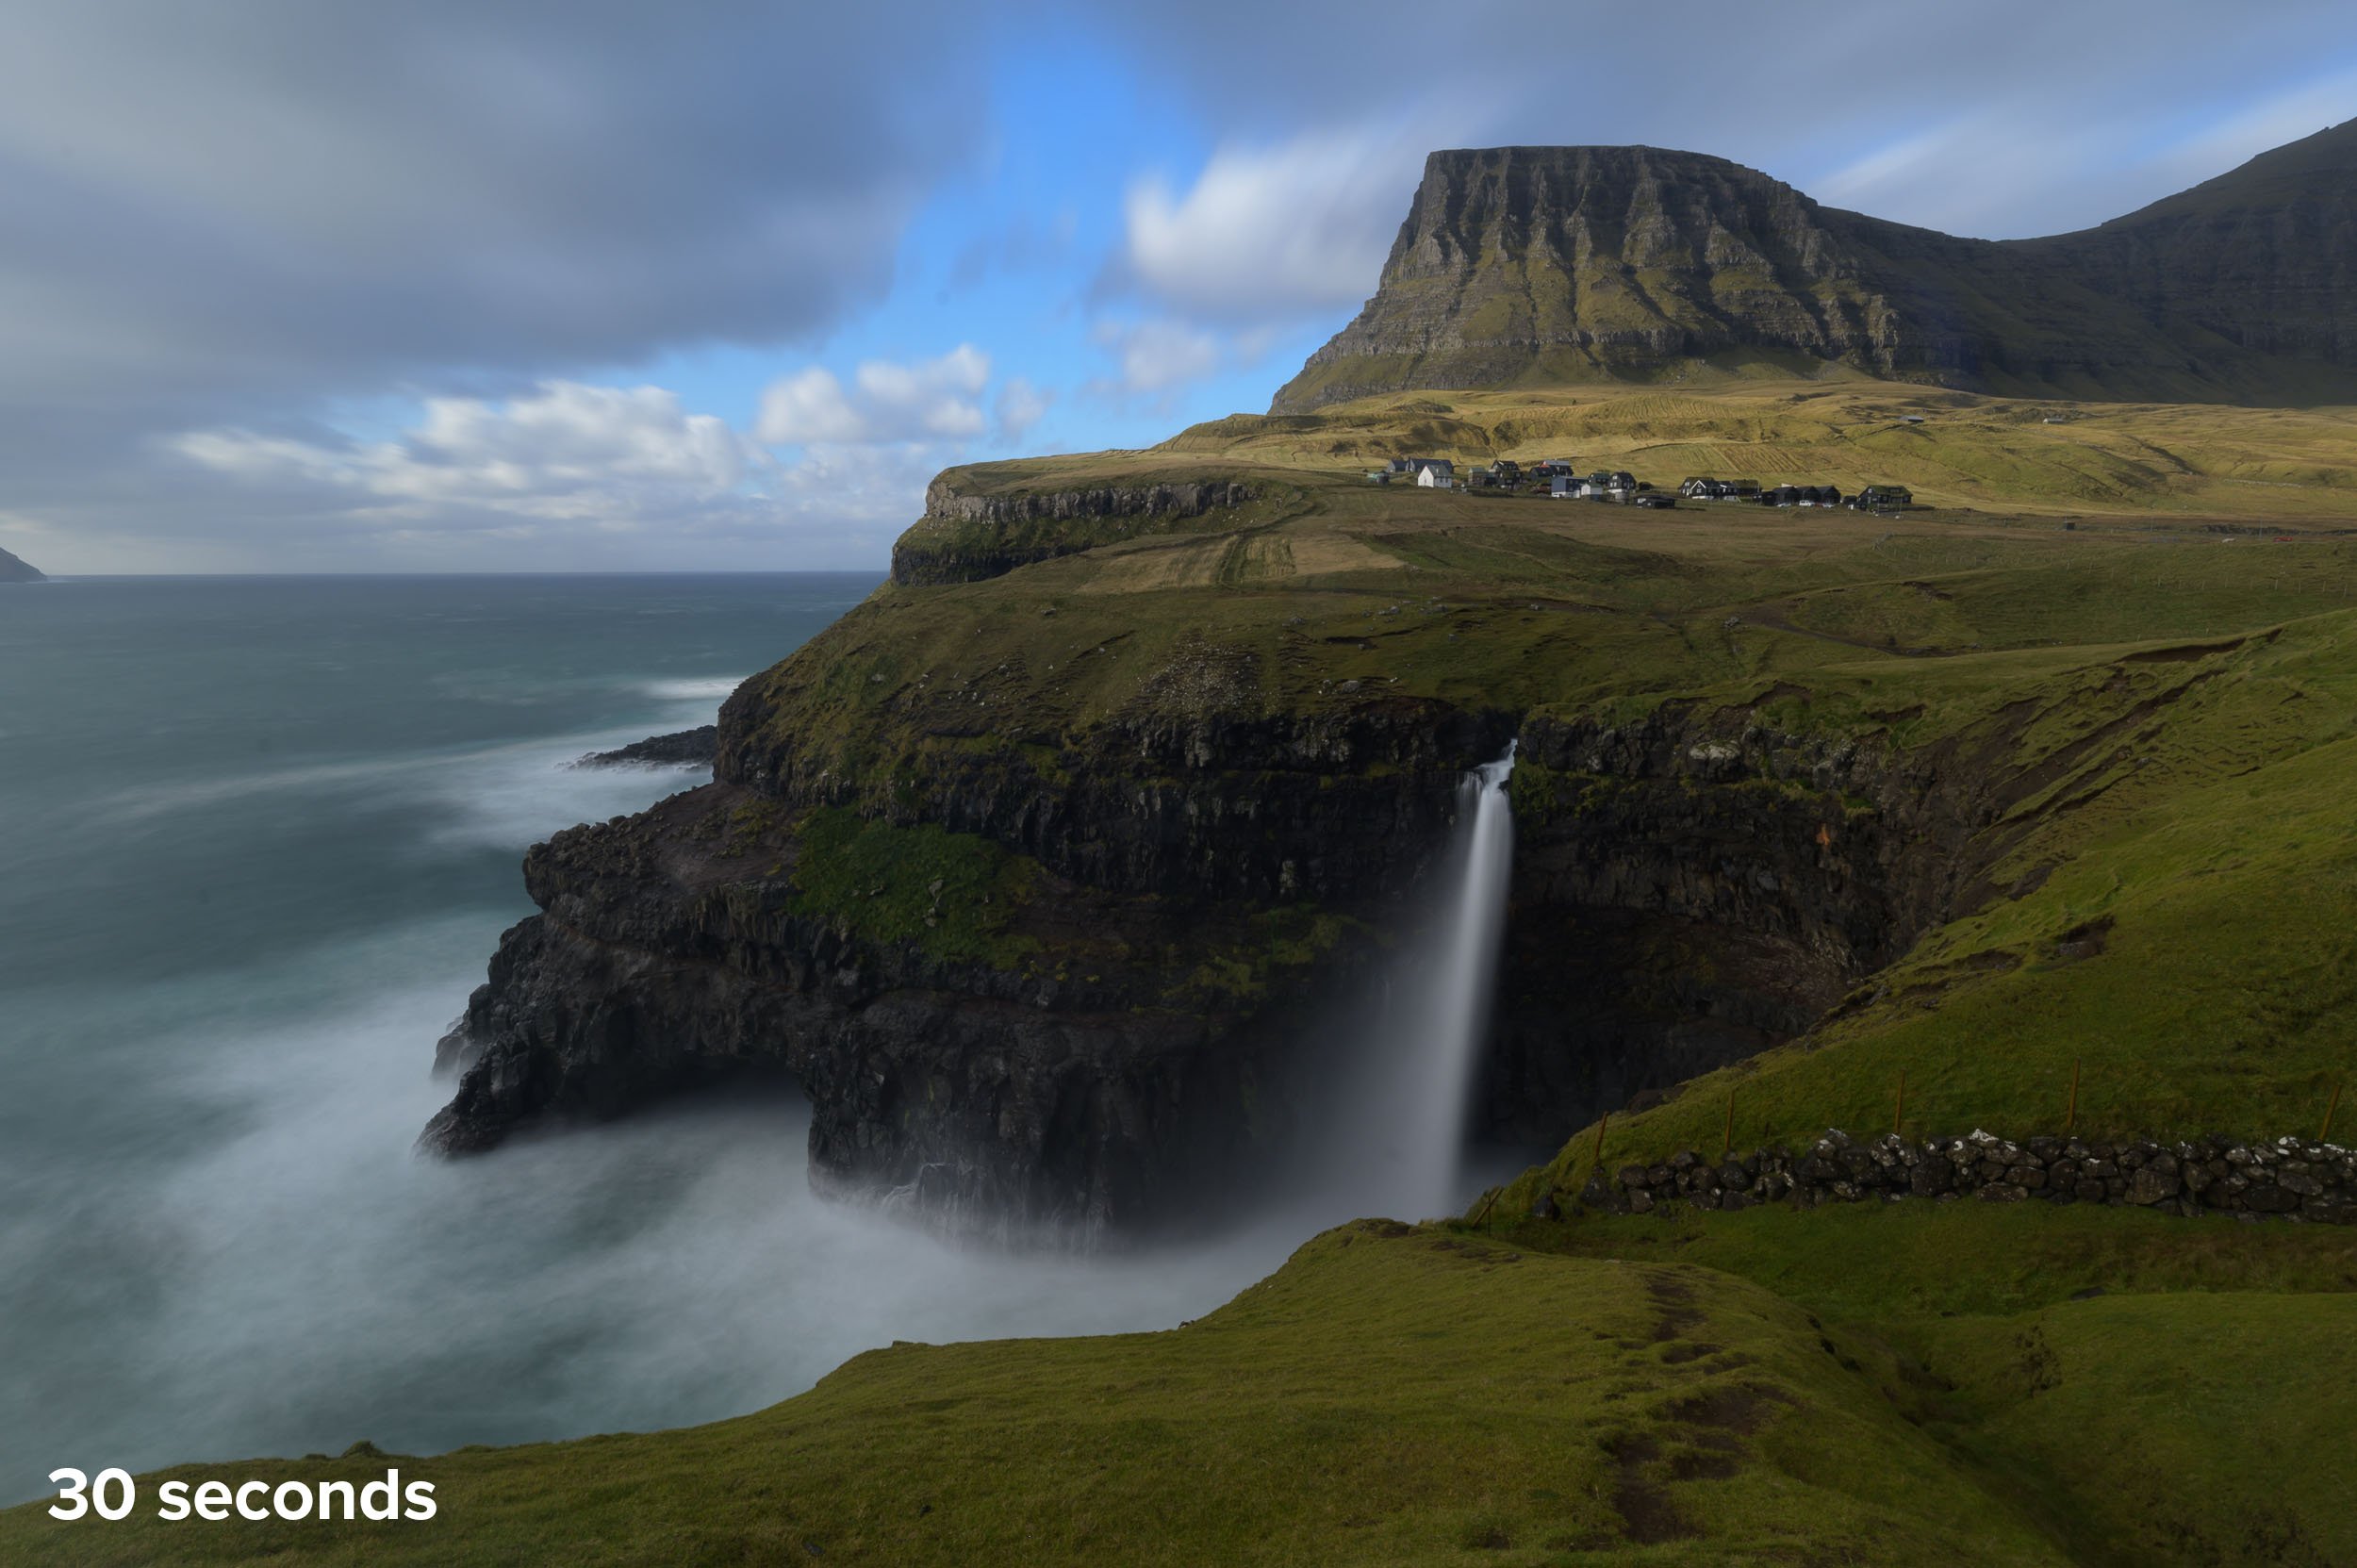
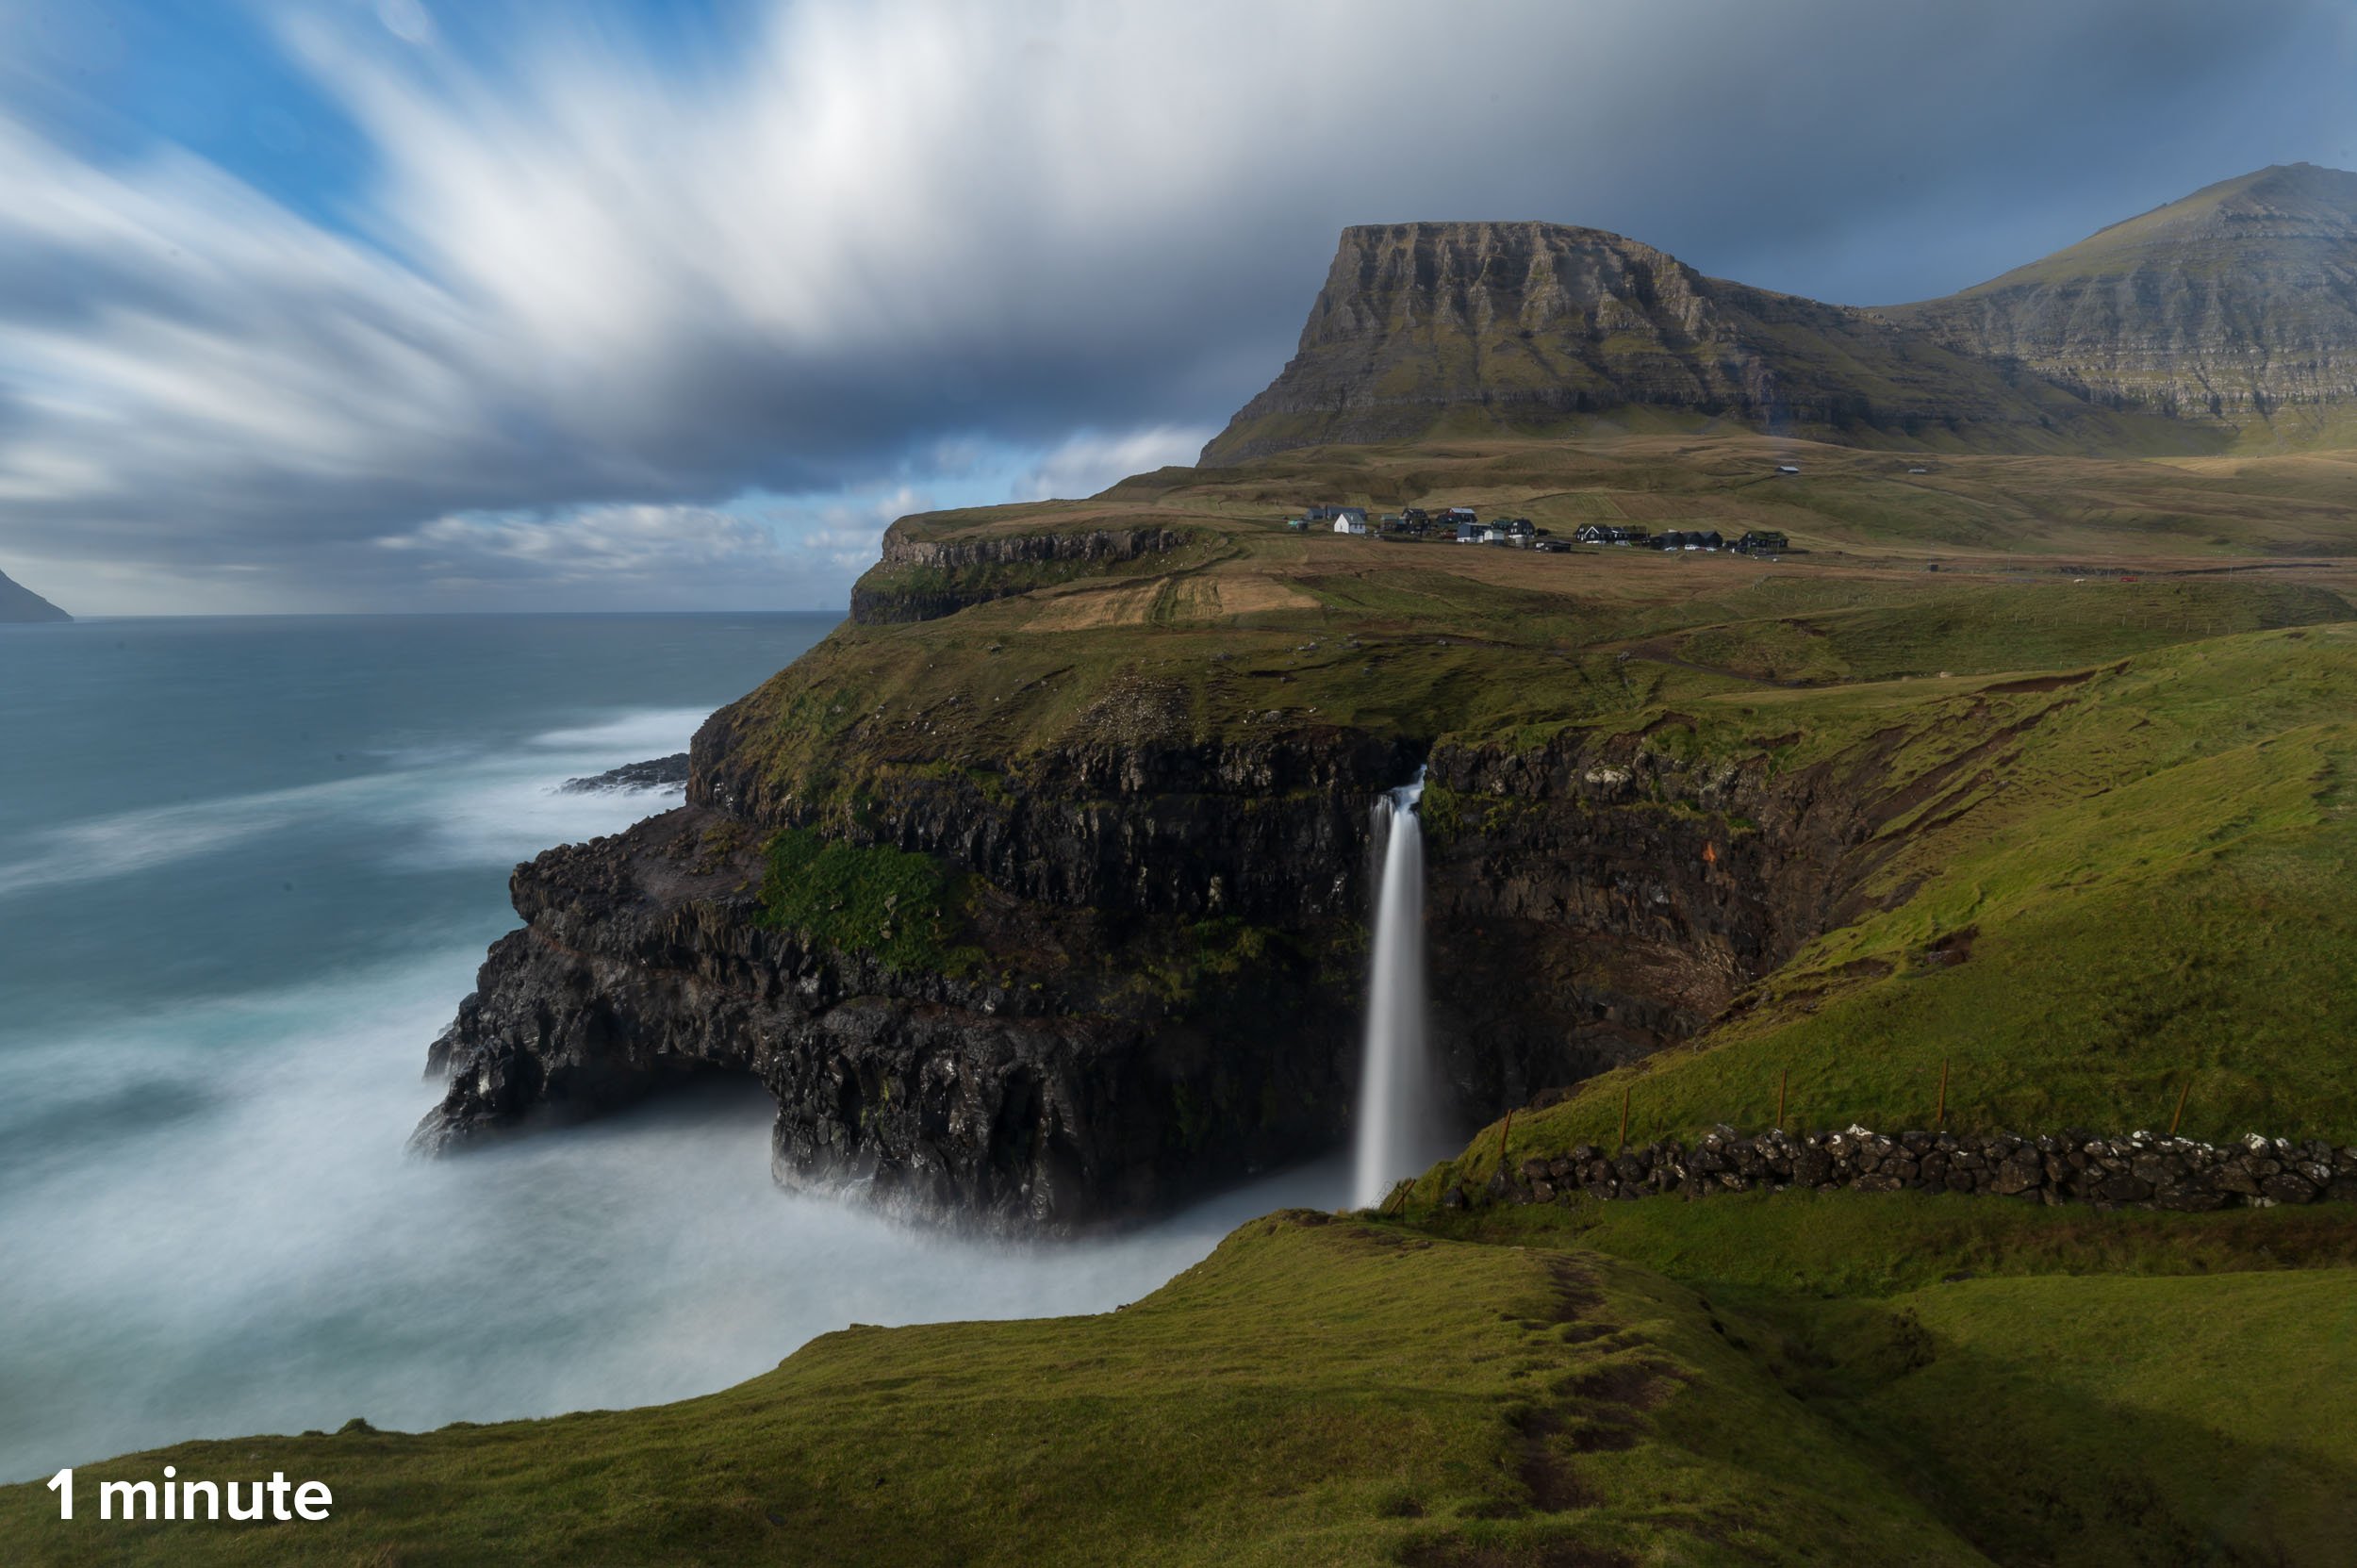
It’s hard to say what shutter speed is best, because it varies in different conditions. Try different speeds to determine what may look best in your current situation. In the following example I tried multiple shutter speeds when shooting the Múlafossur Falls in the Faroe Islands.
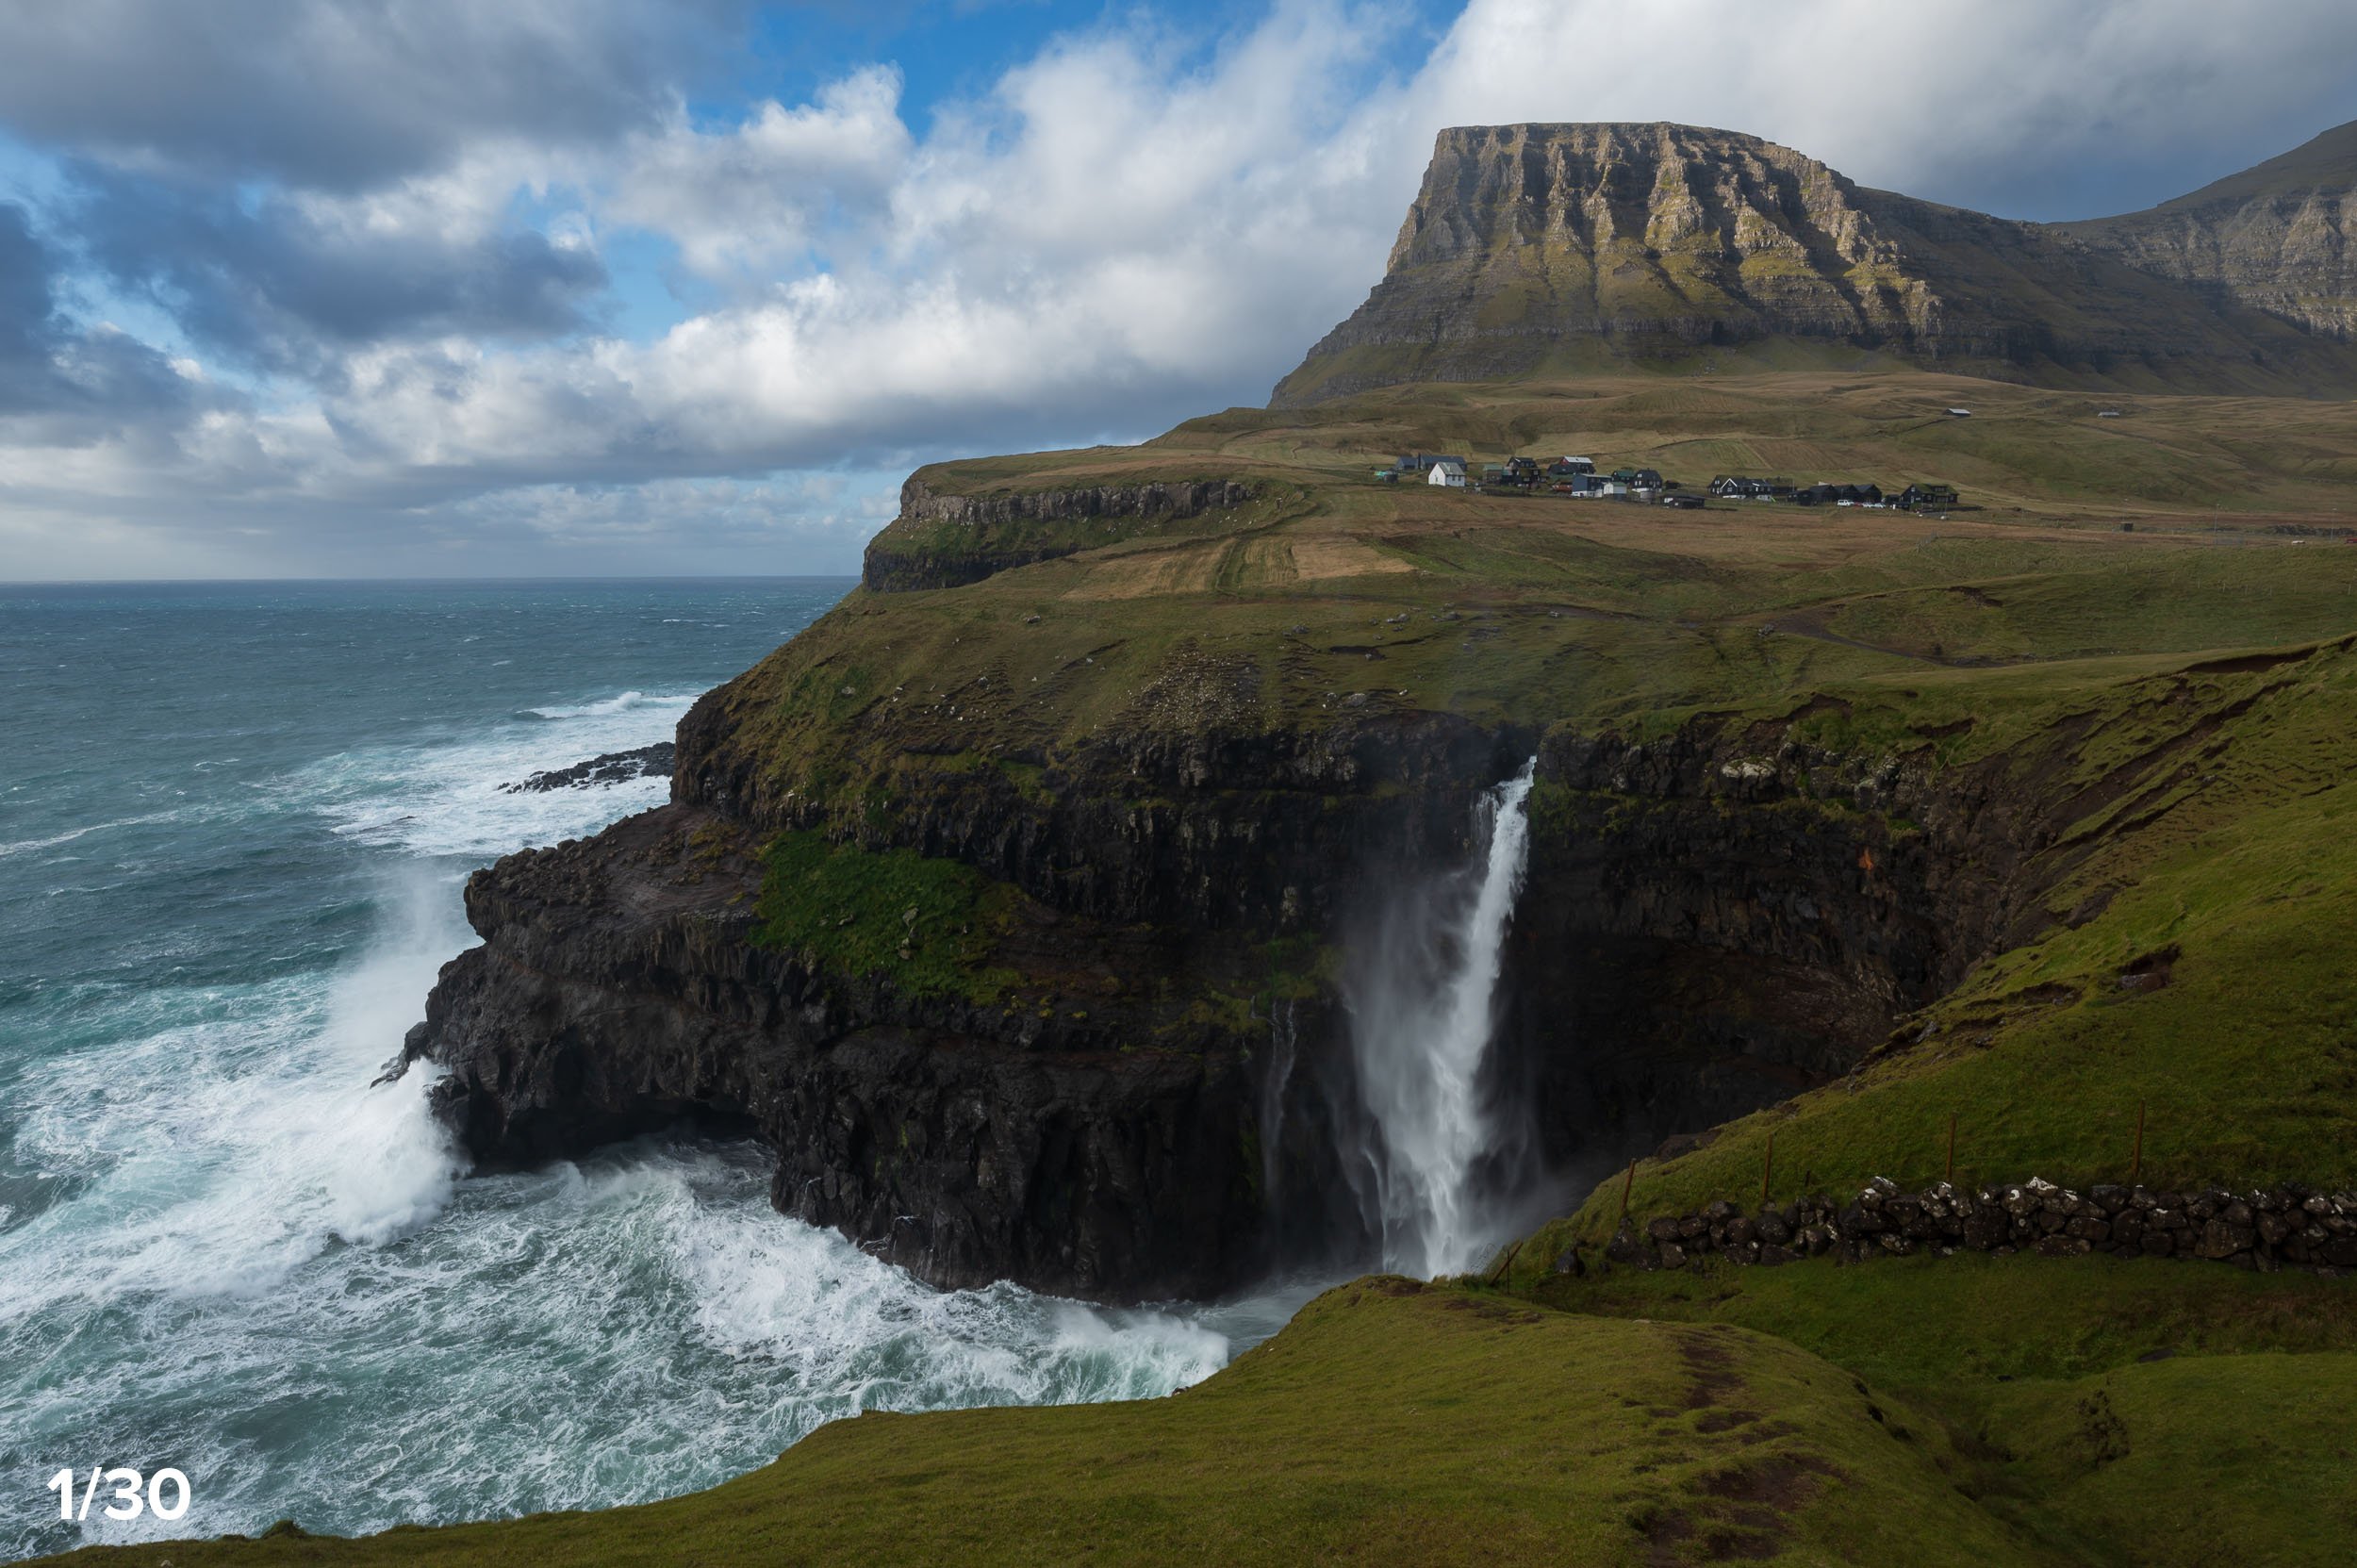
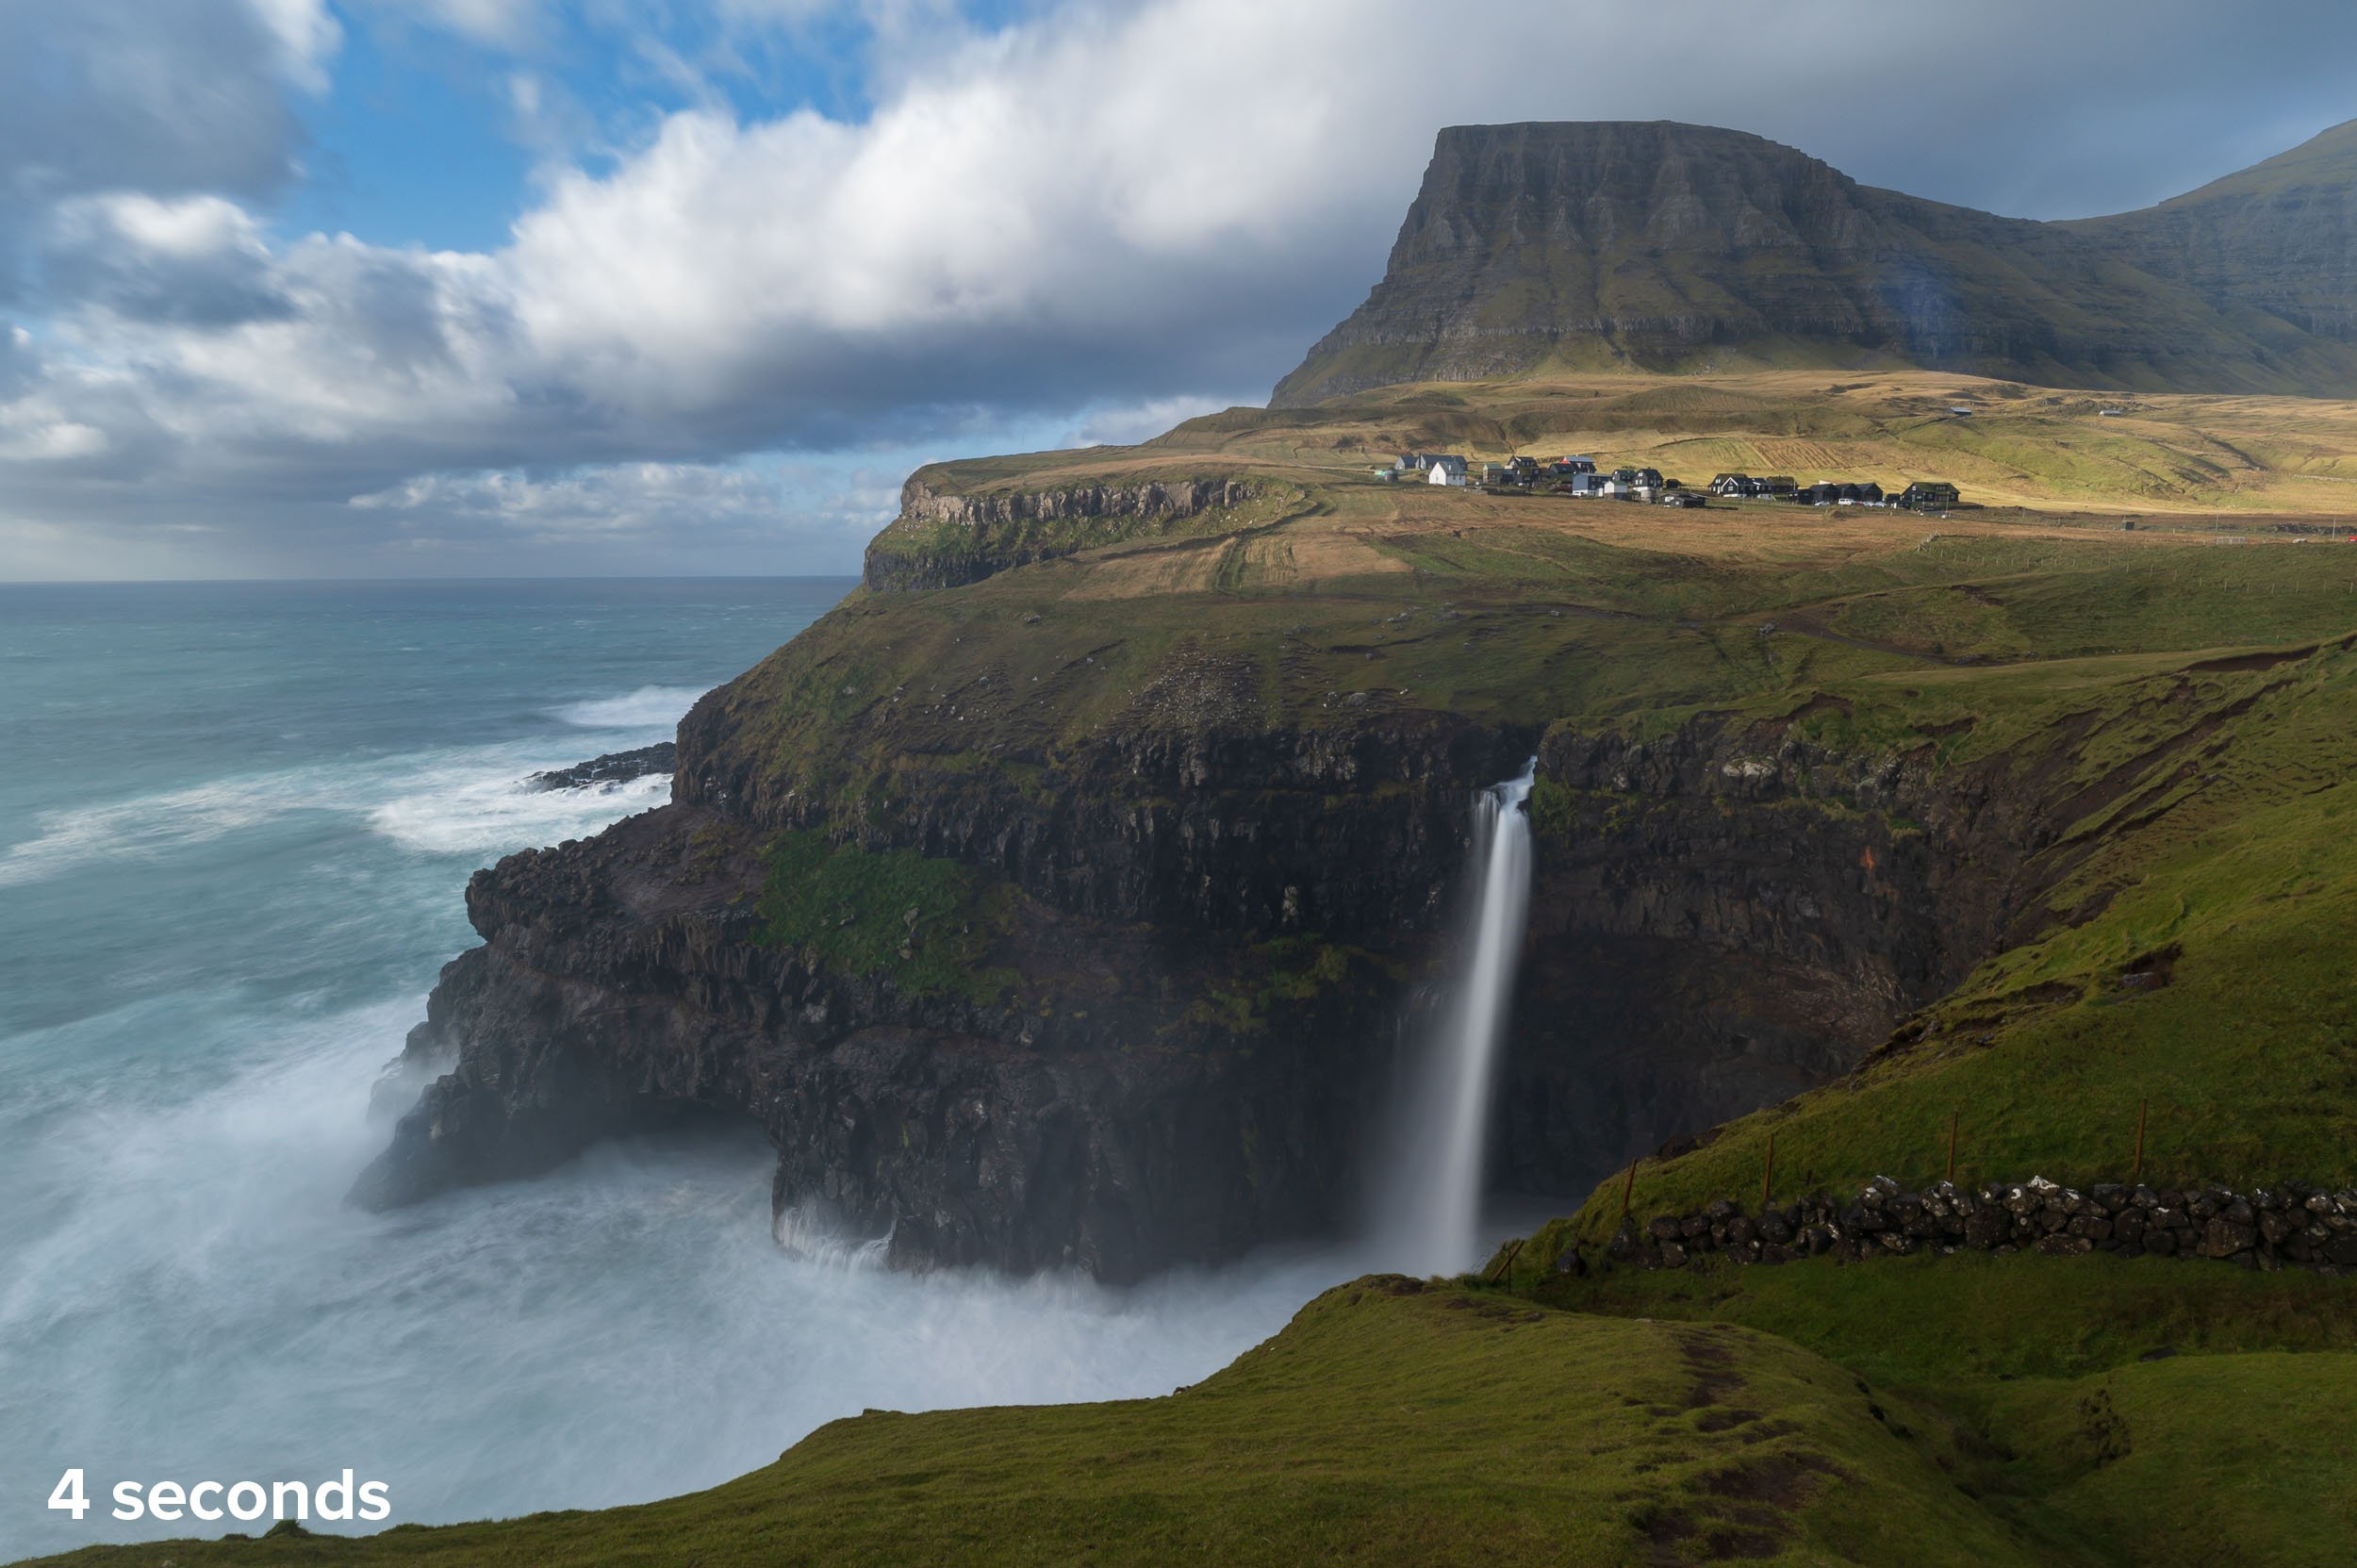
Múlafossur Falls, Faroe Islands. Nikon Z 6II with a Nikon 14-24mm f/2.8 lens at 18mm. f/14, ISO 50.

Since we are more concerned with the look of the clouds as opposed to getting pinpoint stars, we have more leeway in our exposure times.

For example, many folks think that night skies should be captured only at either a relatively short shutter speed (8-15 seconds) to render the stars as points or a very long shutter speed (15 minutes or more) to render them as long trails. While this is sound practice for clear skies, the presence of clouds allows for more flexibility. The main consideration here is the look of the clouds rather than the length of the star trails. Even a shorter speed of 2 minutes renders the stars as small streaks and is enough to let the viewer know the image was made at night.

Faroe Islands. Short exposures of 6, 8 or 10 seconds typically render the clouds as an awkward blur. The stars may be points, but the blur of the clouds is not enough to render a surreal quality. This exposure appears to be a mistake as the clouds are not sharp enough or blurry enough. Nikon Z 6II with a Nikon 24-70mm f/2 lens at 27mm. 6 seconds, f/2.8, ISO 6400.

A 1- minute exposure gives the clouds enough time to streak across the sky. Nikon Z 6II with a Nikon 24-70mm f/2.8 lens at 27mm. 1 minute, f/4, ISO 400.

Clouds as a Compositional Element

Once we begin to add clouds into our photographs (day or night), we need to start thinking about them as an important compositional element. Their structure and placement within the frame are important. The cloud streaks will read as lines, and therefore we consider them just as we would any other lines in a photograph.

Horizontal lines crossing the frame from left to right or right to left tend to have more of a calming effect. They seem to be more at rest. Since these types of lines don’t add a lot of energy, they require a dominant foreground as a contrast, or you could further the calm mood by choosing a more subtle foreground.

Horizontal lines tend to have a calming effect as they streak over dynamic Miami. Nikon D4S with a Nikon 70-200mm f/2.8 lens at 70mm. 30 seconds, f/10, ISO 800 (foreground) and 3 minutes, f/10, ISO 160 (sky), blended in Adobe Photoshop.

Diagonal lines and converging lines have much more visual energy. They are caused when clouds are moving directly at us (converging) or just off to our right or left (diagonal). This type of cloud movement can become very dramatic elements in our compositions. The use of wide- and superwide-angle lenses helps accentuate these lines.

Clouds moving from the lower left of the frame to the upper right create diagonal lines over the Chisos Basin in Big Bend National Park. Nikon Z 6 with a Nikon 24-70mm f/2.8 lens at 24mm. 2 minutes, f/11, ISO 800.

Converging lines are created when the clouds are moving directly at you as in this scene from Glacier National Park. Nikon Z 6 with a Nikon 24-70mm f/2.8 lens at 24mm. 3 minutes, f/4, ISO 200.

Bettering Your Odds

Since our clouds will play such an important role in our final composition and it’s nearly impossible to predict the final look of an exposure, it’s important to shoot lots of frames.

I begin by experimenting with shutter speed. Once I find a shutter speed that renders the clouds in a manner I find complementary to the rest of the scene, it’s time to shoot that same shutter speed over and over again. Each frame will capture the clouds in a different position, so by shooting more frames, we increase the chance of getting a pleasing position for the clouds.

I shot the following photos at the same exposure. Notice how the clouds complement the scene more in some frames than in others.
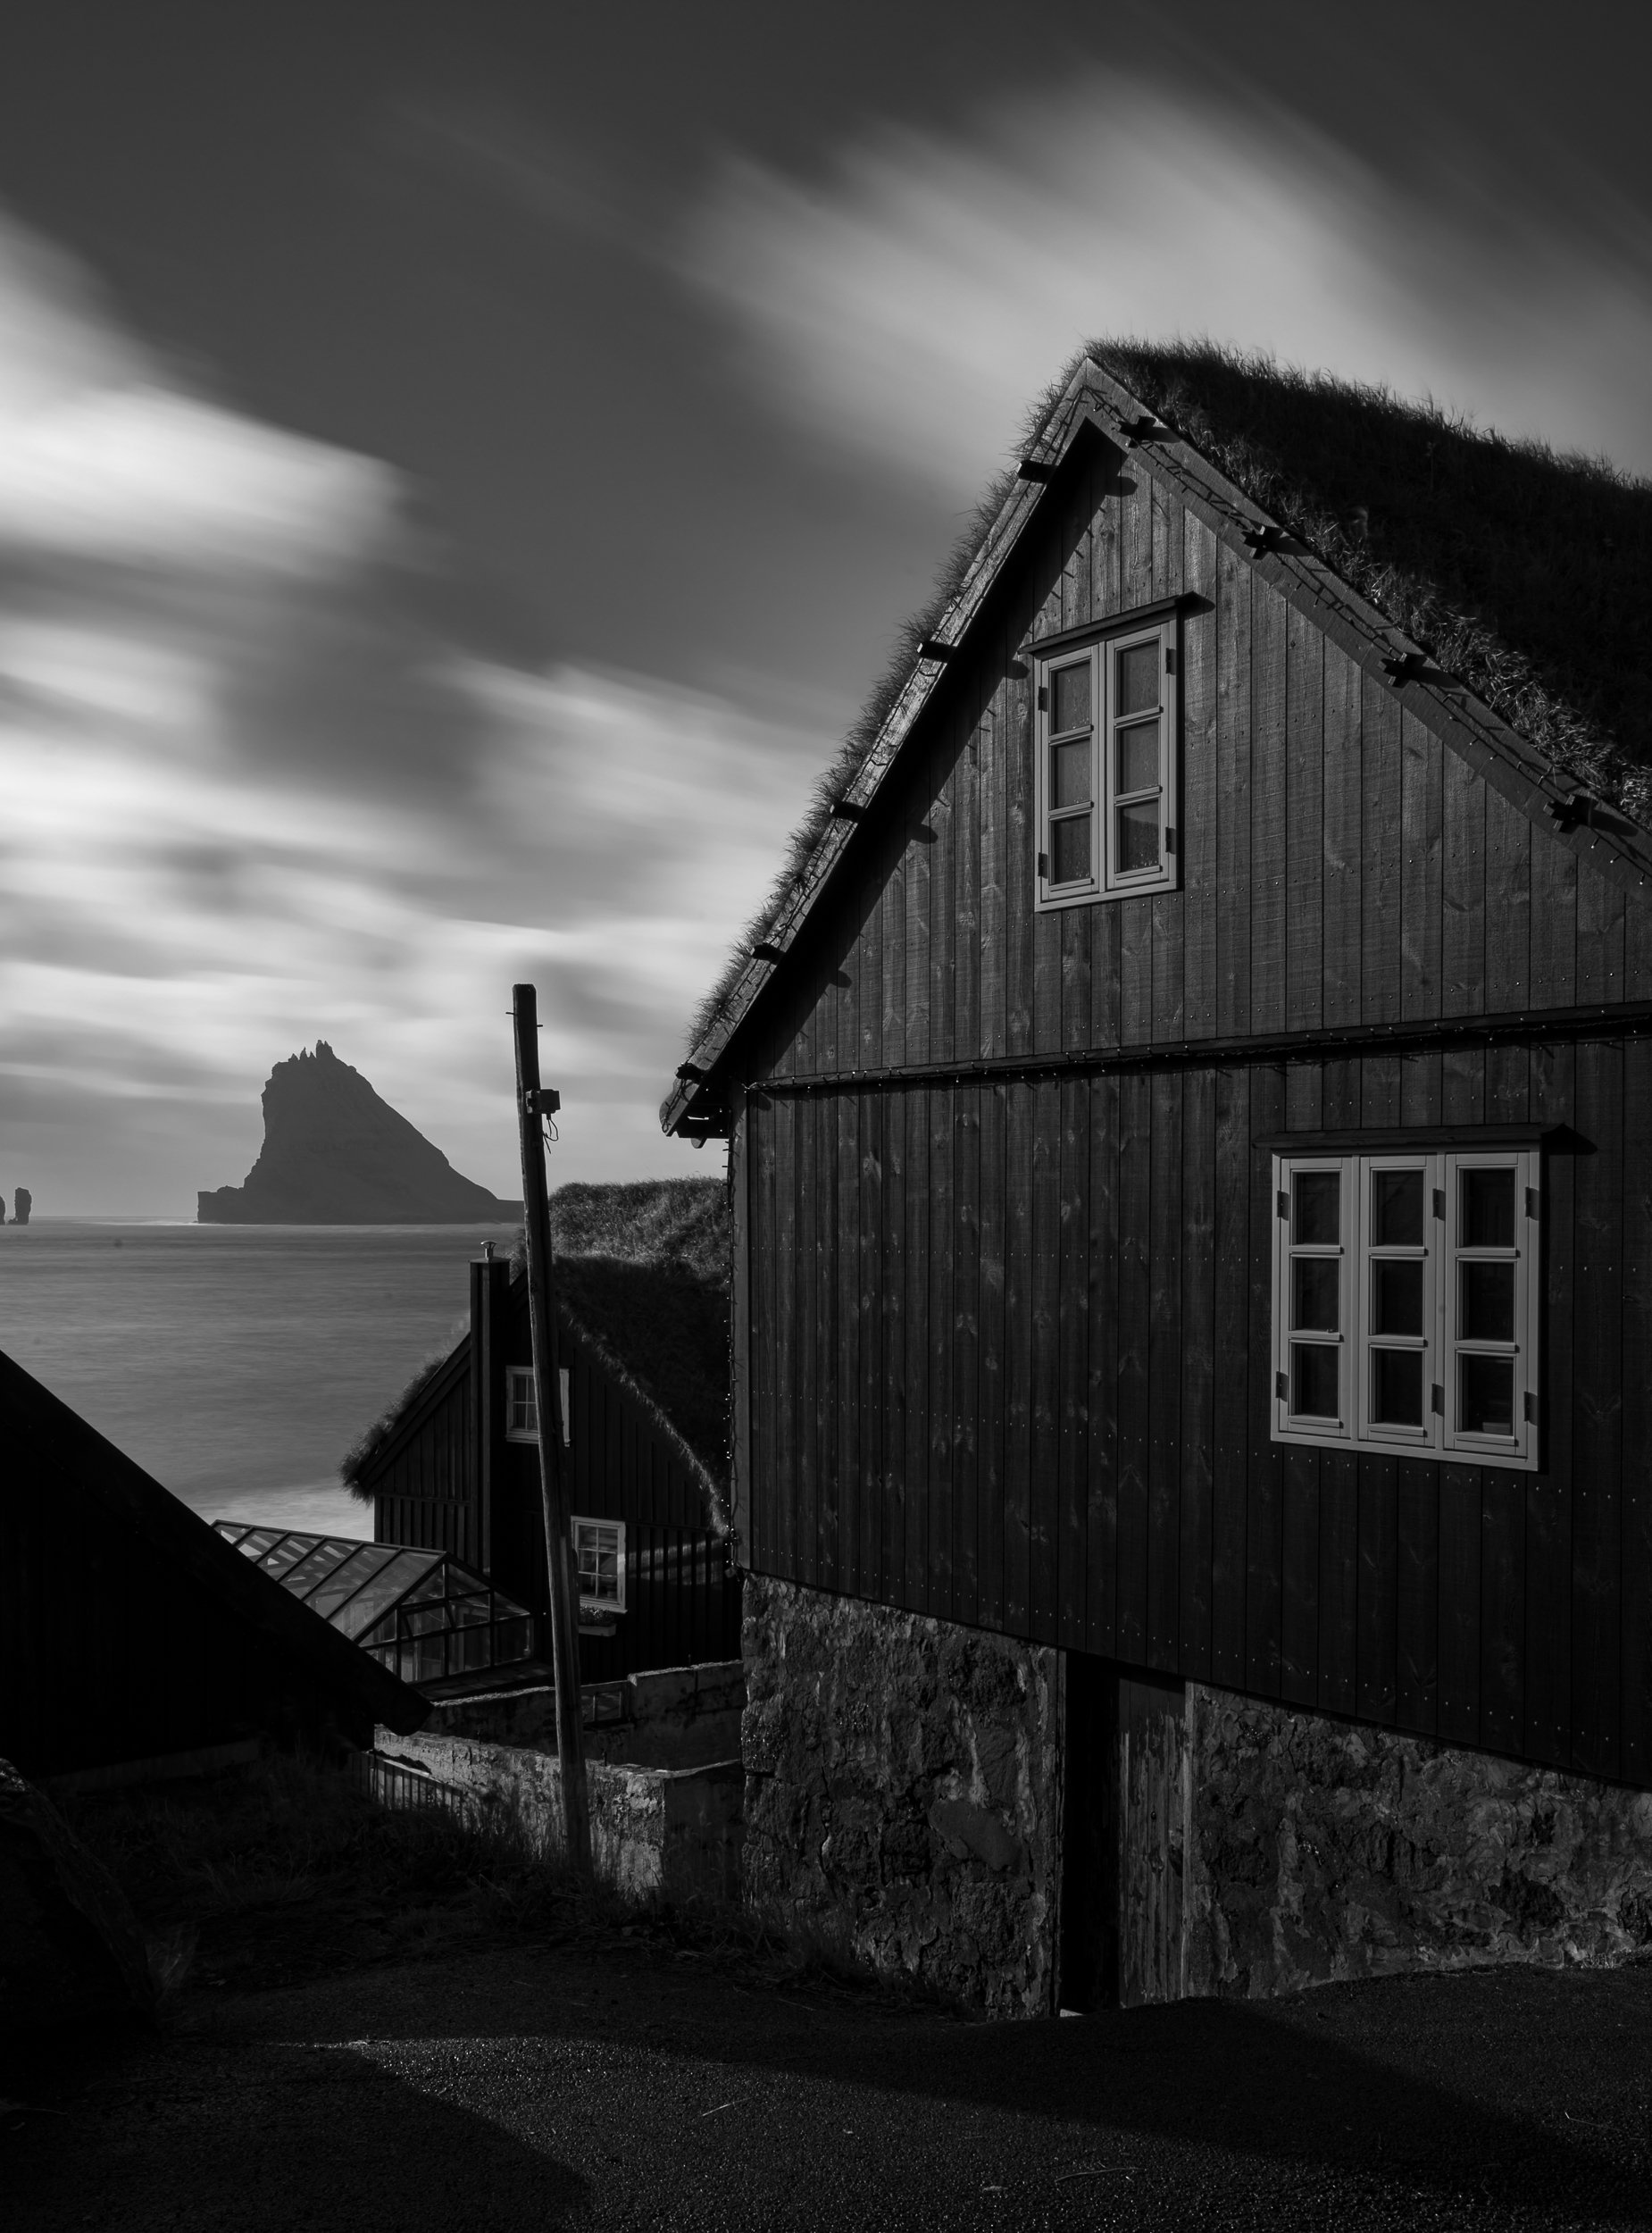
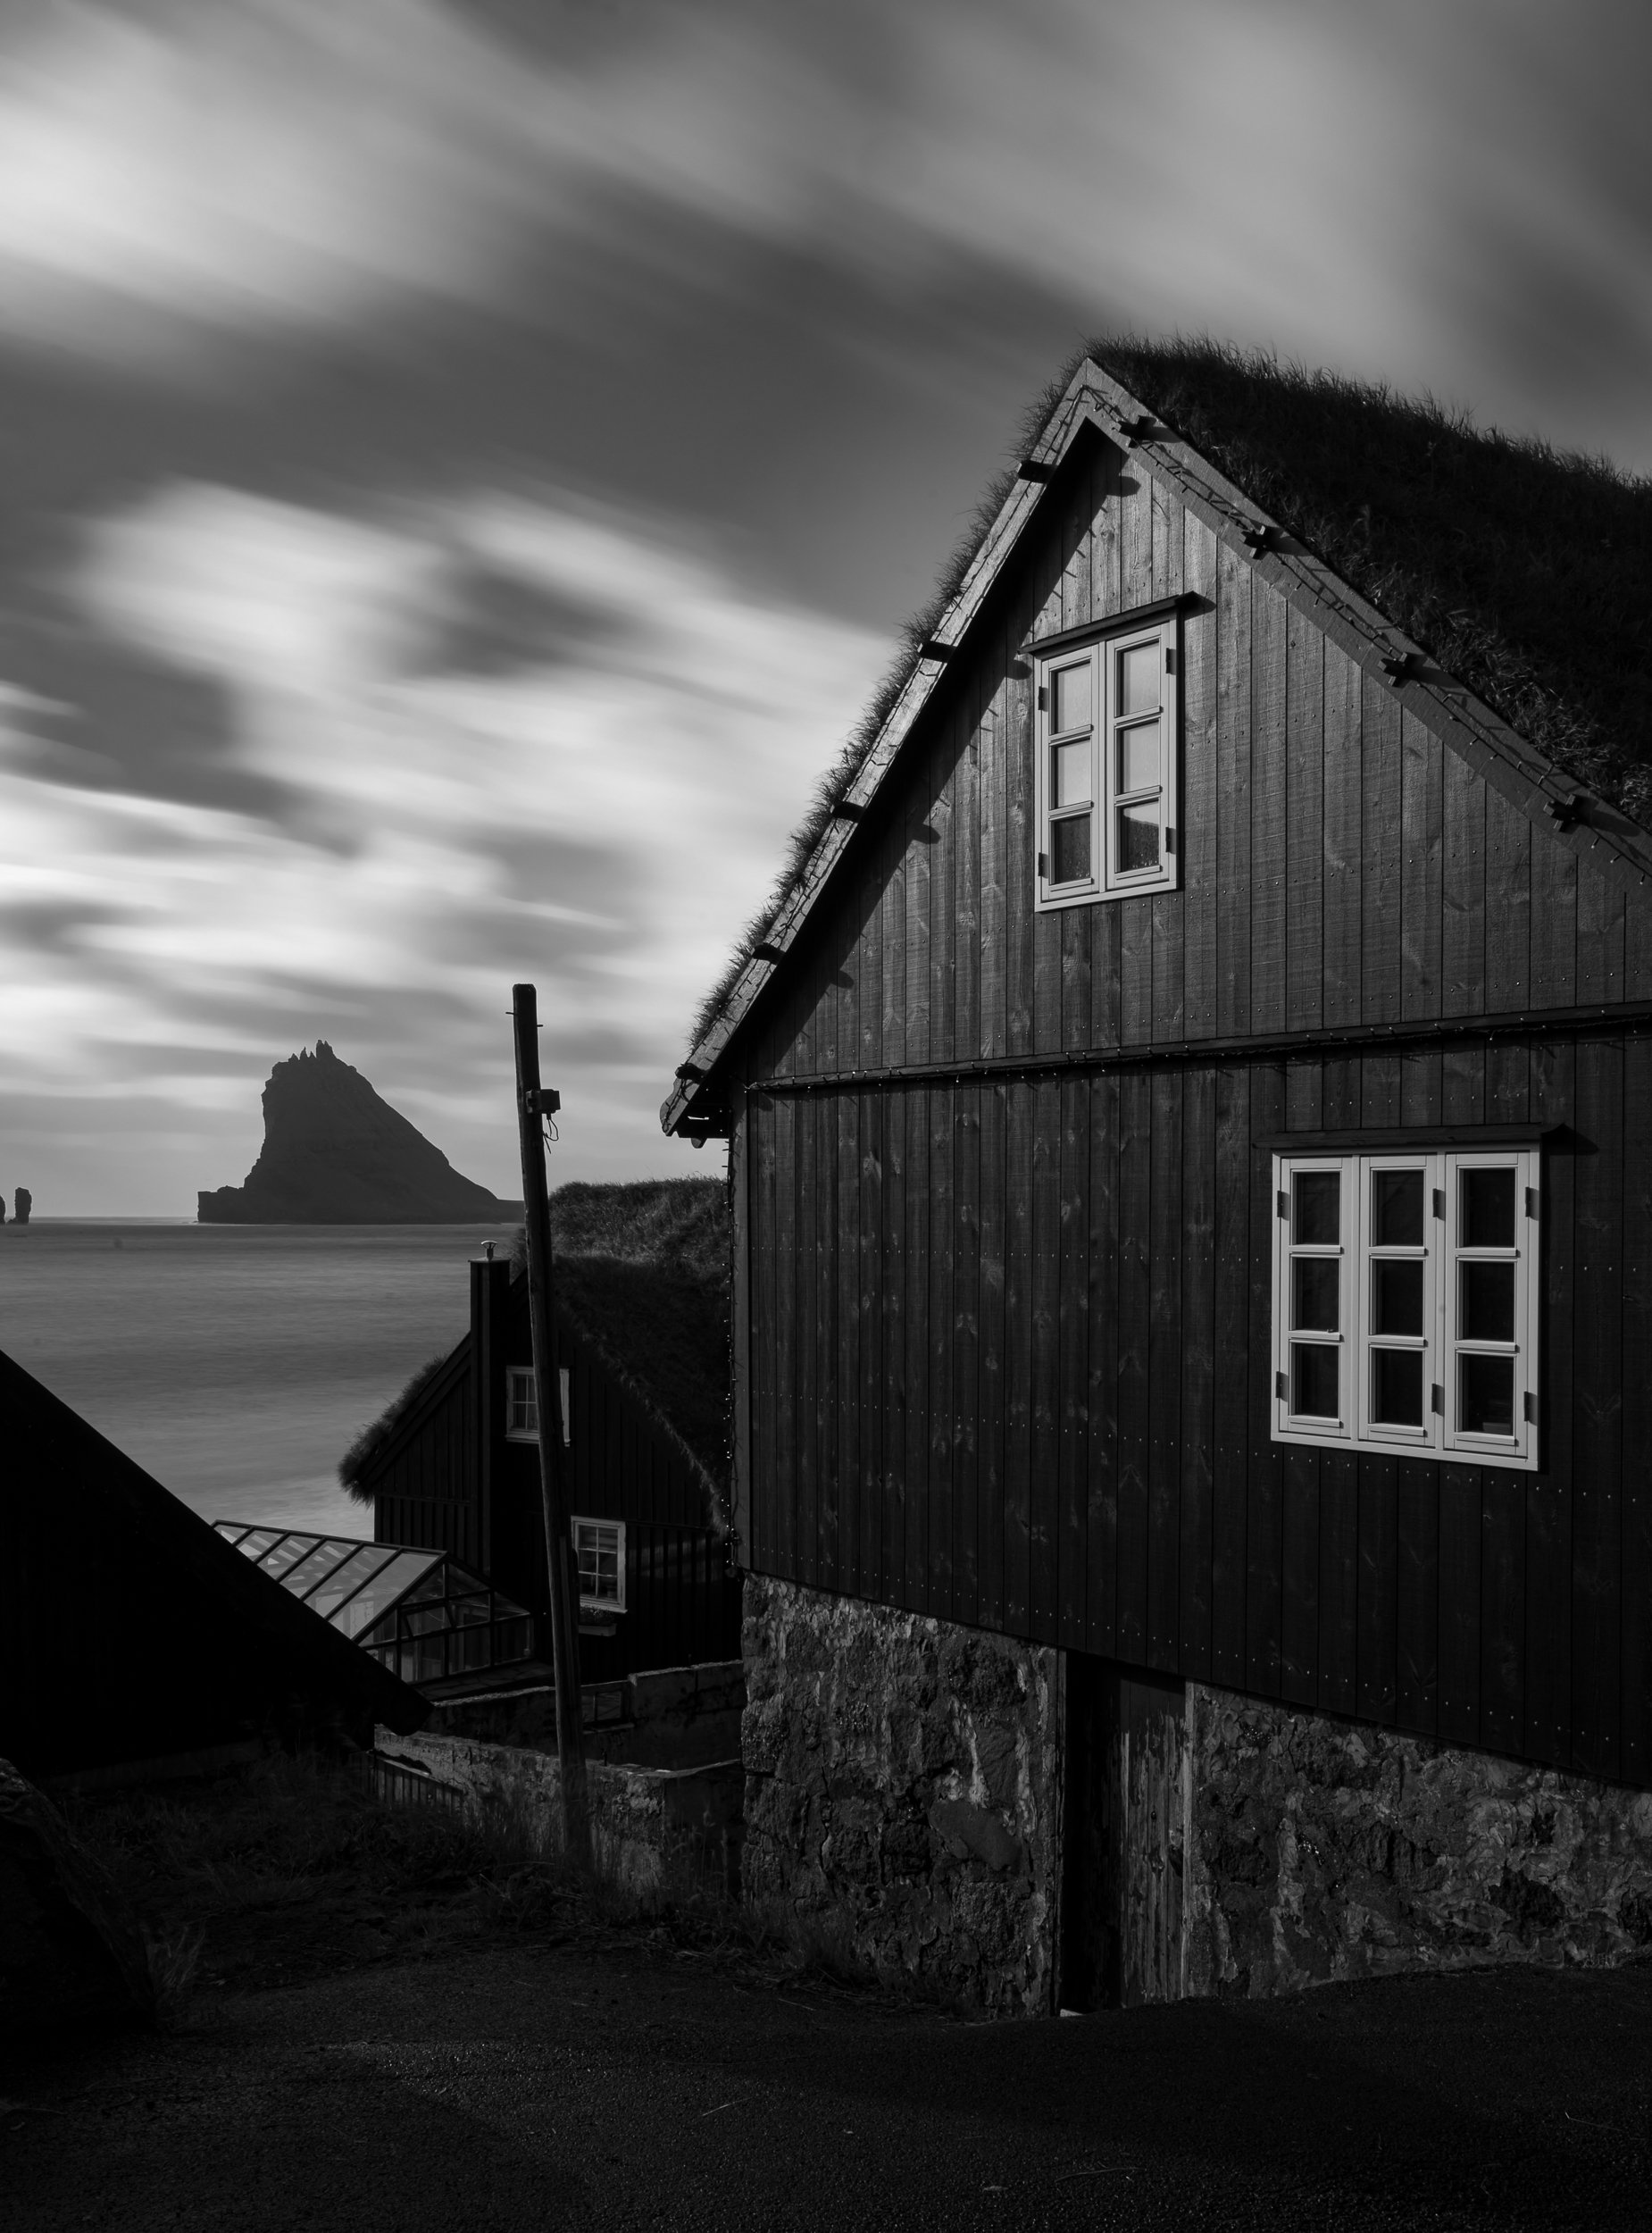
Nikon Z 6II with a Nikon 24-70mm f/2.8 lens at 33mm. 30 seconds, f/20, ISO 50.

Cloud Height and Moon

Another consideration when creating cloud streaks is the moon phase and location. Clouds in the night sky will be greatly enhanced with some moonlight. If there is no moon or city lights to illuminate them, the clouds will be far less visible and tend to simply obscure our sky rather than add an interesting element. A quarter to full moon is a good time to capture cloud trails over the landscape.

The full moon to camera left illuminated the clouds as well as Going to the Sun Mountain in Glacier National Park. Nikon D850 with a Nikon 14-24mm f/2.8 lens at 21mm. 6 minutes, f/4, ISO 100.

Shooting straight into the full moon over Lady Boot Arch in the Alabama Hills of California. Nikon D4S with a Nikon 14-24mm f/2.8 lens at 14mm. 4 minutes, f/5.6, ISO 200.

Cloud type and height can vary dramatically, as will the effect in the resulting photographs. Lower-elevation clouds have a much stronger impact on the composition than higher-elevation clouds. The higher clouds tend to become more transparent during long exposures. This type of cloud can be a subtle element in your final frame.

High clouds can be a subtle element when long exposures render them as more transparent, as seen in this photo from Zion National Park. Nikon D4 with a Nikon 24mm f/2.8 lens. 4 minutes, f/5.6, ISO 200.

Where to Find the ‘Best’ Clouds

Where can you find clouds? Anywhere, really. But those dramatic low clouds are more common the closer you get to the poles—that is, generally regions closer to the Arctic and Antarctic tend to have more low clouds, and the regions closer to the tropics tend to have more high clouds.

You’ll also find more low clouds around the ocean. This is why I love doing cloud photography in places like the Faroe Islands, where we’re running a workshop this coming May. Not only is Faroe close to the ocean (being a remote island, after all), but it’s also at a relatively northern latitude. That combination can make for nights filled with dramatic low clouds racing across the beautiful landscapes. You can see that in many of the photos accompanying this post.

High clouds are fun to work with too, so if you like that effect, know that you’re more likely to see them as you get to locations either closer to the equator or more inland from the ocean.

And of course you’re more likely to see low clouds in the mountains—because you’re at a higher elevation, closer to the clouds!

Post-Processing

Simply capturing the clouds may not be the end of the process. Often we’ll need to enhance them in Lightroom to bring out their true drama.

A common technique is to create a mask for the sky and increase Dehaze. This will add the needed overall contrast to the sky that brings out the structure of the clouds. However, along with this contrast comes a deeper saturation and darkening of the whole sky. The simple fix is when increasing the Dehaze slider, follow up with decreasing Saturation and increasing Exposure.
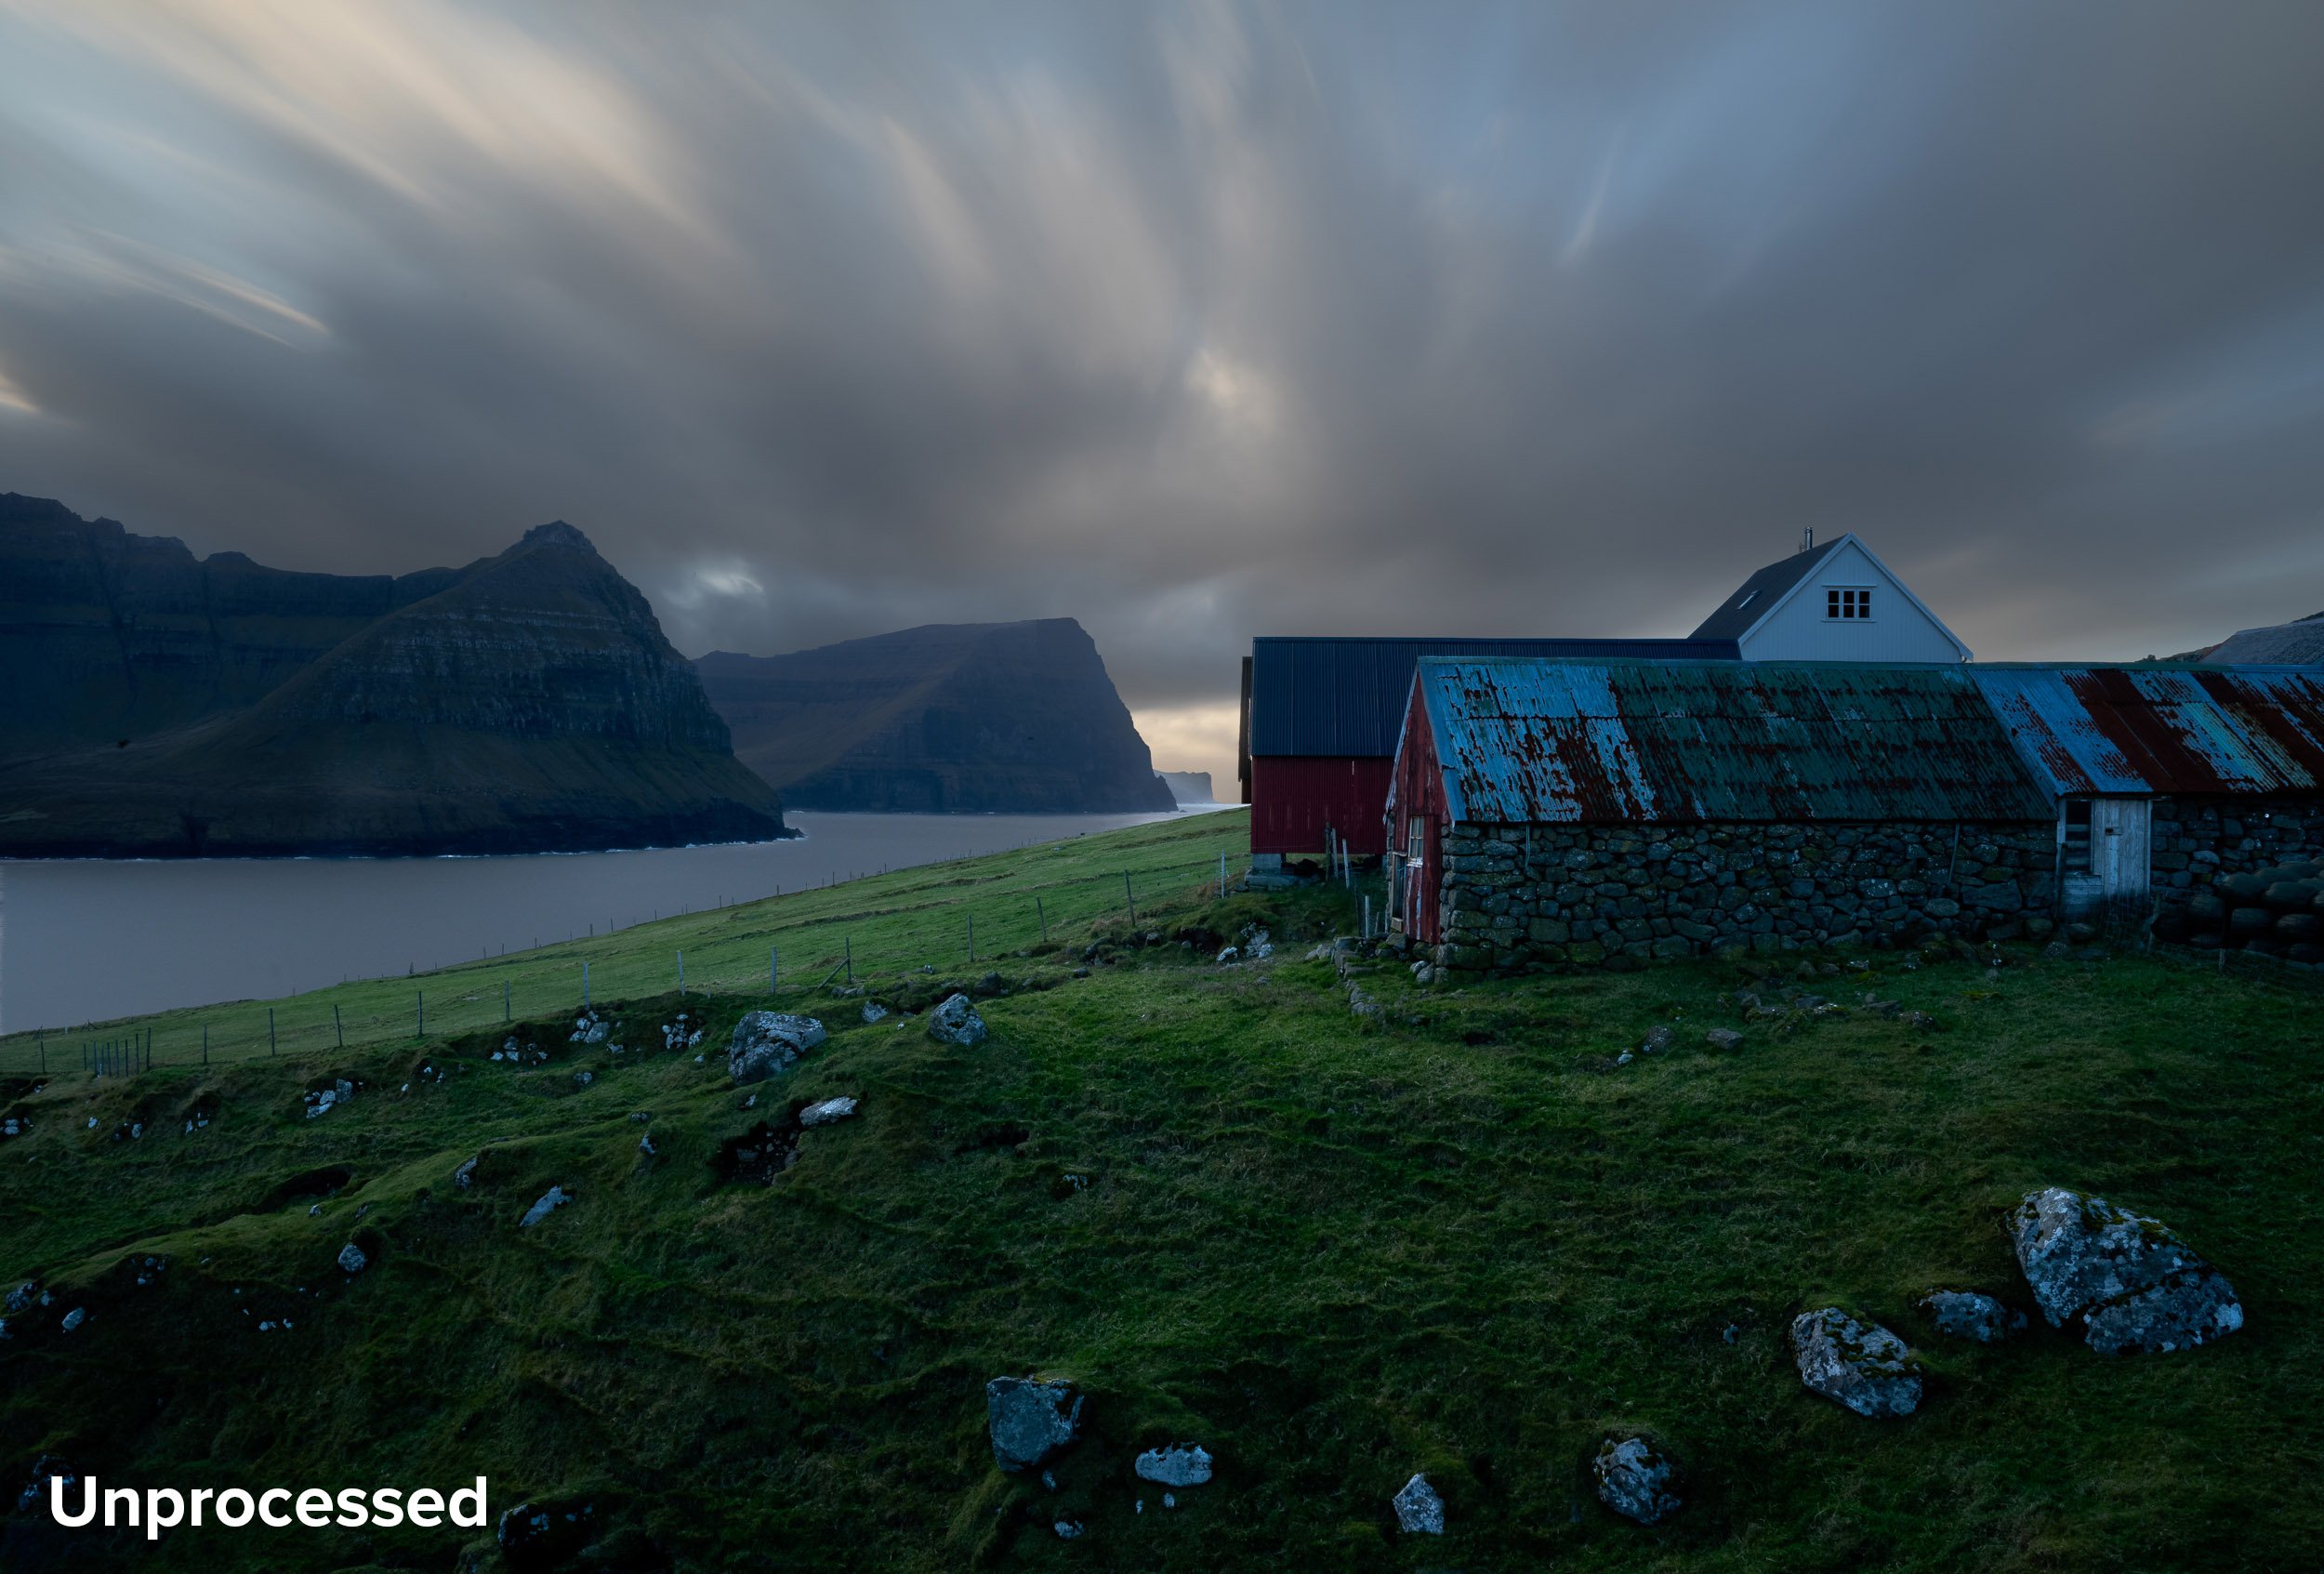
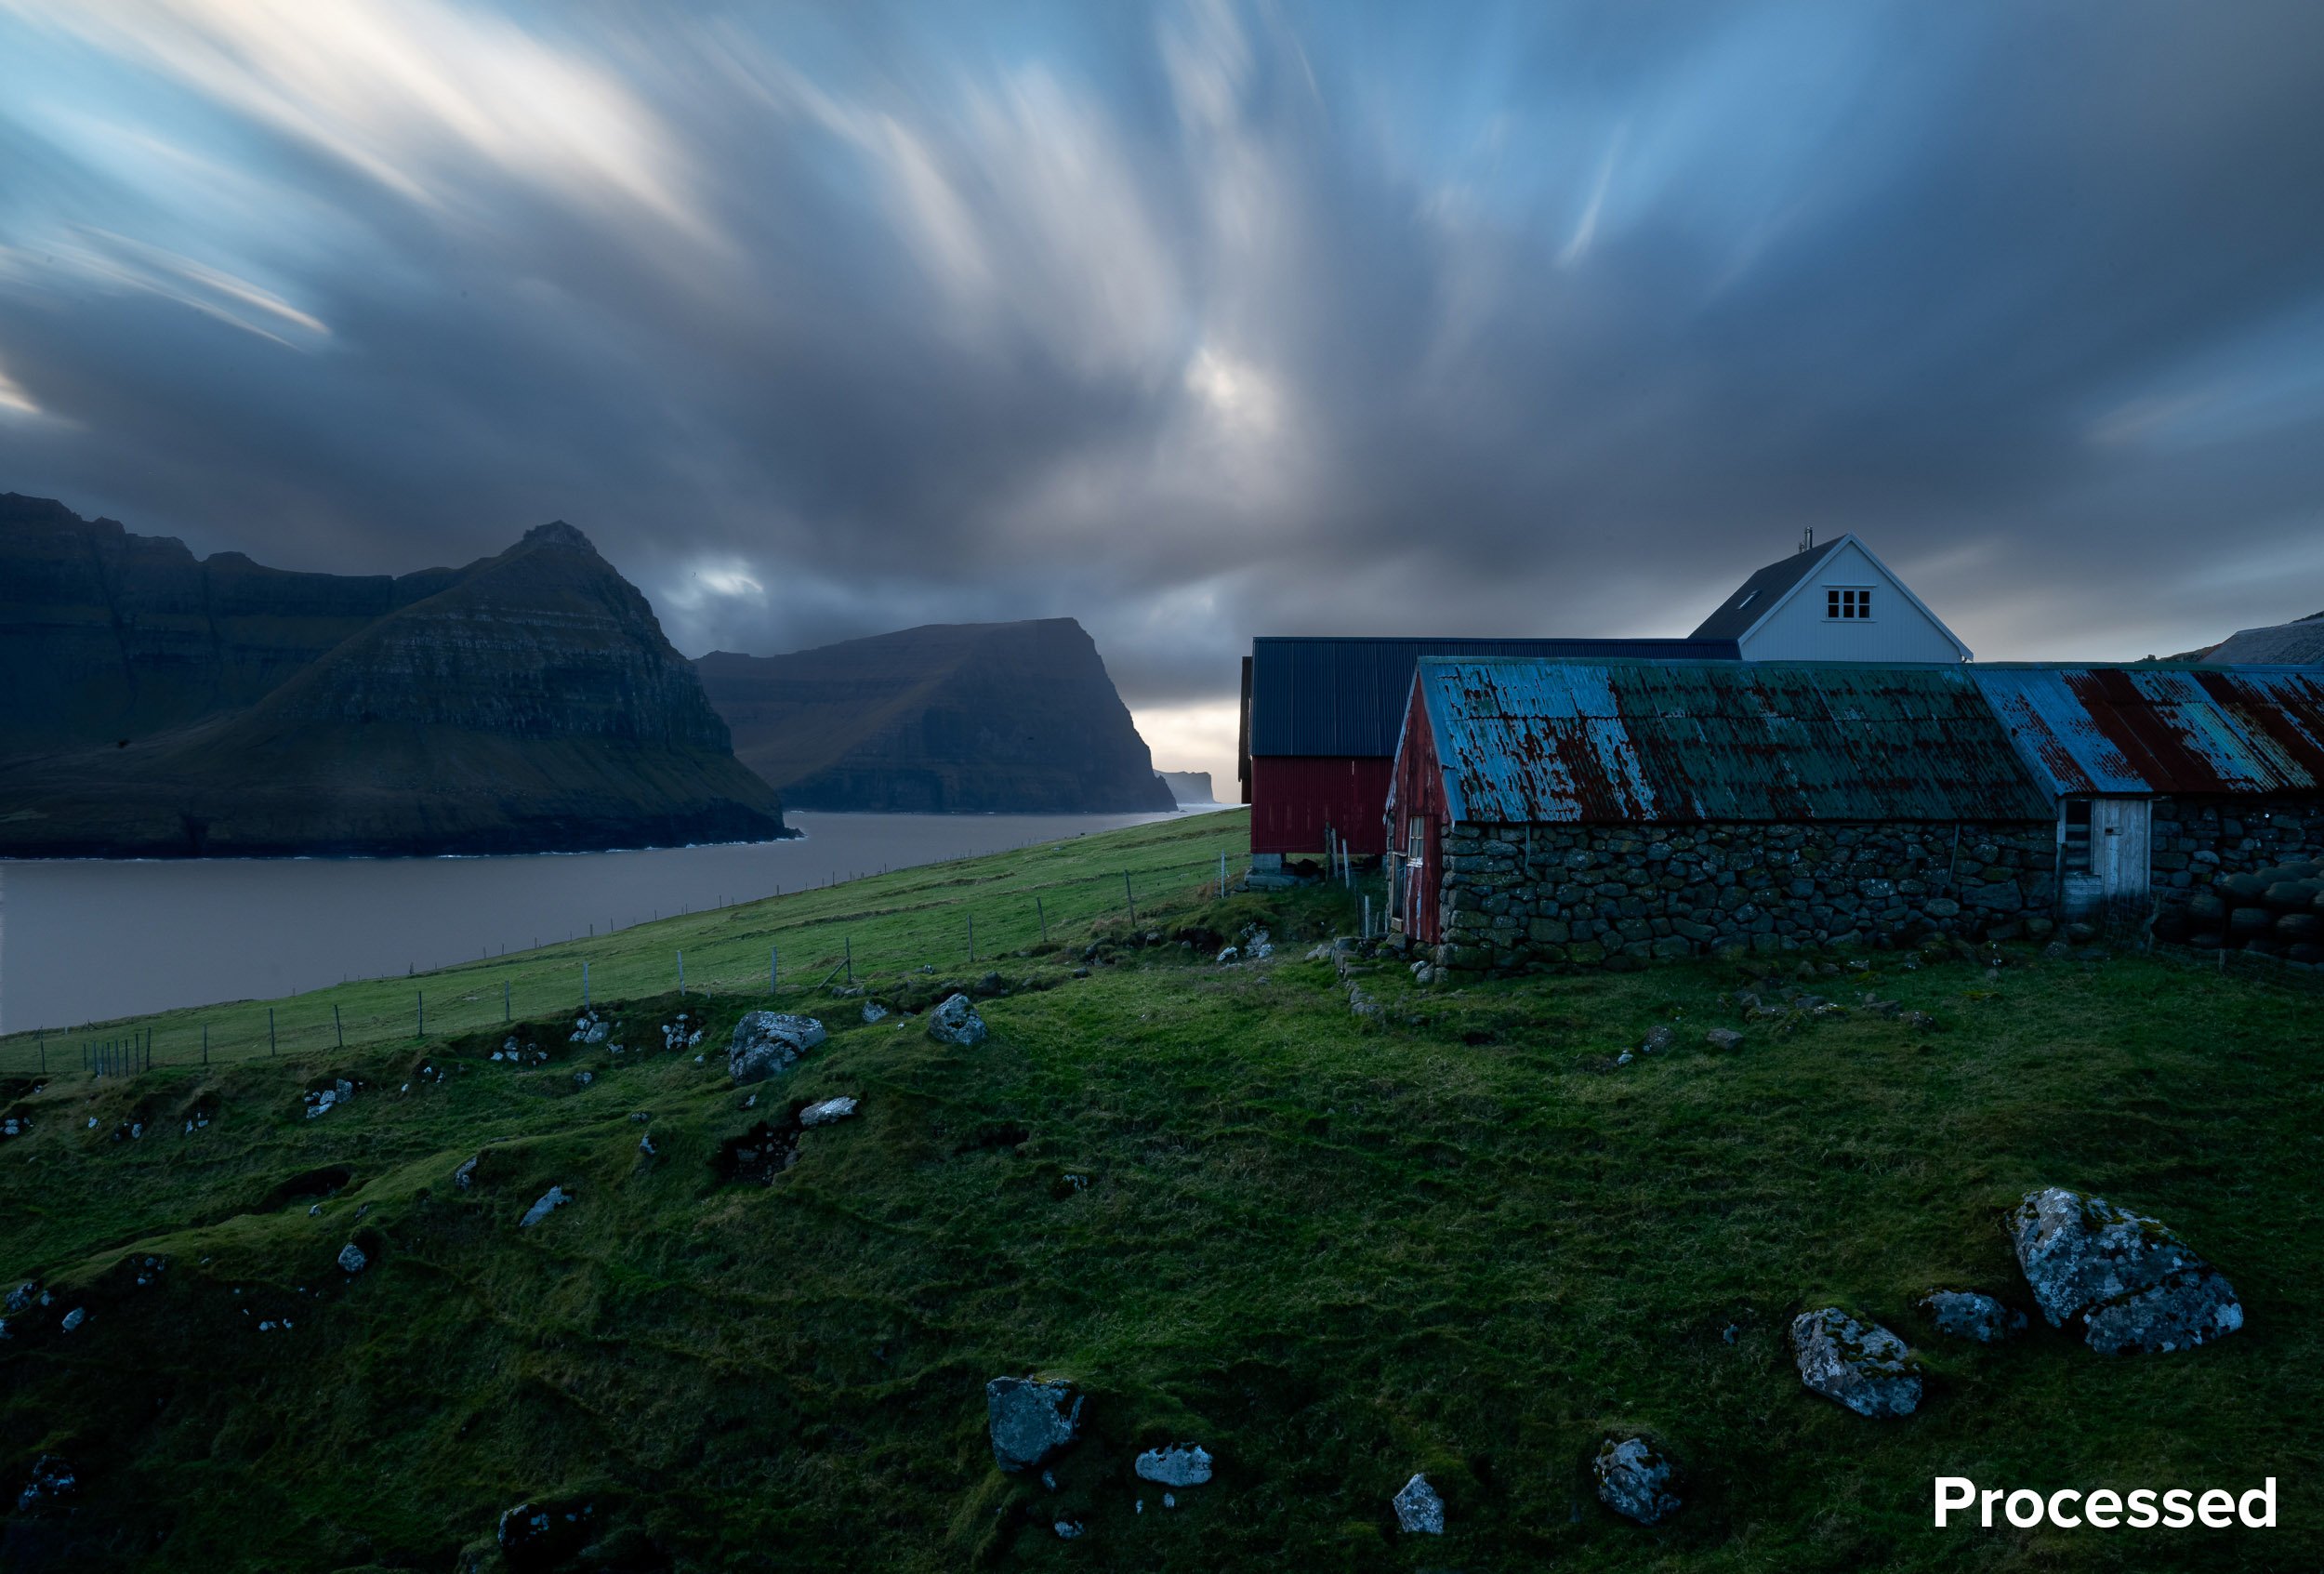
For this image from Faroe Islands, I created a sky mask in Lightroom and increased Dehaze to +55. This oversatured the blues and darkened the entire sky, so, still within the sky mask, I increased Exposure to +1.00 and decreased Saturation to -25.

Wrapping Up

I hope this gives you some motivation to stay out even when the sky isn’t clear. Don’t pack it up and go home when the clouds roll in. Embrace them! Experiment with different shutter speeds and lots of frames to create those beautiful cloud streaks across your night skies.

If this inspires you to shoot clouds at night (or if you’re already doing it), then we’d love to see the results! Share in the comments below, or on our Facebook page, or on Instagram (tag us @nationalparksatnight #nationalparksatnight #seizethenight).

Tim Cooper is a partner and workshop leader with National Parks at Night. Learn more techniques from his book The Magic of Light Painting, available from Peachpit.

UPCOMING WORKSHOPS FROM NATIONAL PARKS AT NIGHT

Even More Words: Updates to the Night Photography Glossary

In January 2022 we released an e-book titled The Night Photography Glossary. It’s a reference guide to over 250 terms about night photography, along with over 80 images to illustrate. Our hope was that the glossary would be a fun educational tool that would also help unify and standardize many of the terms that all us night photographers use to describe the many crazy things we do.

We also intended the glossary to be a living document, adding to it as updates seemed appropriate, or as our niche developed new techniques and adopted new fascinations.

To that end, we recently added 25 terms, and updated others! You can read the newly added terms below.

You can also view the full list of terms on our Night Photography Glossary page, or download the e-book version.


New Terms in the Glossary

auroral corona · rays of auroras converging to form a cone or crown shape, sometimes visible when the zenith of an aurora is directly overhead

black moon · the appearance of an “extra” new moon during a specific time period; most commonly the “black moon” label is applied to a second new moon within one calendar month, though originally the term indicated the third of four new moons in one season

cityscape · a photograph that depicts a city skyline, usually photographed from a distance with a normal or telephoto lens

corona · the outer layer of the sun, visible during total solar eclipses

The sun’s corona, visible during a solar eclipse. © Gabriel Biderman.

dead sky · a sky devoid of any visual characteristics other than blackness, due to complete, dense cloud cover unlit by any nearby ambient light sources

deepscape · a photograph that depicts a landscape in front of a deep-space object in the sky

double processing · processing the same image file with two different results and then blending the two resulting images; for example, a noise blend

earthshine · the dim glow of the unlit portion of a crescent moon, caused by sunlight reflecting off Earth and onto the moon surface

light pillar · a vertical shaft of light extending from the horizon during twilight or nighttime, caused by either sunlight or moonlight radiating from below the horizon (i.e., before sunrise or moonrise, or after sunset or moonset) and reflecting off high-altitude ice crystals; also known as a “sun pillar,” “solar pillar” or “moon pillar”

lunar corona · a faint disc or small rings of light around the moon created by moonlight refracting through thin clouds

moonlight blend · a processing technique for combining a foreground photographed under moonlight with a sky photographed in darkness at another time of the night (i.e., before the moon rose or after it set) to create a final image with foreground detail in front of a starry sky; also known as a “twilight blend”

moon pillar · a vertical shaft of light extending from the horizon during twilight or nighttime, caused by moonlight radiating from below the horizon before moonrise or after moonset and reflecting off high-altitude ice crystals; also known as a “lunar pillar”

moonscape · a nighttime photograph wherein the landscape is illuminated by moonlight; [see photo]

A moonlight blend. The foreground was photographed as the moon rose from the horizon, and the sky was exposed earlier in total darkness. © Matt Hill.

noise blend · a processing technique for combining two (or more) parts of an image that are processed differently for noise reduction, such as a foreground landscape and a background sky that require different noise mitigation

noise stacking · a processing technique for reducing apparent high ISO noise by analyzing multiple exposures of the same scene in noise-reduction software

planisphere · a handheld star chart for identifying celestial objects in the field

solar maximum · the period of the highest solar activity during the 11-year solar cycle, resulting in an increased frequency of sunspots, solar flares, coronal mass ejection and auroras

starlight blend · a processing technique for combining a foreground photographed with a long exposure under only starlight with a sky photographed with a shorter, star-point exposure to create a final image with foreground detail in front of a starry sky; [see photo]

A starlight blend. The foreground was exposed for eight times longer than the sky, and the two frames were blended in Photoshop. © Chris Nicholson.

sun pillar · a vertical shaft of light extending from the horizon during twilight or nighttime, caused by sunlight radiating from below the horizon before sunrise or after sunset and reflecting off high-altitude ice crystals; also known as a “solar pillar”

twilight blend · a processing technique for combining a foreground photographed during twilight with a sky photographed in darkness to create a final image with foreground detail in front of a starry sky; also known as a “blue hour blend” [see photo]

vertorama · though the term in its basic form may indicate any photograph in a non-standard tall format, it’s most commonly used to describe a technique wherein the photographer exposes multiple frames while tilting the camera vertically through a scene, then “stitches” those frames together in post-production to create one high-resolution image that is taller and more detailed than could be created with a single frame in the same camera; i.e., the vertical equivalent of a panorama [see photo]


There’s More Where That Came From

Remember to see the full list of terms on our Night Photography Glossary page. Bookmark the page so you can return to it whenever you see a night photography term you’re not familiar with. Or, better yet, download the e-book!

Chris Nicholson is a partner and director of content with National Parks at Night, and author of Photographing National Parks (Sidelight Books, 2015) and Photographing Lighthouses (Sidelight Books, 2023). Learn more about national parks as photography destinations, subscribe to Chris' free e-newsletter, and more at www.PhotographingNationalParks.com.

UPCOMING WORKSHOPS FROM NATIONAL PARKS AT NIGHT

Ready for a Virtual Adventure? Announcing the 2024 Night Photo Summit!

We are thrilled to announce the 2024 Night Photo Summit!

This fourth annual virtual conference spans 3 days and highlights what’s new and exciting in the intersecting worlds of night photography, national parks and dark skies.

Since 2021 the summit has evolved and grown to gather photographers, artists, authors and astronomers from around the globe to share their passion for all things nocturnal.

The Night Photo Summit is here to scratch your itch, and promises education, inspiration and just plain fun. The nights may be cold now, and the Milky Way core might be hiding below the horizon, but with that comes the promise of a not-too-distant spring and the promise of new opportunities to get back out there and make stellar images.

Until then, we’re here with a cadre of new speakers and new topics to whet your appetite and to sow new ideas for the coming year. The summit is also a great way to connect with old friends and to make new ones, with multiple opportunities to network and socialize with both speakers and attendees.

Join us February 2-4, 2024, to experience 3 days of dynamic presentations from more than 35 luminaries who will light up your nights and your imagination.

SPEAKERS

We have felt immensely blessed to be able to work with so many top-notch speakers for the summit, and this year is no different. In addition to a few returning presenters, attendees will get to learn from and interact with 19 inspiring new voices.

The 2024 speakers include Sean Bagshaw, Royce Bair, Benjamin Barakat, Yuri Beletsky, Gabriel Biderman, Forest Chaput de Saintonge, Tim Cooper, Joshua Cripps, Alan Dyer, Daniel Freeman, Michael Frye, Kim Henry, Kerry-Ann Lecky Hepburn, Matt Hill, Melissa Kaelin, Marybeth Kiczenski, Lance Keimig, Tim Little, Pete Mauney, Andrew McCarthy, Brandon Nesbitt, Chris Nicholson, Eric Pare, Jessica Rojas, Jess Santos, Mike Shaw, Anthony Sleiman, Chris Smith, Babak Tafreshi, Adam Woodworth and Dan Zafra, with more to be announced in the next couple of weeks.

SESSIONS

This year’s summit features sessions on planning extraordinary images, shooting with drones at night, using weather apps and exploring urban night photography, as well as (of course) techniques including image capture, different ways of working with moonlight and star trails, black and white at night, post-processing and more.

There are classes for all levels, including a series of five pre-recorded presentations that cover all the fundamentals of night photography.

There are intermediate and advanced level courses, as well as instructive, inspirational and informative sessions covering a wide range of topics. All in all, the programming totals over 45 hours of learning and virtual adventure.

Sponsors & Giveaways

We are thrilled to announce that several sponsors are already on board! B&H Photo, Nightscaper Photo Conference, Sigma, Spencer’s Camera, Calibrite, Novoflex, Acratech, Chimani and Focus on Stars are raring to go, soon to be joined by more!

Each and every sponsor is offering giveaways to be randomly awarded at the summit’s final party. More info on that to come!

How to Join Us

If you’re into night photography, or if you want to get into it, this is an event you absolutely do not want to miss.

Tickets are $399, and include:

  • 3 days, more than 35 instructors, over 45 hours of inspiration, instruction and fun

  • a Fundamentals series of video classes for newbies or anyone who wants a refresher

  • 1 year of access to re-watch all of the courses

  • a live image review session

  • exclusive glow-in-the-dark summit T-shirt

  • personal access to product experts from manufacturers and developers sponsoring the event

  • giveaways throughout the duration of the summit

  • an unprecedented opportunity to connect with like-minded photographers passionate about the night

Moreover, if you purchase your ticket by January 13 at 2 p.m. EST, you’ll get your shirt and a swag bag before the summit!

(Note: shirts and swag bags will be mailed only to attendees with U.S. addresses, but we may be able to help those from other countries too. We’ll be in touch with more info after you register.)

Registration is available now, so sign up today and mark your calendars to join National Parks at Night for the world’s fourth online Night Photo Summit!

JOIN US ON SOCIAL MEDIA

As if all of that is not enough, we’ll be releasing plenty more information over the next few weeks. To stay tuned in to it all, we invite you to follow the summit social media accounts on:

We are very much looking forward to seeing you online next month. In the meantime, feel free to ask us any questions via the social media accounts above, in the comments below, or through the Night Photo Summit webpage.

Seize the night … online!

Lance Keimig is a partner and workshop leader with National Parks at Night. He has been photographing at night for 30 years, and is the author of Night Photography and Light Painting: Finding Your Way in the Dark (Focal Press, 2015). Learn more about his images and workshops at www.thenightskye.com.

UPCOMING WORKSHOPS FROM NATIONAL PARKS AT NIGHT