Well, the holidays are upon us. How can I tell? I’ve eaten turkey-based foodtstuff six days in a row.
With that in mind (the holidays, not turkey), I and my National Parks at Night partners started thinking about things we’d like as gifts. … Oops, I mean things that other night photographers might like as gifts.
So we put together a list of great products related to photography, the night sky and the national parks, then thought about why we love these items. Then we wrote it all up and published it as our very first "National Parks at Night Holiday Gift Guide."

This Gift Guide is our gift to you. We’re providing it as a free downloadable PDF ebook, so you can read it and reference it on any device, anytime, anywhere. Inside you’ll find products from major brands such as Nikon, Manfrotto and Apple, along with great little finds from smaller companies and startups. You can download it here:
Feel free to share the guide, too. Blog it. Tweet it. Facebook it. Email it to a friend. Print some copies and stand in Times Square shouting, "Hear ye hear ye read all about it! Amazing gifts for night photographers!" Holidays are for happiness, so spread the cheer.
If you prefer to read the guide in our blog, that's okay too; we're also publishing it right here, below. (Though, we will say the ebook version looks cooler. It has a lot more pictures, plus it contains two discount codes that don't appear anywhere else online, including this website.)
We hope that perusing the items in the guide will inspire you to give some great gifts to the night photographers in your life. And if you’d like to give us one or two of these things, we won't argue!
2016 Holiday Gift Guide
Raindrops on roses, whiskers on kittens, bright copper kettles—none of these are likely on the holiday wish-lists of night photographers. Why? Because those don’t help us shoot in the dark. (Though we might welcome warm woolen mittens.)
However, the photography industry is full of products that do help us, or that we covet at least for the fun of owning and using them. In one way or another, all help us make better photos, and all help us have more fun in the dark.
If you’re searching for the perfect gift for the nocturnal photographer in your life, then we’re here to help. The following includes a few of our favorite things for seizing the night.
—Gabe, Tim, Matt, Lance & Chris
p.s. — If you decide to purchase any of the items in this gift guide, please consider using the links included, as many help earn a small commission that supports the National Parks at Night workshop program.
Apple
iPad Mini 4
A tablet is one of the most useful ancillary tools in modern photography. The iPad Mini 4 is certainly among the best in the category, and easy to carry in a camera bag. Use it for apps that help you scout national park locations—such as Chimani, Photo Pills or Photographer’s Ephemeris. Or use it for apps that help you produce better night photography—such as Tack Sharp or even Adobe Photoshop Lightroom. Also use it for keeping up with emails, making photo notes on-site, or carrying your portfolio of fantastic night images everywhere you go.

B&H Photo Video Pro Audio
Gift Card
We promise you—if you want to let the photographer decide, there’s no gift card they’d rather have than one from the mothership of all camera stores, B&H. Cards are available in varying amounts, can be used online or in-store, and they fit perfectly in a stocking.
Coast Portland
HP7R
Hands-down, our favorite flashlight for light painting. The HP7R outputs up to 300 lumens of bright light in a perfectly even beam, allowing for smooth painting of objects near or far, and features three power modes and a slide focus for honing or broadening the illumination. It can be powered by either alkaline or lithium batteries, and rechargeables can be recharged right inside the casing using the included micro USB connector. Moreover, the HP7R is impact- and weather-resistant and comes with a lifetime warranty.
(For a 25% discount available only through National Parks at Night, use the code “PARKSATNIGHT.”)

CreativeLive
Night Photography Week Online Course
CreativeLive offers some of the very best photography education on the internet, and our favorite (though we admit bias) is the Night Photography Week bundle we created with them in 2016. From the entire National Parks at Night crew, learn about gear, scouting, astrolandscapes, light painting, night portraiture and more. The course comprises nearly 18 hours of instruction in 82 class segments, plus bonus materials that include information on camera and light-painting gear, lists of apps to help with location scouting and night photography, and articles about topics such as camera settings and the 400 Rule.
Digital Silver Imaging
Museum-Quality Print
The end product of successful photography is a beautiful print, but in this busy modern age too few of us have time to dedicate to our digital darkroom. So the perfect gift for the photographer in your life could be a top-notch print of his or her work. Digital Silver Imaging is the place to get it. DSI combines the best of digital technology and chemical-based silver printing to create works of stunning quality. The proof is in the print, or in the clientele—regular DSI customers include museums, collectors and photographers with a discerning eye for perfection.
(For a 15% discount available only through National Parks at Night, use the code “NPAN16.”)
Gitzo
GH3382QD Series 3 Center Ball Head
For the past couple of years Gitzo had been promising an A-grade ball head, and then they delivered an A+ instead. The GH3382QD Arca-type compatible head is low-profile, low-weight and can hold a 40-pound camera/lens combo with no creep or fuss. Moreover, loosen the screw-knob lock and due to the tungsten disulfide coating, the ball moves 360 degrees as smooth as silk.

Intervalock
Intervalock
If you’re tired of your intervalometer dangling from your tripod, blowing in the wind, shaking your camera and ruining your long exposures, the most elegant solution we’ve seen is the Intervalock. Secured to a tripod leg by a Velcro strap, this portable pocket will keep almost any model of intervalometer still and accessible.
Light Painting Brushes
Deluxe Starter Kit
Light Painting Brushes offers a comprehensive set of unique light-writing tools that is sure to stir the creative juices of any night photographer. Their Deluxe Starter Kit includes universal flashlight connectors, along with tools for creating light orbs, light sculptures, light graffiti and anything else you can imagine.
Lonely Speck
SharpStar2
One of the challenges of photographing astrolandscapes is focusing on the sky in the dark. That’s where Sharpstar2 saves the day (er, the night). Based on astronomy technology, this special filter uses a Bahtinov Mask to help you achieve perfect focus on the stars. Simply verify the focus pattern in your camera’s Live View, and sharpness is assured.
(For a 10% discount available only through National Parks at Night, use the code “NPAN10.”)
Manfrotto
190go!
Night photographers need support that is strong and stable, as well as easy to use in the dark. We also like a lack of weight, particularly because we’re often carrying two tripods into the field for multiple long-exposure setups. The Manfrotto 190go! exceeds all these needs as the perfect tripod for either a primary or secondary support system (or both!). It closes down to less than 18 inches and is available in aluminum and superlight carbon fiber versions. Plus, to create an all-in-one night photography support solution, add an Easy Link attachment to hold a focusing light.

Mappinners
National Parks Scratch Off Travel Map
For the national parks buff, little is more satisfying than tracking where you’ve explored. Mappinners helps with its National Parks Scratch Off Travel Map. This 36x24-inch awesome wall decoration features scratch-off spots for all 59 U.S. national parks, so you can track your footsteps across the country’s greatest natural spaces.
National Park Service
Annual Pass
We photographers love to visit national parks, and for good reason: They contain some of the most wonderful wildernesses in all of the land, ready for our cameras and creative minds. But gosh, those entrance fees can add up. That’s why a National Park Service annual pass is an ideal complement to any photographer’s pocket. For just $80 (or $20 for seniors—lifetime!), the holder can enter any NPS unit for free.
National Parks at Night
Photography Books
Four of the National Parks at Night instructors have written definitive guides to popular photography subjects, all of which make excellent gifts. Moreover, the complete set can keep the photographer in your life well informed and educated about topics ranging from national park locations to how to shoot in the dark.
Photographing National Parks, by Chris Nicholson
HDR Photography: From Snapshots to Great Shots, by Tim Cooper
Night Photography And Light Painting: Finding Your Way in the Dark, by Lance Keimig
Night Photography: From Snapshots to Great Shots, by Gabriel Biderman
2017 Night Photography Calendar
We’ve compiled a ton of information useful to night photographers—including the dates of new and full moons, national park night-sky festivals, celestial and astronomical events, astronomy holidays (yep), as well as inspirational quotes about the night sky—and combined it with some of our favorite national parks night photographs. The result? “Seize the Night,” our very first wall calendar!

Nikon
D750
Put simply, you can’t get a better camera for night photography, particularly at this price point. At under $2,000, the Nikon D750 has everything a night photographer could want in a body right now: It has low noise at high ISOs, ISO invariance, ability to pull tremendous detail out of underexposed images, and a T (time) setting on the shutter speed dial, as well as being lightweight and compact. But really, it’s all about the image quality, and the D750 outshines all the other options under the stars. To level up the gift, add one of the best lenses for seizing the night, the Nikkor 14-24mm f/2.8.

Palette
Aluminum Professional Control Surface Kit
There are the usual ways of manipulating adjustment controls in Lightroom and Photoshop—a mouse or a touchpad (ack!) to name the very most common two. Both can be tedious. But you know what’s a lot easier? Using the sliders, dials and buttons provided with a Palette Aluminum Professional Control Surface Kit. Assign each tool to whatever adjustment you want, and digital editing gets much more intuitive. Other size kits are available, and the module configuration is completely customizable. Palette also works with Illustrator, After Effects, InDesign, Premiere Pro and Final Cut Pro.

Peak Design
Everyday Backpack
For spacious and convenient storage in a robust yet exquisite design, look no further. The Everyday Backpack, available in two sizes, holds just about anything you need when venturing into the field or into the office. It’s adaptable, partly due to moveable dividers, and partly due to the integration of Peak Design’s Capture Clip points that allow you to quickly attach or detach cameras or accessories. And while it’s great at holding whatever you need it to, the MagLatch clasp and the dual side-loading, weatherproof, zippered access points facilitate getting those things in and out quickly. Also, look into the optional Field Pouch, a perfect size for storing light-painting tools.
Tether Tools
Case Relay Camera Power System
Long night exposures can deplete a camera battery pretty quickly. The best power-loss prevention is a hearty external battery. Tether Tools offers an ideal solution with its Case Relay, a light and portable setup that, when combined with their rechargeable 10,000-mAh Rock Solid External Battery Pack, can keep you powered-up all night.
Tyler Nordgren
Stars Above, Earth Below: A Guide to Astronomy in the National Parks
Tyler Nordgren—an astronomer, astronomy professor and avid night photographer based in California—offers a fresh perspective on our favorite topic: the night skies of the national parks. In Stars Above, Earth Below: A Guide to Astronomy in the National Parks, Nordgren touches on many of the night-sky wonders we encounter in our most precious spaces, helping us better understand what we’re so passionate about photographing. Also check out Nordgren’s series of “Half the Park is After Dark” posters from his dark-sky awareness campaign with the National Park Service.
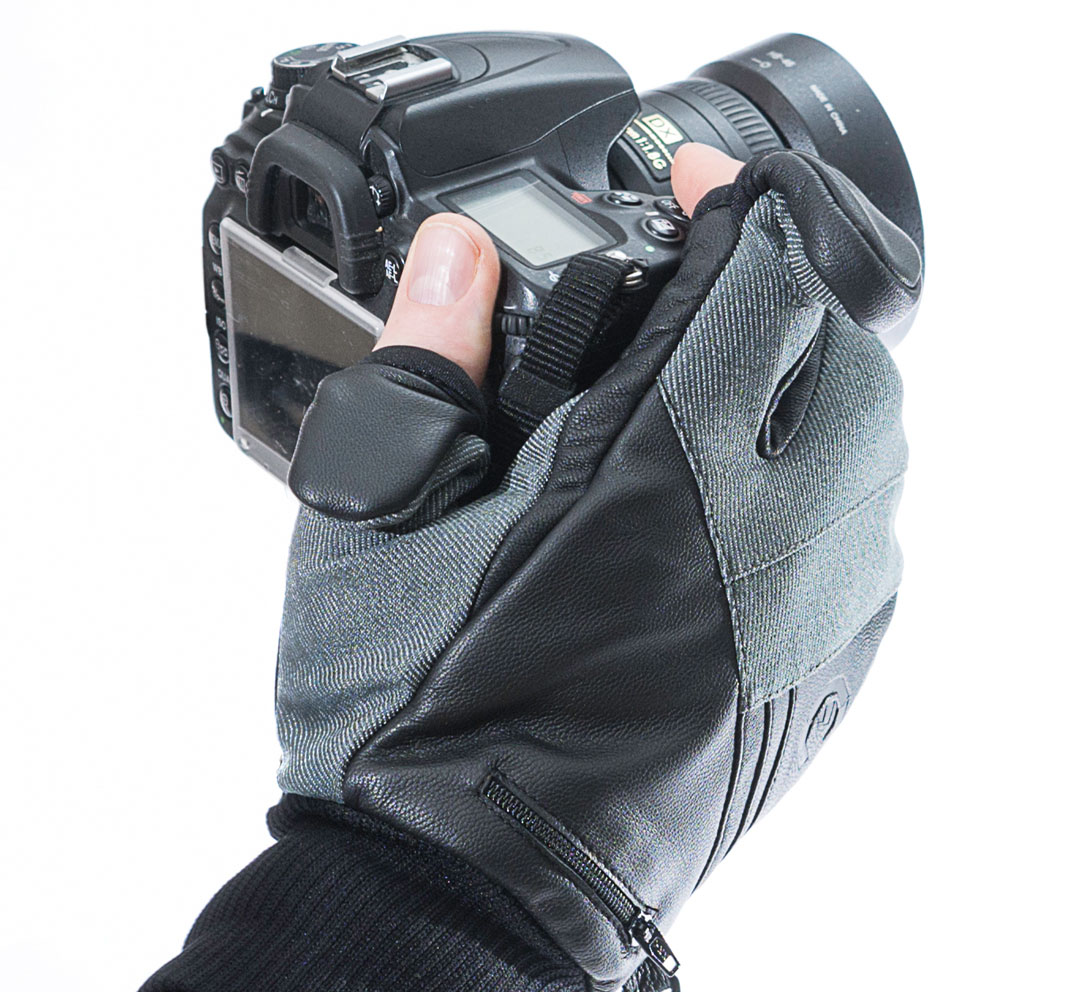
Vallerret
Trigger Mitt
Night photographers often find themselves in finger-numbing conditions, so yes, those warm woolen mittens we mentioned earlier really would be handy. But even better is the Trigger Mitt, a set of gloves designed specifically for photographers working in cold conditions (like, ya know, night). More accurately a half-glove, half-mitten, the Trigger Mitt is designed to keep unused photo fingers together and warm, while allowing the thumb and pointer to move freely. A thin but comfy layer of insulation keeps the Mitts more pliable than the ski gloves that so many photographers use, ensuring that you maintain a great feel for your camera.
Vello
Shutterboss II
An intervalometer is practically required gear for the night photographer—so important that it’s even a good idea to carry an extra. The Shutterboss II is one of our most preferred. The backlit display is easy to read at night, making it simple to configure for continuous shooting, self-timer, long time exposures and interval shooting.
X•Rite
i1Display Pro
Once the photos are home in the computer, we want them to look right—and helping us do that is X-Rite. The i1Display Pro works with all modern monitors, ensuring color accuracy throughout your entire workflow, from screen to print or projector. Features include Advanced Filter and Optical Systems, and an ambient meter that can adjust your display output in changing light conditions.
For more information about gear mentioned in this post: