Working in (and with) the Dead of Night—Photographing in Cemeteries

Burrishoole Abbey, County Mayo, Ireland, 2009. This image was made while leading a photo tour of western Ireland. The headstone was illuminated from the left with a Surefire G2 flashlight, and minimum aperture was chosen to maximize depth of field with the longer focal length. The underexposed background has just enough information to provide context, and the moon rising in the distance provides an additional counterpoint to the foreground subject. Canon 5D, Canon 28-135mm lens at 70mm. 13 seconds, f/32, ISO 100.

Wherever I travel, somehow I end up in graveyards. Ireland, Japan, Cuba, Texas …

It’s not that I’m preoccupied with death, but just that I find cemeteries to be interesting places reflective of culture, and most importantly, the residents usually don’t complain about trespassers. Oddly enough, Matt Hill and I first met in a cemetery while photographing the Headless Horseman in 2010! What better place to do some night photography in late October?

If you are lucky enough to live in a place with an intriguing graveyard, I recommend that you give it a try––but you might want to take a friend, especially if you are wary of headless horsemen or things that go bump in the night.

In the paragraphs that follow, I’ll offer some guidelines and suggestions for night photography in cemeteries. Be sure to pay attention to the image captions, as they contain all of the technical details and explanations of the illustrations.

Challenges and Opportunities

Aside from the creepy factor, there are no particular peculiarities to night photography in a cemetery any more than in our more usual nocturnal haunts. The terrain and lighting can vary from one to the next just as it can in any environment. Making successful images in a graveyard is dependent on finding an interesting subject and combining it with interesting light, whether you find that light or create it yourself. If you are fortunate enough to have a little fog as well, then you really can’t go wrong.

These two images were made on the same foggy night in May 2016. The cool-toned image is dominated by backlighting with a Coast HP5R LED flashlight supplemented by moonlight. Nikon D750, Nikon 24-120mm f/4 lens at 24mm. 30 seconds, f/5.6, ISO 800.

The warm-toned image is dominated by light from fog-diffused high pressure sodium vapor streetlights, with a key light on the cross from a Coast HP5R flashlight to camera right. Note that the 90-degree sidelighting exaggerates the texture in the cross, creating strong contrast in an otherwise soft scene. Nikon D750, Nikon 24-120mm f/4 lens at 50mm. 10 seconds, f/5.6, ISO 1600.

Conditions and opportunities in large urban graveyards might be very different from small rural ones, with the urban options being relatively unaffected by moonlight due to streetlight, while lighting in more remote cemeteries may be totally dependent on the phase of the moon. Just as with any other landscape, graveyards can be photographed in starlight, moonlight, streetlight, with light painting, or any combination of light sources.

If you’ve read many of my previous articles, you know that I like to revisit locations over time in different conditions (see “Revisiting Locations Can Lead to Seeing with New Eyes”). The two images below were made in the ghost town of Terlingua outside Big Bend National Park—the first under a full moon in 2007 and the second nine years later under a new moon. I tried as best as I could to recreate the composition from memory in the later shot, but the conditions were so different that the resulting images look like they were made in different places altogether.

I’d be hard-pressed to pick a favorite between the two, as I like them both. They are just different. Of course it’s more difficult to work in starlight, and we’re faced with the usual challenges of bumping up against the limits of our equipment with noise from high ISOs, short exposure times to preserve star points, and shallow depth of field from wide apertures; therefore, compromises will have to be made on a case-by-case basis to get the best results. Foregrounds are more dependent on light painting and will usually be underexposed in the absence of added light.

These two images were made nine years apart at the same location. The 2007 image was shot during a full moon at Dia de los Muertos, when candles illuminated many of the grave sites. The orange glow is from one such candle. There was no added light painting. Canon 5D and an adapted Nikon 28mm f/3.5 PC lens. 5 minutes, f/8, ISO 200.

The 2016 image was shot on a moonless night with fast-moving clouds in April, with Coast HP5R backlighting from camera left and a brief pop of bounced light in front of the fence with the same light source. Atmospheric conditions and added lighting make these two images of the same subject completely different. Nikon D750, Nikon 24-120mm f/4 lens at 24mm. 30 seconds, f/4.5, ISO 6400.

Modern vs. Historic

Every boneyard is different, and reflects the spirit(s) of the people buried there. The old cemetery at Terlingua is full of mostly Mexican and Mexican-American miners, many of whom died as a result of breathing the toxic mercury vapors that were part of the smelting process at the nearby cinnabar mine at Villa de la Mina. The humble wooden crosses lean in all different directions, and the place seems abandoned and forgotten except at Dia de los Muertos on November 1, when elaborate decorations festoon the graveyard and many of the graves are adorned with little skulls made of sugar.

Jacob Taylor has resided at Sleepy Hollow in Concord, Massachusetts, since 1767. The image was made in 2010 with a Surefire G2 flashlight from slightly above the stone, flagged with black mat board so the camera didn’t see the light. The three headstones in the middleground were lit with the same light source, but indirectly. I bounced the light off of a 12-inch Wescott reflector from behind the central stone. The shallow depth of field and strong vignetting also help to isolate the primary subject. Canon 5D Mark II, Canon 50mm f/1.4 lens. 3 minutes, f/4, 100 ISO.

Jacob Taylor is buried in the Sleepy Hollow cemetery in Concord, Massachusetts. Many of the graves there date to the late 17th and 18th centuries, and the elaborately hand-carved tombstones chronicle the evolution of styles and trends in funerary art during the Colonial period of U.S. history.

The modern side of a different Sleepy Hollow Cemetery in Tarrytown, New York, dates from the first half of the 20th century and contains large family crypts and mausoleums of wealthy industrialists. The image below is the Rockefeller family mausoleum, which reflects the wealth and power its residents. The Sleepy Hollow in Tarrytown is the final resting place of Washington Irving, the author of The Legend of Sleepy Hollow and the tale of the previously mentioned truncated equestrian. More on him in a minute.

The Rockefeller Crypt at Sleepy Hollow in Tarrytown cost $2 million to construct in 1920. That would be about $22.5 million in today’s dollar. That’s a lot of money to house the family after they are dead and gone, but when your name is Rockefeller, you can afford it. Shot in 2012, with varying cloud cover reflecting mixed streetlighting from Tarrytown and the Tappan Zee Bridge, the combination of which is responsible for the color in the sky. The monument was lit from left, right and low to the ground with a Surefire G2 incandescent flashlight for three of the four minutes during the exposure. Canon 5D Mark II and an adapted Nikon 28mm f/3.5 PC lens. 4 minutes, f/8, ISO 100, with a second, shorter exposure for the moon.

Lighting

Take advantage of multiple mixed lighting sources rather than trying to fight them. Burial Hill in Plymouth, Massachusetts, is a fantastic example of a graveyard that beckons photographers to explore the grounds and very old headstones. Many of the Mayflower Pilgrims and their descendants are buried here, and the varied terrain, the large, ornate stones, and especially the variety of light all make for great photo opportunities. There are no lights in the graveyard proper, but it is in the heart of downtown Plymouth and is surrounded by the lights of the small city of 60,000.

Burial Hill in Plymouth, Massachusetts, is one of my favorite cemeteries. This image, made on top of the hill, shows trees lit by the sodium vapor lights of town, but the top of the hill is relatively dark except for some moonlight. The headstones were backlit with a Coast HP7R LED flashlight, with a little “ghosting.” Image made in 2014. Canon 5D Mark II and an adapted Nikon 28mm f/3.5 PC lens. 4 minutes, f/5.6, ISO 100.

As is often the case with light painting, sidelighting and backlighting are particularly effective techniques to show the engraved text on gravestones. Mary Meriam and the cheerful winged skull that adorns her gravestone have resided six feet under in Concord since 1693, but despite the many years that have passed, both the ornaments and text on the remarkably well-preserved stone are easy to read, made more so by the strong sidelighting. The key to using this technique effectively is to balance the ratio of added to ambient light in such a way that it draws attention to the stone, but still gives enough exposure to the background to provide context.

This image was made in 2010 with an LED flashlight from camera right and slightly above, just out of frame. I held the light even with the edge of the stone to emphasize the deep and well-preserved engraving. I also swept the light across the ground behind the stone to help separate the middleground and background. Canon 5D Mark II and Canon 50mm f/1.4 lens. 2 minutes, f/5.6, ISO 100.

Models

Sometimes the best models are the dead ones. I’ve had the good fortune to both photograph and teach workshops at the Sleepy Hollow Cemetery in Tarrytown at the invitation of the cemetery director.

It was at the first of these workshops that Matt and I first met while coaxing the elusive Headless Horseman into posing for our students. Aside from the issues of ectoplasm not usually registering on sensors or film, the transient and transparent nature of ectoplasmic beings, and their generally unpleasant temperament, Matt and I have been able to document his regal countenance on multiple occasions. We eventually figured out that the promise of a fresh pumpkin (or a six-pack of Captain Lawrence IPA) was all it took to get him and his noble steed to stand still for a few minutes while we fiddled with lights and made a few exposures.

All kidding aside, adding models to your graveyard images is a great way to add some life to the scene. Costuming appropriate to the locale is important, and lighting the figure separately from the background is key. Flash is usually easier to control, and also works well for animate or semi-animate objects that tend to move during long exposures. Combining a long exposure for the overall scene with a burst of light from a strobe can be used to great effect. Backlighting is a great way to separate a dark figure from a dark background, just as silhouetting your model against an open sky may also be. Lighting from below is a way to make anyone look scary.

Hugh Francis is the official Headless Horseman of both Tarrytown and Sleepy Hollow, New York. He’s held that unusual position for many years. Outside of the Halloween season, he maintains a farm in upstate New York where he cares for retired New York City police horses, which he recruits to accompany him when he goes out to search for his head. These images were made between 2011 and 2014.

Lighting by Matt with a Profoto AcuteB with a Magnum Reflector and grid on a stand with a small softbox directly behind the horse, and I used a Surefire G2 incandescent flashlight for fill from camera right. Canon 5D Mark II and an adapted Olympus Zuiko Shift 35mm f/2.8 lens. 30 seconds, f/5.6, ISO 1600.

Lighting by Matt with a Profoto AcuteB bare-bulb directly below the horse and rider, and I used a snooted Surefire G2 incandescent flashlight for the cross edge lighting from camera right. Canon 5D Mark II and an adapted Nikon 20mm f/3.5 lens. 30 seconds, f/5.6, ISO 1600.

Lighting by Matt with a Profoto AcuteB on a stand with a small softbox directly behind the horse, and I used a Surefire G2 incandescent flashlight for fill from camera left. Canon 5D Mark II and an adapted Nikon 20mm f/3.5 lens. 4 seconds, f/5.6, ISO 1600.

Access

There are a few logistical considerations that should be addressed.

Many cemeteries are officially closed at night, and some have fences to keep photographers and teenagers out, and the spooks in. It’s usually the larger historic cemeteries that are restricted. Sleepy Hollow in New York is one such place, while the smaller but equally compelling Sleepy Hollow in Massachusetts is wide open 24/7.

Do your homework and make a few calls if you want to go through the gate rather than climb over the fence and take a chance on getting kicked out, arrested or buried alive. It may be possible to gain access with the promise of sharing your images, or by simply showing some examples of what you would like to do.

Remember, asking to take pictures in a graveyard at night might seem a little out of the ordinary, so having a way to show that you’re not a weirdo can be helpful.

Safety

Perhaps the most likely thing to go bump in the night when photographing is graveyards is your head or camera hitting a gravestone after tripping over other stones or the precariously low fences sometimes placed around family burial plots. Take a partner with you, or go alone if you dare—but just for peace of mind, this kind of activity is better with a friend.

Have a Grave Time!

Opportunities abound for photographing in cemeteries at night, and it’s good fun too. Just be sure to get permission, as they tend to be busier this time of year with ghost hunters, teenagers and disgruntled spirits, and the police make frequent patrols in many places. Take a friend or two to keep you company and to help with the lighting.

We’d love to see whatever you come up with, so please post in the Comments section, to our Facebook page, or to Instagram and tag us (@nationalparksatnight).

Be careful out there, and Happy Halloween!

Hugh trying to figure out where to pour his beer after a hard night’s work, 2016. Coast HP5R flashlight from camera left. Hugh’s dark cape is severely underexposed, but that seems to be the least of his worries. This was a quick grab shot at the end of a long night and we were all having a good laugh at his expense. Hugh is a true gentleman, and a very good sport. Nikon D750, Nikon 24-120mm f/4 lens at 27mm. 8 seconds, f/4.5 at ISO 800.

Lance Keimig is a partner and workshop leader with National Parks at Night. He has been photographing at night for 30 years, and is the author of Night Photography and Light Painting: Finding Your Way in the Dark (Focal Press, 2015). Learn more about his images and workshops at www.thenightskye.com.

UPCOMING WORKSHOPS FROM NATIONAL PARKS AT NIGHT

(No, We’re Not Crazy) Why You Should Use a Circular Polarizer at Night

I had another “What if?” moment, dear readers.

It was this: What if I use a circular polarizer at night?

My mind boggled. It balked. It basically said, “There are tons of reasons you should not even consider doing that.”

Such as:

  • You’ll lose up to 1.5 stops of light! My precious light …

  • It’s going to be hard to see the effect through the lens.

  • A polarizer is another thing to carry and/or take care of. (Have you seen my backpack? I call it the “kitchen sink.”)

  • Your sensor will capture fewer stars—perhaps?

  • You may be disappointed.

So What?

Despite all those naysaying, braying voices in my head, I set about scraping out some moments during our Rocky Mountain National Park workshop to run some experiments.

Why? Well, I know polarizers have these positive traits:

  • minimized reflections, making water easier to see through

  • more vibrant colors and deeper saturation

  • reduced highlights, which puts more of the exposure inside the dynamic range of my camera

  • eliminating or reducing off-axis light

That last one was really exciting to me, as we would have lots of moon at Rocky Mountain, as well as at our workshop immediately afterward at Chaco Culture National Historical Park.

Maybe, just maybe, I could make a polarizer do something useful—or even something amazing.

Note: Since my polarizer was a screw-in 95mm, I did not go through the hassle of removing it during tests. I simply set it to minimum effect for the “before” images and maximum effect for the “after” images.

Testing My Hypothesis on Star Trails

So I set out to test my hunch that it would work. After all, it’s just science, right?

On our final day of the workshop, we embarked on an add-on adventure with five attendees, during which we hiked with our gear almost 2 miles (one way) with 650 feet of elevation gain at over 8,000 feet of altitude. It was challenging, but we did it.

Our first shoot location, Emerald Lake, had a moon shadow slipping around to the right. The moon was at my left shoulder—ideal conditions to make a polarizer work.

Tip: Polarizers work best when used perpendicular to the light source (90 degrees). So keep the moon (or sun, if you are so inclined), on your right or left shoulder.

I set the polarizer to minimum effect:

Nikon D850, Zeiss 15mm Distagon f/2.8. 30 sec, f/2.8, ISO 6400.

Exactly what I’d expected. Not a lot of stars. So I turned off my camera, peeped through the viewfinder, turned the polarizer and found the area of deepest effect:

Nikon D850, Zeiss 15mm Distagon f/2.8. 30 seconds, f/2.8, ISO 6400.

I was so excited (and it was so cold) that I settled into a sequence of eight 7.5-minute exposures, totaling one hour:

Nikon D850, Zeiss 15mm Distagon f/2.8. Eight frames at 7.5 minutes, f/2.8, ISO 6400.

Booyah. Many stars, despite shooting with broad moonlight. It worked!

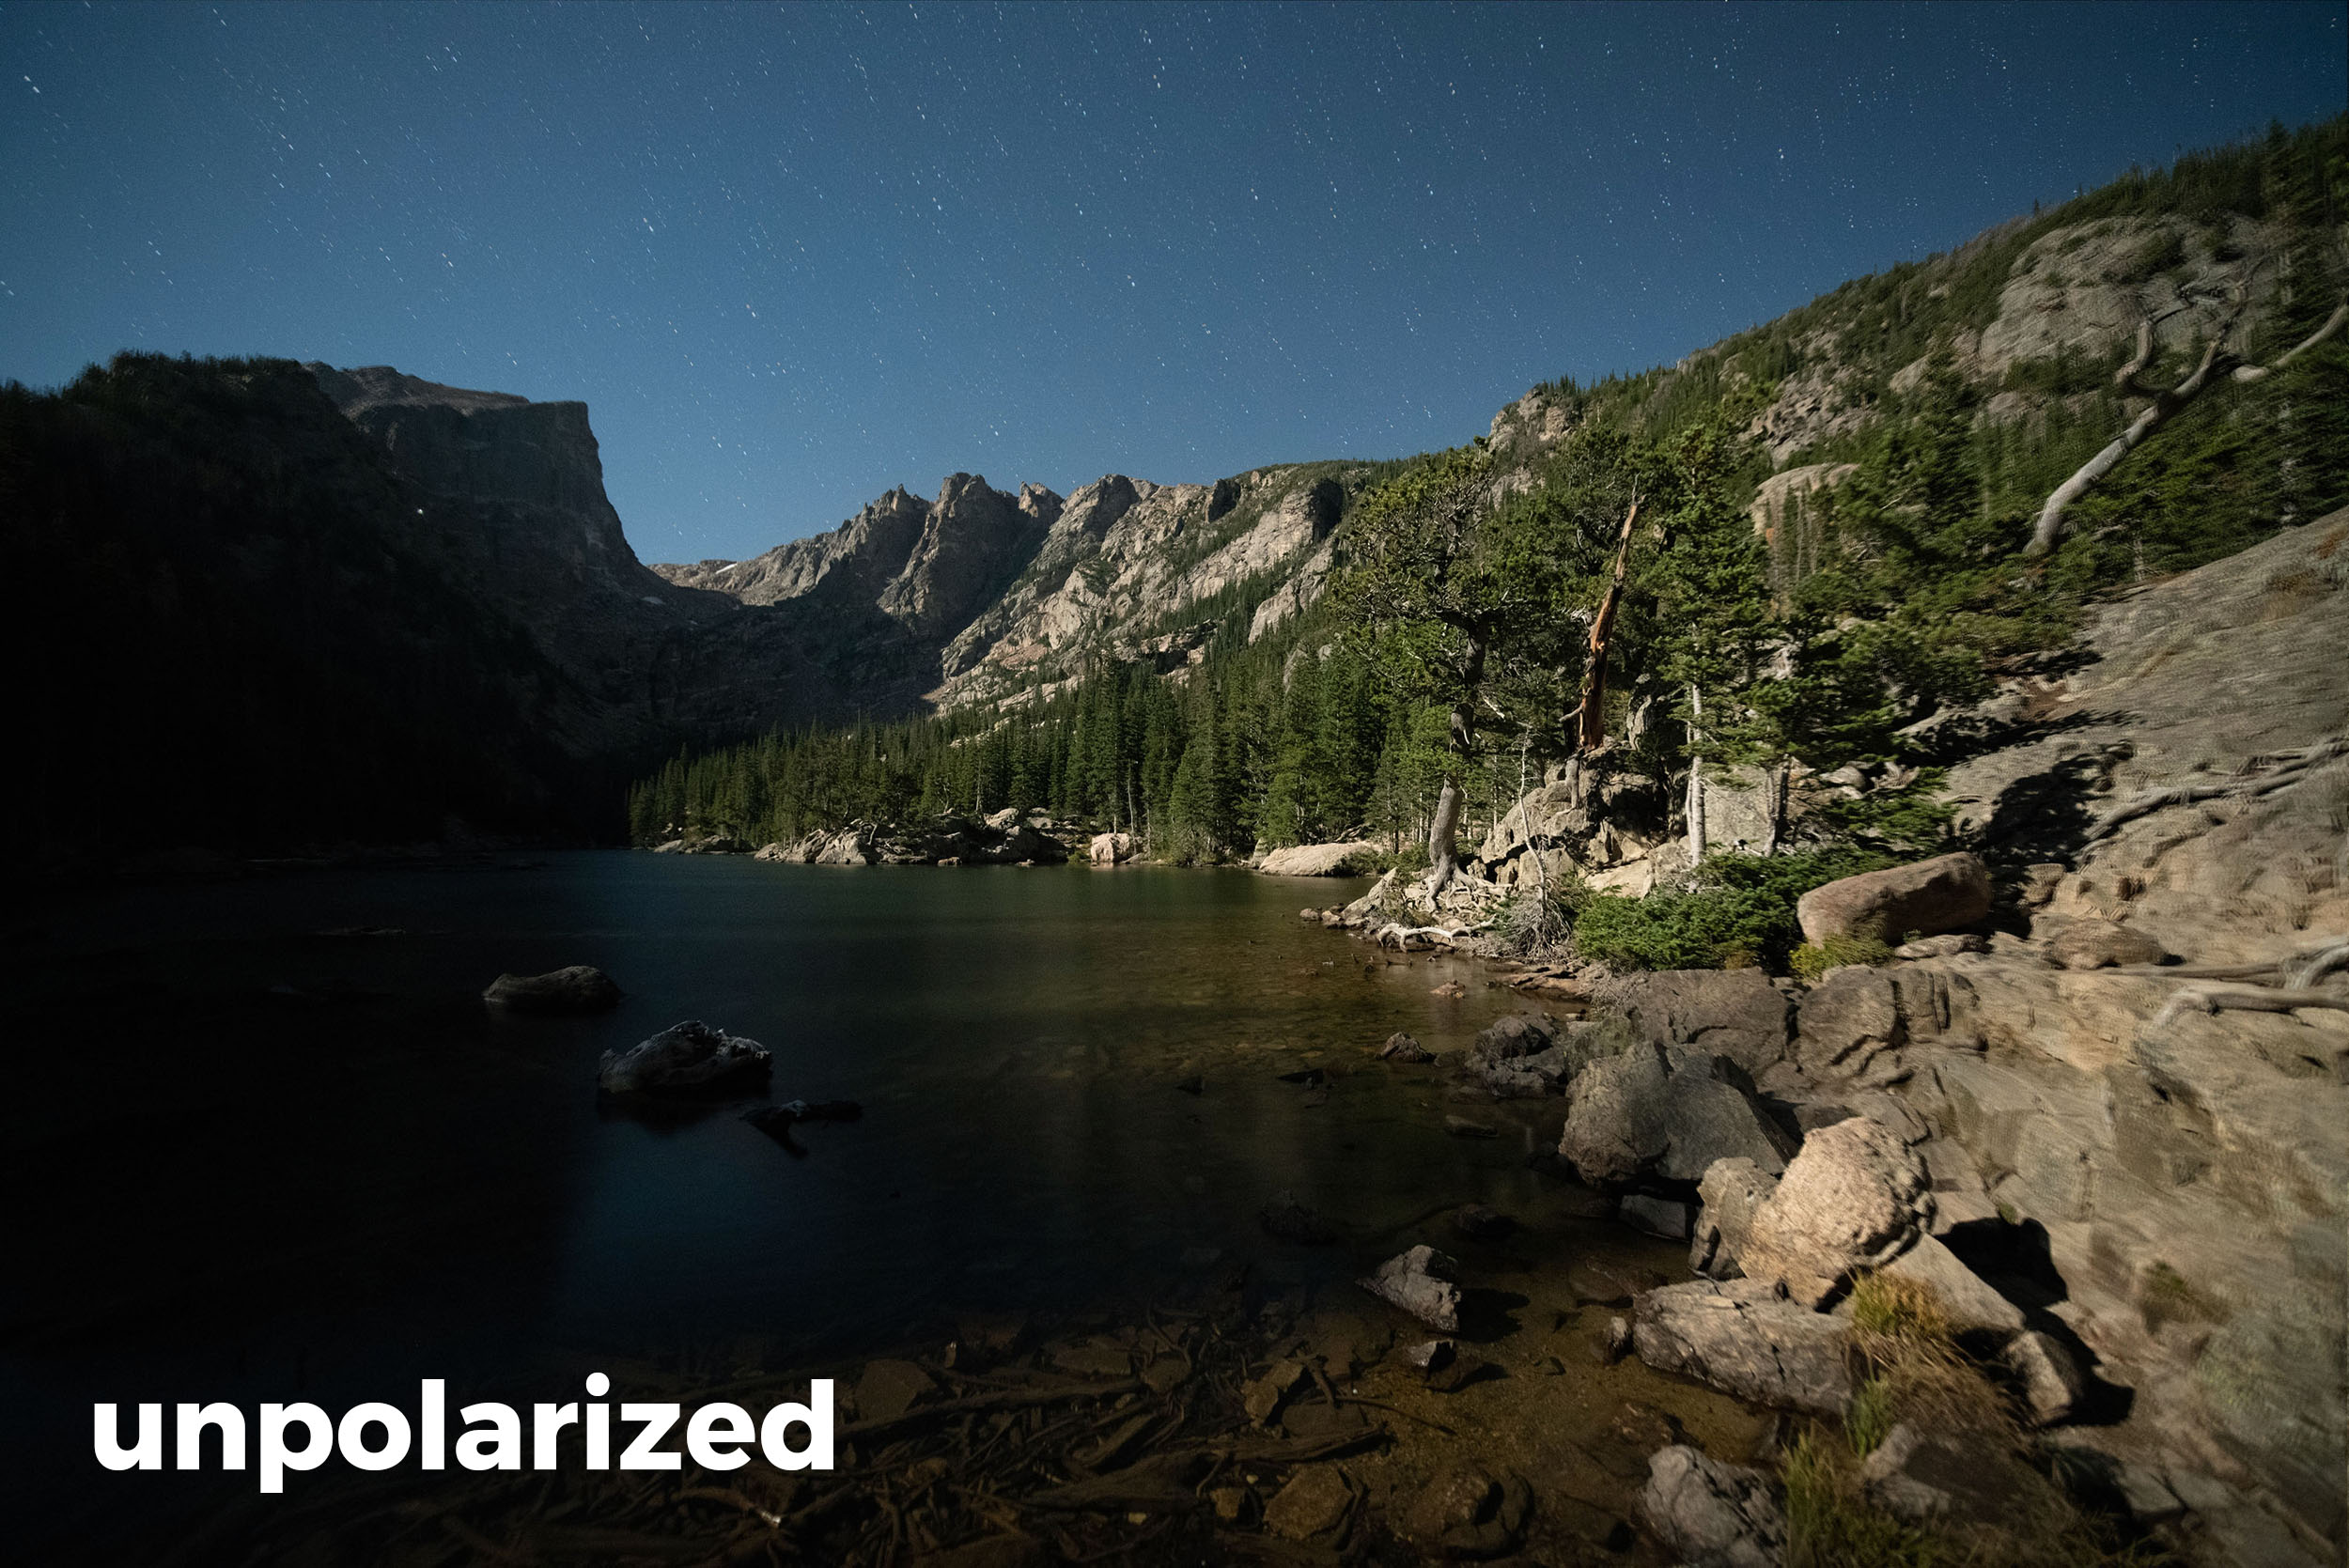
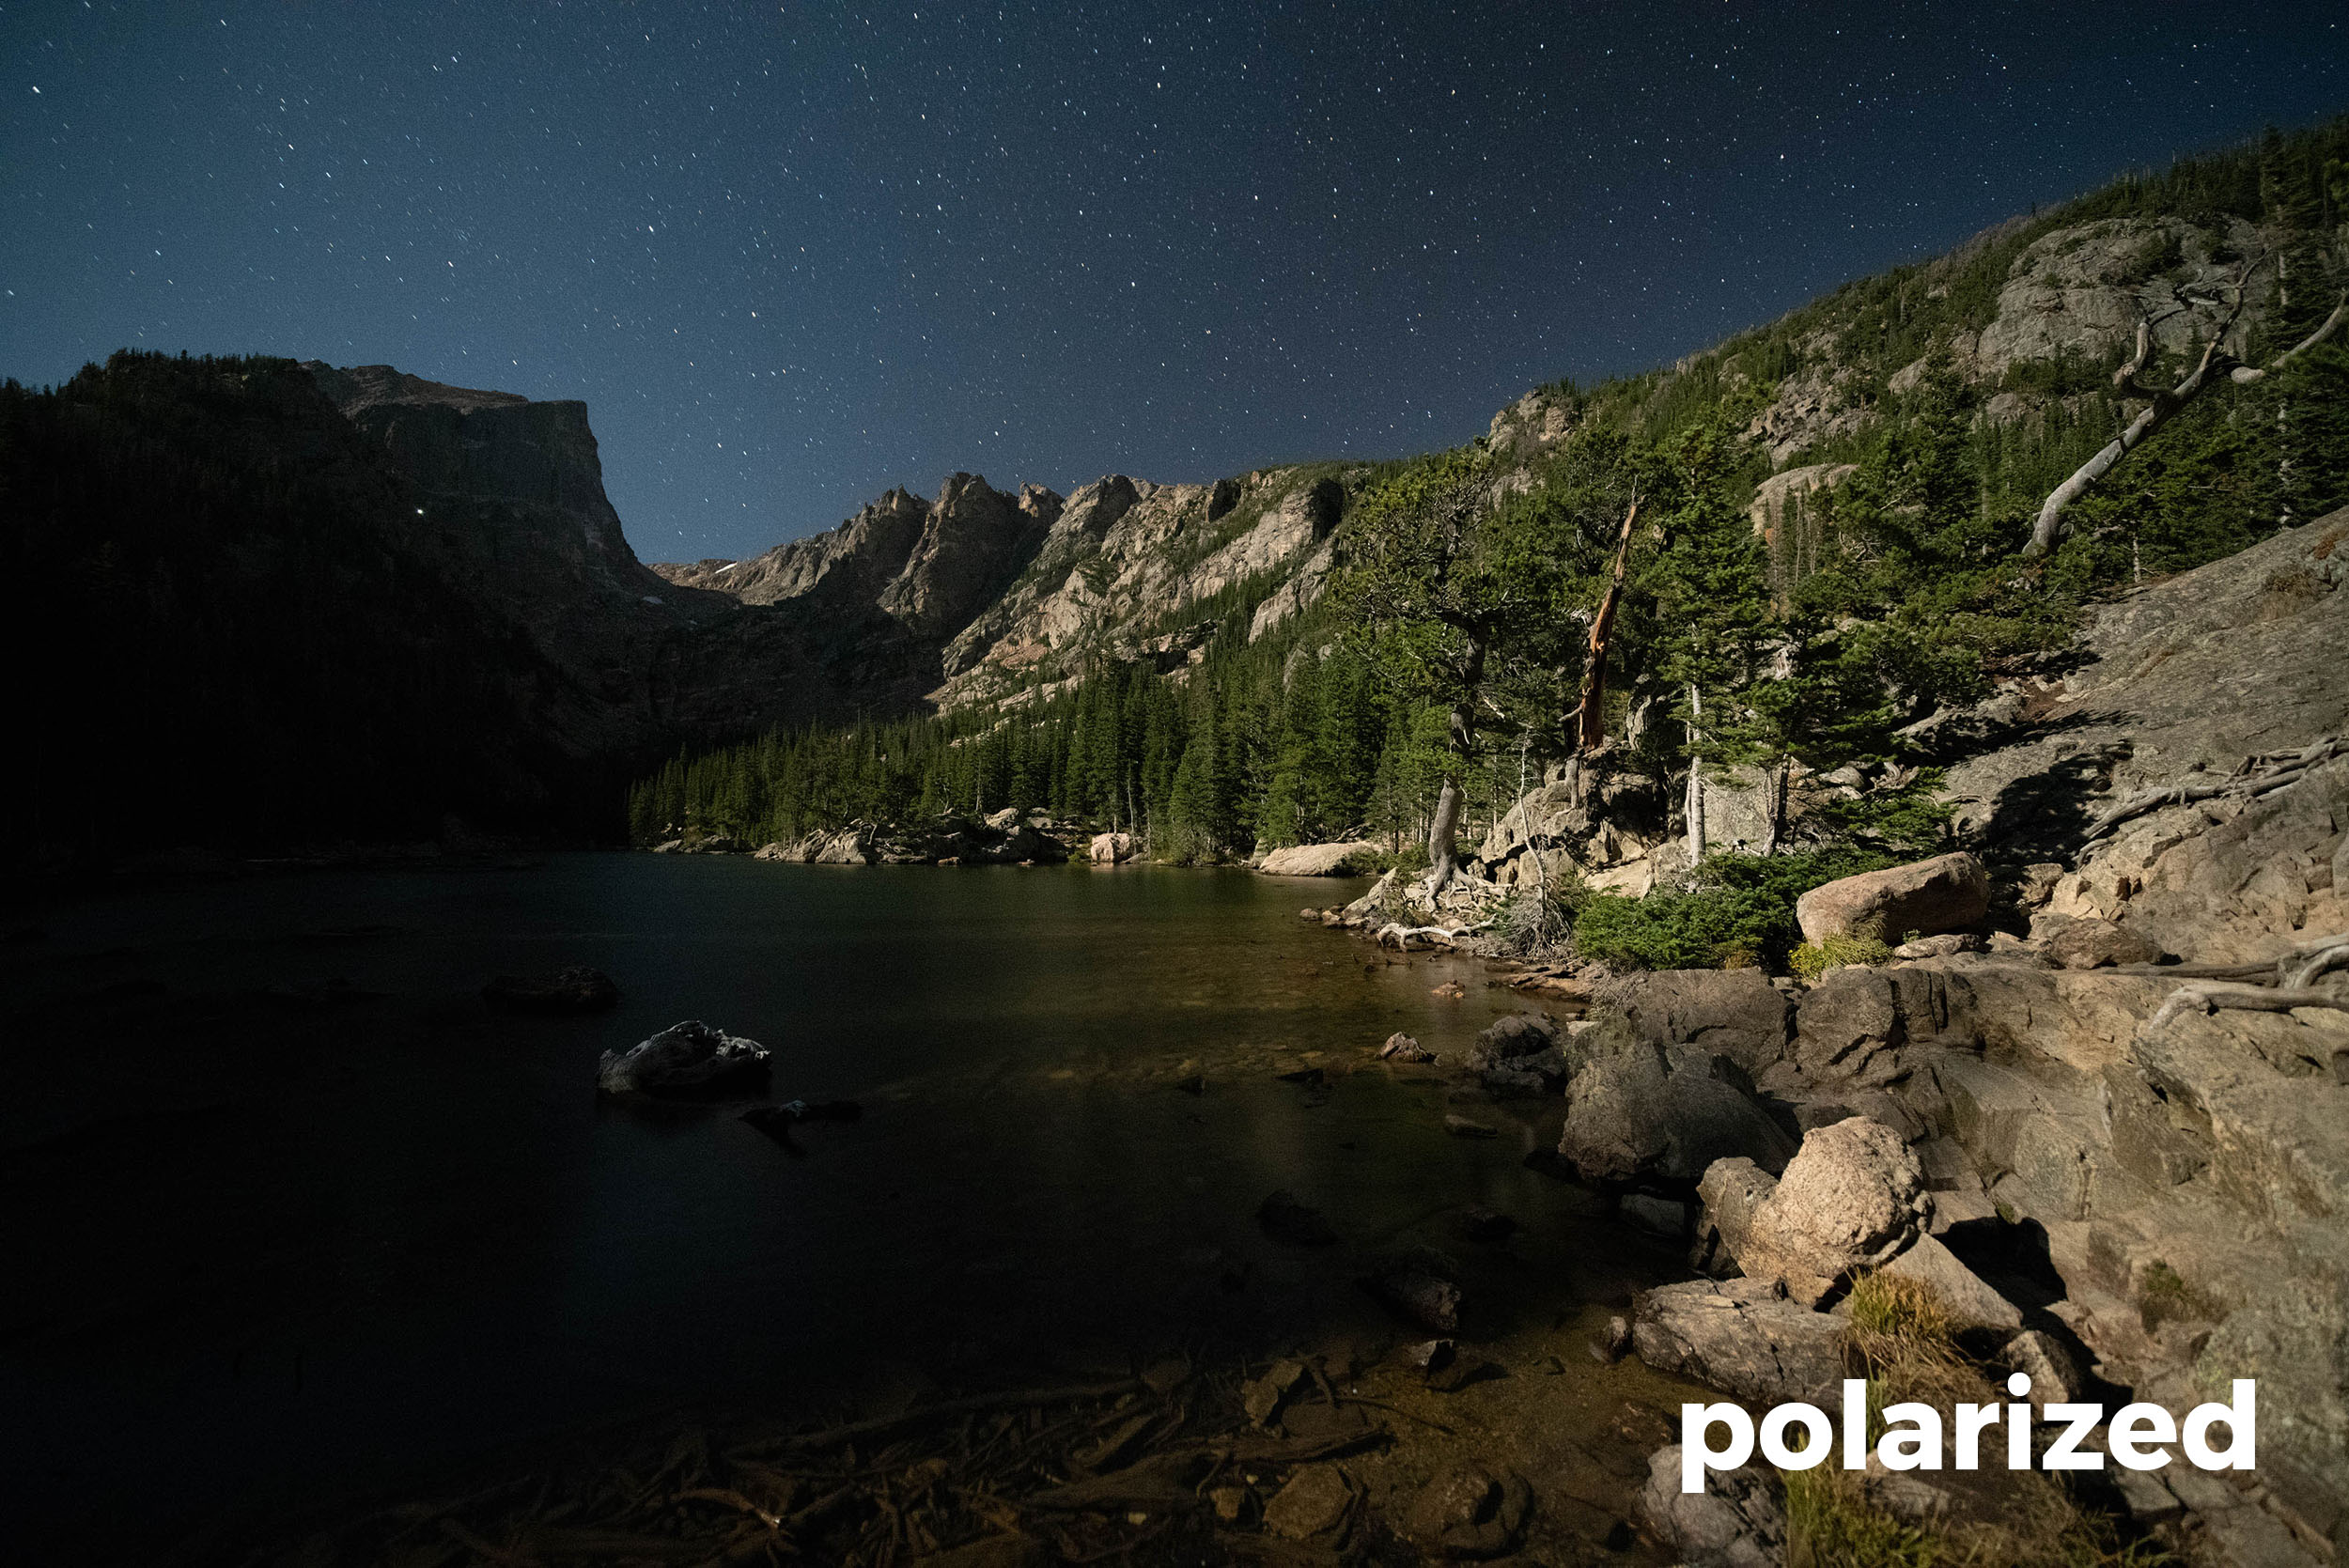
As we started hiking back down, we stopped at Dream Lake. I wandered to the south end of the lake with a student and set up another test, this time with stiller water. (There had been crazy wind up at Emerald Lake.) I ran two high ISO tests at 15 seconds, f/2.8, ISO 6400:

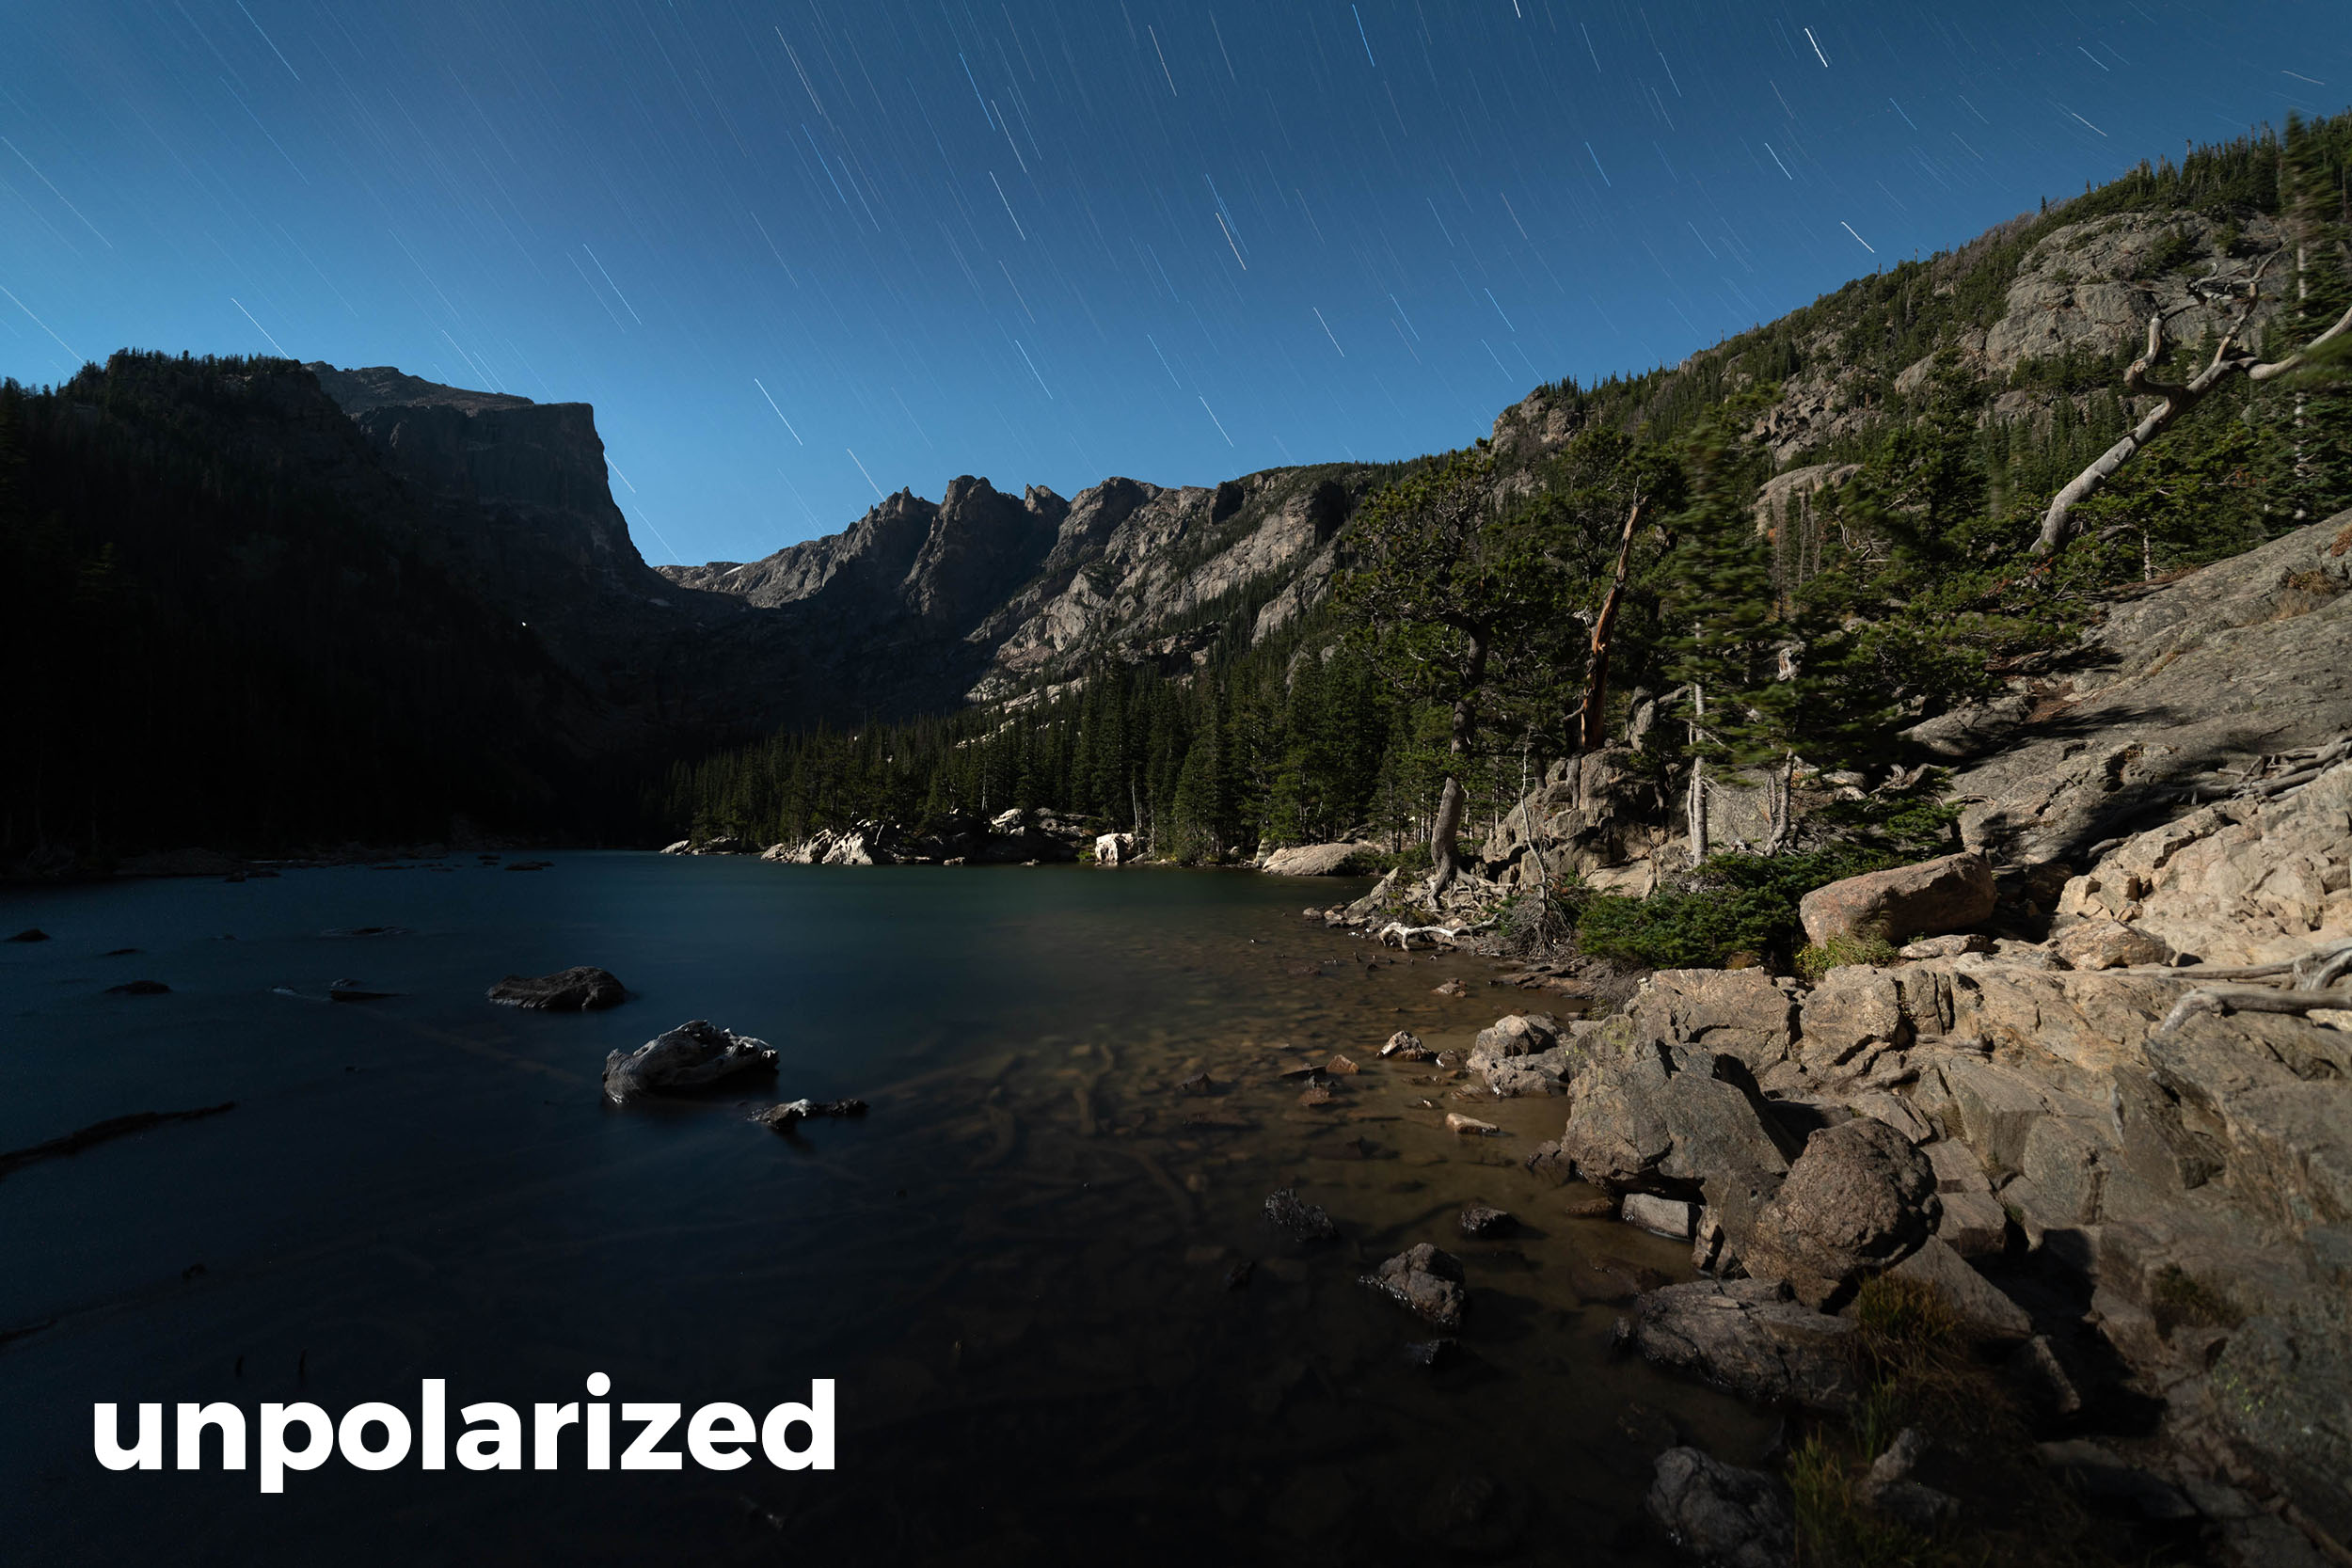
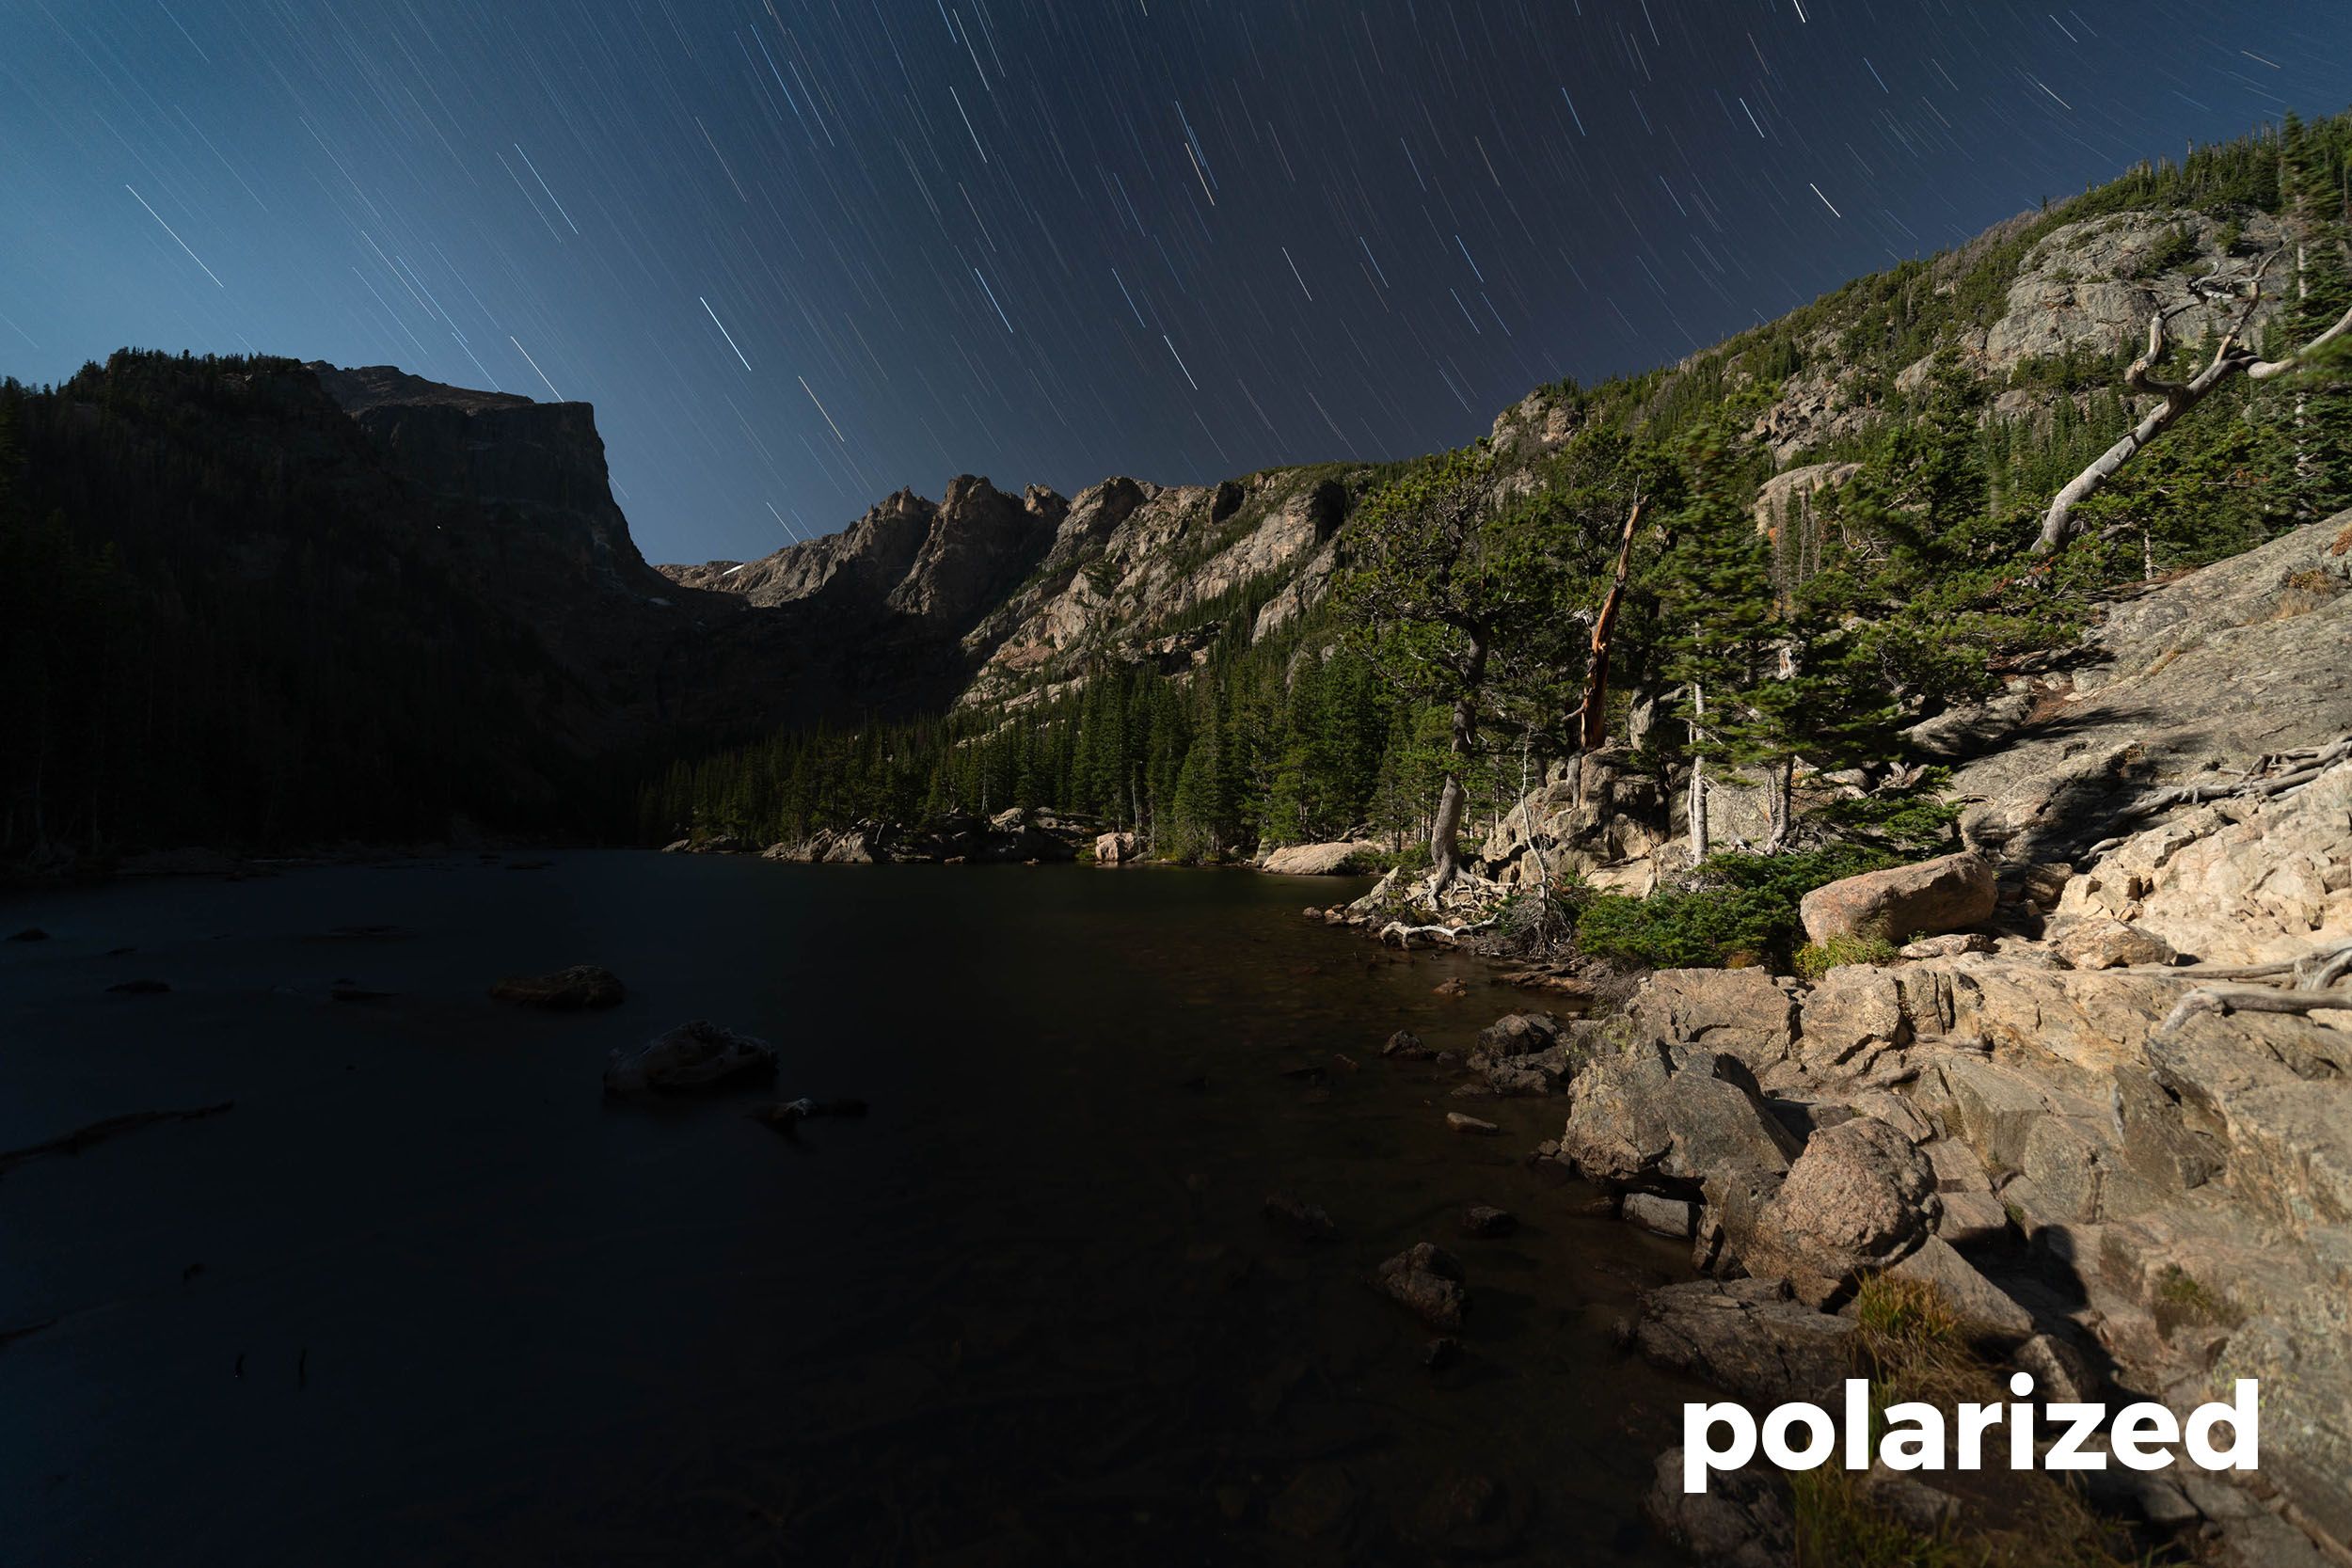
I loved what was happening so much that I wanted to grab two 15-minute exposures to compare:

(I wish I’d done the “without” photo first, because the moon came out more during that exposure.)

So, then I had another “What if?” moment during editing. What if I used the water from the zero-polarizer shot and masked it in to the yes-polarizer shot?

Nikon D850, Zeiss 15mm Distagon f/2.8. 15 minutes, f/2.8, ISO 100. Maximum polarization (in the sky portion).

Again, a wonderful solution for pulling out more stars and deeper, darker skies. Plus, if you shoot both, you can choose the best of each and blend them together. That’s powerful stuff.

And then the Rocky Mountain workshop was over. … But I had another workshop (with Lance) in two days, so Chris and I hustled down to Chaco Culture. And during the second-to-last night, I had a couple of moments here and there to test again.

Facing north, I wanted to test how many stars I could capture at f/13 for a star trail rip.

Test shot No. 1. Nikon D750, Zeiss 15mm Distagon f/2.8. 25 seconds, f/11, ISO 3200. Maximum polarization.

Test Shot No. 2, with a different polarizer orientation: Nikon D750, Zeiss 15mm Distagon f/2.8. 25 seconds, f/11, ISO 3200. Three-quarter polarization.

I felt it had better skies. I wanted a touch darker, so I dropped to f/13 and I committed to a one-hour shot with Long Exposure Noise Reduction turned on.

I admit, I had to do some post work to pull out the stars on the skies, but they’re there!

Nikon D750, Zeiss 15mm Distagon f/2.8. 1 hour, f/13, ISO 50. Three-quarter polarization.

I think next time I’ll shoot such a photo at f/8 to see a touch more stars. But it’s not the normal, cluttered sky we get without polarization and a much wider aperture. And the sky in the background is darker—much darker—which is something we don’t generally see when shooting in moonlight.

But what about the Milky Way?

Well, what about the Milky Way? It’s a silly question, right? You can’t shoot the Milky Way on a moonlit night.

Or … ?

This last test, if successful, would be the coup de grace, on my circular polarizer experiments. Can I extract a Milky Way from moonlit skies? It was an idea raised by Jason, a Rocky Mountain attendee who was on that hike with us the week before. And now I could try it out.

Now in New Mexico, we were shooting at Pueblo Bonito, the park’s showpiece ancient structure, which features over 600 rooms plus multiple kivas of fascinatingly intricate architecture.

There was a 25-minute window of darkness between the end of twilight and moonrise. We hustled to nail the Milky Way during that window, but I suspected I had an advantage with a circular polarizer and hoped I could make it appear even after moonrise.

As soon as the moon rose, people started repositioning to re-frame to make the Milky Way less important. They couldn’t see it. But … maybe I could?

First shot, with minimum polarization:

Nikon D750, Zeiss 15mm Distagon f/2.8. 25 seconds, f/2.8, ISO 6400. Minimum polarization.

And then...

Nikon D750, Zeiss 15mm Distagon f/2.8. 25 seconds, f/2.8, ISO 6400. Maximum polarization.

Double booya. Ignoring the fact that someone did light painting in the foreground for this shot, check out that Milky Way! This is not a composite. It’s one frame, with some Lightroom adjustments.

You may notice that the area of sky around the Milky Way is darkest. That’s not from a local adjustment in post, but rather that’s where the circular polarizer’s effect happens. I strategically placed the effect right along the axis of the Milky Way. The polarization occurs only in that area (rather than the whole sky) because I am using a superwide lens and the effect covers a limited angle.

Anyway, back to the exciting part. I was able to shoot a clear Milky Way sky with a full moon lighting the landscape. My whoops of pleasure resonated from the canyon walls. I let out massive yawps of glee.

Folks, a revolution has arrived. You can put one more big gun in your bag to make your night skies sing. You can use a polarizer to photograph the Milky Way in moonlight.

When Does a Circular Polarizer Not work?

One caveat: When using ultrawide-angle lenses (like my Zeiss 15mm Distagon), you will discover that the area affected by polarization can be narrower than you want.

Check this out—I adjusted the polarizer all around to find a sweet spot, but didn’t find one: (

I also experienced some flare when the moon was at the edge of my ultrawide lens in the above.

So to avoid these two things that I found disadvantageous, I switched lenses to my 35mm, went vertical with a lens hood, and made a pano stitch (without a polarizer), and am very happy.

Note: Polarizing with pano stitches is rarely successful.

Nikon D850, Sigma 35mm f/1.4 Art. Ten frames at 10 seconds, f/5, ISO 6400. No polarizing filter.

So watch your images to be sure the effect is one you want to commit to, but give it a shot.

Wrapping Up

A circular polarizer is definitely worth putting in your toolkit for night photography. ’Nuff said.

And I can’t wait to see what you do with this! Please test for yourself and post your results in the Comments section here or on our Facebook page. We’d love to see what amazing things you make.

Gear

For you gear geeks: I used the Benro Master Slim Circular Polarizing screw-in filter on my Zeiss 15mm Distagon.

In case your superwide lens doesn’t accept a screw-in, know that many manufacturers, Benro Filters included, now make 100mm and 150mm square filter holders that allow for a circular polarizer to be mounted, as well as neutral density and graduated neutral density filters. It’s an amazing photography world we live in these days.

Matt Hill is a partner and workshop leader with National Parks at Night. See more about his photography, art, workshops and writing at MattHillArt.com. Follow Matt on Twitter Instagram Facebook.

UPCOMING WORKSHOPS FROM NATIONAL PARKS AT NIGHT

Our First Night Photography Summit and More — We’re On the Road Again!

One of our favorite parts of what we do is getting out into the imaging community to talk about what we love: night photography and national parks. Either as a group or individually, we routinely speak at conferences, trade shows, national park celebrations, camera clubs and so on. We do this all year, but we always seem to be especially busy in the fall.

And so it goes again in 2018.

Over the next several weeks we will be presenting and leading night walks at some of the biggest and most exciting photography events in the U.S., from north to south and coast to coast. Plus … in conjunction with a couple of great partners, we will be hosting our very first night photography summit, a three-day celebration and discussion of all things night photography!

Read on for more information about where, when and how to join us on the road for some amazing night photography educational experiences.

New York Night Photography Summit

Babylon, New York
November 2-4

We’re going to break from chronological order for a moment to start with this one, because we’re too excited to delay announcing it any longer: We will be hosting our very first conference, the New York Night Photography Summit, just three weeks from now.

Moreover, we will be partnering on this event with two incredible ambassadors of the photography world:

  • PhotoPills, the app that serves as the personal assistant and scouting solution for photographers around the world. The creator and bard of PhotoPills, Rafael Pons, will be joining us to teach about scouting and about how to use their powerful app, as well as helping us teach during mini-workshops in the field.

  • Photographic Federation of Long Island (PFLI), the huge umbrella of camera clubs from two counties of New York and the five boroughs of New York City. PFLI knows the island better than anyone, and they’ve secured a venue for the presentations and vendors, as well as permits for our mini-workshops on Friday and Saturday nights at Fire Island National Seashore and the Fire Island Lighthouse.

The summit will take place over the long weekend of November 2-4, from 10 a.m. to 3 p.m. each day. There will be lectures and tutorials on night photography, plus access to vendors, book signings with authors, and more. On hand will be National Parks at Night instructors Gabriel Biderman, Lance Keimig, Matt Hill and myself. Presentation topics covered will include:

  • ideal gear for night photography  

  • how to photograph lighthouses at night

  • planning Milky Way images with PhotoPills

  • tips and tricks for post-processing 

  • leveling up your creative night photography experience

  • light painting

  • Milky Ways and starry skies

Then, on Friday and Saturday night we’ll be leading night mini-workshops at the beautiful Fire Island locations. Rafael and four of the National Parks at Night instructors will be on hand to help with:

  • photographing the Milky Way in November

  • photographing star trails & star points

  • light painting the rolling sand dunes and sweeping shoreline

BenQ, maker of the best photography-specific computer displays you can buy, has eagerly signed on as a sponsor for the event, and will be bringing some of their best monitors for attendees to check out. B&H Photo, the world’s premier photo retailer, is also sponsoring, as is our favorite photo printer, Bay Photo Lab.

To learn more about the New York Night Photography Summit, and to register for the event, visit npan.co/NYSummit.

OK, now onward with chronological order. …

Out of Moab Landscape Photography Conference

Moab, Utah
October 5-9

This one just ended—Out of Moab is the second national park-based landscape photography by the Out of Chicago group, and this time was in the amazing sunrise, sunset and night landscapes of Arches National Park, Canyonlands National Park and Dead Horse Point State Park. I was at the conference delivering a talk titled “6 Steps to Better Night Photography,” as well as leading night excursions to Landscape Arch, Windows Arch Loop, and Sand Dune and Broken Arch.

The conference sold out very shortly after it was announced, so if you’re interested in what this great organization is offering in the future (hint: Northwest coast), be sure to get on their mailing list. See OutOfChicago.com for more information.

Biscayne & Redwood National Parks

Homestead, Florida, and Hiouchi, California
October 19-20

This year Biscayne and Redwood national parks are celebrating their 50th anniversaries, and we’ll be there celebrating with them!

We ran workshops in both parks this year, and photographs from all the workshop students (as well as instructors) will be part of a pair of print exhibits held simultaneously in visitor centers at each park. The opening receptions will occur the weekend of October 19, and will include presentations, night photo walks and mini-workshops by Gabe, Tim, Lance and myself. The public is welcome.

The exhibits and the associated events are being sponsored by Bay Photo Lab. In addition to making the event possible, Bay will be providing all the prints for both locations, using their patented Xposer print format that comes with custom hanging hardware.

Moreover, many of the workshop attendees’ and instructors’ prints by Bay are available for purchase from our online gallery. All profits will be donated to the two parks.

For more information, see our previous announcement of this event.

PhotoPlus International Conference + Expo

New York City
October 25-27

We’re back at one of the largest photography conferences and trade shows, once again talking about the ways and arts of nocturnal imaging. This year we’ll be presenting “The Night Photography Toolbox: Gear and Skills to Level Up Your Nocturnal Images,” sponsored by Nikon. Here’s the official summary:

“Advancements in technology have made Milky Way and dark-sky photography more accessible, from cameras and lenses to software, GPS receivers, LED panels and much more. The members of National Parks at Night will share which gear helps them successfully scout, capture and create in a variety of night environments. They will also discuss productive processing, nocturnal photography techniques and other skills in their toolbox that will inspire you to ‘seize the night!’ ”

In a rare event, all five National Parks at Night instructors—Gabe, Lance, Matt, Tim and I—will be on stage presenting together.

For more information, visit the PhotoPlus website via this link, where you can register for the expo for free and get 15 percent off the price of a conference pass.

B&H Event Space

New York City
October 29-30

Immediately after PhotoPlus, a few of us will be spending a couple of days at the B&H Event Space delivering talks to the in-person audience and via livestream.

Lance and I will be discussing “Our Journeys into the Night: How We Found Ourselves in the Dark,” and Tim will present “Processing Your Night Photography: Lightroom through Photoshop.” Our good friends at BenQ, maker of the best photography-specific computer displays in the world, are sponsoring both talks.

Nature Visions Expo

Manassas, Virginia
November 2-4

Based in northern Virginia in the shade of the nation’s capital, Nature Visions features three days of seminars, lectures and workshops. Three of those will be led by Tim:

  1. “Realistic HDR”

  2. “Nightscapes: After the Magic Hour”

  3. “Power of Photoshop for the Outdoor Photographer”

For more information, visit the Nature Visions website.

Sierra Club

New York City
November 15

Our friends at the New York City Sierra Club Photography group have invited us to return, this time with Matt leading a one-night workshop, “Central Park at Night.”

The public is welcome; tickets are $30. For more information, visit the club’s website.

Sloss Furnaces National Historic Landmark

Birmingham, Alabama
November 18

20170413_Birmingham_098-6.jpg

Our final workshop of 2018 will conclude with Gabe and I presenting the student slideshow at the park’s visitor center, giving the public a chance to view the unique night work that we’ll do in this unique setting.

For more information, stayed tuned to our social media accounts and to the park webpage.

B&H Event Space

New York City
January 17, 2019

Let’s put this in the category of “sneak peak,” because while the event is confirmed, it’s yet to be officially listed. So, you heard it here first!

We will start the new year back the Event Space, as I join photographer and expert backpacker Sherry Pincus for “Backroads and Backpacks: Photography Off the Beaten Path.” (You may recognize Sherry as being the backpacking instructor for our first backcountry workshop at Shi Shi Beach in 2019.)

180219.043_Chris Nicholson.jpg

Sherry and I will talk about how to find the unique photos in popular national parks by driving the primitive roads and/or hiking into the wilderness, far away from the overlooks, the information signs and the tourists. Not only the how-to, but also the how-to-stay-safe.

Stay tuned to our social media and to the B&H Event Space calendar for the pending announcement. (The event will be free to attend live or via livestream.)

Conferences, Camera Clubs, et al.

Throughout the year all five National Parks at Night instructors lecture, present, and lead photo walks and workshops all around the country—at conferences, trade shows, camera stores, museums, galleries, photography clubs and more. In 2018 we’ve had the joy of participating at:

  • OPTIC Imaging Conference (sponsored by B&H Photo)

  • B&H Event Space (sponsored by BenQ)

  • CreativeLive

  • Photographic Federation of Long Island Spring Spectacular (sponsored by B&H Photo)

  • Rocky Mountain School of Photography

  • Maine Media Workshops + College

  • Biscayne National Park’s Dante Fascell Visitor Center

  • Connecticut Valley Camera Club

  • Greater Lynn (Massachusetts) Photographic Association

  • Long Island Camera Club

  • Englewood (Florida) Camera Club

  • New Haven Camera Club

  • and more

Interested in having us join your party next year? We’ll happily add you to the schedule!

If you belong to a club or conference that might like to hear about night photography and/or national parks, etc., feel free to contact us. There are numerous topics we’re prepared to talk about. We’re also eager to speak and/or lead photo walks for podcasts, trade shows, outdoors groups, night sky festivals, arts councils, museums, educational institutions and … well, probably for anyone interested in participating in engaging discussion about the topics we are crazy-passionate about.

To keep updated about where and when we’ll be presenting at any given time, reference our Speaking Engagements webpage, or sign up for our event notification emails.

We look forward to meeting you all out in the photography community at some point soon. Until then, seize the night!

Chris Nicholson is a partner and workshop leader with National Parks at Night, and author of Photographing National Parks (Sidelight Books, 2015). Learn more about national parks as photography destinations, subscribe to Chris' free e-newsletter, and more at www.PhotographingNationalParks.com.

Celebrating the National Trails System Birthday with a Walk to an Arch

I love doing the photography, but sometimes—often, in fact—the experience is more important.

Such was true last night, when I hiked the Corona Arch Trail near Moab, Utah. The trail runs 1.5 miles one-way through BLM land to a pair of arches, one rather old and one rather youngish (by geological standards). The trail crosses railroad tracks and weaves through wildlife fences, and in two parts you need to hold a cable lest you fall, and in one part you need to climb a ladder lest you need to turn back. Along the way you see cacti and slickrock and washes and cliffs and boulders and a valley of high-desert landscape so beautiful that you’ll certainly stop walking for a moment just so you can stand and gaze and wonder how we’re so lucky to live on a planet so pretty.

I hiked this trail not because I had to. No assignment beckoned me, no promise obliged me. I wanted only to celebrate the 50th birthday of the National Trails System—which, you may know, is today. And what better way to celebrate, I figured, than to hike one of the newest national trails? Corona Arch Trail was named as such this past May.

Union Pacific Railroad Potash Rail, along the Corona Arch Trail, Moab, Utah. Nikon D3s, 24-70mm f/2.8. 498 seconds, f/4, ISO 800.

Milky Way and boulder, along the Corona Arch Trail, Moab, Utah. Nikon D3s, Irix 15mm f/2.4. 25 seconds, f/2.5, ISO 8000.

I set out on the trail as the sun set on the horizon. I always talk about scouting a location before photographing it at night, and that goes quadruple when you’re also hiking it at night.

Alas, I didn’t scout. I’d traveled to Moab only yesterday morning—to explore, to research, to photograph and to start getting ready to speak at the Out of Moab photography conference. I wasn’t here to hike a national trail, but the idea somehow got in the rental car with me, and it wouldn’t leave me alone for the 3.5-hour ride from the airport, so I relented and decided I’d walk into the unknown (albeit a short unknown) for my first night of shooting. On 4 hours of sleep. With jet lag.

First, I found a campsite near the trailhead, along the banks of the Colorado River, and pitched my tent. That’s not the sort of task I wanted delaying my walk till dark, but it’s also not the sort of task I wanted waiting for me at midnight after a hike. I preferred the ability to march off the trail late, collapse into my sleeping bag and quickly drift to sleep to the sounds of the rippling river and the whisper of wind through the willows and cottonwoods hovering over my tent.

The sun rolled down, and darkness rolled in—quickly. A new moon replaced that big ol’ sun, and some high clouds blocked some sky. And I was on a trail I didn’t know. It’s not the kind of trail that tunnels through a forest in an easy-to-see sort of way. Rather, it’s the kind that meanders over slabs of rock and over hills that don’t have much shrubbery to delineate where the side of a path ends and where the edge of wilderness begins. In other words, it’s the kind that can be hard to stay on without daylight.

Before heading off on a trail I’m unfamiliar with (in the dark, no less), I took cell-phone pictures of the map and directions posted at the trailhead. It was useful info when I didn’t know where to turn.

I’ve been on hikes before. In Olympic, in Acadia, in Big Bend, in Rocky Mountain, in Bryce Canyon, in Lassen Volcanic, in Death Valley. With experience comes intuition. You often know which way the trail goes, even if you don’t know the trail. Last night, I was thinking that exact thought when I realized I hadn’t seen a cairn in a while. I was off trail. And I didn’t know how to get back on. So much for my intuition.

I backtracked, then tried another possible route. I backtracked again, then tried yet another. I stood on a rock ledge, now needing a flashlight to see anything at all, wondering if, halfway to my goal, I’d need to abandon my night’s mission. Then I saw it—a cairn in the valley! Succeeded by several more! Onward!

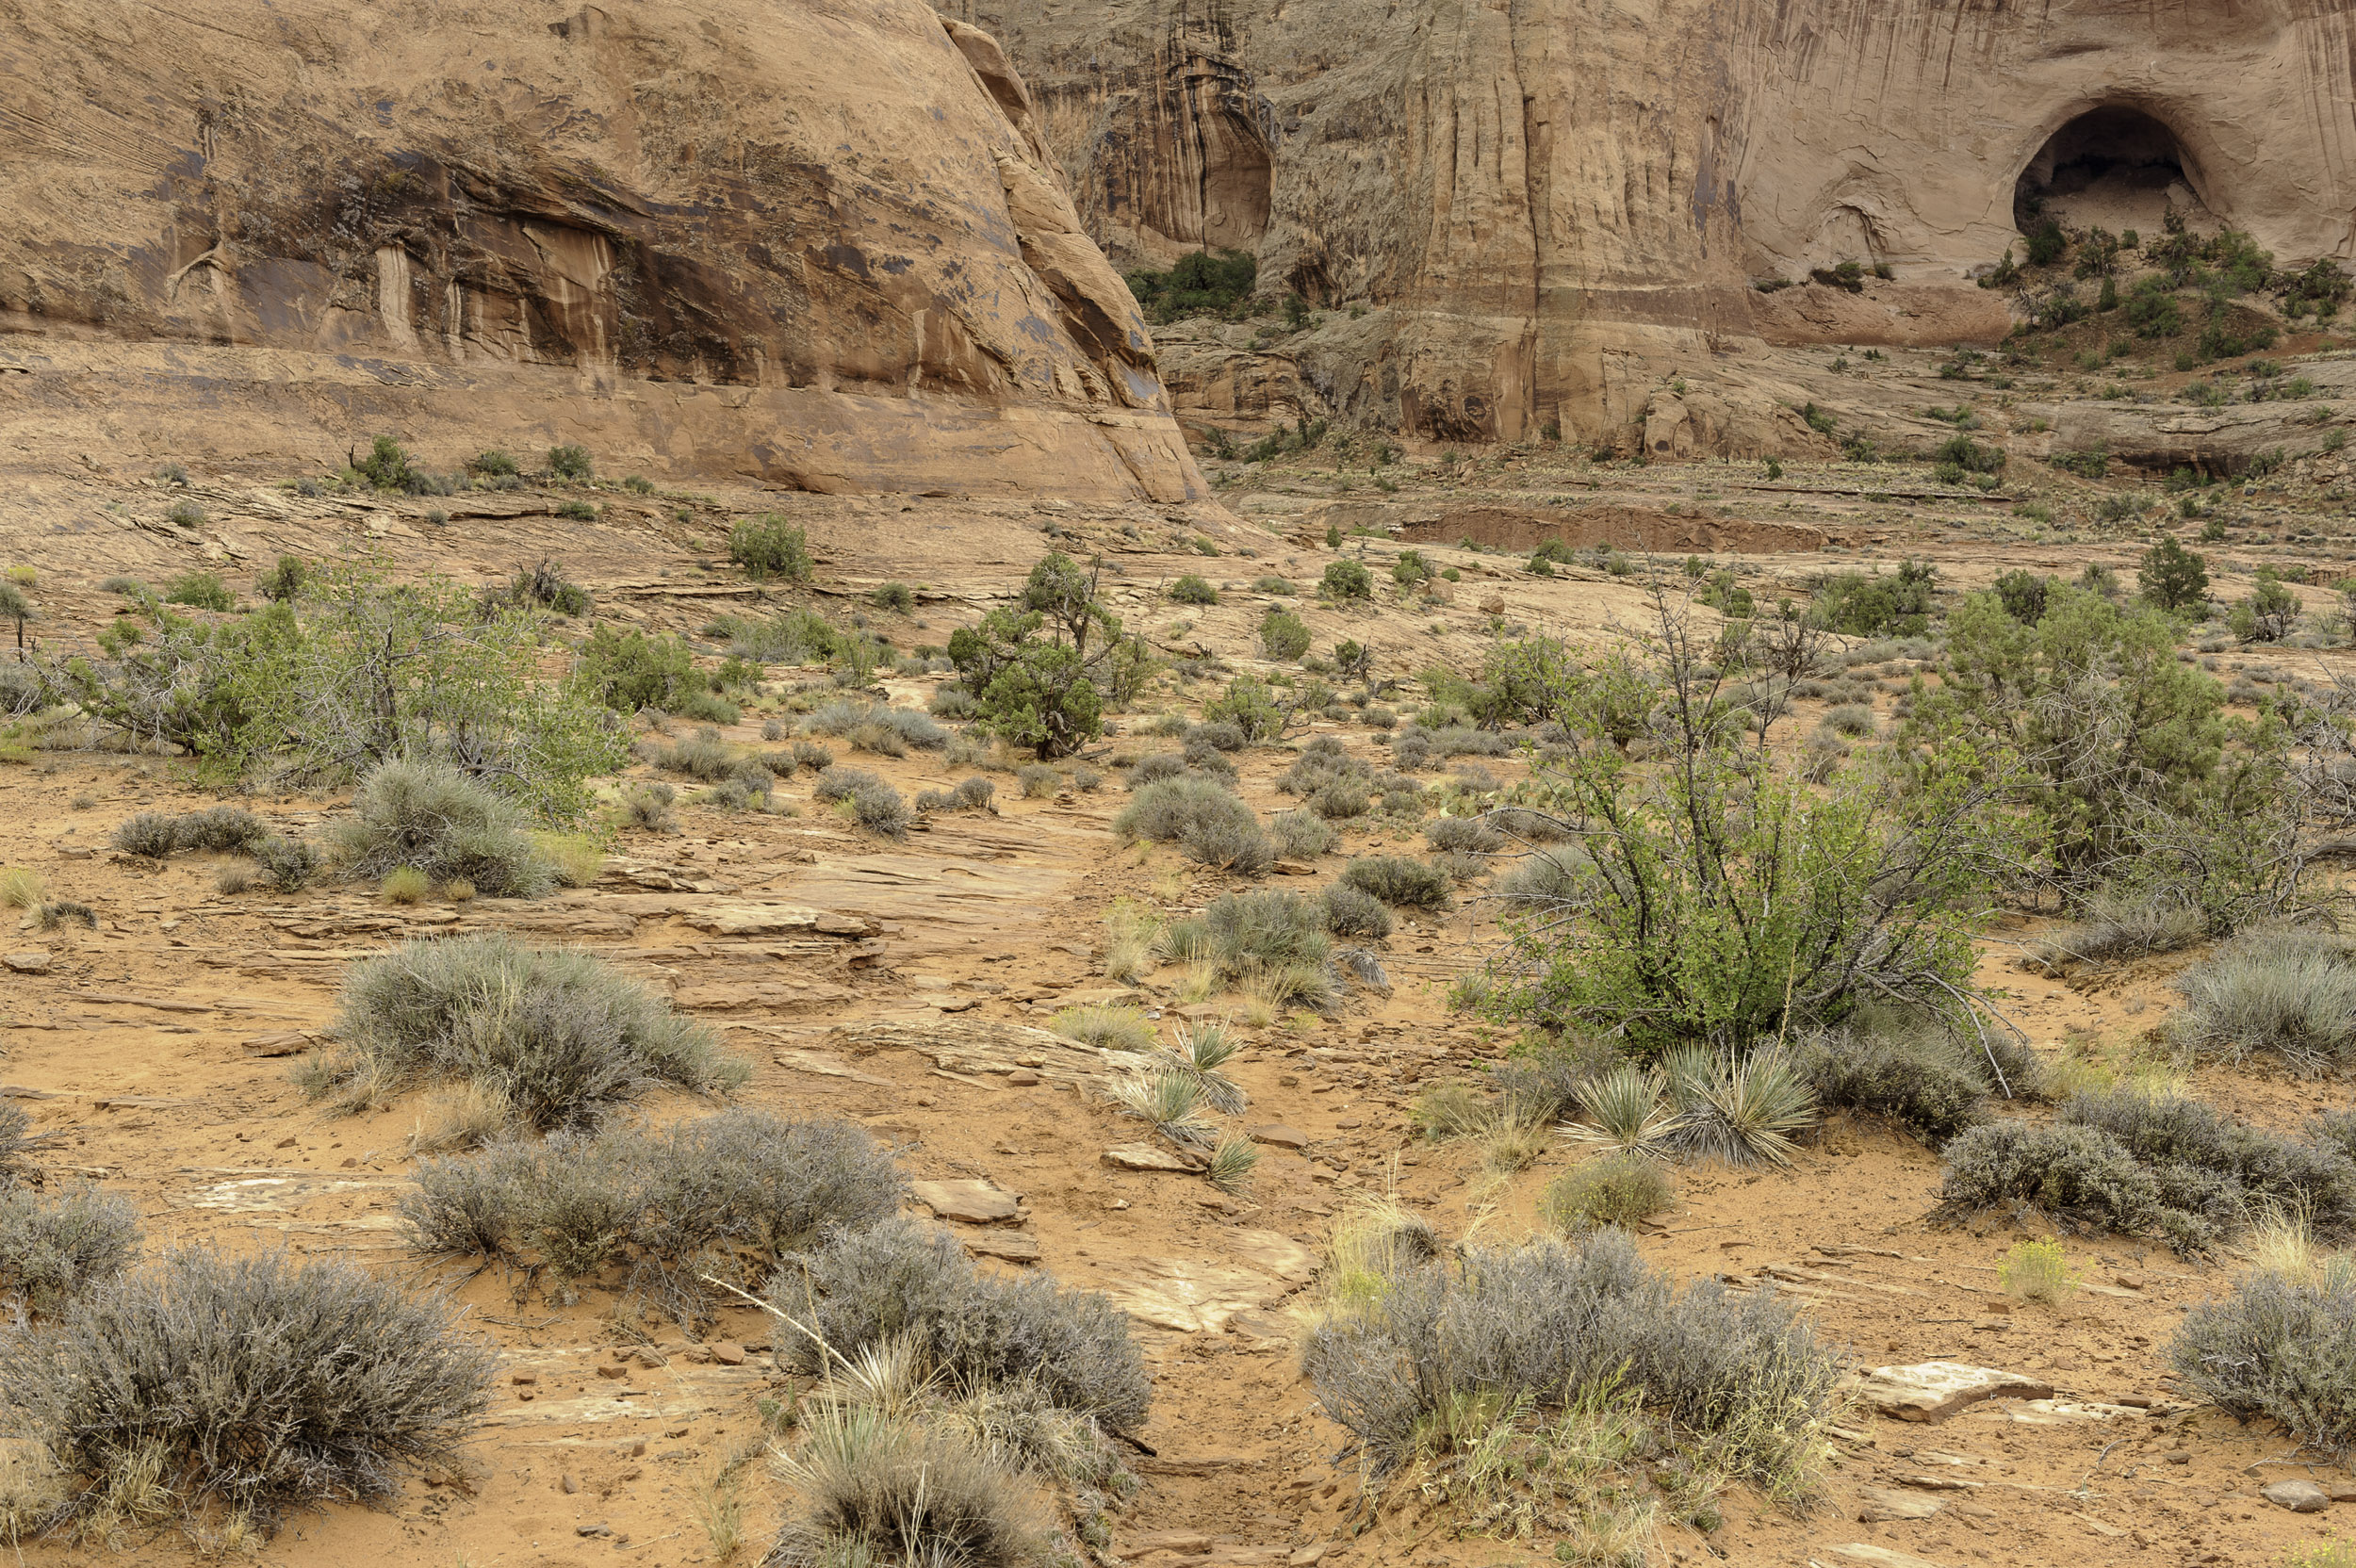
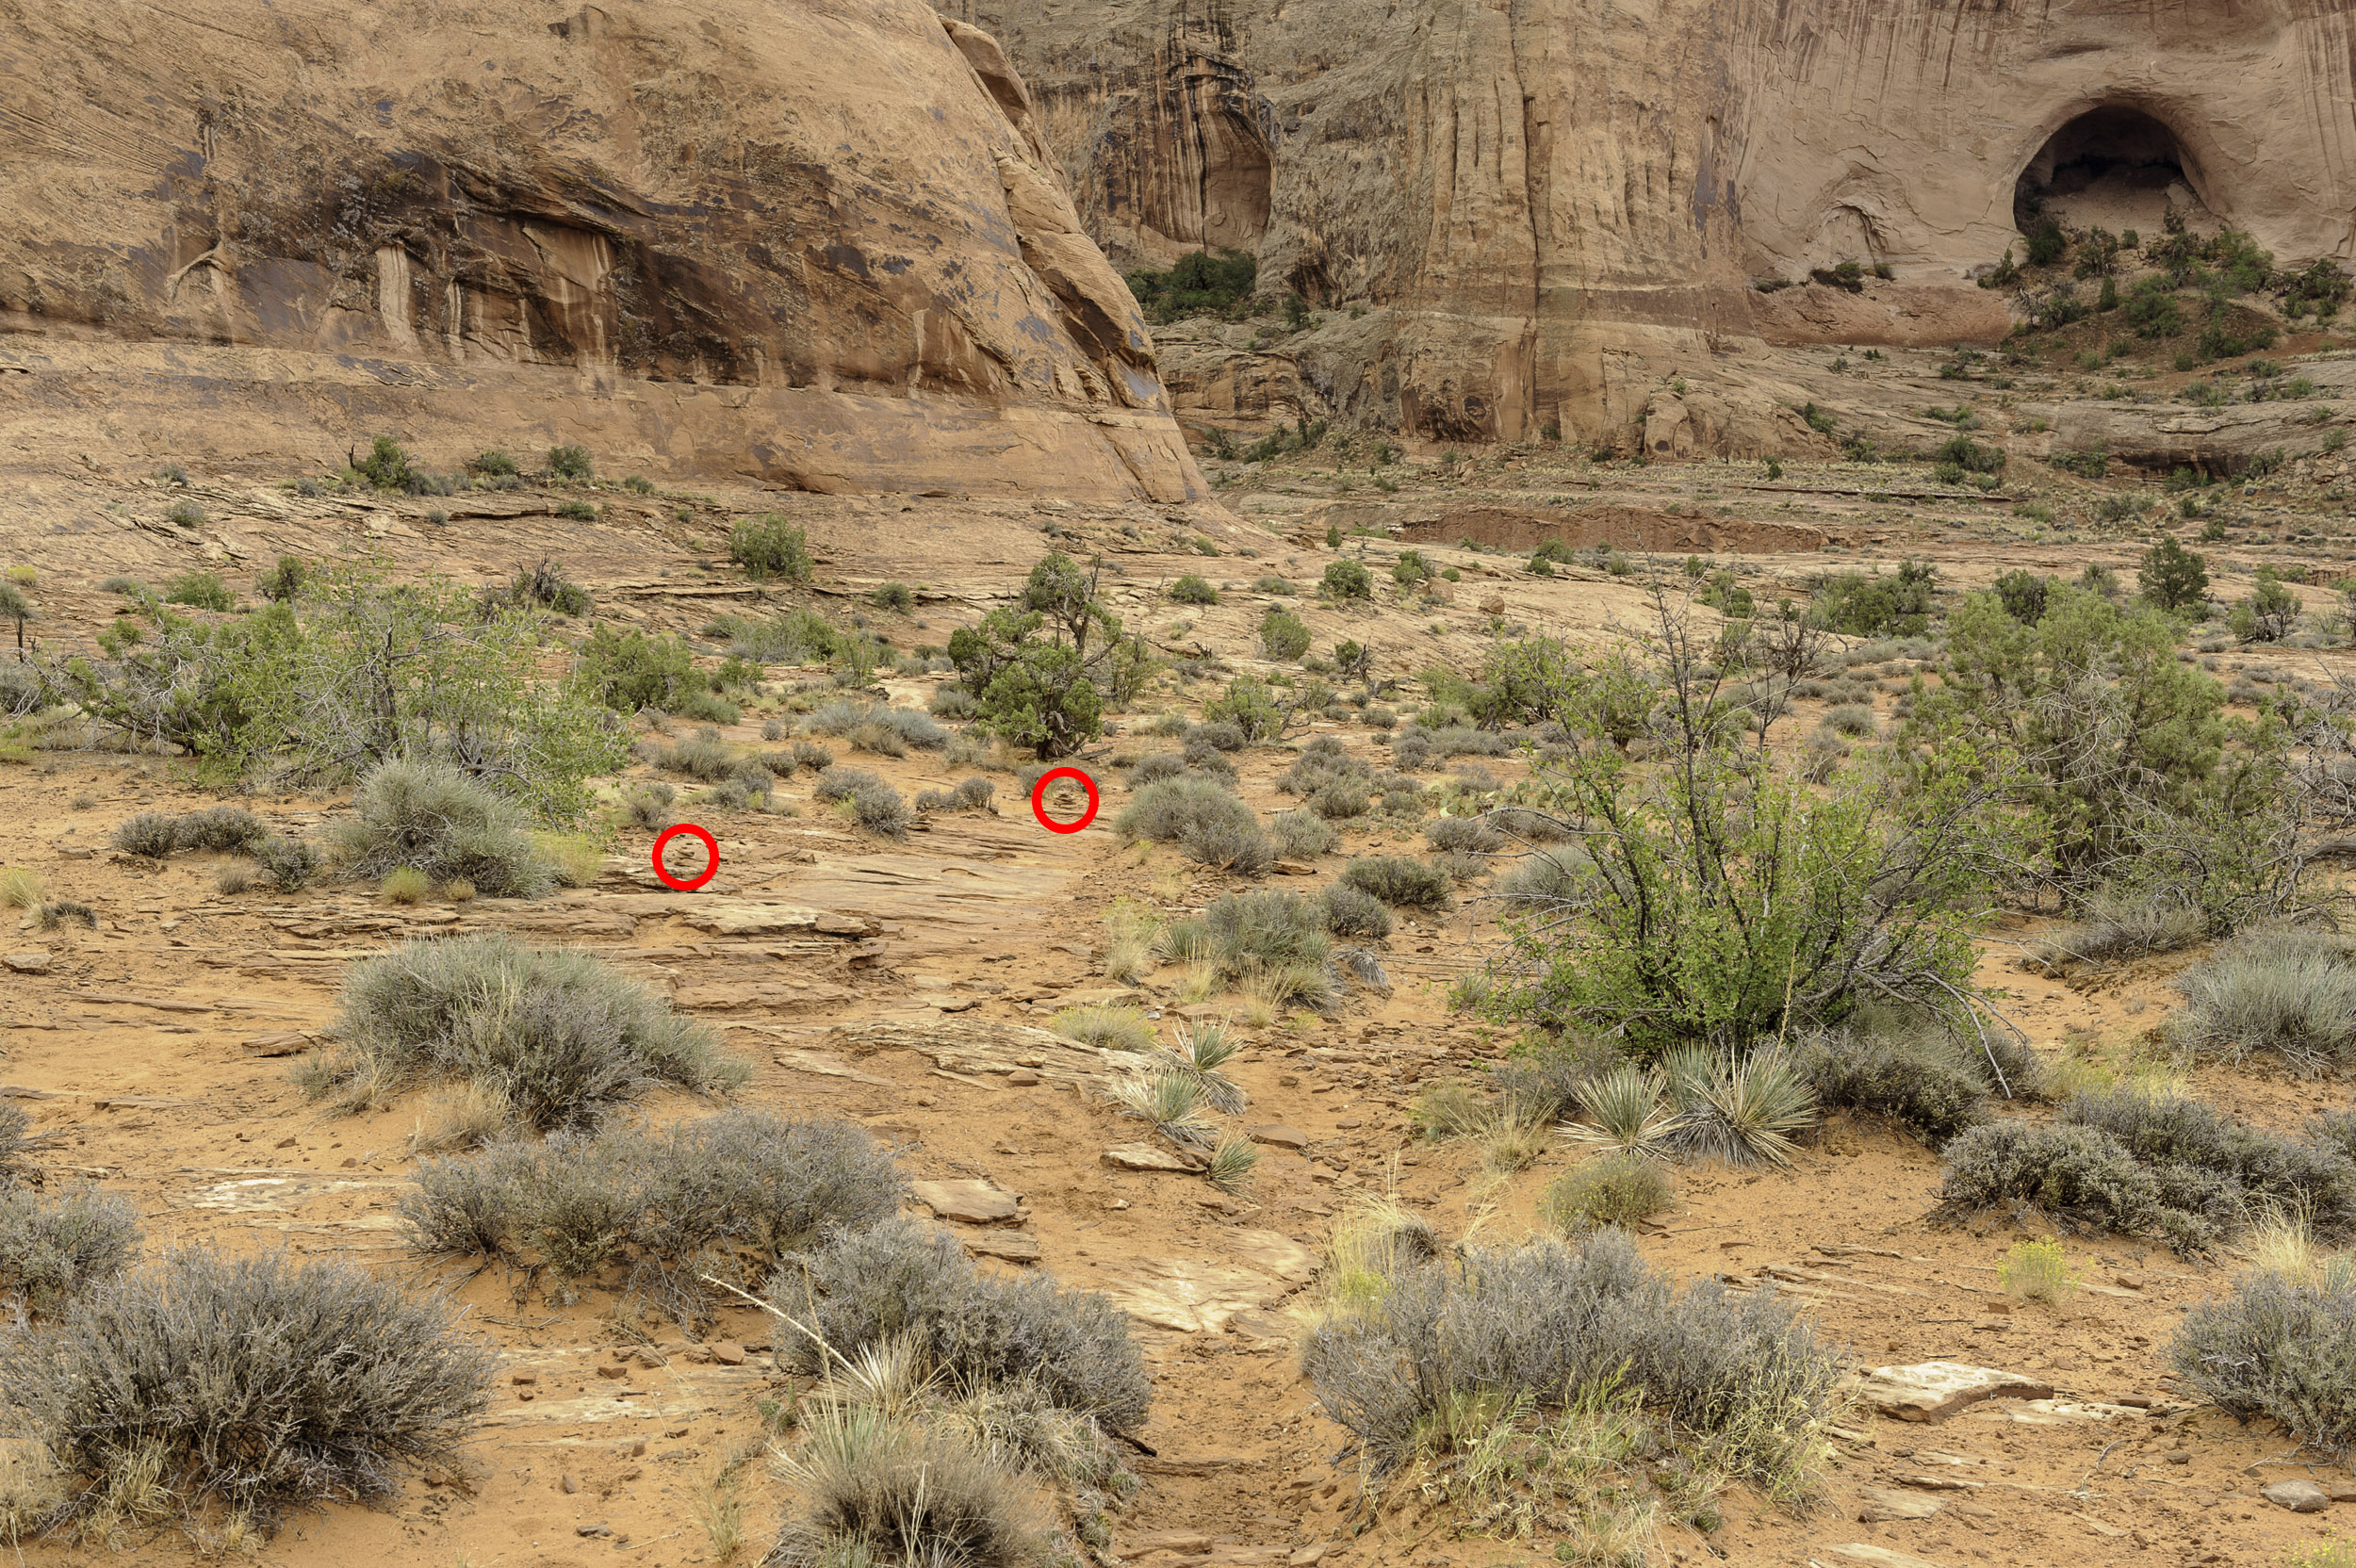
Which way do I go? The trail through the valley and along the cliff isn’t too hard to follow in daytime, but proved a (fun) challenge with no moon. Can you spot the cairns in the photos below? How about in the dark?

I found the bottom of the cliff (not hard—it’s pretty high, in both an awe-inspiring and daunting way). Then I found the cables to steady myself on a steepish incline. And the smooth half-shoe-size steps scalloped into the rock face. And the second set of cables. And the ladder. I was also, now and then, finding faint paint blazes marking the direction of the trail. Green blazes, on red rock. For a guy who’s red-green color blind. I appreciated the gesture.

At that point, I could finally see Corona Arch. I still had some hiking to finish before reaching it, but the way was now obvious—just around the edge of the horseshoe-shaped cliff, where the rock was relatively flat and easy to walk on, and … wait a minute … from the corner of my eye … I could see … nothing. I turned my head and saw, just a few feet from where my feet met the rock … nothing. No more rock—no more ground. It was the edge of another cliff, but this time the edge led to lower elevations. I peered over and shined my flashlight down—way down, to piles of talus. I’d been walking along the edge of a sharp drop and hadn’t even noticed. (So this is what the BLM trail sign meant by “mild exposure to heights.”)

It was then that my focus shifted from enjoying the walk to surviving the hike. I don’t usually shine a light when walking in the dark, because my curse of color-blindness is offset by the blessing of excellent night vision. Also, I enjoy walking in the dark, relishing the mystery of the night landscape, mesmerized by the same stars our ancestors saw. You can see plenty well under a moon, and if you give your eyes time to adjust, under the stars too. (Which often reminds me of the John Denver line: “The shadow from the starlight is softer than a lullaby.”)

But after noticing the drop, I switched on my Coast headlamp—not to my usually preferred red mode, but to bright, white light, because I have a 5-year-old daughter who’s expecting me home alive next week. I love walking under starry skies, but there will be more of them in future years, and I want to walk under them with her.

The headlamp served me well. (Except for when I used the red light to see if my finger was bleeding. Not effective.) So did my Coast HP7R, mostly for spotting cairns ahead on the trail, or for scanning the surrounds for mountain lions. (As always, I didn’t see any, except in my imagination. The only actual wildlife issue I had was moths banging into my headlamp.)

The cairns led the way—when I could spot them with my flashlight.

What also served me well was my hiking shoes. I’ve been committed (not officially) to Salomon trail runners for many years. I trust their tread, and the tread treated me well on this trail—I didn’t slip once, which was critical for my confidence while hiking atop a cliff in the dark. I also trust their shoes’ wide base, which saved me from rolling an ankle several times on uneven rock.

I never felt in danger, but I was persistently aware of the palpable fact that I would be in danger if I didn’t mind my environment and make all my choices prudently. So I hiked on, confidently, though constantly looking to my right to make sure the cliff wasn’t close.

Then, I reached Corona Arch.

I turned off my headlamp and let my eyes adjust to the dark. It’s a beautiful location. An impressive rock formation 140 feet wide, 105 feet across. It’s a window to receding rock face on one side, and to that magnificent valley on the other. From the arch, you look across the landscape toward a wide ridge with rough character, while behind you a cliff with a couple of aspiring arches (see you in 10,000 years!) towers over your shoulders.

Even when you don’t know where a trail is, you can usually tell where it isn’t, which is a very good place to start.

I started moving around the location, working the scene, eager to have fun and to finally photograph. I tested some light painting with my Luxli, chose to mount my Irix for ease of focusing in the dark, and used PhotoPills to determine hyperfocal distance. I discovered that I’d left my intervalometers in the car, that the battery in my timer release was dead, and that I had mismatched the receiver and transmitter from two different sets of wireless remotes. It was a comedy of oversights not uncommon on the first night of a trip. But that’s OK. I love doing the photography, but yeah—the experience …

So I used my old simple Nikon trigger release with the camera on Bulb mode and counted my shutter speed in my head. During my final, 16-minute exposure, I lay back on the rock and watched the stars quietly pass behind the arch’s silhouette. I worked on only two compositions (remember: no sleep, yes jet lag), and then felt ready to hike back.

Corona Arch, Moab, Utah—the better (I think) of my two setups from the location. Nikon D3s, Irix 15mm f/2.4 lens. 985 seconds, f/5.6, ISO 2500.

I began the return trip, confidently, though constantly looking at that cliff to my left.

My intuition was more reliable on the way out. I knew the trail now, knew the landmarks, knew the general direction. And even when I lost the trail, I found it. Even when you don’t know where a trail is, you can usually tell where it isn’t, which is a very good place to start. You re-find the trail by process of elimination.

I did get a little lost yet again, after losing sight of cairns and of green blazes on red rock, but I ended up on a ridge from where I could see the campfires of the other few people who had pitched tents not far from mine. Comfortable that I was nearly back, I decided to photograph some more, then I returned to the car, then to the tent, more tired and more satisfied than when I’d begun.

About 60,000 miles of national trails weave through our natural spaces. Some of these trails are famous: Appalachian, Pacific Crest, Continental Divide. Many are not: Ice Age, Ala Kahakai, Mormon Pioneer. They’re all worth walking a mile or more. And you don’t have to travel to Moab to do so. Every state in the U.S. has a national trail.

Happy 50th, National Trail System. Oh wow, the places you go.

For more information on the National Trails System, visit the NPS website. For more on the 50th Anniversary celebration of the national trails, see www.trails50.org.

Chris Nicholson is a partner and workshop leader with National Parks at Night, and author of Photographing National Parks (Sidelight Books, 2015). Learn more about national parks as photography destinations, subscribe to Chris' free e-newsletter, and more at www.PhotographingNationalParks.com.

UPCOMING WORKSHOPS FROM NATIONAL PARKS AT NIGHT