How to Deal With Light Pollution, Part II: Post-Production

Note: This is the second in a three-part series about one of the most common questions we get: How do you deal with light pollution? We have three answers: with filters, with post-processing, with creativity. In this week’s blog post, Lance Keimig discusses the second of those solutions: processing in Lightroom.


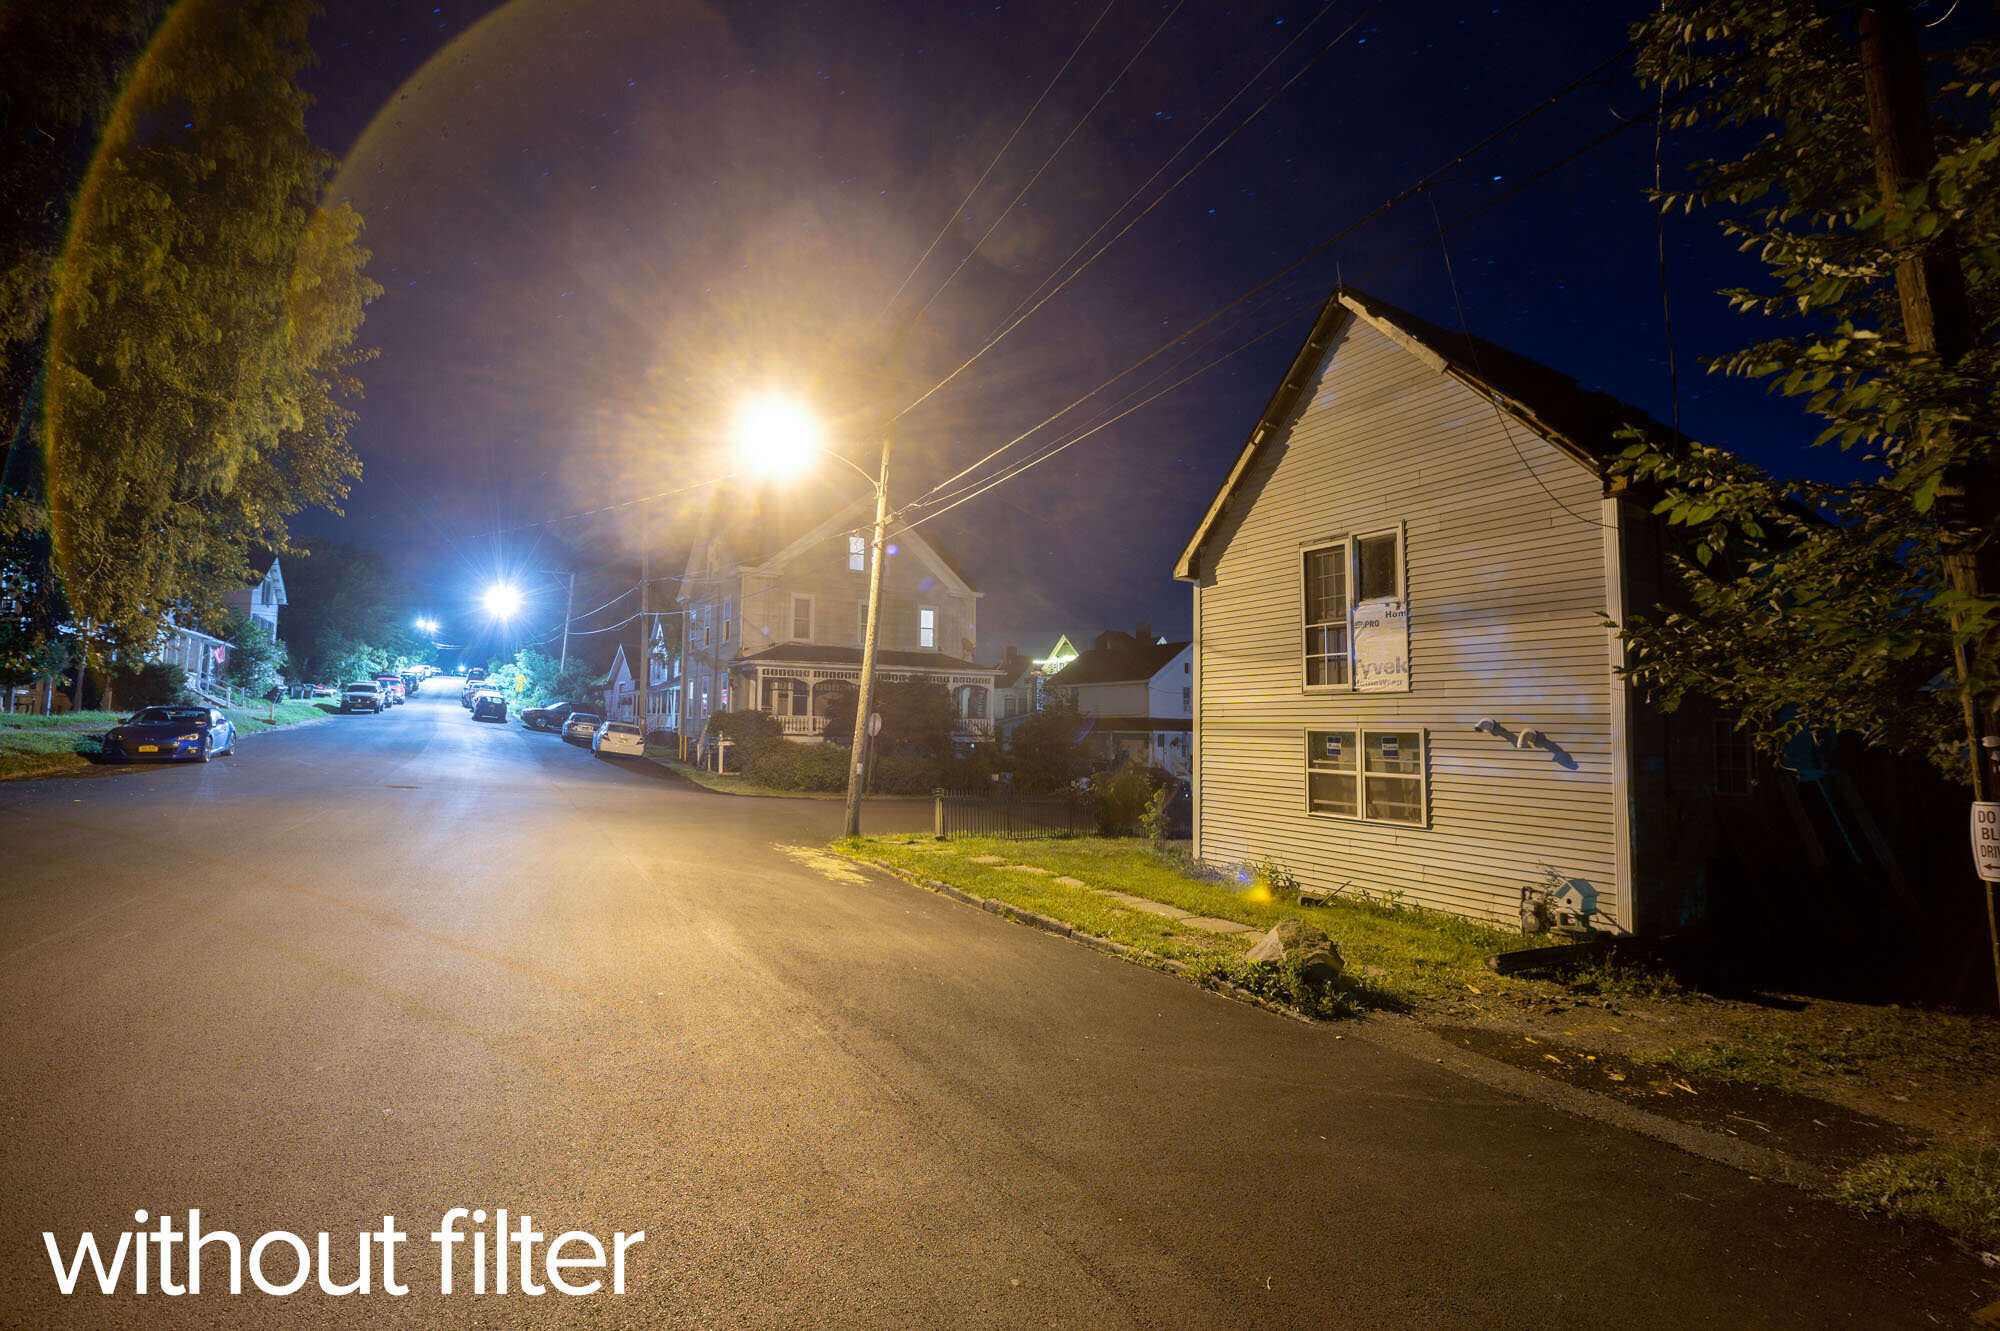
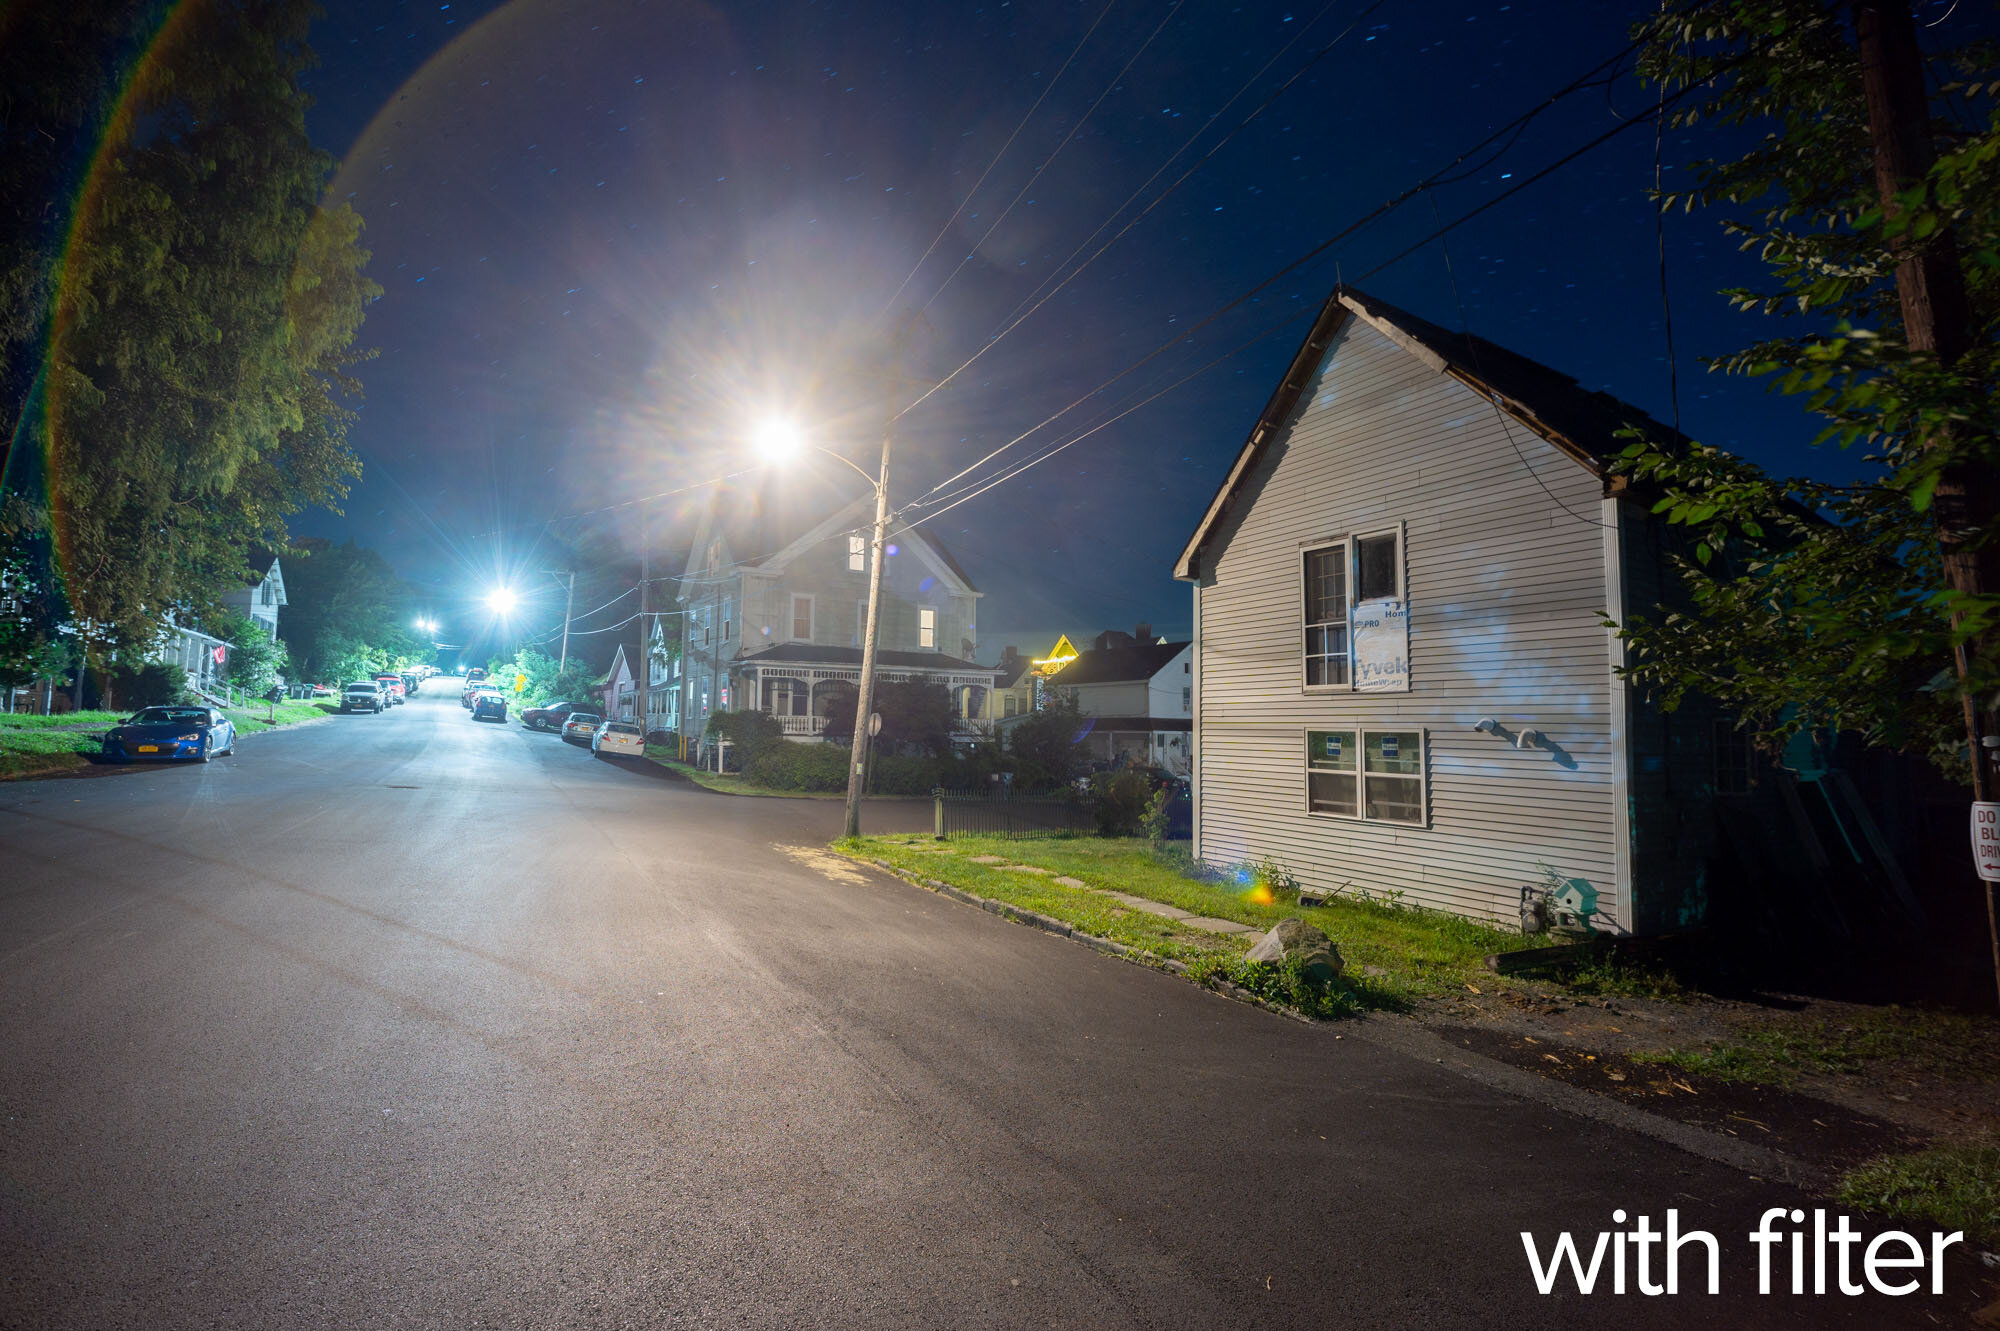
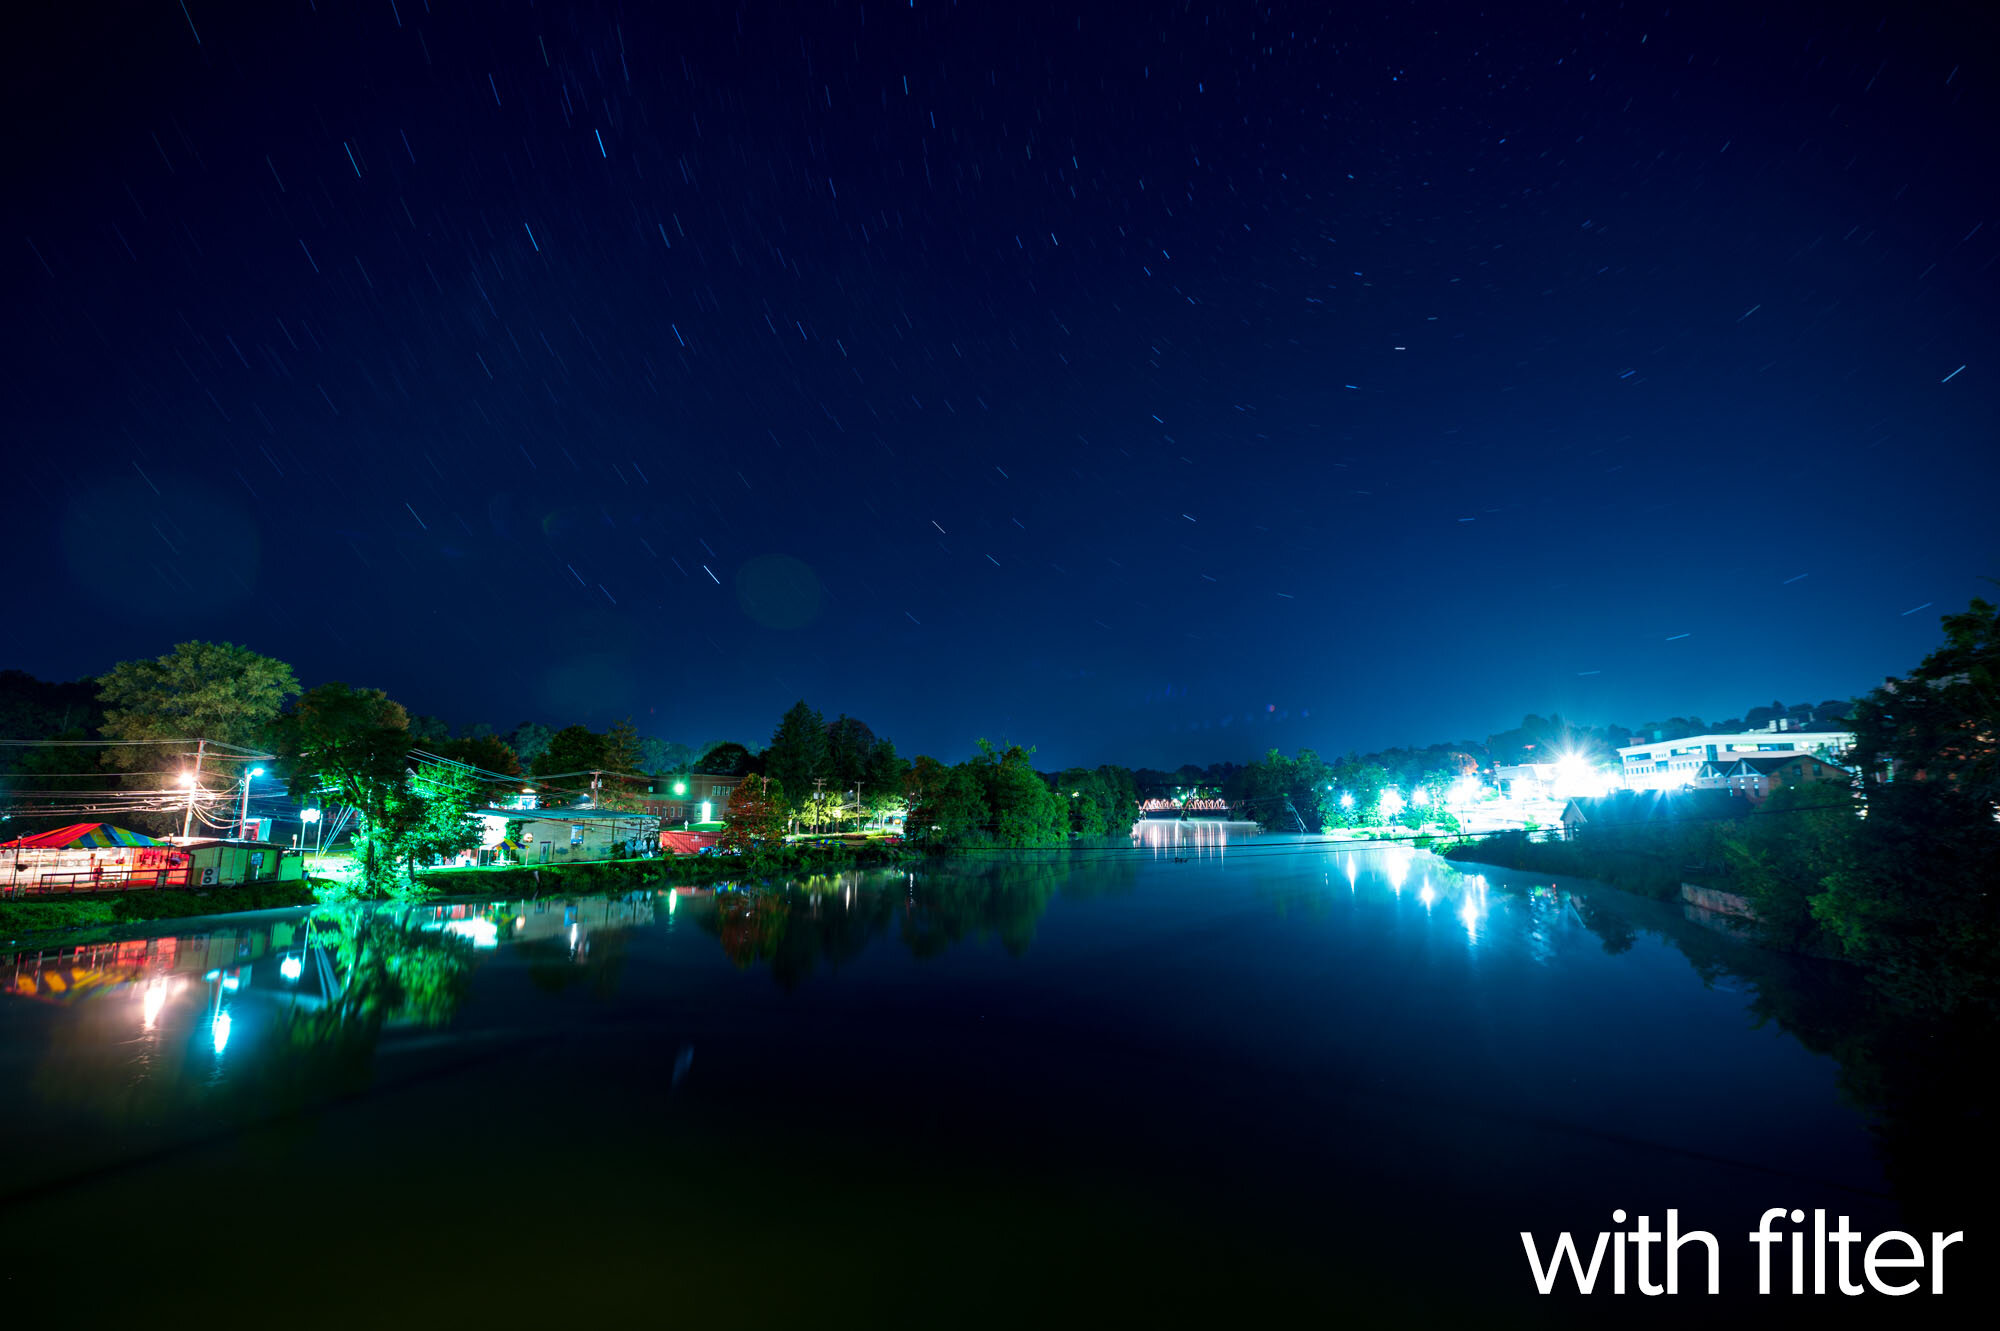
Last week, Matt wrote about his experiences testing a couple of light pollution filters, and he showed how they can be useful for neutralizing color casts in clouds from artificial lights, in reducing atmospheric haze, and especially for taming the beasts known as sodium vapor lights.

He showed that the two filters he tested work primarily by filtering out a narrow band of intensely orange light that is particular to sodium vapor lights. Before the widespread adoption of LED street lighting, high pressure sodium vapor was the most common form of street lighting used worldwide. These lights are still quite common, and until they are eliminated altogether, light pollution filters will probably be the first line of defense against the color shifts they cause in photographs.

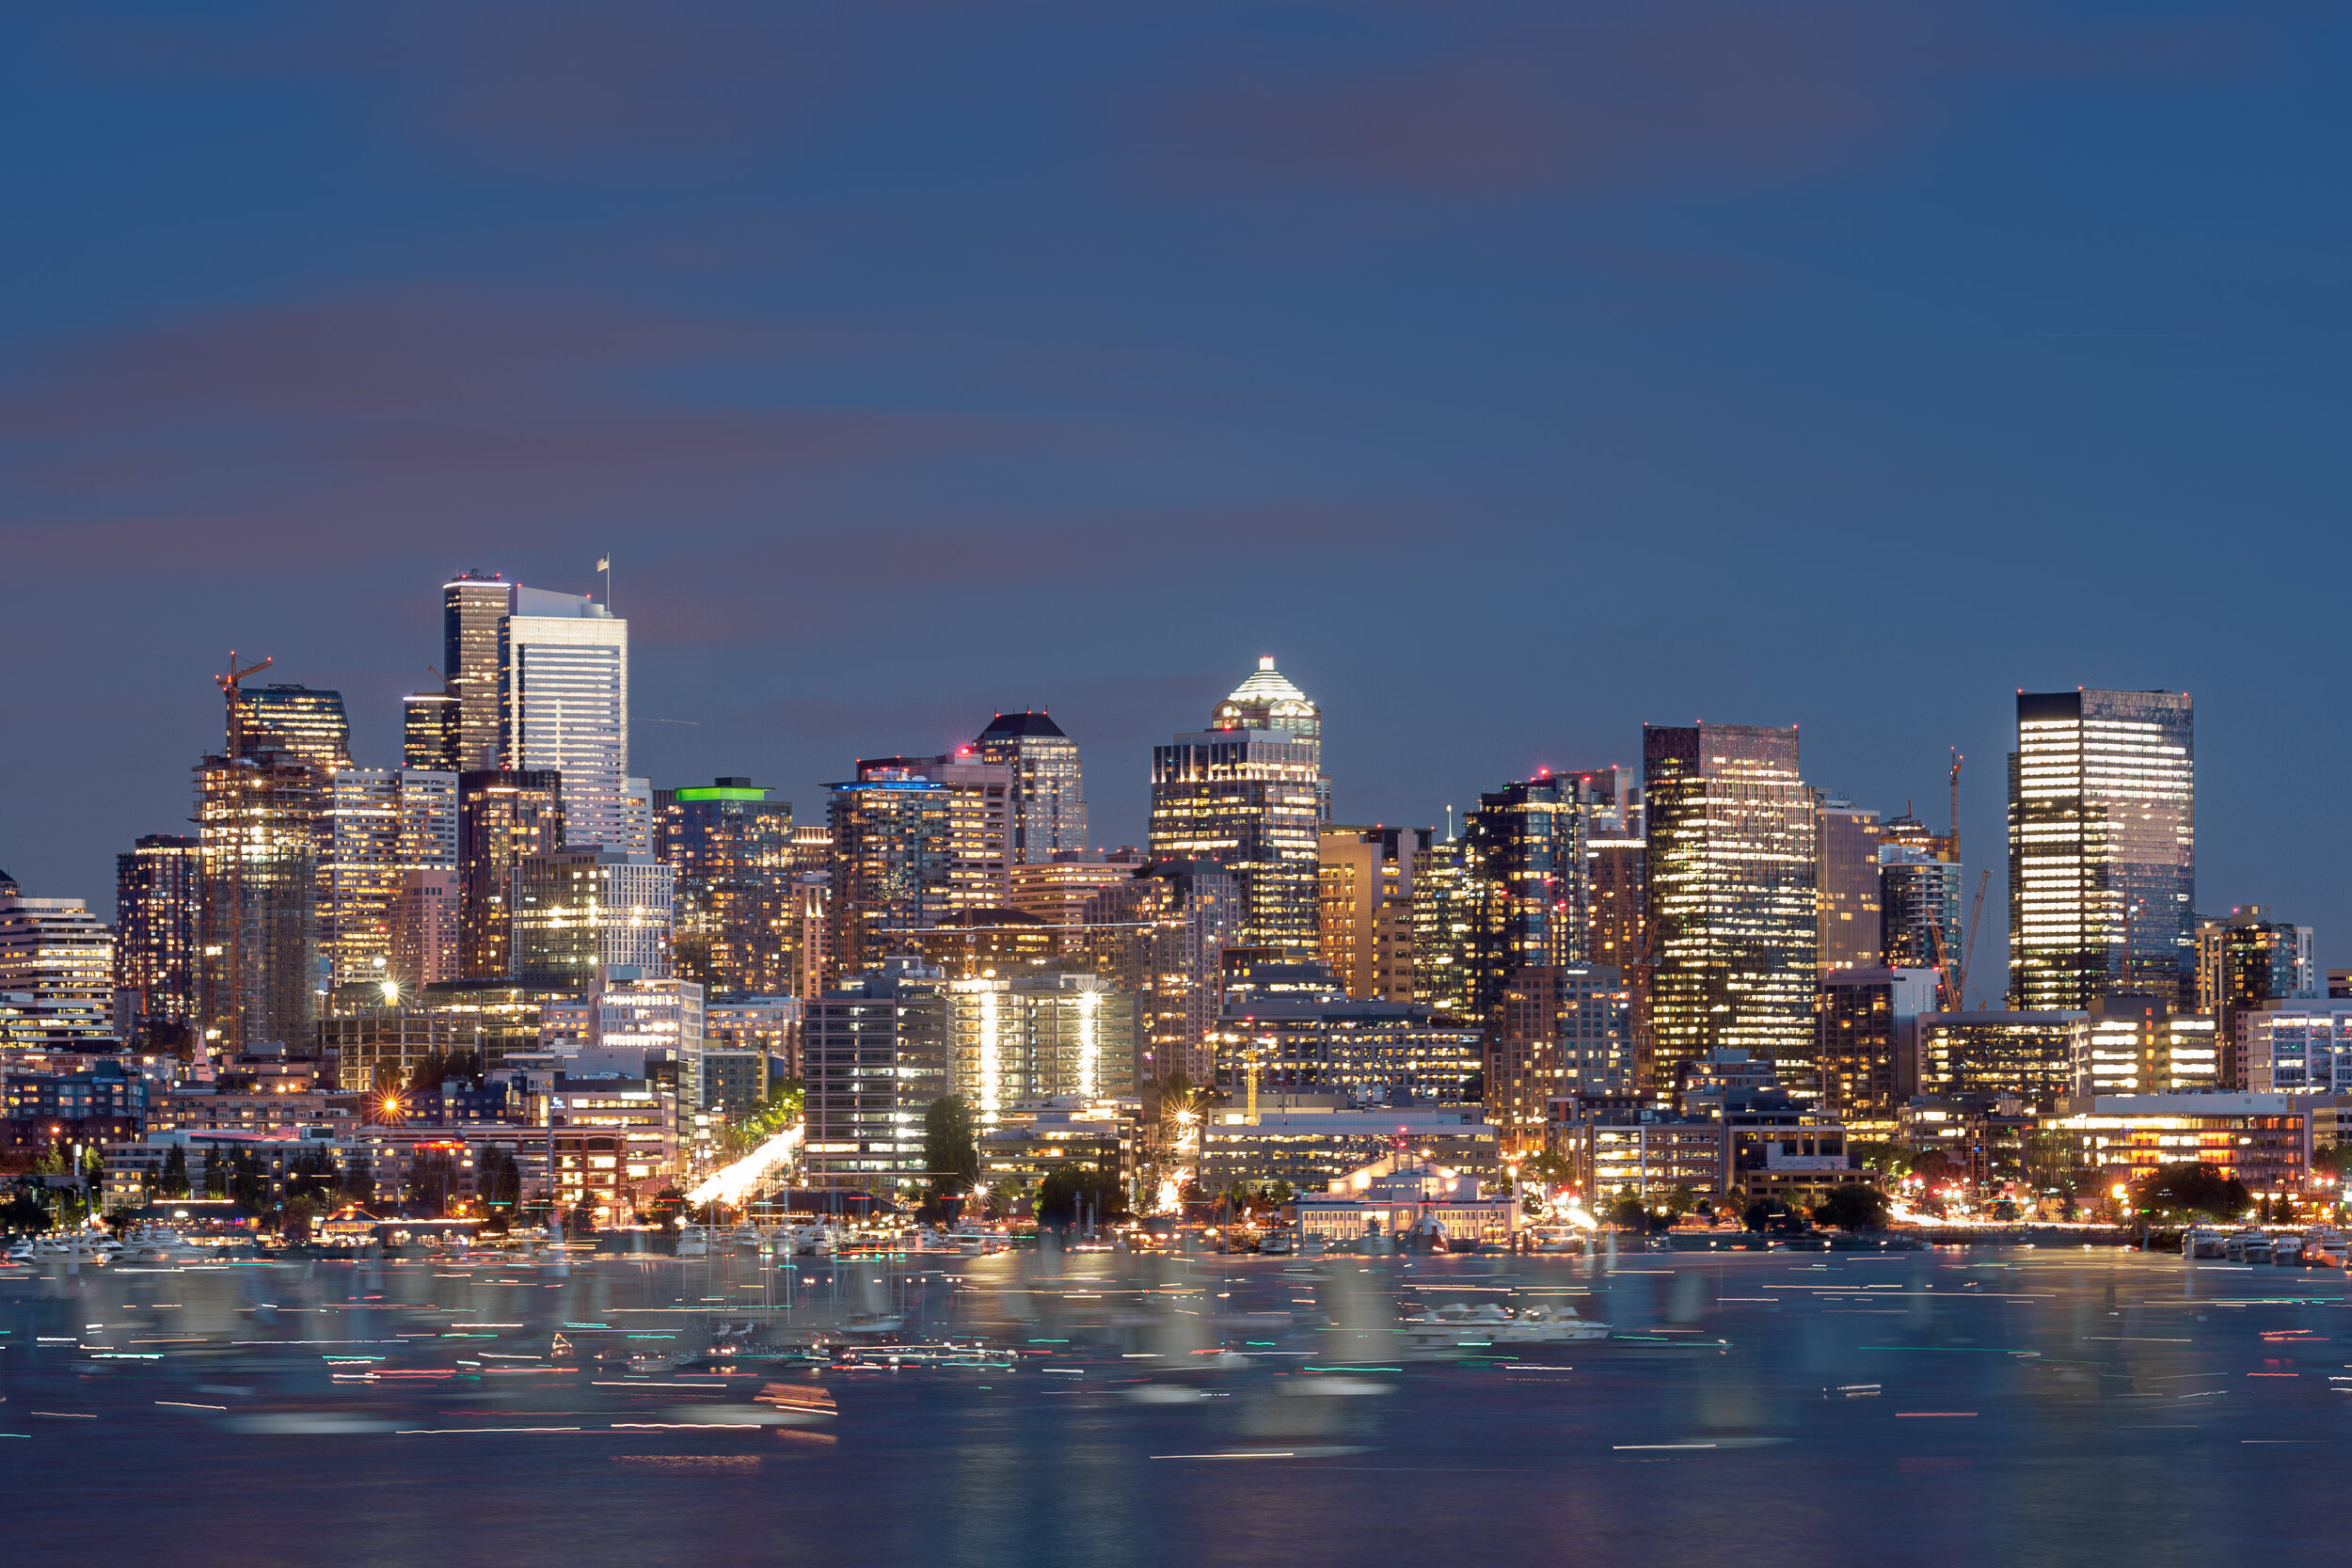
The image above is a good example of the types of artificial light sources that cause light pollution. The intensely yellow lights are low pressure sodium vapor, and the others in the scene are high pressure sodium vapor. Canon EOS 6D with a Nikon 28 mm f/3.5 PC lens. 6 seconds, f/8, ISO 200.

When we consider the problem of light pollution in night photography, there are two conundrums:

  1. unwanted color casts in the clouds and in the sky

  2. stray light that obscures the stars in our images

Light pollution filters can address both of those issues, providing that the bulk of the light pollution is from sodium vapor lights.

However, if you don’t use a light pollution filter, post-processing offers an alternative method to correcting unwanted color casts from light pollution in night photographs. In this post and the accompanying video (you can jump to it here), I’ll show you examples of how you can employ post-processing techniques to minimize unwanted color casts from light pollution. All of these examples utilize Lightroom Classic’s White Balance, Hue, Saturation and Luminance (HSL) and local adjustment tools to achieve the desired effects.

The first example (Figure 1) is one that I made last year during our Shi Shi Beach adventure in Olympic National Park. In this case, the lights from Victoria on Vancouver Island reflected off the low cloud cover and turned the sky yellow. A simple white balance adjustment took care of the yellow, and then a little HSL work with the targeted adjustment tool helped with the red and magenta from the beacon on the hill. I could not remove all of the red and still have the image look natural, so I just toned it down a bit.

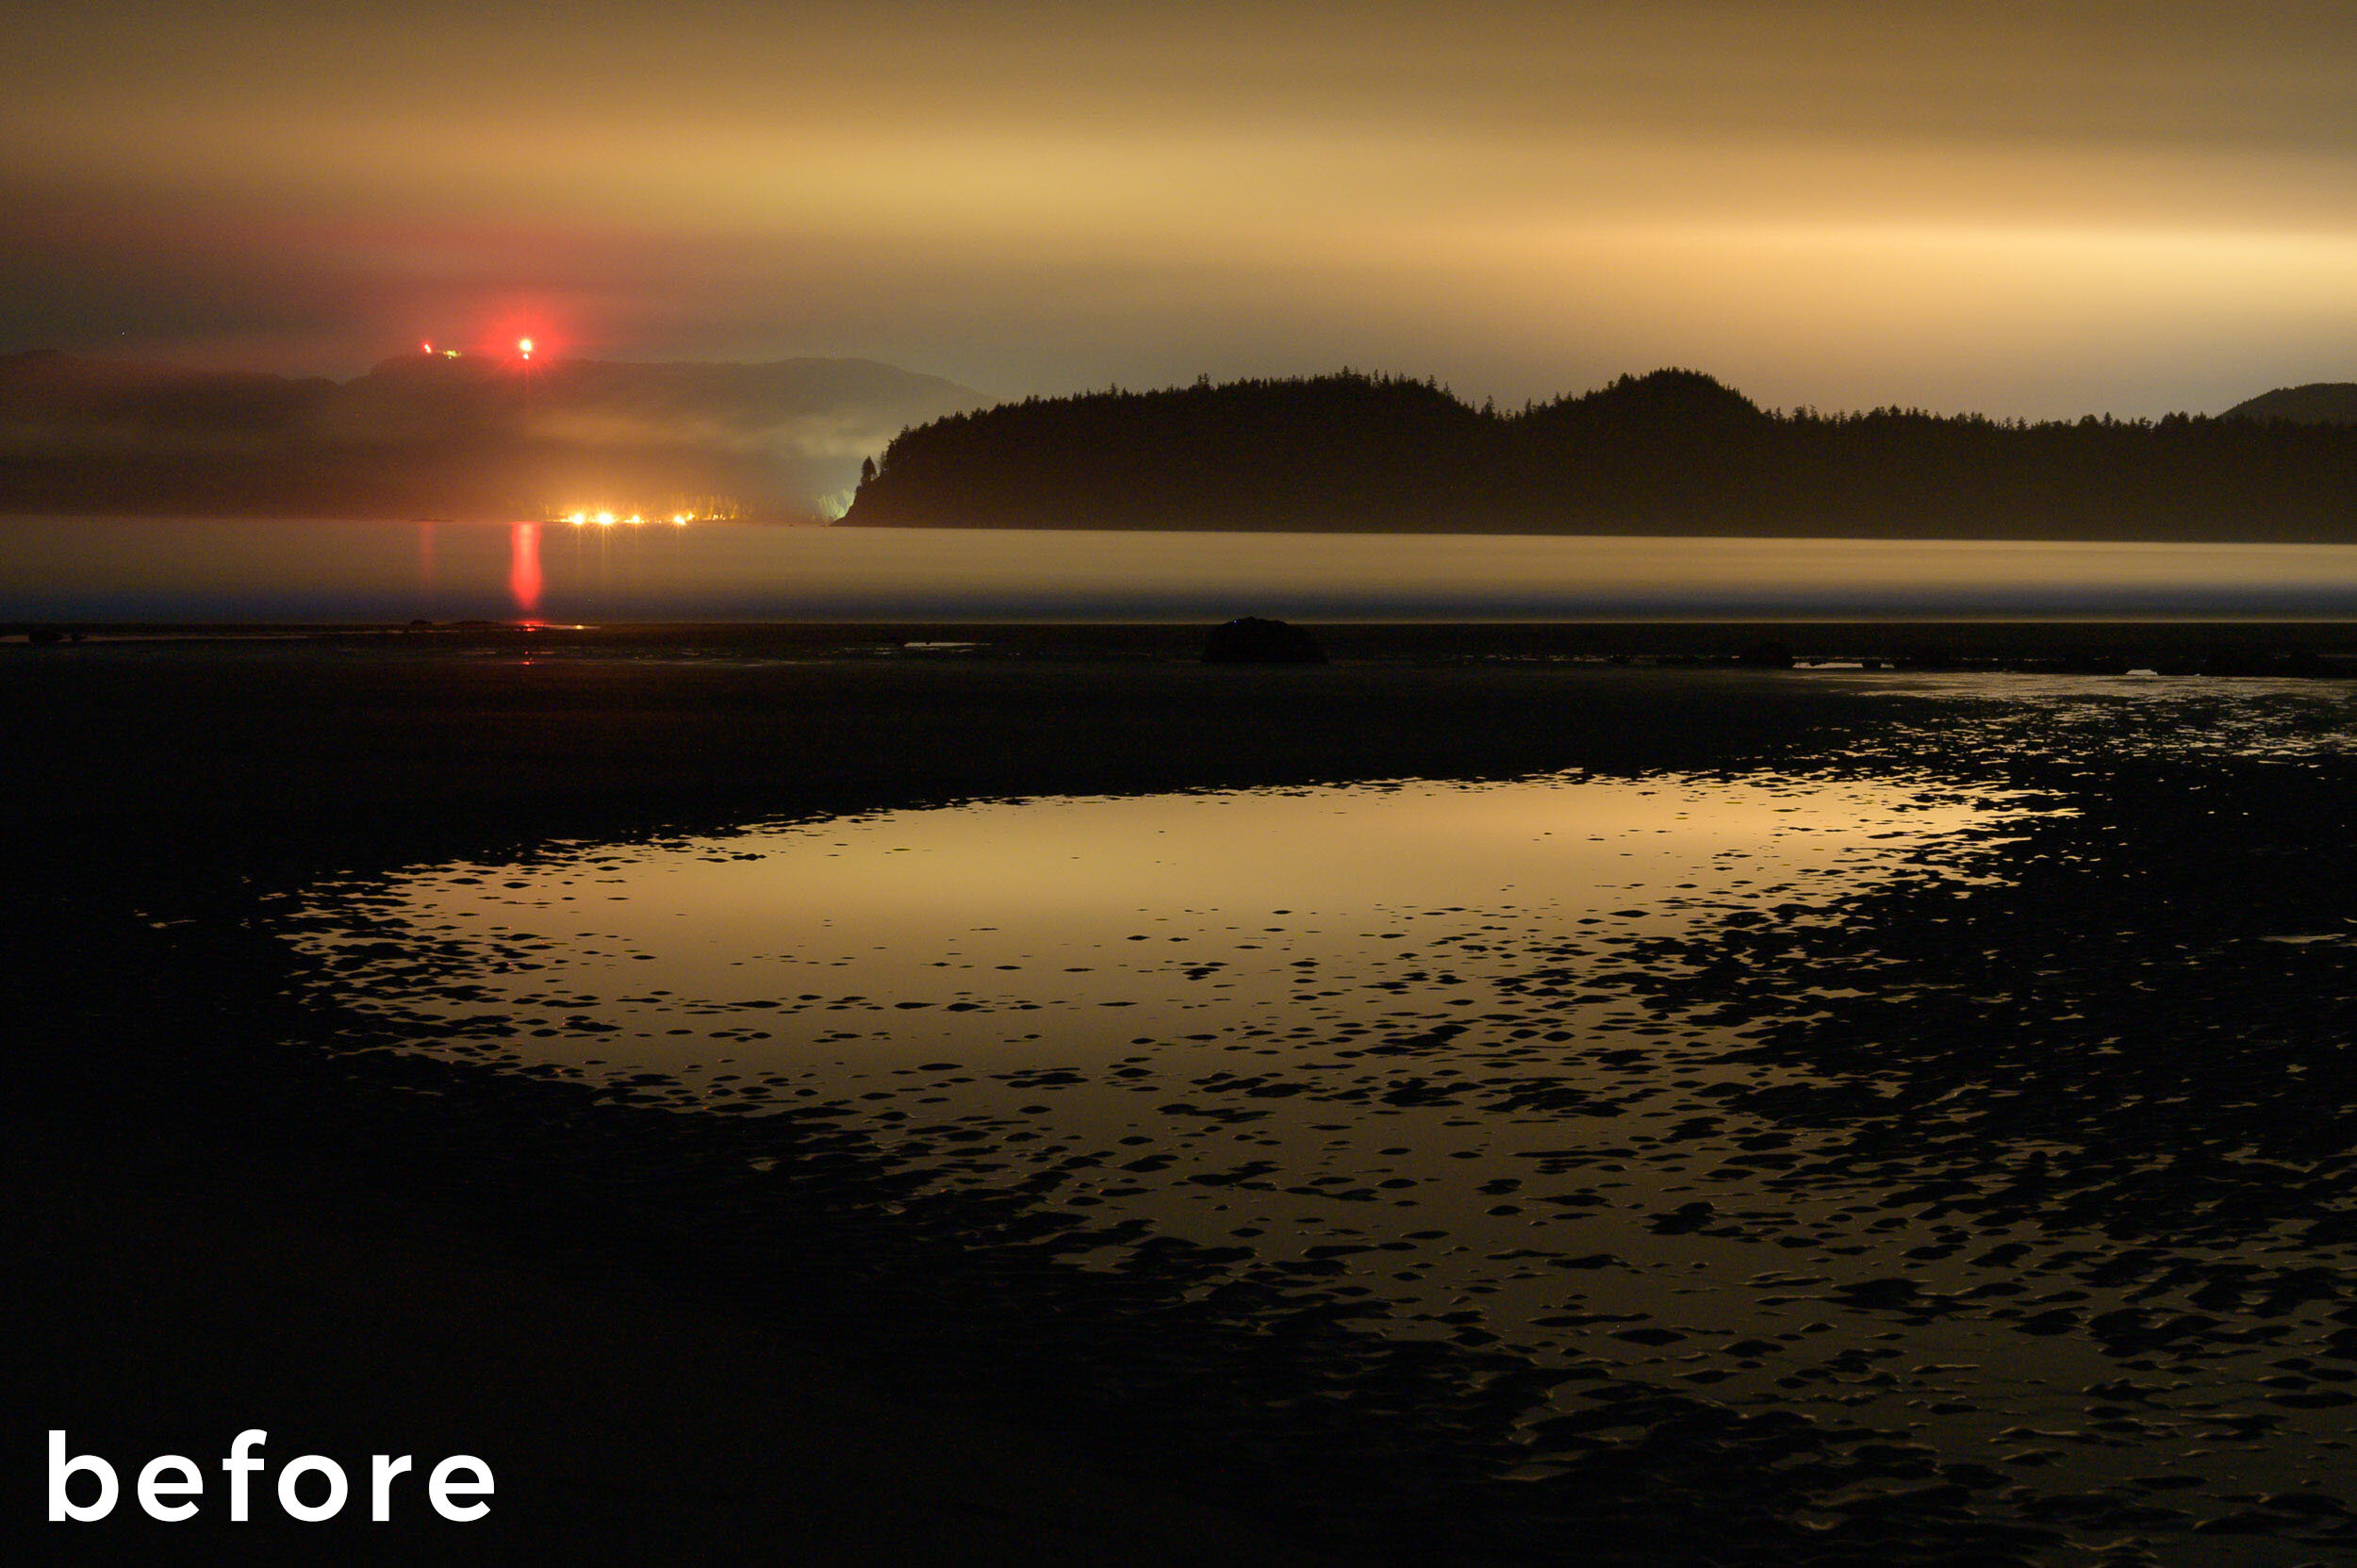
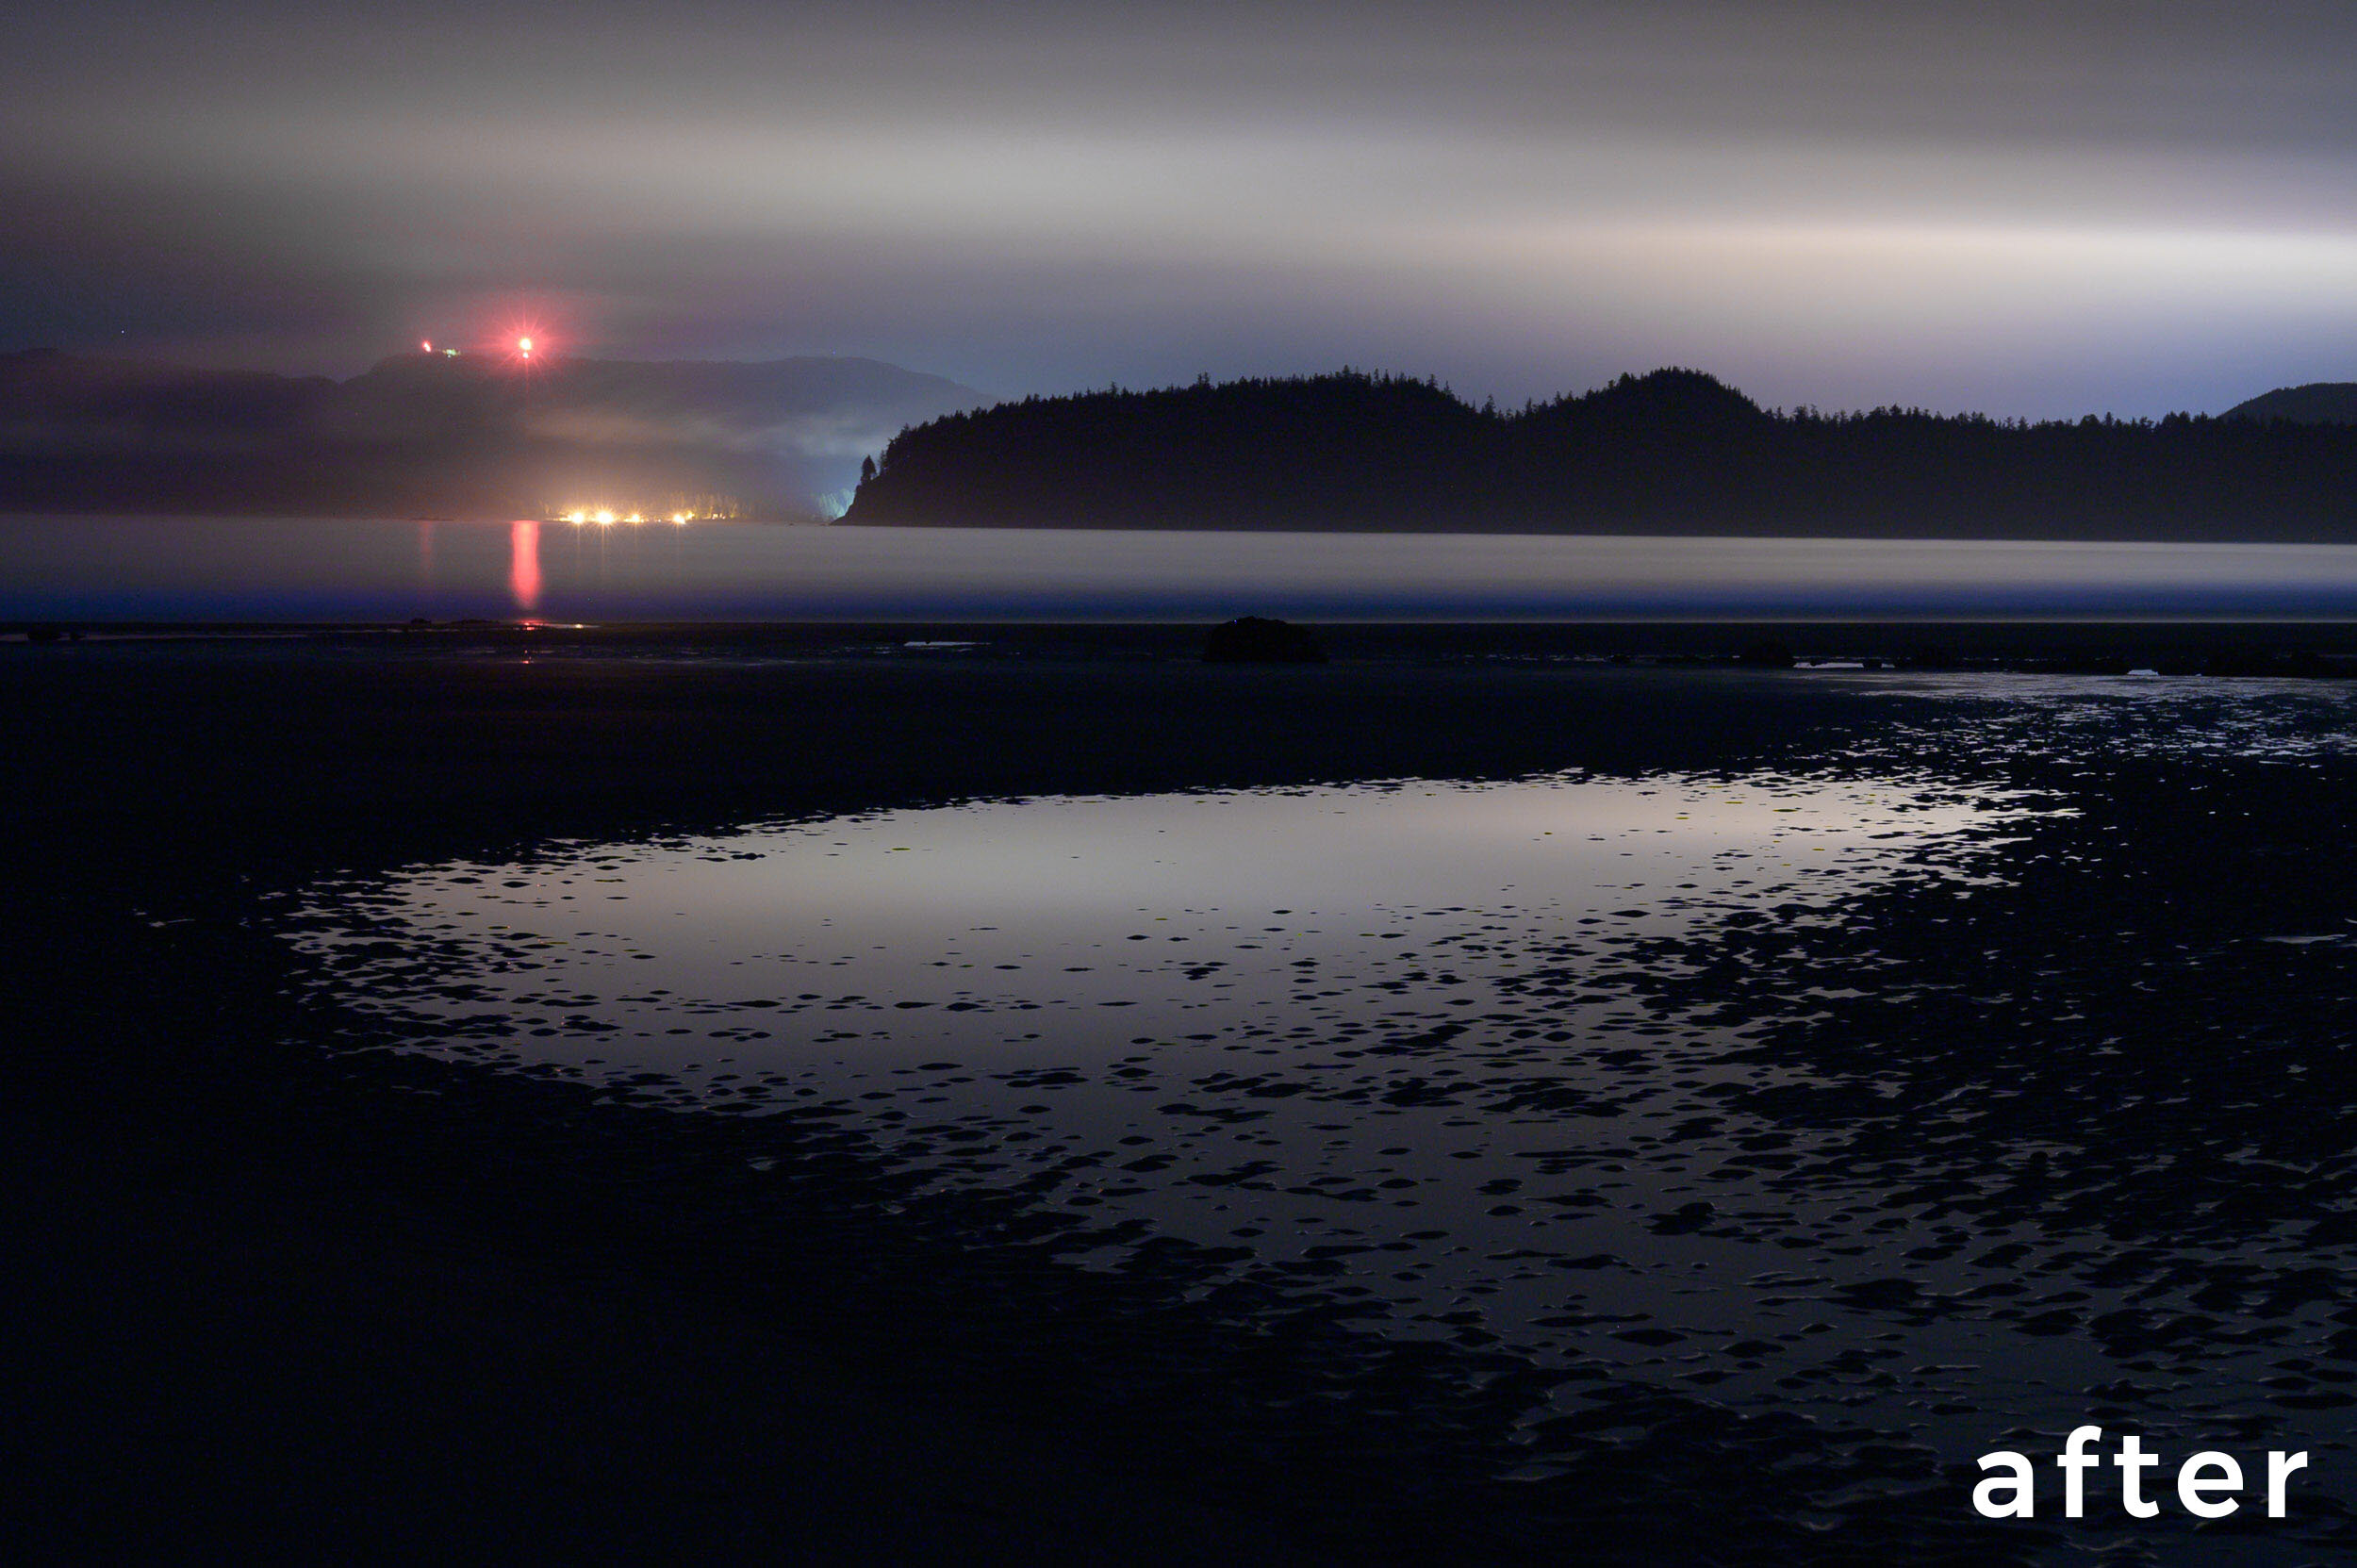
Figure 1. Light Pollution over Vancouver Island. Nikon Z 6 with a Nikon Z 24-70mm f/4 lens. 693 seconds, f/5, ISO 800.

I made the next image (Figure 2) at the Owens Valley Radio Observatory in California. Light pollution on the horizon to the south shows a yellow glow from sodium vapor lights. HSL adjustments took care of removing the unwanted yellow from the image.

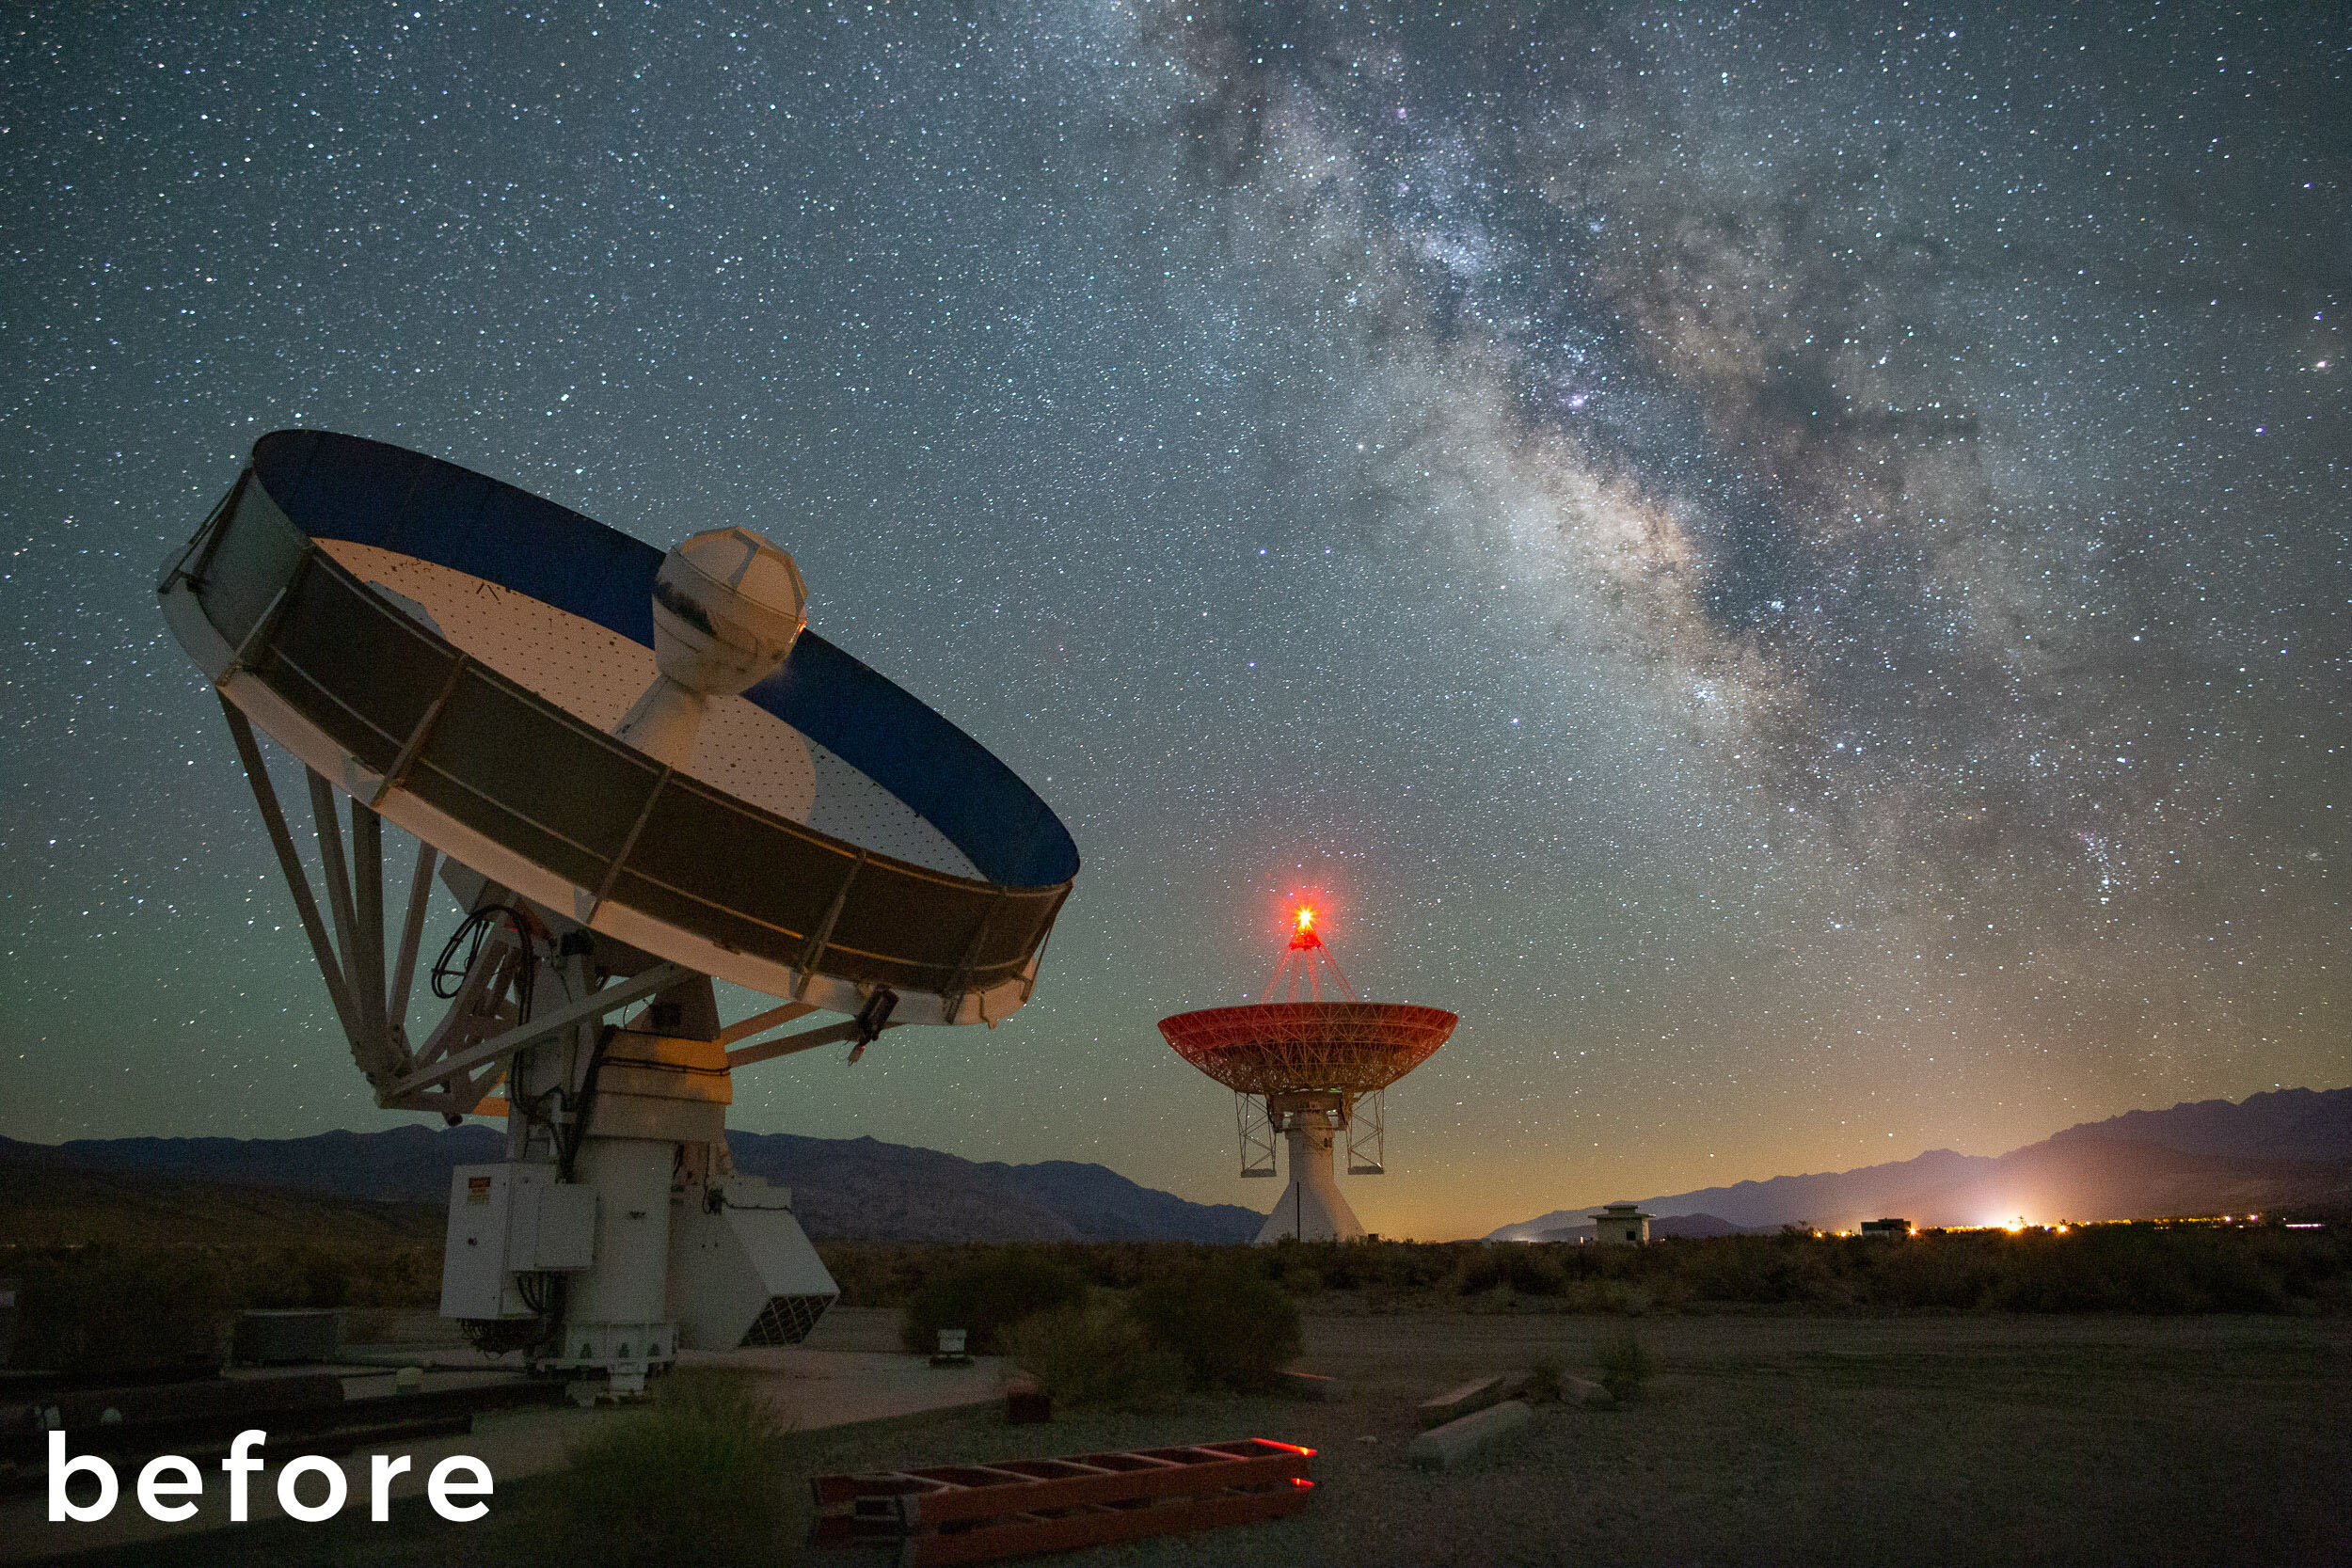
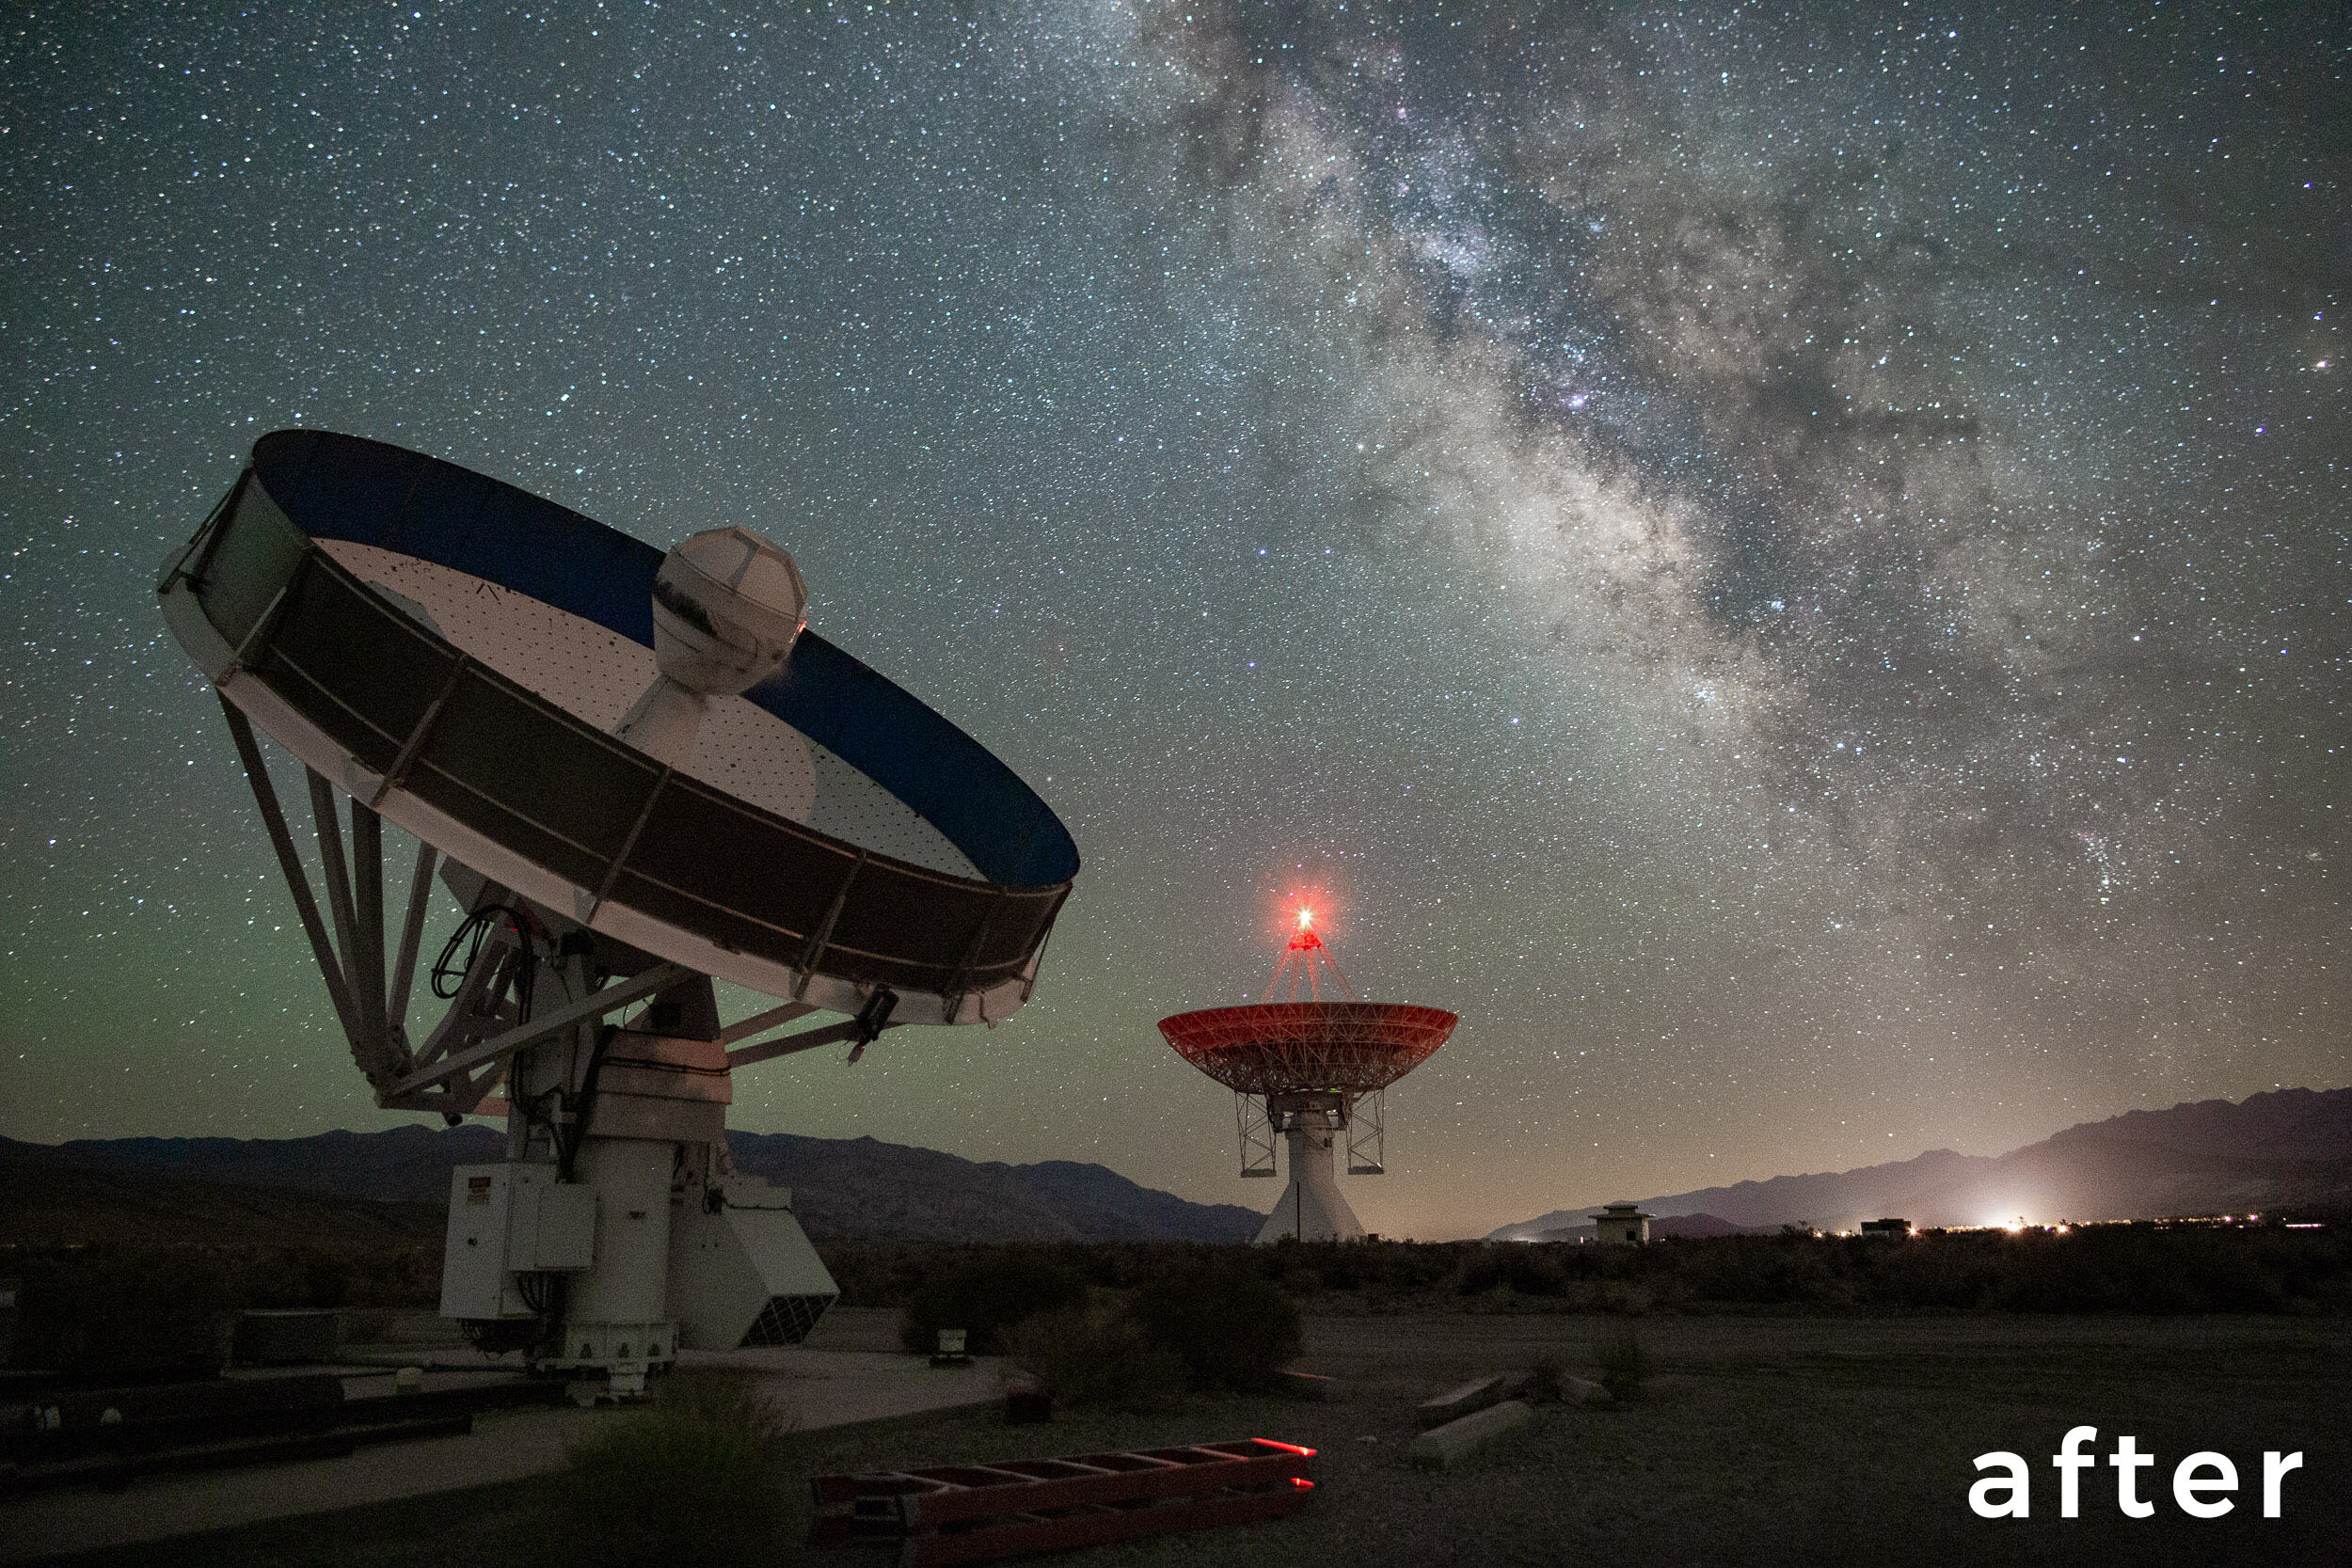
Figure 2. ORVO and Milky Way. Canon EOS 6D with a Nikon 20 mm f/3.5 AIS lens. 20 seconds, f/4, ISO 6400.

The image from Lassen Volcanic National Park (Figure 3) also had yellow light pollution at the horizon, but also a fair amount of yellow and orange in the soil at the foreground, so an HSL adjustment would have affected more of the image than needed. In this case, I used a local adjustment brush and desaturation to solve the problem.

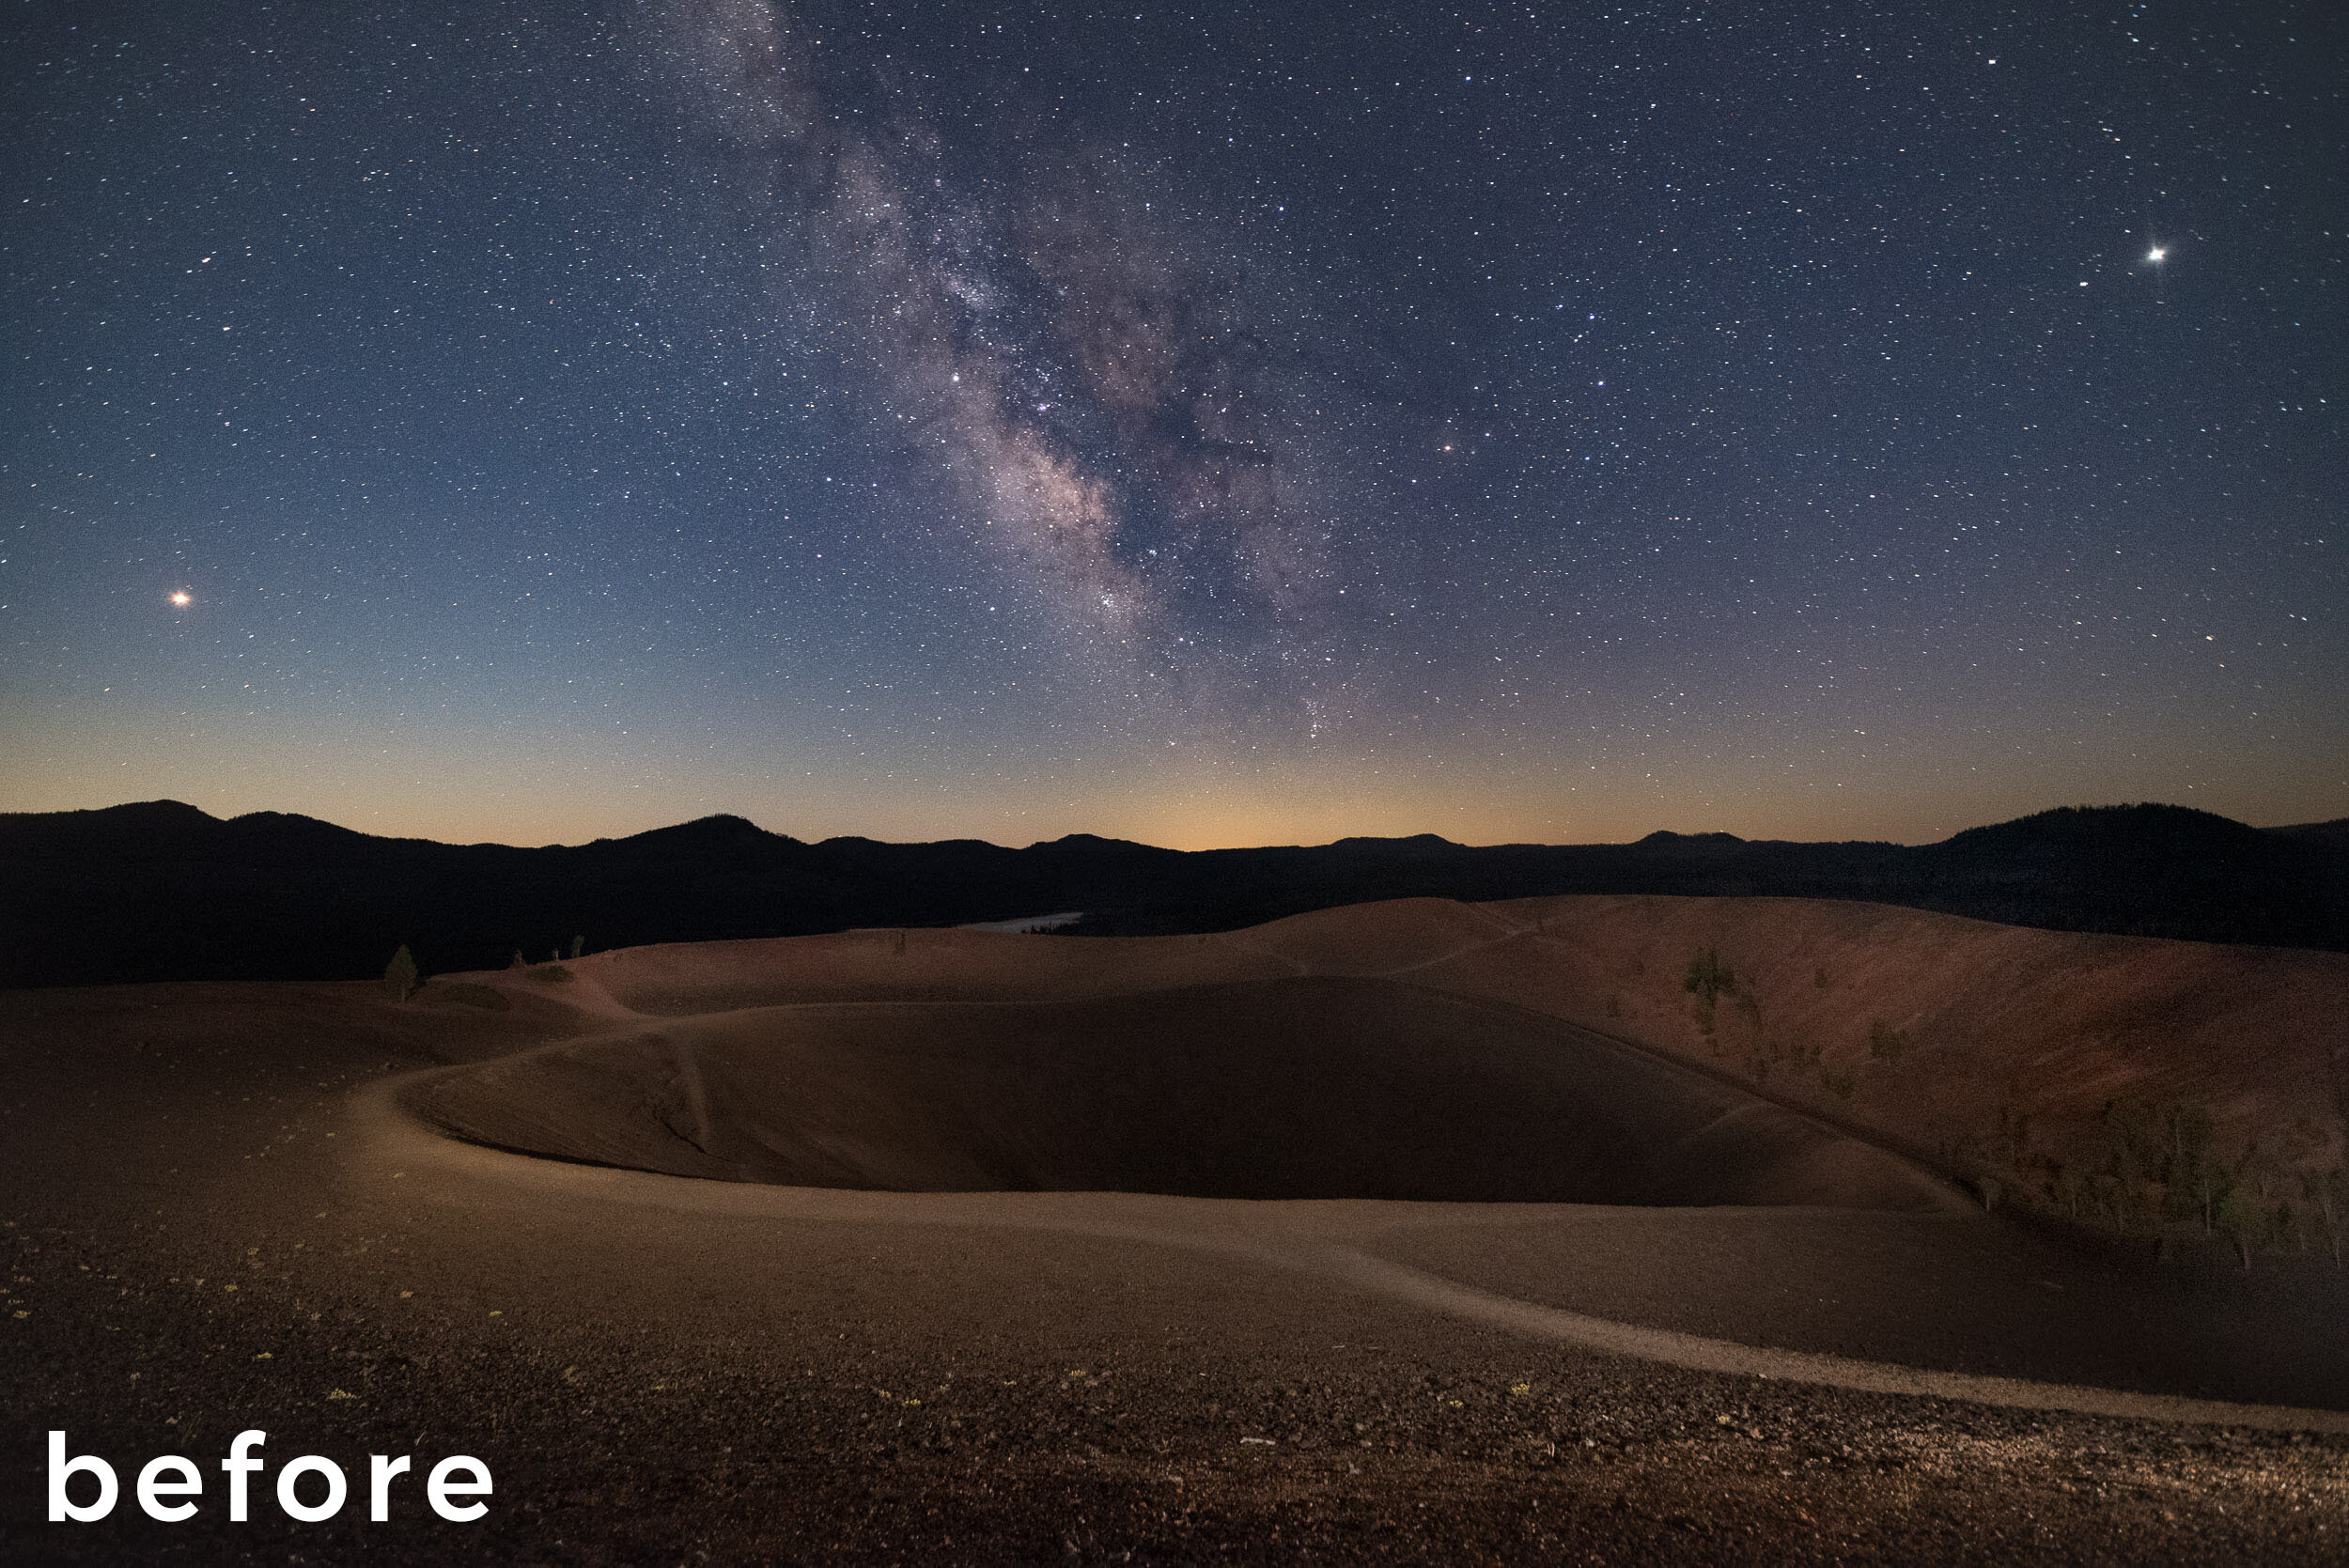
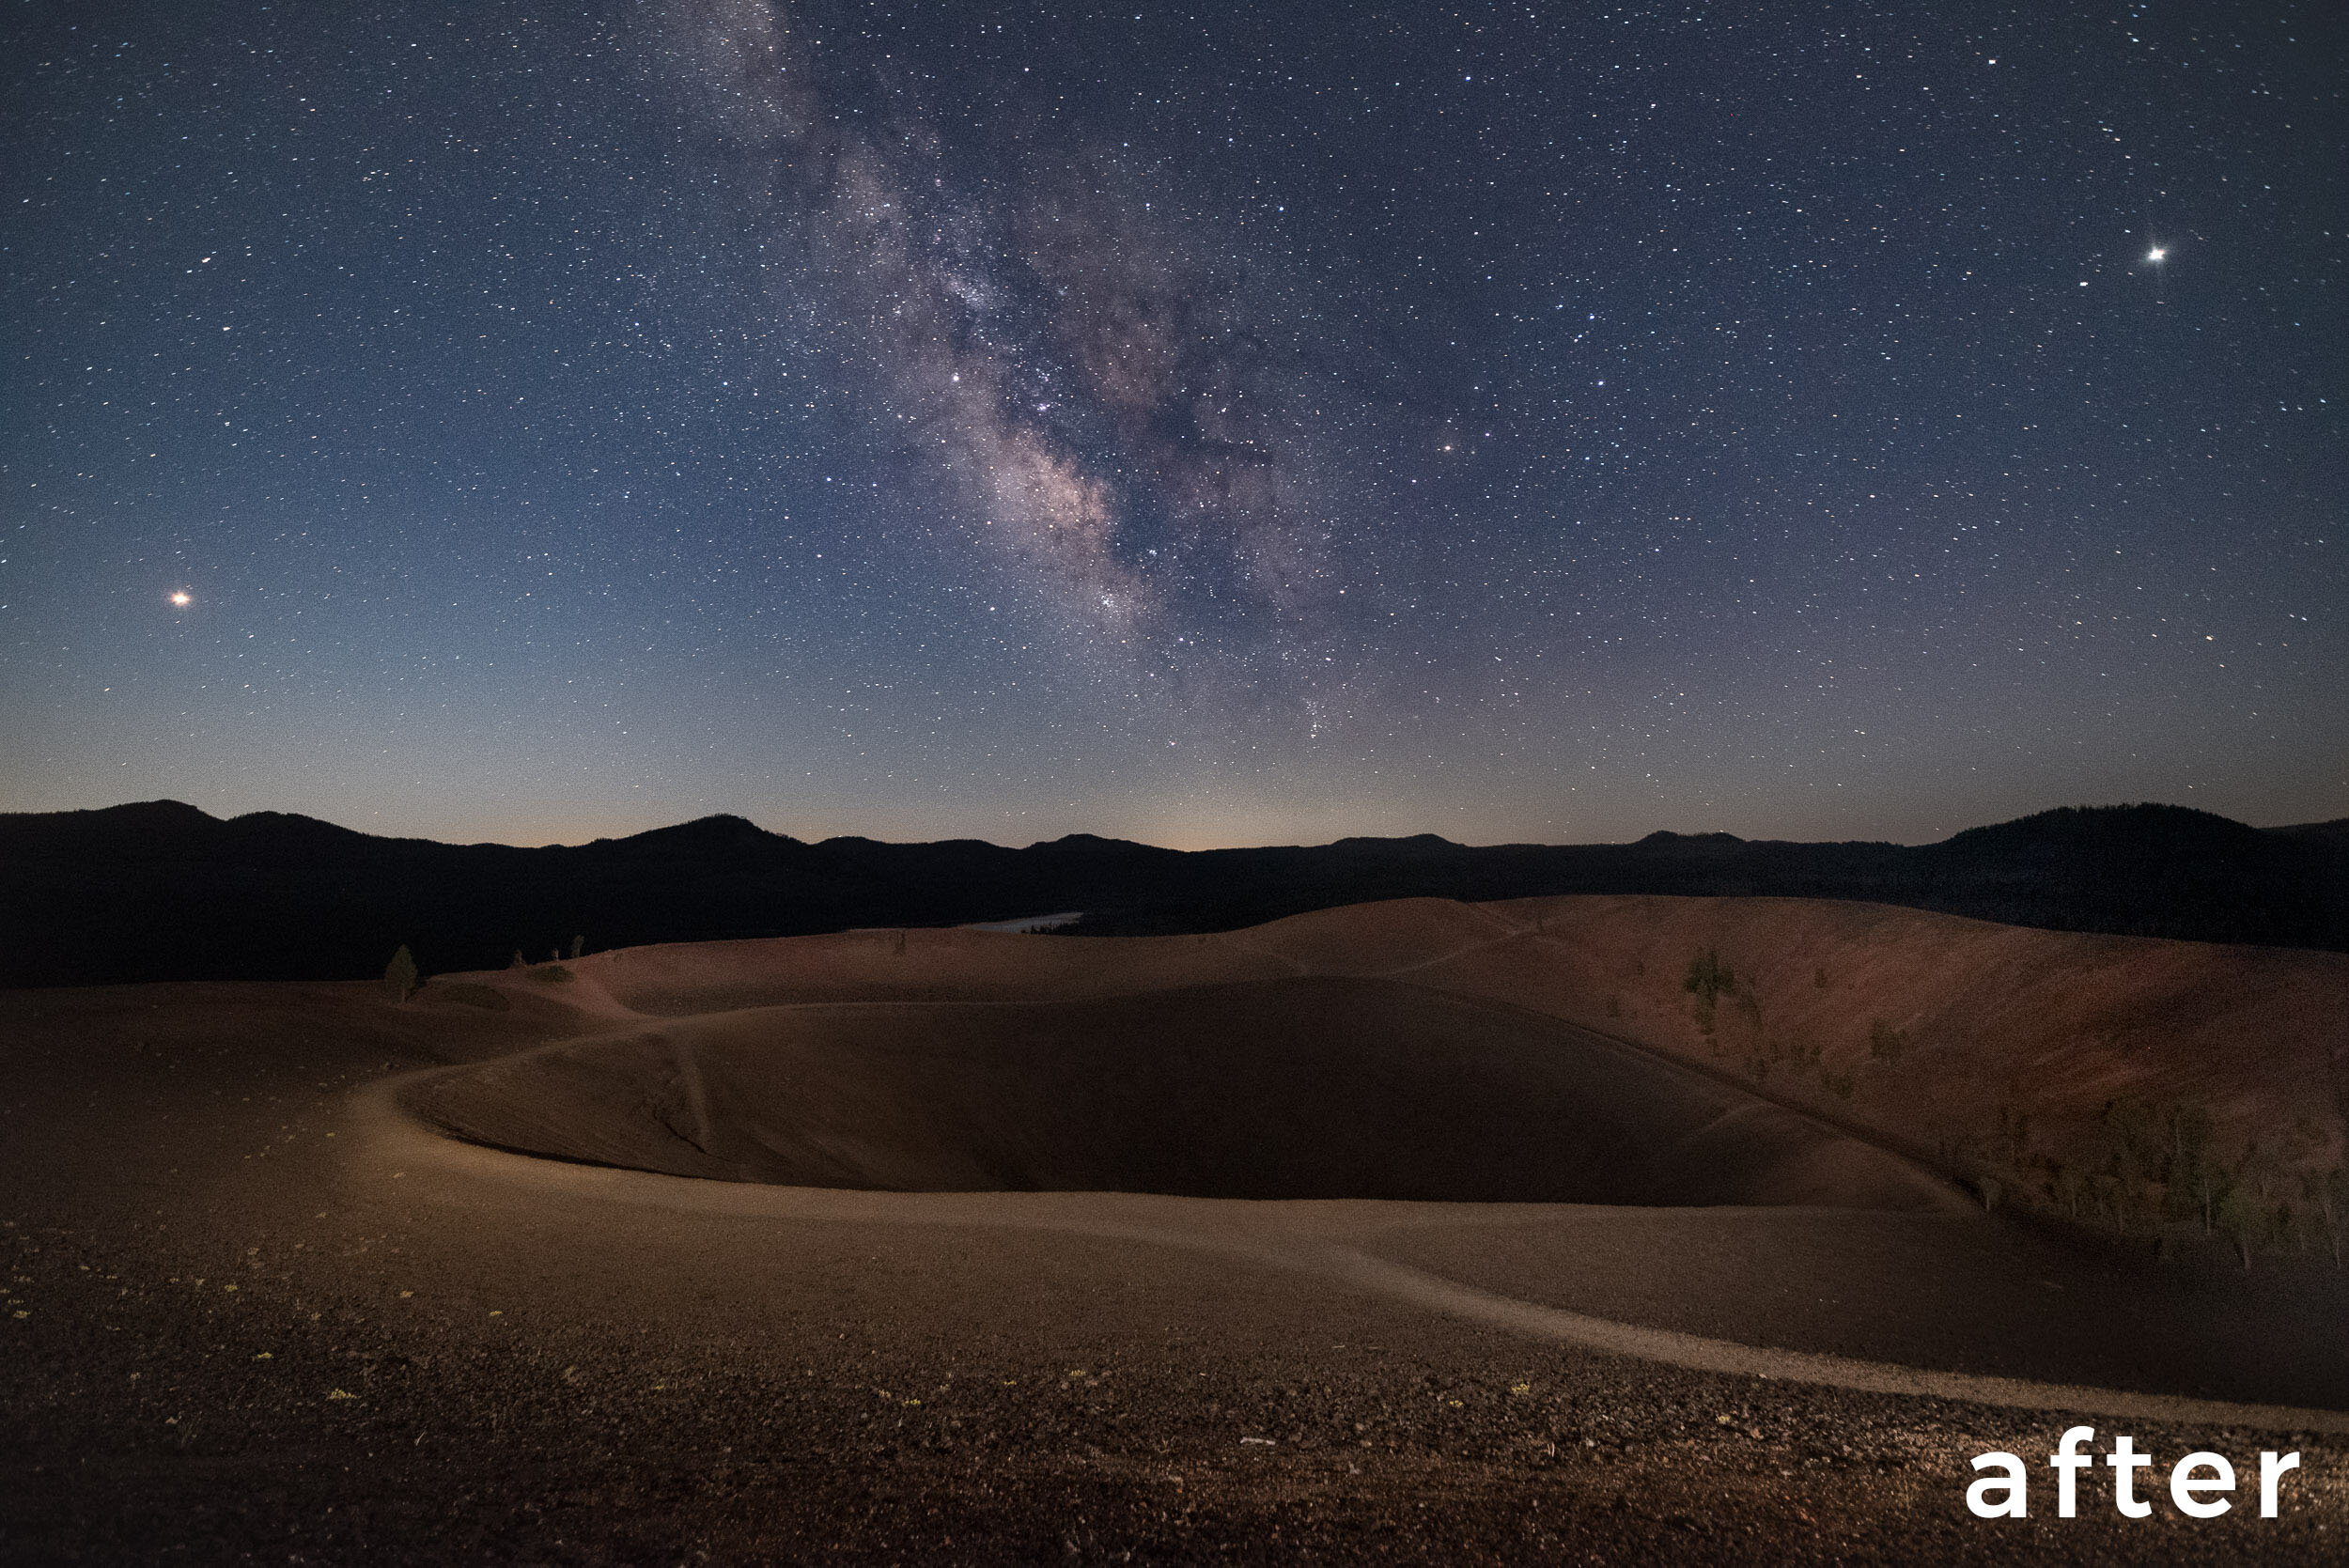
Figure 3. Cinder Cone, Milky Way, Jupiter, Saturn and Mars. Nikon D750 with an Irix 15mm f/2.4 lens. 25 seconds, f/3.2, ISO 6400.

Dealing with light pollution in urban environments tends to be a bit more involved, and also subject to taste in how the image is presented. Below are two examples from Lowell, Massachusetts, an environment primarily lit by sodium vapor with a host of other light sources thrown in for good measure. For this first one (Figure 4), I used a gradient on the sky to remove the color cast without affecting the foreground.

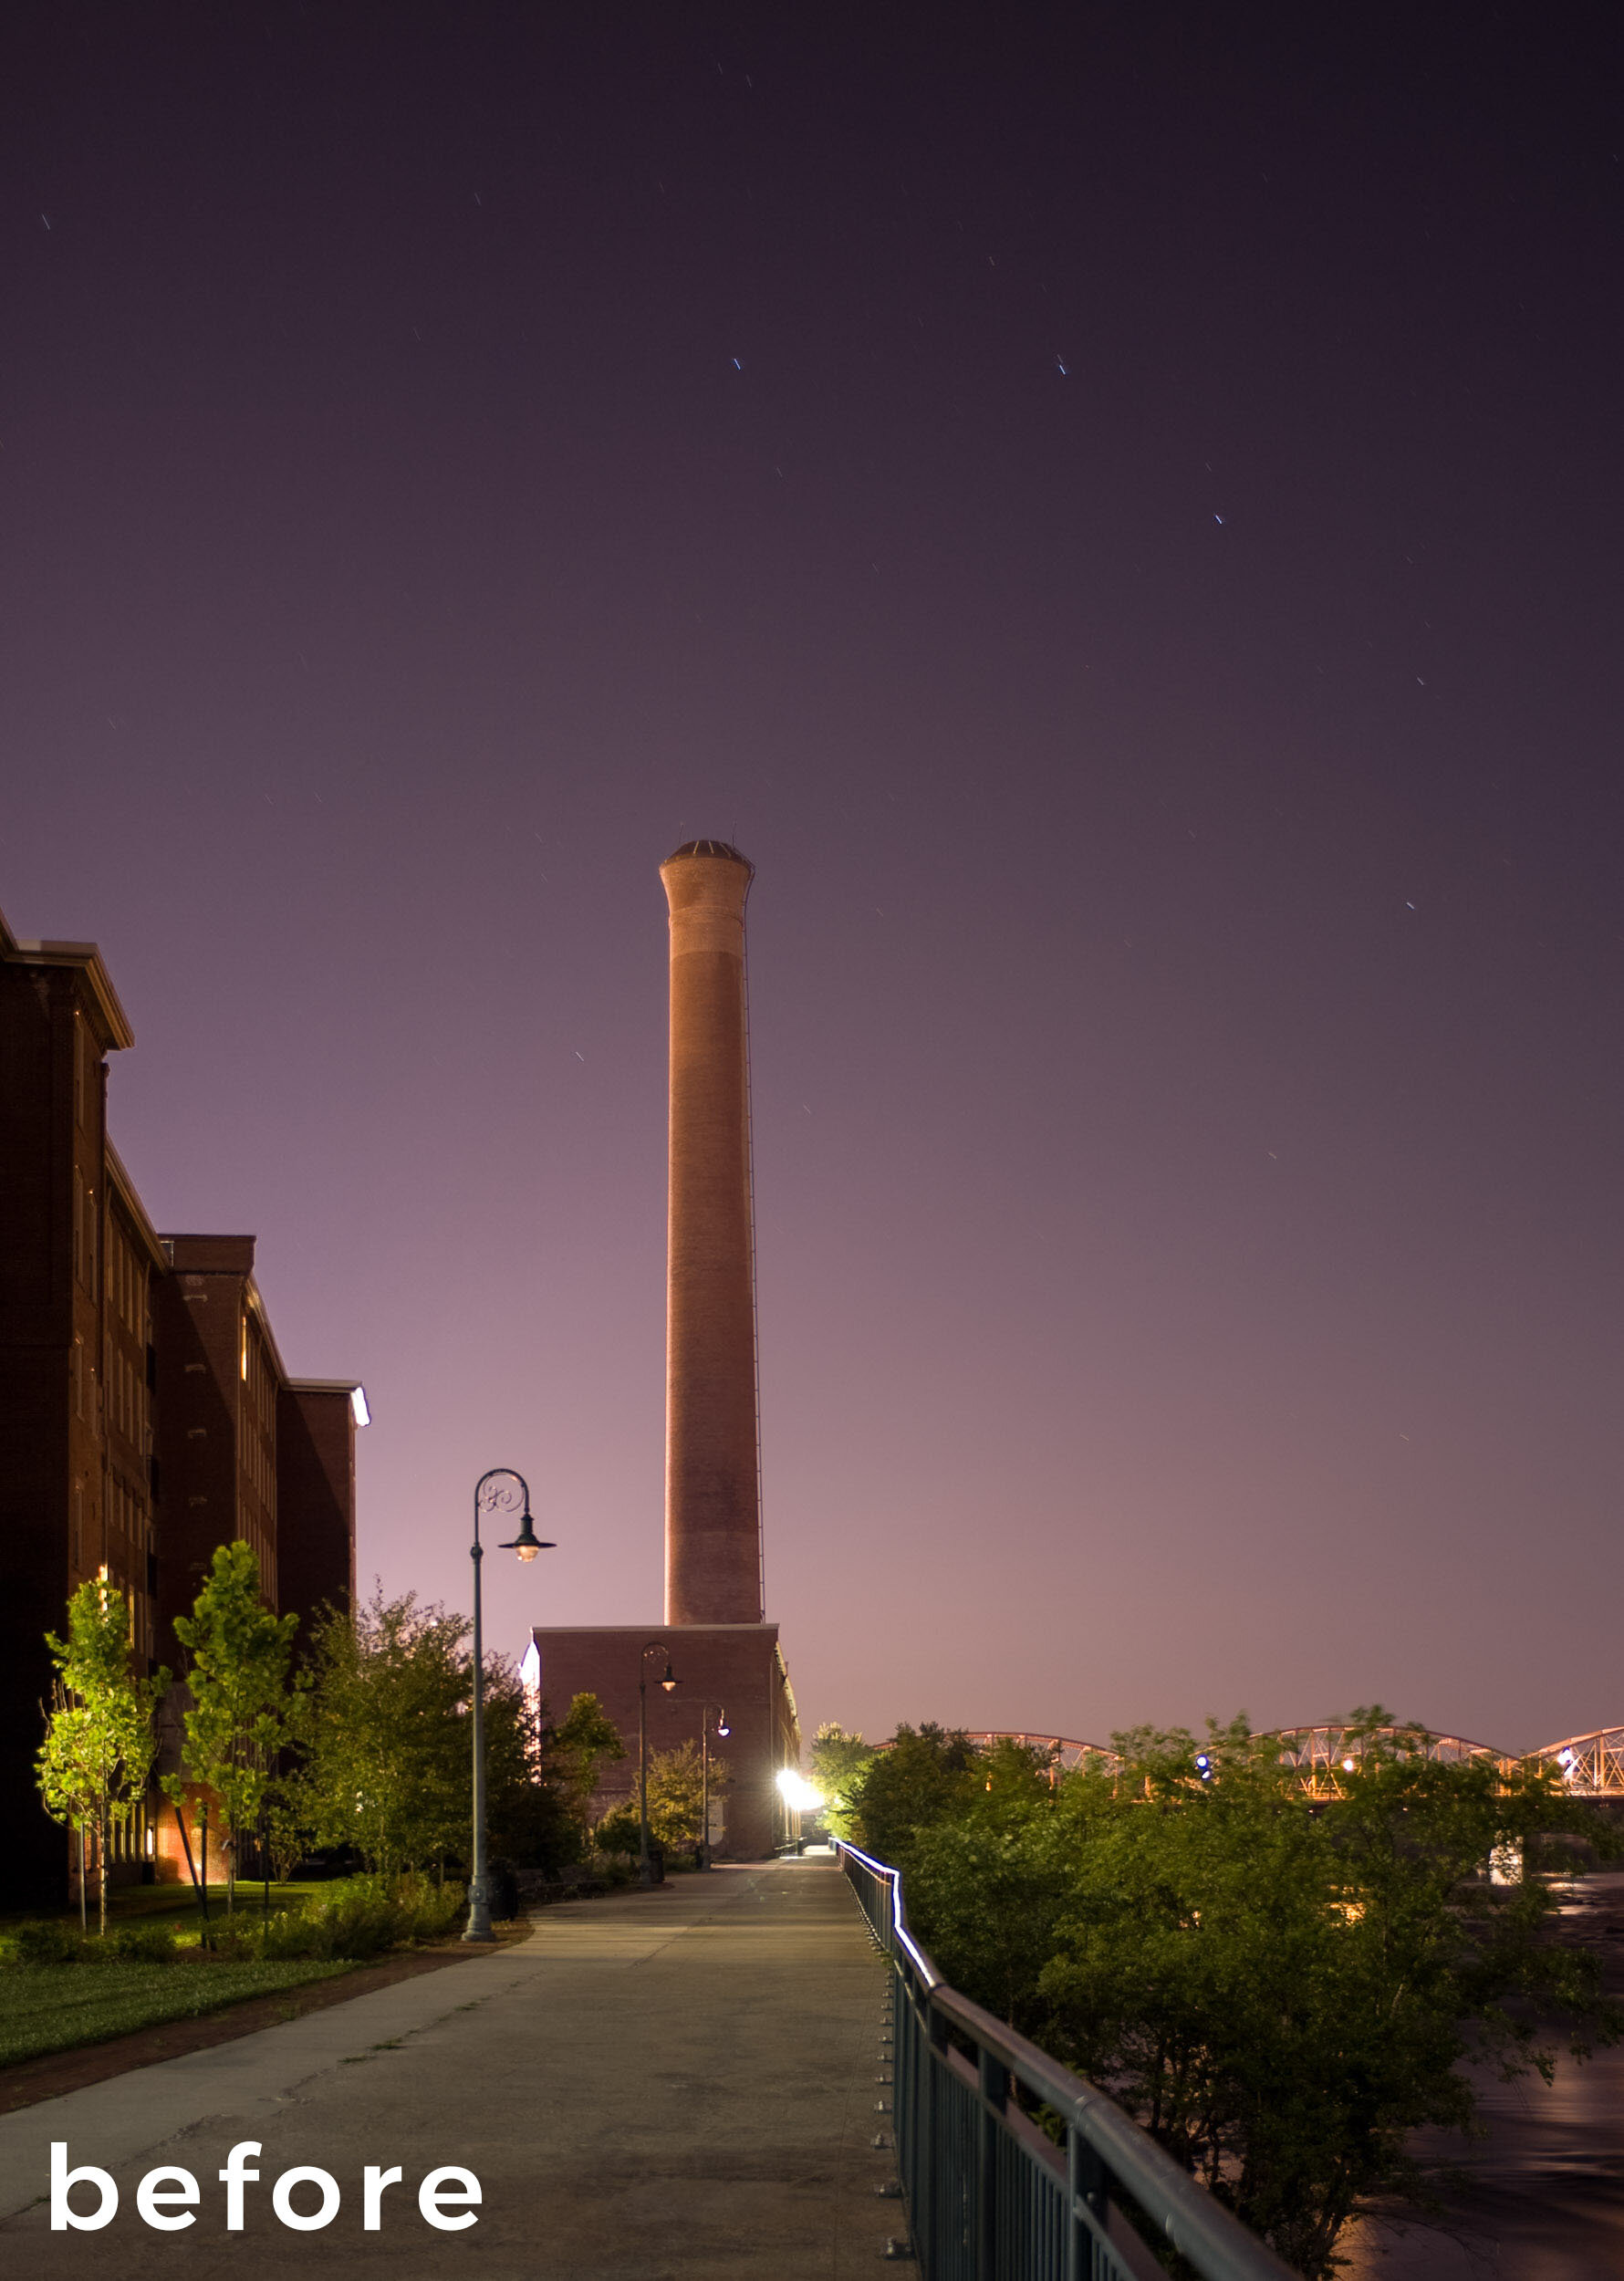
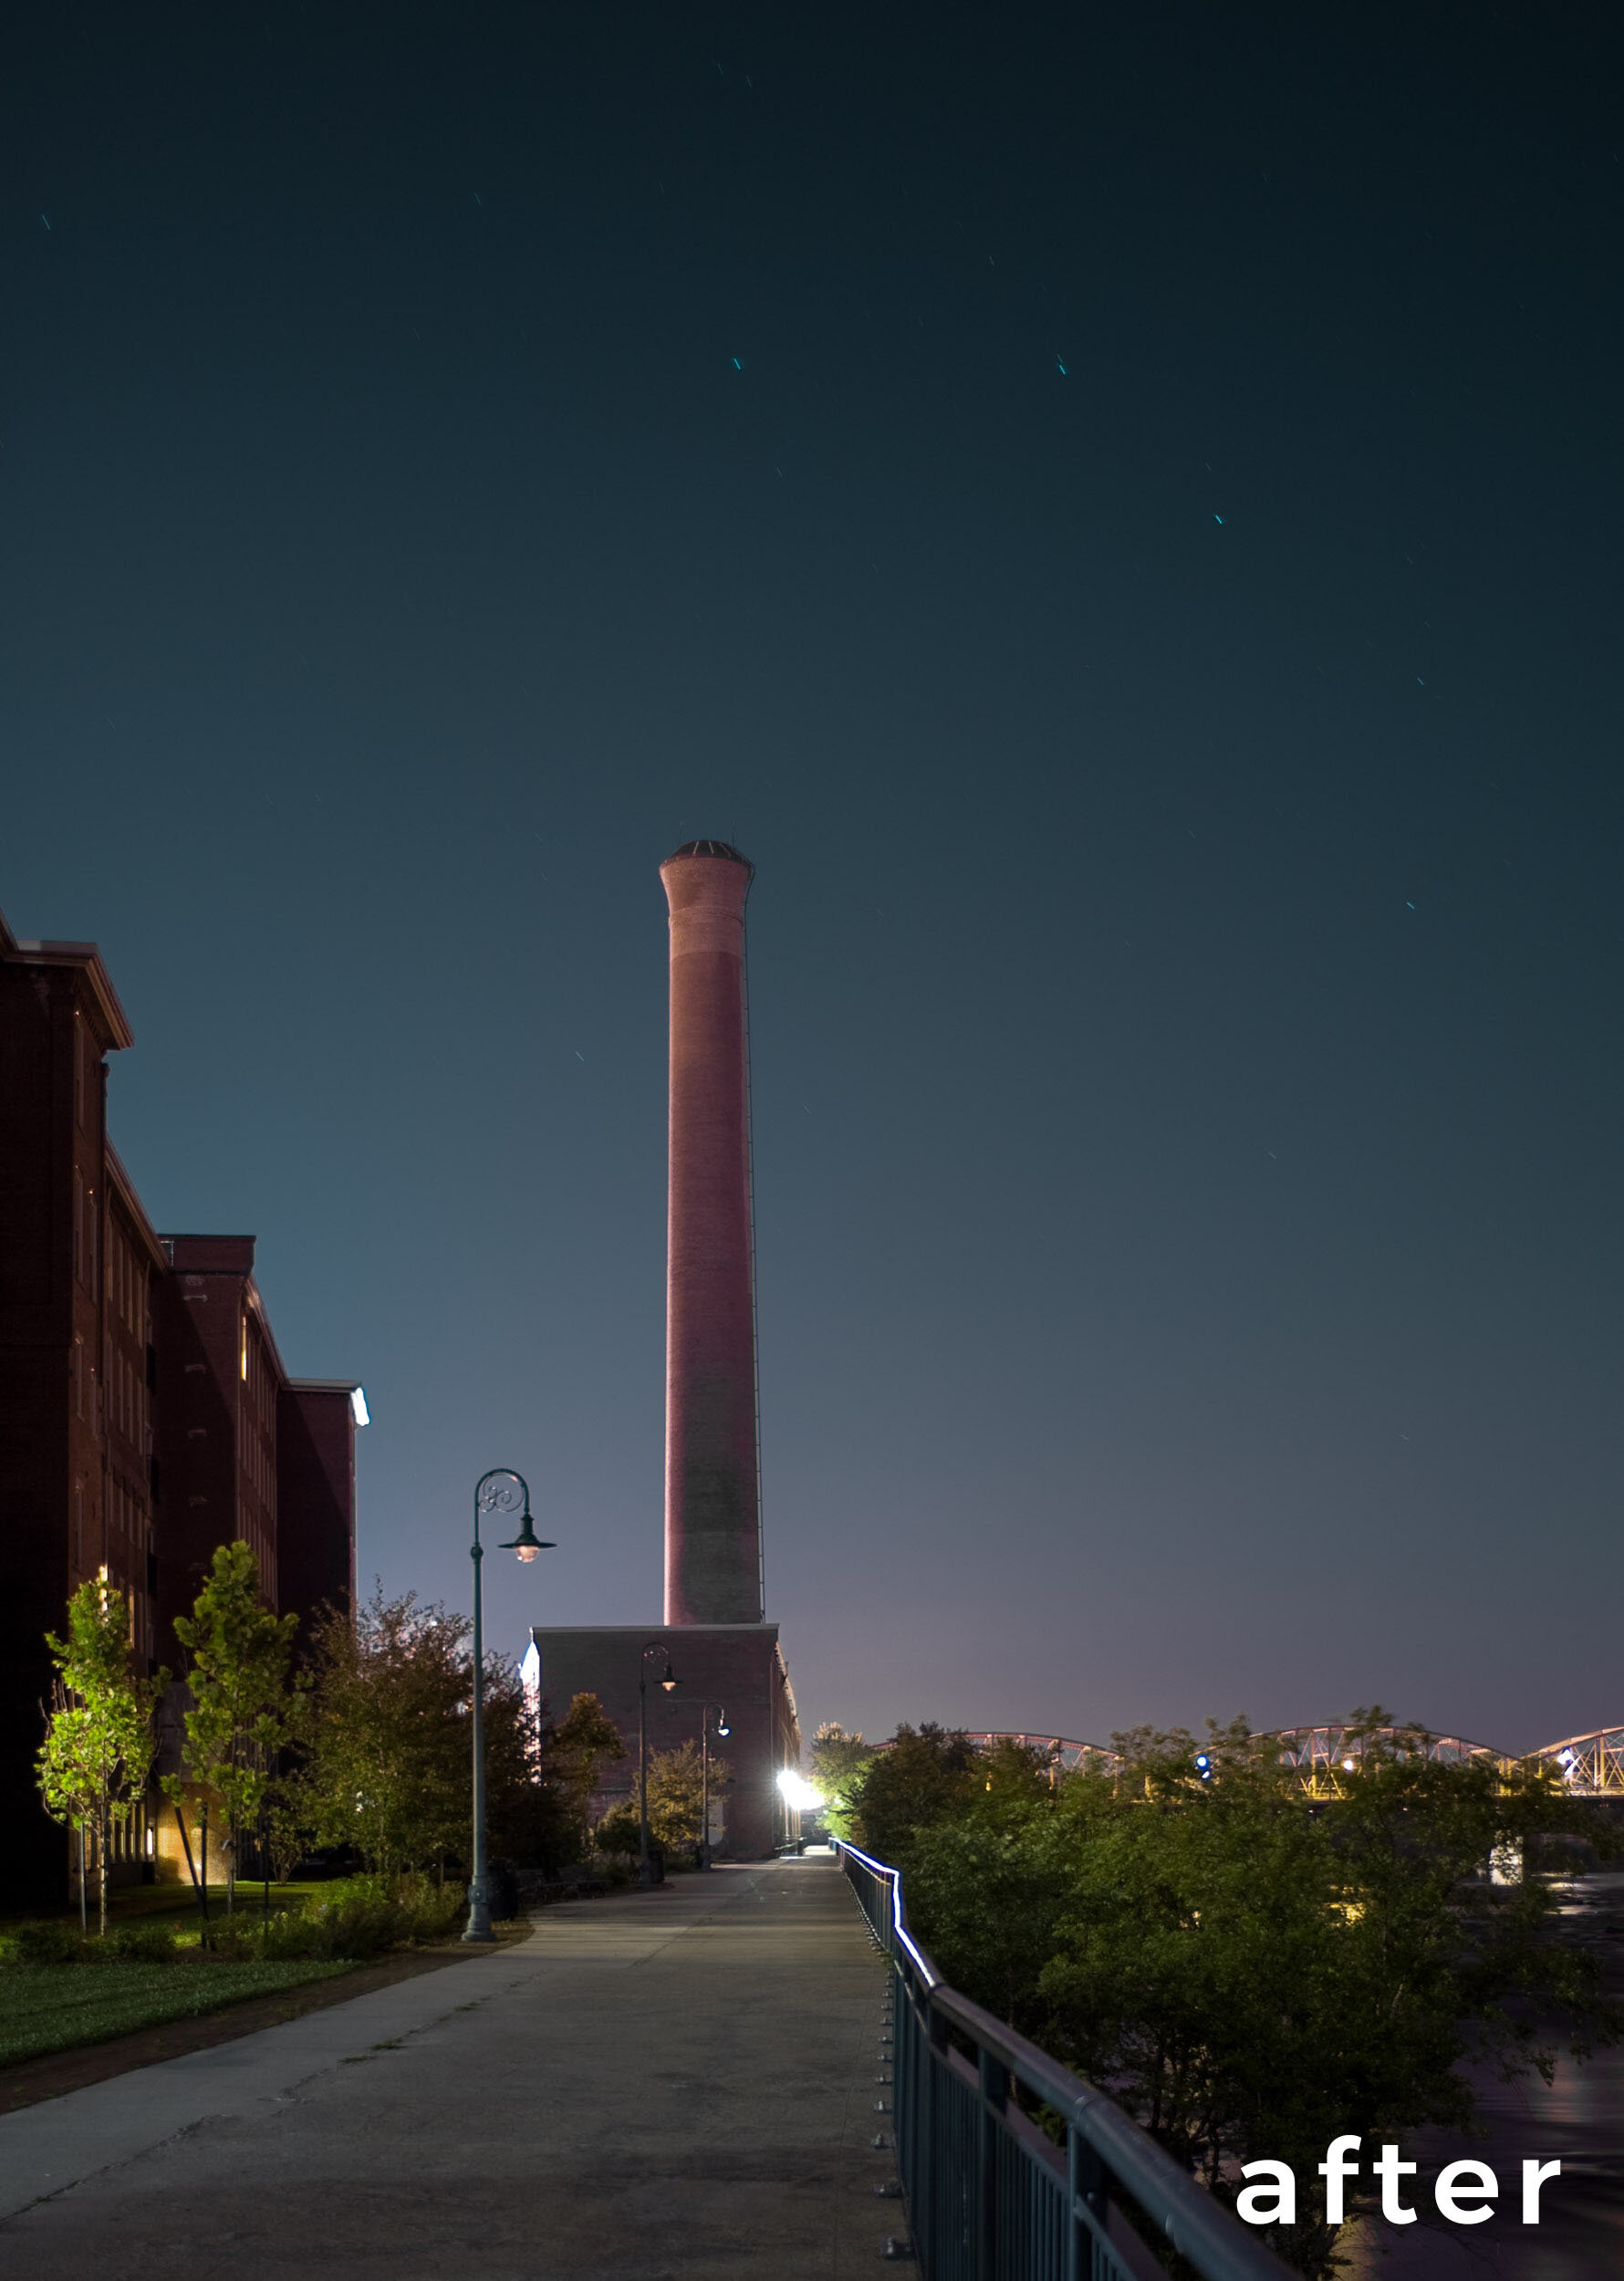
Figure 4. Lawrence Mills, Lowell, Massachusetts. Canon EOS 5D with a Nikon 28mm f/3.5 PC lens. 74 seconds, f/8, ISO 100.

In this last example (Figure 5), setting the white balance by using the eyedropper on the clouds eliminated the color cast from the ambient sodium vapor lights, but exaggerated the cyan from the metal halide lights on the structure. A selection with the local adjustment brush enabled me to desaturate the cyan on the building without affecting the rest of the image.

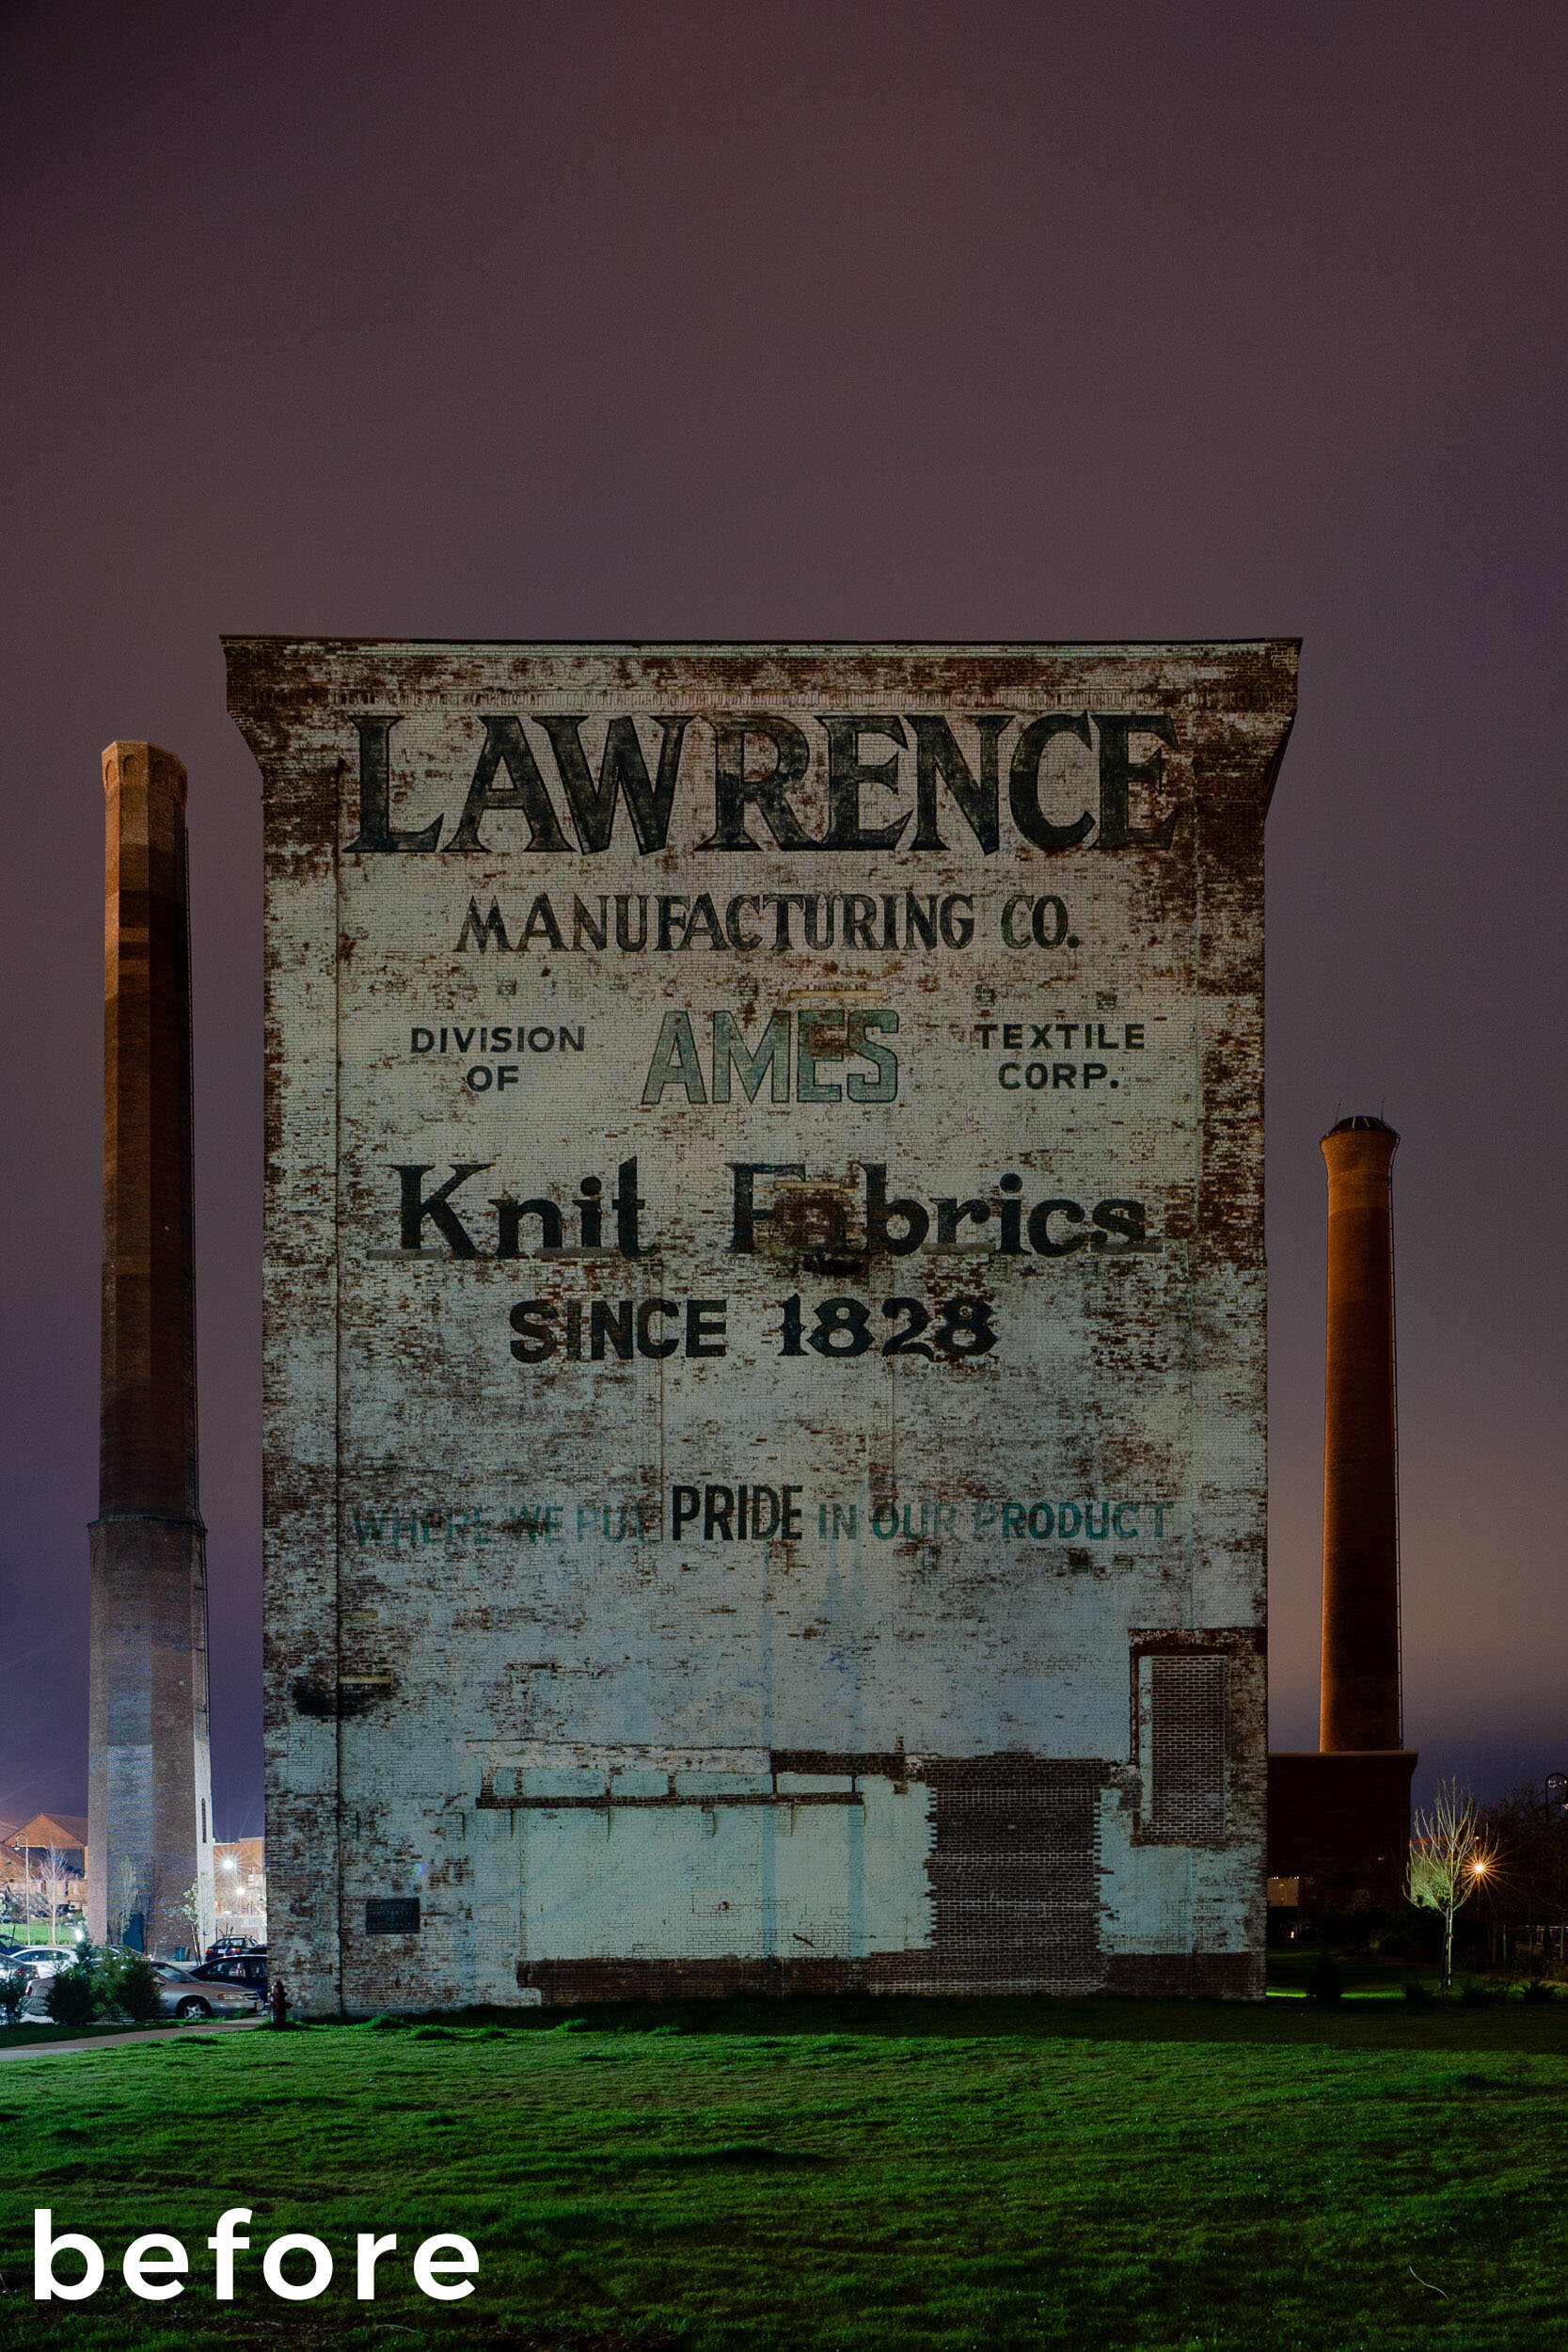
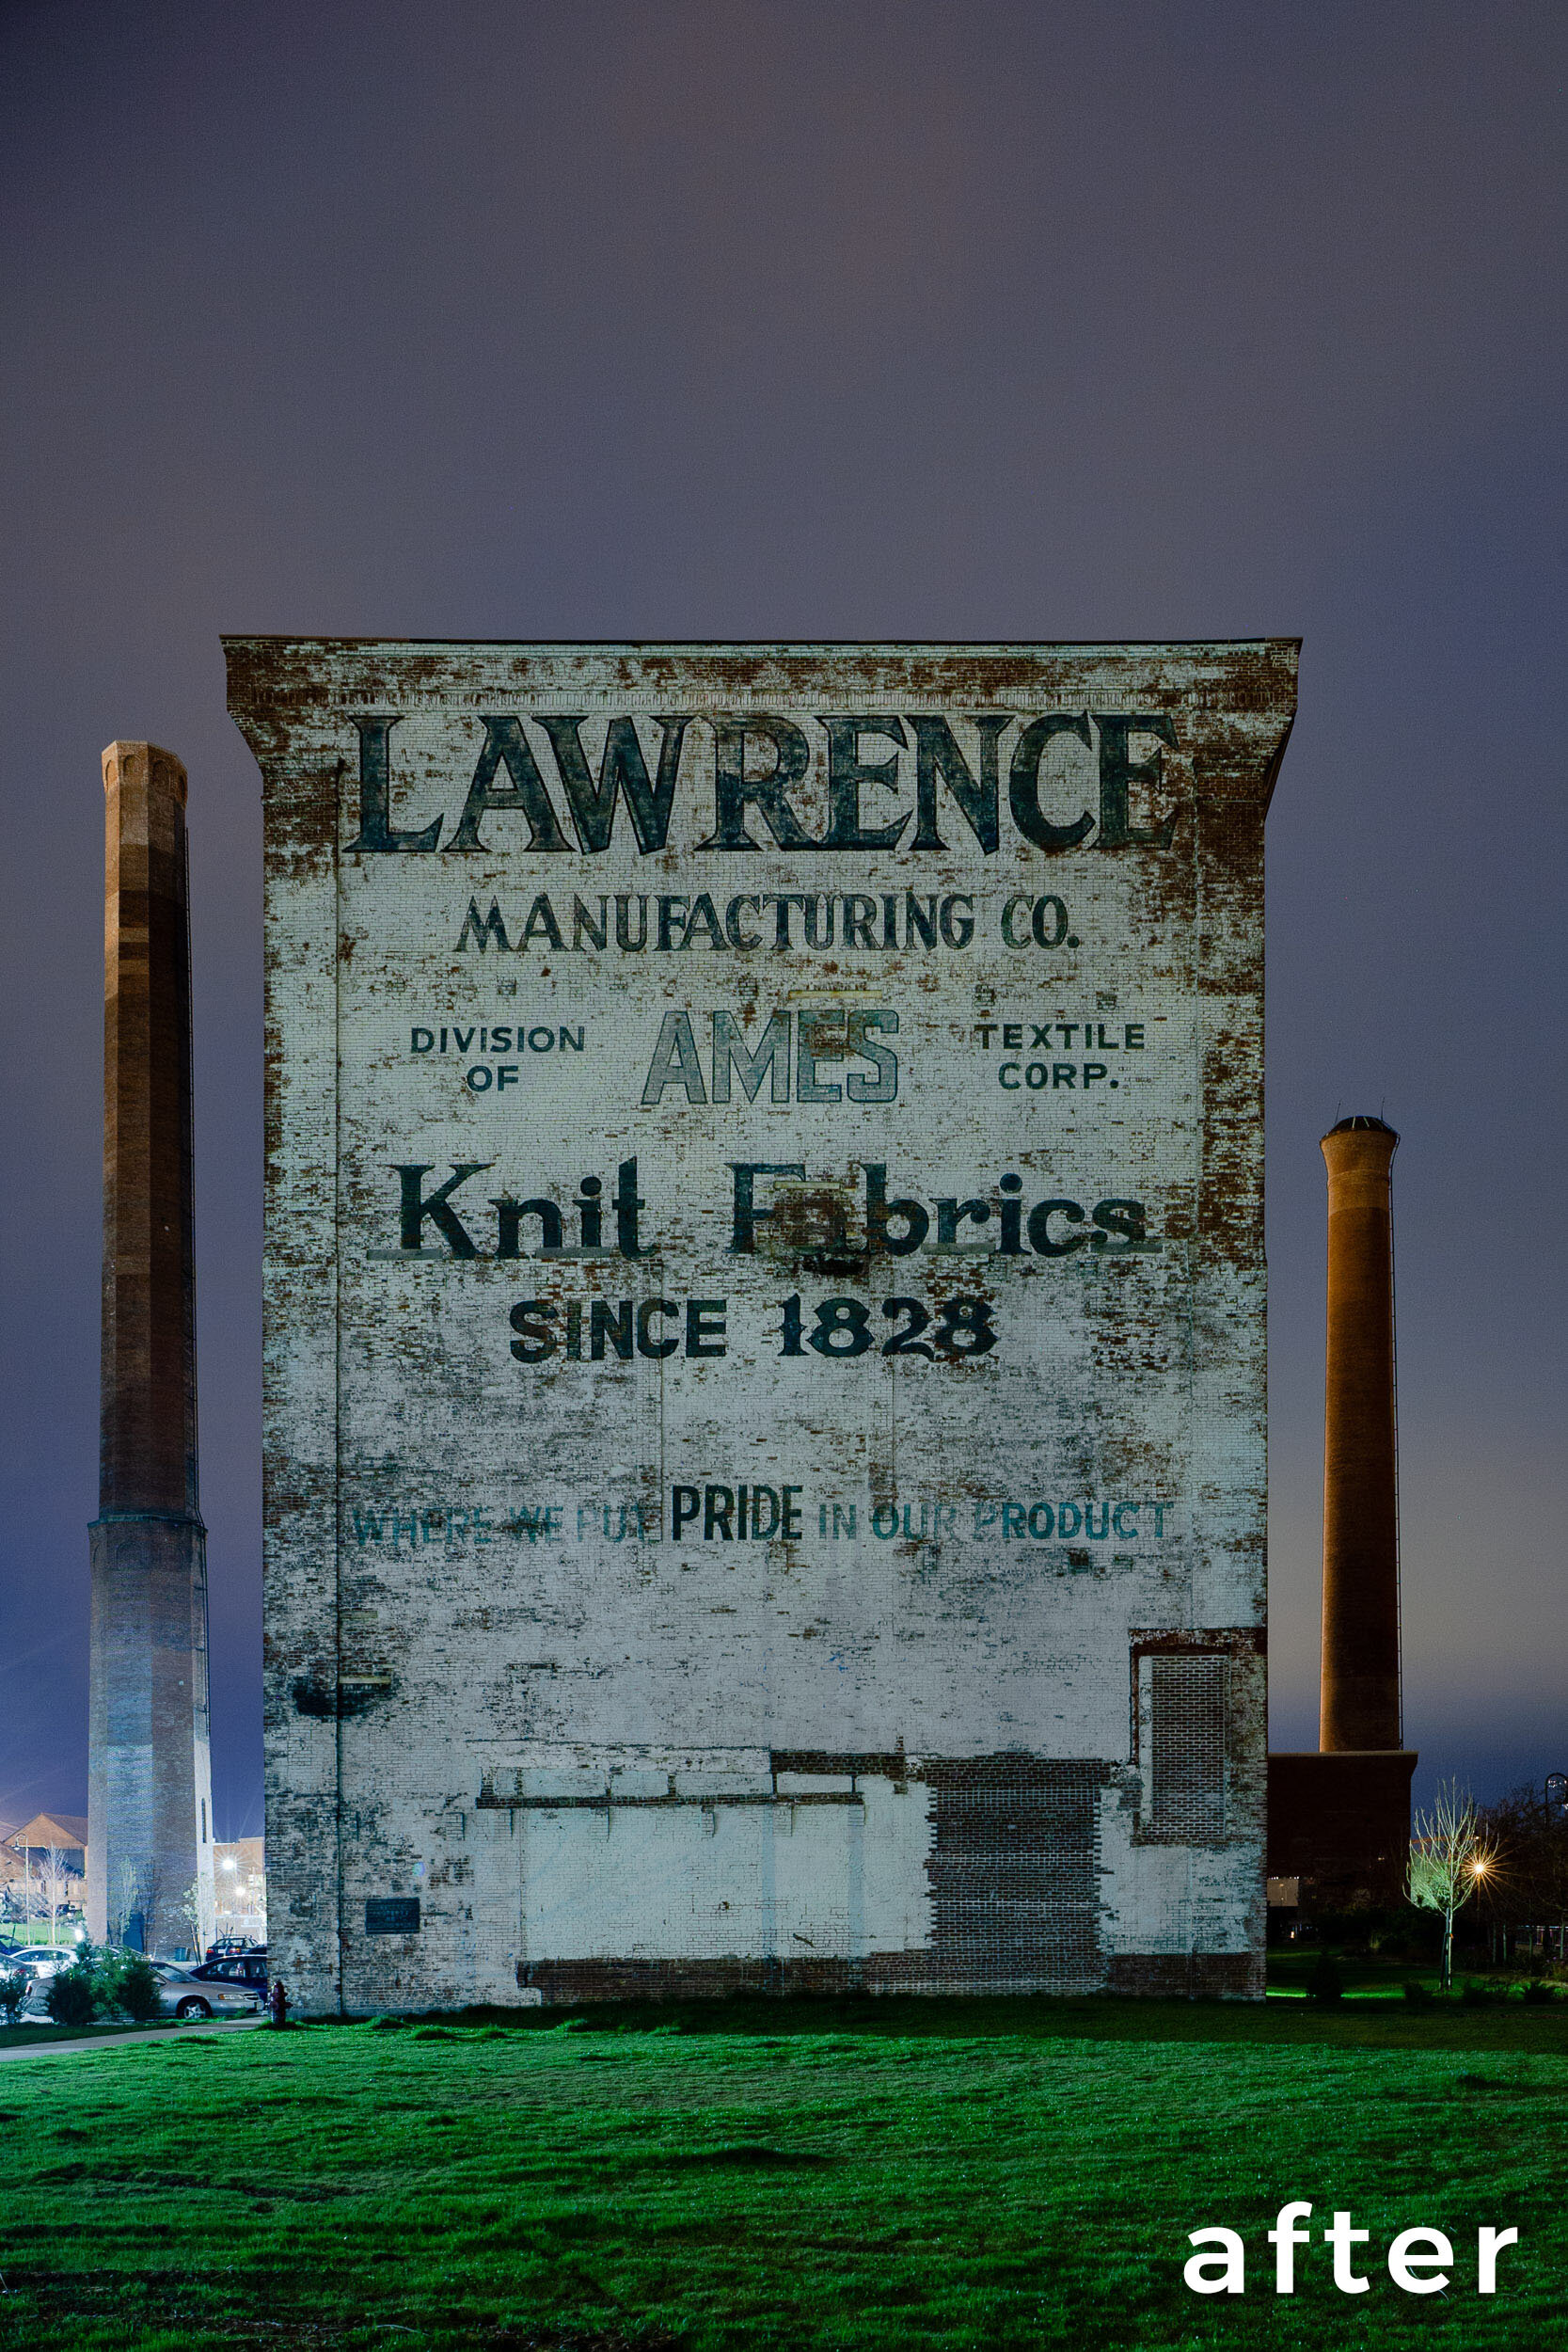
Figure 5. Lawrence Mills, Lowell, Massachusetts. Canon EOS 5D with a Nikon 28mm f/3.5 PC lens. 73 seconds, f/8, ISO 100.

Video Tutorial

In the video below, I offer more detail on how I accomplished the edits I mentioned above, walking you through all the steps for achieving the same results in your own photos affected by light pollution.

Wrapping Up

As you can see, if you don’t have a light pollution filter, or even if you do, post-processing techniques offer another option for dealing with light pollution in nocturnal images. The techniques are most effective at minimizing color casts from gas discharge lights such as sodium or mercury vapor, or metal halide lights.

However, be aware: If the stars are obscured by scattered light in the atmosphere and are thus not recorded by the sensor, no amount of post-processing can bring them back. However, judicious use of the Dehaze slider will help bring out the stars that are present, and can also compensate for the loss of contrast from light reflected off of particulates in the low atmosphere that are the source of the problem.

In Part 3 next week, Chris will write about learning to live with light pollution in night images, and how to turn a hindrance into an unexpected bonus. Stay tuned, as the more tools you have at your disposal, the better your chances of a successful image regardless of the light conditions!

Lance Keimig is a partner and workshop leader with National Parks at Night. He has been photographing at night for 35 years, and is the author of Night Photography and Light Painting: Finding Your Way in the Dark (Focal Press, 2015). Learn more about his images and workshops at www.thenightskye.com.

UPCOMING WORKSHOPS FROM NATIONAL PARKS AT NIGHT

How to Deal With Light Pollution, Part I: Filters

Note: This is the first in a three-part series about one of the most common questions we get: How do you deal with light pollution? We have three answers: with filters, with post-processing, with creativity. In this week’s blog post, Matt Hill discusses the first of those solutions: light pollution filters.


Light pollution is a reality. It affects humans’ quality of life. And it’s not addressed in a serious manner by most local governments.

When it comes to night photography, it’s purely up to individual aesthetic if light pollution is positive, negative or neutral.

I like to think of the problem as a coffee metaphor. Would you make coffee without a filter? No. That would be sacrilege (and like drinking mud). The same principle applies to photography. There are certain situations wherein a filter does exactly the right job and is therefore necessary. Neutral density and polarizers are perfect examples.

But as light pollution filters are relatively new to the photography world, the question stands about whether they fall into the same category. So I set out to understand if and when light pollution filters are useful. After some deep testing experimenting in post-processing and hours thinking about the issues, I have some observations and suggestions for you.

The bottom line is this: Yes, light pollution filters are very helpful in certain situations. Read on to find out when I’d suggest using them.

Note: This will not address deep-sky light pollution filters used typically for strict astrophotography. I focused on what we do best: astro-landscape and suburban/urban night photography.

The Problem(s)

1.  exactly what light pollution filters do is not clearly described.

The manufacturers of light pollution filters claim they remove unwanted color casts from night photography. But very few, if any, provide graphs or data showing which wavelengths of light are blocked. On top of that, very few laypeople know what the heck those mean anyway—so maybe that’s why they aren’t just readily available on the manufacturers’ websites.

In short, the makers say that the filters block a yellow glow. And most often they claim the glow comes from sodium lights. But there are distinctions in this range. As we see in Figure 1, low-pressure sodium vapor lamps typically emit at 589 nm (nanometers).

Figure 1. Source: Wikipedia

The Irix website provides the chart in Figure 2, which clearly shows 589.3 nm as the wavelength being narrowly blocked with only 15 percent transmittance. This means only 15 percent of the light at that wavelength passes through the filter. And it slopes up on either side, so some other nearby wavelengths (colors) are also affected.

Figure 2. Source: Irix.

By comparing the two charts—the emitted light spectrum and the filter’s blocking profile—we see that this is a very specific filter. In fact, it has only one job: to block light at a very narrow wavelength.

Mercury vapor lamps are trickier to filter for, since there are many wavelengths and uses for them. But when used as overhead street lighting, they typically show as blue (435.8 nm) and green (546.1 nm) to our eyes. There is a yellow-orange variant too, which emits at 578.2 nm. This latter one is likely also blocked using (what I can discern as being) typical light pollution filters.

Figure 3. Source: Wikipedia.

We also need to consider the LED revolution. Many cities and townships are in the process of (or have completed) converting all street lamps from the often-beautiful mixed-color lighting to very consistent and “clean” LED lighting. The color temperatures from LEDs may vary widely from warm to slightly cooler than daylight. They also emit more of the color spectrum and will thus render colors better (though not as well as a true tungsten light source). Keep reading to see examples.

So it feels like this wave of light pollution filters is about 10 years too late. But is it?

2. how to best use light pollution filters is not clearly described.

Not one manufacturer source that I researched suggests a white balance setting, nor any post-processing settings. None even mention the filter factor (i.e., how much light the filter eats and how much to compensate for it).

It seems to me that photographic lens filters are a sunset product. Meaning, they are mostly outdated and unnecessary except for the aforementioned specialty filters that have very narrow, specific jobs that cannot be reproduced by post-processing. Their effect must be in-camera. Because this category of products is basically fading away, there are very few passionate manufacturer advocates who put energy into clearly explaining what the filters are for and how to use them. This is a personal gripe I have and my own observation. But it makes sense, right? I wish more technical and instructional information existed in the filter market in general, and definitely for such a new type of filter that’s been generating such buzz.

3. Using filters is inconvenient.

Screw-on filters are a PITA to mount and unmount. I get so anxious doing it. Especially since I often have my camera over a precipice, railing or bridge. I dread that the filter will fall out of my hand or not thread properly and splash/crash.

Some forward-thinking manufacturers now use a magnetic mount system. I have not tested this, but the premise of it addresses my pain directly. My concern (again, having not used it) whether the filter remains in place if I forget it’s on and move my tripod around with the camera mounted. I am not sure how strong those magnets are.

Drop-in filters are also painful to use. Resin filters damage the optical quality of your images too much to even consider. And glass drop-in filters, even though they are chemically hardened, are still glass and therefore fragile. So transporting them to the shoot location and them keeping them safe as you move around is another concern.

Bottom line: You have to care about the problem to use the solution.

The Gear

For these tests I used the following camera gear:

Testing Methods

I shot one control and two tests with the following process:

  1. Photograph without a filter at Tungsten white balance.

  2. Photograph with an Irix screw-in filter.

  3. Photograph with a Benro drop-in filter.

To avoid bumping the camera, I gently screwed in the Irix filter, shot, unscrewed it, and then used the quick-mount Irix filter holder with the Benro glass filter in it. Minor camera movements happened—despite my process.

Locations

I chose a few locations with varying light pollution. I did not go to a place without light pollution, as that would negate the need for the filters.

  1. Athens, New York—Bortle 4 (rural/suburban transition)

  2. Catskill, New York—Bortle 5 (suburban)

  3. Astoria, New York—Bortle 8-9 (city sky / inner city sky)

Let’s Talk About Color

Visible light occurs between 400 and 750 nm. Some light sources emit full-spectrum light (such as tungsten lighting) and some emit less of the color spectrum (such as sodium vapor).

So I brought along my favorite tool for getting a) the most accurate color in-camera, b) a reliable color reference for comparison and c) a reliable neutral for color balancing. That tool? The X-Rite ColorChecker Passport Photo 2.

Color management is not voodoo. And color science is not as daunting as it seems.

Here is how I use it:

Building a camera profile

When I want to make sure I have the colors represented as closely as possible to correct, I photograph the object in Figure 4:

From Lightroom, using the ColorChecker plugin, I export that image to build a profile (Figure 5).

Figure 5.

Then after restarting Lightroom, under “Profile” in the Basic panel of the Develop Module, I choose the new camera profile.

Figure 6.

The process of building a camera profile is simply one of asking science to place all the color values where they should be (Figure 7). Know this: You may want to build camera profiles for different light sources, such as midday sun, moon, flash, flashlight, sodium vapor, etc. Even if you don’t use a white balance adjustment, the colors will render more true to life.

Figure 7. It’s science. Color science. And don’t the colors look more “right” as you both profile and apply a white balance?

Let’s compare them side by side without a profile and without color balance adjustments, as seen in Figure 8:

Figure 8. Nikon Z 6 with an Irix 15mm f/2.4 lens. Tungsten white balance; 30, 50 & 50 seconds (left to right), f/2.5, ISO 125.

It’s easy to see what a sodium vapor light source does to color when you have a series of calibrated color patches. None of them look right without correction. That’s because that light source is not full spectrum, so different-colored objects reflect it differently.

And when you put a filter on the lens to filter out that light source, you are compounding a problem again. First, the light source didn’t emit at full spectrum, so expecting it to render anything “naturally” is not just unreasonable, it’s impossible. The color patches above demonstrate this. You can come closer via profiling and white balancing, but never true to a full-spectrum light source.

Figure 9. Note the dramatic change in contrast on the stone bench arm beneath the ColorChecker Passport, as well as the neutralization and color change in the streetlamps in the background.

But when you apply a light pollution filter to block that spectrum, you can prevent it from affecting (or, polluting) your image.

That’s when these light pollution filters become viable. Even necessary.

I provide all the above to help you understand the side-effects of filtering out that spectrum and the ideal ways to approach correcting this. I will explain what I have learned.

OK, let’s get out of the science weeds and into the practical application.

One more note before we continue: I love my ColorChecker Passport Photo 2 for daylight and flash camera profiling. It’s invaluable. But for night photography it falls short; often due to the partial spectrum light sources we use. I highly recommend owning one but its applications for night photography are limited to primarily white balancing. It was, however, an excellent tool to demonstrate the color shifts and missing color spectrum.

Light Pollution Filters in the Field

The first time I saw a practical benefit for a light pollution filter was when facing … well, light pollution. (Amazing, right?)

When photographing the Perseids this year, I set up my Nikon D750 as a second camera facing due north from Athens, New York, toward Albany, New York. That city is 45 miles north and yes, it brightened the sky.

Figure 10. Nikon D750 with an Irix 15mm f/2.4 lens, no filter. White balance 3200 K, 260 seconds, f/2.8, ISO 100. Note the warm clouds and cool sky.

Figure 11. Nikon D750 with an Irix 15mm f/2.4 lens, with an Irix Edge Light Pollution Filter. White balance 3200 K, 257 seconds, f/2.8, ISO 100.

Figure 12. Nikon D750 with an Irix 15mm f/2.4 lens, with a Benro TrueNight filter. White balance 3200 K, 252 seconds, f/2.8, ISO 100.

All of the images in Figures 10 to 12 were “cooked to taste” in Lightroom.

With the Irix and Benro filters, a few things happened:

  • The clouds became neutral.

  • The haze in the sky decreased dramatically.

  • The Benro filter seemed to be even more aggressive in neutralizing the yellows.

  • I noticed about one-half to two-thirds of a stop of light loss, and I often increased exposure time to compensate.

The second point above piqued my curiosity. So as I tested more, I looked for evidence of haze being removed from the sky, but found instead that the strong yellow cast from a sodium vapor streetlight was completely removed from the light on the side of the house (Figure 13). This has major implications for urban night photographers because white balance and post-processing do not offer great solutions for color correcting sodium vapor lights, due to their limited spectral emissions as noted earlier.

Figure 13. Nikon Z 6 with an Irix 15mm f/2.4 lens, with no filter (left) and an Irix Edge Light Pollution Filter (right). 61 seconds, f/4, ISO 800.

Here is a Lightroom screen capture zoomed in:

Figure 14.

Note I did not go turn off that light source. I put on the Irix filter. That’s it.

So now I am thinking to myself: All those times I sighed heavily when trying to color correct an image that had heavy orange/yellow streetlights in it—this filter could have prevented a headache.

Figure 15 shows the light source that was hitting the side of that house, without and with a filter (for effect!). It’s not an artful shot, but check out the contrast on the blacktop, as well as the contrast in the sky and on the side of the house:

Figure 15. Nikon Z 6 with an Irix 15mm f/2.4 lens. 61 seconds (left) and 86 seconds, f/4, ISO 100.

Figure 16 shows how you can make a brick church look a little more like a church:

Figure 16. Nikon Z 6 with an Irix 15mm f/2.4 lens. 60 seconds, f/2.8, ISO 100.

The pair in Figure 17 is especially dramatic. Notice how the yellow glow in the water foreground disappears, along with many reflections. But the sky gets more contrast as the yellow/orange is removed:

Figure 17. Nikon Z 6 with an Irix 15mm f/2.4 lens. 441 seconds, f/4, ISO 100.

Now, in Figure 18, an example that addresses the burning question in our night photographer hearts: “Will it help my Milky Way images?” I processed each of these individually to taste. Applying the ColorChecker camera profile to the no-filter image helped. It did not help the others, so I applied the Adobe Landscape profile and processed to them look similar. They probably look the best they can:

Figure 18. Nikon Z 6 with an Irix 15mm f/2.4 lens. 10 seconds, f/2.8, ISO 6400.

The examples in Figure 19 have mixed light sources. The lamp on the side of this building is a CFL (compact fluorescent) bulb. The light hitting the side of the building is from multiple sodium vapor streetlamps. Note that the fill light almost disappears, yet the CFL lamp remains unaffected. Wavelength filtration at its finest.

Figure 19. Nikon Z 6 with an Irix 15mm f/2.4 lens. 15, 25 and 25 seconds (from left to right), f/11, ISO 400.

Finally, I decided to pay a visit to the mecca of light pollution, New York City. I visited Astoria Park’s waterfront and shot downstream toward the Hellgate and RFK bridges. I think I got just about every kind of light source one can get in a single frame.

Figure 20. Nikon Z 6 with an Irix 15mm f/2.4 lens. 8, 13 and 13 seconds (from left to right), f/5.6, ISO 800.

I processed those (Figure 20) to be similar to each other. I found that the skies in the images shot with filters were a bit duller, so I had to boost the luminance and sometimes tweak the hue. Otherwise, global adjustments were all that were necessary.

To me, the shot without the filter seems better. But this was just this night at that location with those skies.

In Conclusion

Using and testing light pollution filters, I learned:

  • If you have some particular man-made lights that are vexing, and you have a filter that can block them, light pollution filters are useful.

  • If you like your clouds to be a neutral cast, light pollution filters are useful.

  • Your image ends up being more blue, which will require additional post-processing.

  • I can imagine that this helps immensely in situations where the horrid orange yellow light makes skin tones look terrible or prevents you from editing a color image properly.

  • It’s surprising to just be able to subtract that light source without affecting much else.

If you absolutely hate carrying filters and using them, none of this matters. 🙂 But if you find any of the above effects attractive, perhaps you will make room in your bag.

Big thanks to Irix for their support. We use their lenses all the time and love them. Getting to know their other products has been a privilege.

Also thanks to Benro for loaning us the TrueNight glass filter.

If you want to learn more about light pollution, please visit or join the International Dark-Sky Association. They provide a wealth of educational materials, conversation starters and resources for those who want to help address the light pollution issues that affect nearly everyone on the planet. Please consider becoming a member or donating money to support the pursuit of dark skies.

Questions?

I hope so! Lay ’em on in the comments below, on our Facebook page, or via email to adventure@nationalparksatnight.com. In the future I plan on doing a big shootout of all the light pollution filters I can get my hands on. So what you ask now will help me develop a better testing schema.

Thanks! Seize the night.

Ready for another solution to light pollution? Read “How to Deal With Light Pollution, Part II: Post-Production.”

Matt Hill is a partner and workshop leader with National Parks at Night. See more about his photography, art, workshops and writing at MattHillArt.com. Follow Matt on Twitter Instagram Facebook.

UPCOMING WORKSHOPS FROM NATIONAL PARKS AT NIGHT

Five Questions: Remote Setups, Induro Tripods, Acceptable Noise and More

Answering questions about night photography is our livelihood, and it’s our passion. We do it on workshops, we do it at conferences, we do it here. And we’re happy to do it in all those places.

This installment of our “Five Questions” series features inquiries about remote setups, multi-row night panoramas, tripods, high ISO noise and controlling a Luxli via Bluetooth.

If you have any questions you would like to throw our way, please contact us anytime. Questions could be about gear, national parks and other photo locations, post-processing techniques, field etiquette, or anything else related to night photography. #SeizeTheNight!


1. An Overnight Remote Setup

Question:

I live 5 miles from a spectacular 30,000-acre nature preserve of Sonoran desert. I have never seen a nighttime star or Milky Way image of this location, and I want to do one. The problem is that the preserve adamantly closes at sundown. I thought maybe I could take a camera and intervalometer and tripod just before sundown, set it up in an untraveled area and throw a bit of camouflage cloth over it. I can pull it off, but how do I keep my Nikon from powering down? If I use a muted wireless strobe to add a touch of fill, how do I keep the strobe from turning itself off ? Will an intervalometer let me program an 8- or 9-hour delay? — Jim

Answer:

The Vello Shutterboss II—set for a 9-hour delay.

First, is there any chance the preserve would give you special access, knowing what you’re trying to do, and that the photos could be used to help support the preserve? As my lawyer step-father always says, you never get what you don’t ask for.

That approach aside, and barring a coyote mistaking your tripod for a saguaro (if you catch my drift), I think your plan would work.

Yes, you can set an intervalometer to delay the start of its program. My Vello Shutterboss II allows me to set a delay of up to 100 hours, so 9 hours certainly wouldn’t be an issue. I would, however, make sure the batteries are fresh, just in case.

The camera should stay on without a problem, again, as long as the battery is fresh. (See a pattern?) If you want to be really sure, you could use an external battery, like the Tether Tools Case Relay. If you’re going to be running long exposures back-to-back all night, I would do the latter for sure, or just let the camera stop when it stops.

As for the strobe, it’s probably a nonstarter. If you have one that can use an external high-voltage battery pack, and/or if you can turn off low-power mode, or if the camera’s signal will wake the unit via the hot shoe, PC cord or wireless trigger, then technically you’re all set. But the bigger issue is that a flash would definitely be noticeable even from a distance. A flash in the dark is hardly discreet. It would also likely be quite startling to wildlife, so cue that coyote to exact its revenge. However, you might be able to use a Luxli Viola set at very low power—i.e., Low-level Landscape Lighting, which can be surprisingly discreet, as well as relatively non-distressful to critters.

Finally, before trying this on-location, I’d give it a test run overnight in your backyard. Set up exactly how you would in the preserve, and let it all run. Once you perfect the approach, then bring the setup out for its overnight wilderness experience.

I’m very eager to hear how this turns out. Please send the results! — Chris

2. Foreground and Background for Panos

Hovenweep National Monument, Utah. Two multi-row stitched pano frames shot at different exposures. © 2017 Gabriel Biderman. Nikon D750 and Nikon 14-24mm f/2.8 lens set at 14mm. Sky: 20 seconds, f/2.8, ISO 3200; foreground: 3 minutes, f/2.8 ISO, 1600.

Question:

Is it possible to shoot panos with a well-exposed, moonlit foreground, not move the camera, then after moonset shoot a Milky Way pano background, then blend them in post-production? — S.W.

Answer:

In short, yes! You got it right. If your tripod doesn’t move, then you can do exactly what you’re talking about, exactly as you described. Ideally your tripod head’s tilt angle will be parallel with the ground—in other words, no angle at all, just perfectly straight and level. Then you can make one pano pass for moonlight at a low ISO for the foreground and one after moonset at a high ISO for star points.

Here are a few of our blog posts that might help you make the panos:

3. Induro a Good Low-Cost Option?

The Induro CLT303 Classic Series 3 Stealth carbon fiber tripod.

Question:

I’m interested in purchasing a tripod, and I’m hoping that I can stretch my dollar. I have my eye on the Induro line, which Lance suggested as a reliable option in his book. I like to shoot wildlife (birds, especially) so I’m wondering if the Series 3 tripods (which I know would serve that purpose) would be stable enough for night photography, or do I need to go with Series 4 or 5? What are you using? — Christopher Z.

Answer:

I think that you’ll be fine with the Induro Series 3 tripod. For less money, you could consider the Series 2 or 3 Benro, but the former is a considerably better tripod. Also, check out their new Animal Series, featuring the Tortise, Bat and Rhino models.

There are a lot of good options out there, so it’s worth looking around.

I’ll offer two further suggestions:

  1. See our e-book Three Legs to Stand On: A Guide to Tripods. There’s a lot of info in there that you might find helpful.

  2. If or when you can, make a trip into Manhattan and visit B&H Photo, where you can put your hands on pretty much all the options, and also get expert in-person advice. If that’s not an option, try to attend a photography trade show or large conference where you can do the same.

I’m currently using (and am very happy with) a Gitzo Traveler tripod and Acratech head—but that’s a $1,100 combo. — Lance

4. How Much Noise is ‘Acceptable’?

© 2019 Gabriel Biderman. Nikon Z 6 with a Nikon 14-24mm f/2.8 lens. 15 seconds, f/2.8, ISO 12,800.

Question:

I’ve read your article “The Z 6 is the Best Camera for Night Photography.” I’ve been set to purchase a Nikon D750 because of its low noise, specifically at ISO 3200. But actually your observation of the “highest acceptable ISO” more precisely zeroes in on the most important camera characteristic for a Milky Way photographer. Since you’ve photographed the night with both cameras, what’s the highest acceptable ISO for the Nikon D750? — Bill W.

Answer:

The “highest acceptable ISO” is subjective. Your high ISO threshold might be different than mine, which might be different than Lance’s, etc. It’s all about what’s acceptable to you. Though I will say that for night photography—and especially for Milky Way images—we tend to be more forgiving, because the noise of the higher ISOs blends in with the natural granularity of stars.

Another thought to consider is that noise from the same high ISO is more prevalent in darker moonless images than in brighter moonlit images—especially if we need to open up the shadows in post-production.

That all being said, I am comfortable shooting my D750 at ISO 6400 and I try not to go any higher. ISO 6400 is very workable, but if I go to 12,800 then I need to really massage that image in post, or I need to shoot multiple frames for stacking sharp stars and reducing the noise with Starry Landscape Stacker.

However, while the D750 still holds its own at ISO 6400 and has excellent color and image quality, a lot of the rest of the technology behind it dates back to 2014. So I would consider investing in a D780 (if you want to stay on the DSLR route).

In his post “Best of Both Worlds,” Lance does an excellent job comparing the D750 versus the D780 versus the Z 6. We feel that the D780 is the perfect marriage of the D750 and Z 6. You get a very similar sensor to the Z 6, and improved live view and autofocus over the D750. — Gabe

5. Remote-Controlling a Luxli

Nelson ghost town, Nevada. © 2019 Chris Nicholson. Nikon D850 with a Nikon 24-70mm f/2.8 lens, light painted with a Luxli Viola (interior) and Coast HP7R (exterior). 16 minutes, f/4.5, ISO 64.

Question:

After your presentation at the Optic 2020 conference, I bought the Luxli Viola and am starting to play with it. I’m curious if you guys ever use the Luxli Composer app and Bluetooth control? There seems to be a dearth of instructional stuff on the many useful options. Perhaps all I need is to dial in the desired color temperature and “go for it”? — Steve W.

Answer:

I do use the Composer app! Not all the time, but it’s usually great when necessary. For example, I might want to place my Viola in a place that’s hard to reach, such as on top of some high rocks. Instead of climbing up and down every time I need to make a change, I can use the app to alter the settings remotely.

Another example is when putting the light someplace within the frame, where I might not want to walk through mid-exposure to turn it off—instead, again, I can do that remotely with the app. The image above is a good example of when I took that approach. Even at the dimmest setting, the Viola inside the General Store was too bright to leave on for the whole exposure. To avoid walking into the scene mid-exposure to turn it off, I used the Composer app to snuff the light after 8 minutes.

To learn how to use Composer, check out this YouTube tutorial that Luxli put together:

For our take on how to use Luxli lights, check out Matt’s 2017 blog post “How to Master Color at Night with the Luxli Viola.” — Chris

Chris Nicholson is a partner and workshop leader with National Parks at Night, and author of Photographing National Parks (Sidelight Books, 2015). Learn more about national parks as photography destinations, subscribe to Chris' free e-newsletter, and more at www.PhotographingNationalParks.com.

UPCOMING WORKSHOPS FROM NATIONAL PARKS AT NIGHT

On the Road Again: Announcing Our 2021-22 Workshops

For many reasons, it’s amazing that we are announcing our sixth season. But no matter the reason, it’s a delight to offer you so many opportunities to hone your skills as a night photographer.

Continuing our growth plans for you, we have expanded our options to include something new. You asked for it, and now we are offering two workshops focused solely on learning PhotoPills in the field. And that’s not all! … But I don’t want to ruin the surprise. So let’s get to browsing the dizzying array of destinations for Season 6. Just like the Red Headed Stranger said, we “just can’t wait to get back on the road again..”

Please join us for at a workshop. We look forward to seeing you there.


Use the Waitlist!

As usual, our community has committed very strongly to many of the workshops. Also, eight of these workshops were postponed from 2020 and were already sold out or nearly so. If you see something you really want to attend and there are no tickets now, we urge you to sign up for the waitlist today. On every workshop someone drops out and we ask waitlisters to step up.

The Workshops

Below you can read a little bit about each of the workshops we’ll be running in our sixth season. Click on the photos or the links to read even more.

If you’d like to see a lineup of all the workshops we have scheduled for 2021-22, including updates on how many tickets are available in each, see our Season 6 Workshops page:

OK, onward … Here’s where, like a band of gypsies goin’ down the highway, we’re heading in Season 6. …


Passport Series

These are our signature event workshops, which we hold in national parks. These workshops cater to all levels of night photography. We teach every day, either in the classroom or on field trips, and we shoot every night in beautiful and inspiring places.

We generally run only five Passport Series workshops per year, at least four of them to parks we’ve never run workshops in previously. But this year, that changes. We had three Passport locations we needed to postpone from 2020, and we were disappointed that would supplant some of the new parks we’d been excited to go to. So we said the heck with it, we’ll just go to all the parks we want.

Ready to come with?


Badlands National Park

Nestled in the Northern Great Plains, Badlands National Park comprises 244,000 acres of otherworldly landscapes, grassy prairie and wildlife such as bison, black-footed ferrets, mountain goats and bighorn sheep. We’ll be visiting during the 2021 Perseid meteor shower, and will be focusing on capturing the incredible eroded landscapes with Milky Way, meteors and some moonlight.

Badlands National Park Night Photography Workshop — August 11-16, 2021


Everglades National Park

The Everglades is primal, yet inviting. The landscape is raw, yet beautiful. The mosaic of habitats invites photographers to explore and be inspired by wetlands and pinelands, coastal lowlands and freshwater ponds, hardwood hammocks and cypress stands, and vast sawgrass-prairie "rivers of grass." And, of course, the wildlife, from migrating birds to the park's most famous resident, the American alligator. Over them all at night hover a crisp, starry sky and a Milky Way arching from horizon to horizon.

Everglades National Park Night Photography Workshop — April 12-17, 2021


Joshua Tree

Joshua Tree National Park encompasses sections of two different deserts—the Mojave and the Colorado—both full of opportunities for remarkable images. We will extensively explore this IDA Dark Sky Park. People come for the trees and bouldering during the day, but at night these features take on a heightened surreality and make for great foreground subjects while the Milky Way stretches across the sky. We will also have special access to Keys Ranch, a photogenic “ghost ranch” that has several buildings, old cars and lots of machinery to light paint. The workshop will feature dark starry skies and Milky Way explorations, as well as a gentle waning moon that we can mix with our light painting to create wonderful night images.

Joshua Tree National Park Night Photography Workshop — May 2-7, 2021


North Cascades National Park

In the northern regions of Washington state, some of the least-visited and most beautiful mountains in the U.S. rise dramatically from the landscape under untainted dark skies. An alpine wilderness rife with dramatic peaks, lush forests, placid lakes, roaring waterfalls, curious wildlife and more. We will explore by day and night, visiting and photographing different regions of this peaceful, special place.

North Cascades National Park Night Photography Workshop — August 8-13, 2021


Sequoia National Park

The coast redwood may be the tallest tree in the world, but the giant sequoia is the most massive. You’ll be awed by these incredible trees as we spend a week among them in the Sierra Nevada of California. The park’s dark sky festival will be held August 27-29, so come early and join the festivities!

Sequoia National Park Night Photography Workshop — August 29-September 3, 2021


Shenandoah National Park

Road-trip through time as we fully immerse ourselves in the scenic Shenandoah area. We’ll visit historic towns like Harpers Ferry and venture deep into the surreal underworld of the Luray Caverns. Then of course there is the 105-mile Skyline Drive, which features 75 beautiful overlooks of the rolling Blue Ridge Mountains. We’ll do some daytime hikes to photograph waterfalls, and nighttime shoots to capture the Milky Way rising above the Appalachians.

Shenandoah National Park Night Photography Workshop — June 26-July 2, 2021


Yosemite National Park

While Yosemite doesn’t get the honor of being our first national park, it is this area of vertical granite cliffs, placid meadows and rushing waterfalls that inspired our country’s long history of protecting public lands and irreplaceable scenery. We will explore the valley that inspired America’s greatest idea, particularly at night, when the stars hover over one of the most magnificent landscapes in the world.

Yosemite Valley Night Photography Workshop — October 24-29, 2021


Zion National Park

Boasting some of Utah’s most awe-inspiring red-rock peaks, cascading waterfalls and the beautiful Virgin River, Zion National Park and its amazing landforms are a perfect complement to the night sky. We'll explore this epic, iconic landscape under the stars, as well as venture into a nearby ghost town and its 18th century graveyard under the light of a bright gibbous moon.

Zion National Park Night Photography Workshop — March 21-26, 2021


Adventure Series

We started running Adventure Series workshops in 2017. There are amazing places in the U.S. to shoot at night outside of national parks, and we want to visit those too. National monuments, national forests, scenic byways, urban ruins and more.

This year the Adventures will include one of the best ghost towns in the country, two urban locations, a national parkland that’s 469 miles long and only about a mile wide, a legendary cemetery and more.


Blue Ridge Parkway

The night is falling, and the road is calling. And we will be there, driving and photographing America’s greatest scenic byway. When the sun fades, we’ll bring our cameras along the 469-mile ribbon of national parkland that stretches atop mountain ridges, through farming communities, past historic cabins and mills, alongside meadows and more, while the stars and moon gently shine on the great blacktop river called Blue Ridge Parkway.

Blue Ridge Parkway Night Photography Road Trip — July 4-10, 2021


Mono Lake & Bodie

Explore the northern part of the Eastern Sierra with two nights at the incomparable Bodie ghost town, two nights at Mono Lake, and a one-night foray into the High Sierra of Yosemite National Park. These three vastly different California environs will keep your creative juices flowing in night conditions ranging from dark sky and Milky Way to the gentle light of a first quarter moon.

Mono Lake & Bodie Night Photography Workshop — June 13-18, 2021


New York City

New York City means so many things to so many people: illuminating, exhilarating, intense, intoxicating, frantic, alive. Our mission will be to capture the moving energy of the city—the people, the cars, the bridges and the rivers that surround this 8 million-person island. Within the hustle and bustle we’ll explore the inspirational architecture and quieter green spaces that can be found throughout the five boroughs. We will also focus our lenses and attention on many of the National Park Service units that will educate us on the 400 years of American history that laid the foundation of commerce, immigration and equality in our country.

New York City Night Photography Workshop— September 19-24, 2021


Sedona

Sedona is a vibrant arts community nestled among some of Arizona’s most beautiful red rock buttes. Sitting at an elevation of 4,350 feet, this desert town is world-famous for its natural beauty and new age vibe. It’s also a perfect destination for night sky enthusiasts as one of America’s IDA International Dark Sky Communities.

Sedona Night Photography Workshop — September 5-10, 2021


Sleepy Hollow

Spend three nights photographing in one of the most iconic cemeteries in the world, barely an hour outside of Manhattan in the village of Sleepy Hollow, New York. Expect to be spooked by an abbreviated equestrian with a penchant for drama and overgrown squash. If that sounds like fun, this is the workshop for you.

Sleepy Hollow Night Photography Workshop — November 12-14, 2021


Washington, D.C.

Washington, D.C., is truly one of our must-visit destinations. It’s an awe-inspiring city by day or by night. Combining our nation’s history with a myriad of architectural styles, and the many and varied monuments and memorials, makes D.C. a playground for the intellectually curious and visually motivated.

Washington, D.C., Night Photography Tour — April 22-27, 2021


Voyager Series

As much as we love traveling and photographing in our home country, we also endeavor to trek the globe finding beautiful landscapes and fascinating cultures to immerse ourselves in, especially in the dark. Over the next two years (we plan these ones a little further out), we’ll be heading to overseas destinations that range from one of the most enigmatic islands in the oceans to one of the urban art capitals of the world.

Barcelona

Barcelona, Spain’s premier city of culture and art, is rich in delicious dichotomies. From the 13th century gothic Barcelona Cathedral to the 19th century art nouveau masterpiece of the La Sagrada Familia, from the respectful and beautiful graffiti to the citywide art installations—here world-class food, art and architecture are woven together to create one of the most beautiful and photogenic cities in Europe.

Barcelona Day & Night Photography Tour — September 4-9, 2022


East Greenland Schooner

Experience the extraordinary scenery and Inuit culture of Greenland’s captivating coastline. This trip along the striking and sparsely populated east coast of Greenland will begin and end in the village of Kulusuk, but everything in between will truly be an exploration. Glacier hikes, stand-up paddleboarding, sea kayaking, and of course photography––you’ll have the opportunity to do all of these and more on one of our grandest adventures yet.

East Greenland Schooner Day & Night Photography Tour — September 16-26, 2021


Easter Island

Few places on Earth are as mysterious or compelling as Easter Island. The giant stone figures known as Moai oversee this remote island 2,200 miles off the coast of Chile. Most of Rapa Nui, as it’s known to the locals, is a national park. Not only is it hard to get to Easter Island, it is notoriously difficult to access the park after the sun goes down. But we will be taking a lucky group of fellow night photographers on this rare opportunity of spending an unforgettable week with the Moai.

Easter Island Day & Night Photography Tour — January 25-February 1, 2021


Lofoten Islands 2022

This will be a winter workshop focused on photographing the rugged snow-covered mountain islands, dramatic beaches, northern lights, pristine fisherman’s huts and untouched beauty of this remote and breathtaking region of the world. March is a perfect time to visit Lofoten—the milder winter temperatures make the overall experience ideal for catching the auroras over a snow-globe winterscape.

Lofoten Islands Day & Night Photography Tour — March 18-26, 2022


Scotland: Orkney Islands

During our tour we’ll explore the remarkable ways that past and present collide at the crossroads of the Celtic and Viking worlds. A cluster of 5,000-year-old archeological sites on the archipelago are collectively designated as a World Heritage Site called The Heart of Neolithic Orkney. The main sites consist of two major circles of standing stones, a massive chambered cairn, and the remains of an ancient village that was exposed on a clifftop during a storm in the 19th century. Orcadians live with these monuments in their backyards—these relics are part of the cultural, as well as physical, landscape that influences the way the locals interact with the world.

Scotland: Orkney Islands Day & Night Photography Tour —May 23-30, 2021


Skills Series

All of the above workshops and tours focus a lot on exploration. Our Skills Series events focus on learning something specific—still in an inspiring place, but we focus on a specific skill set. This year we have a couple of workshops based in amazing cities and focused on post-processing, as well as a couple in national parks to learn how to use the best scouting app in the business, PhotoPills.


PhotoPills: Acadia

PhotoPills: Joshua Tree

Long before the photograph comes the idea. And with PhotoPills, the ideas have no bounds. During five days and nights of learning, scouting in two amazing national parks—Acadia and Joshua Tree—we’ll explore the ins and outs of one of the most powerful tools a photographer can keep in their pocket. Learn to plan and capture the Milky Way, sunsets, moonrises, star points, star trails and more.

PhotoPills Bootcamp: Acadia — October 2-7, 2021
PhotoPills Bootcamp: Joshua Tree — May 9-14, 2021


Post-Processing: San Francisco

Post-Processing: Seattle

You’ve spent a lot of time building your camera skills and honing your photographic vision. Now it’s time to take it to the next level. Post-processing has become an integral part of nearly every discipline of photography. Just as the black and white photographers of the 20th century were able to creatively interpret their work in the darkroom, we can now use modern technology to enhance our photos, and even to create images that were impossible only a few short years ago. Join us in either of two amazing cities—San Francisco or Seattle—to learn how to master the tools of post-production.

Post-Processing Intensive: San Francisco — February 21-26, 2021
Post-Processing Intensive: Seattle — July 26-31, 2021


Where Will You Seize the Night With Us?

Thank you all for being part of our community of eager explorers and lifelong learners, and for continuing to use us as a whetstone for your creative skills. We appreciate you so very much.

Here’s to seeing you on the road again, very soon!

Matt Hill is a partner and workshop leader with National Parks at Night. See more about his photography, art, workshops and writing at MattHillArt.com. Follow Matt on Twitter Instagram Facebook.

UPCOMING WORKSHOPS FROM NATIONAL PARKS AT NIGHT