Loving Luna: A Photo Essay Celebration of the Halloween Blue Moon

Over 600 full moons have pulled at me during my lifetime. The moon has not only guided me, but has provided balance to our planet and instructed timekeepers since, well, the dawn of time. It is the second brightest celestial object after the sun, and is Earth’s own private and natural satellite.

Most night photographers object to the brightness of the moon—a veritable star eater that streaks across the sky and blows out the details of the Milky Way. Many night photographers prefer to stay inside than to be out under soft moonlight.

But just as the moon brought wonder and awe to our ancient ancestors, it can bring just as much wonder to our photographs—not to mention the superwonder that even modern humans have been gifted from supermoons, blood moons and eclipses.

Along those same lines, today we experience a blue moon—on Halloween, no less!

Of course, any full moon that falls on Halloween would be a blue moon, but that doesn’t mean it’s common. The last time the two events coincided was 1944, and the next will be 2039.

To honor this event, all five National Parks at Night instructors got together to share images of when they lassoed the moon. We hope this inspires you to get out tonight (after trick-or-treating, of course) to bring back some inspired images!


Matt Hill

The Headless Horseman, Sleep Hollow Cemetery. Nikon Z 6 with a Venus Optics Laowa 15mm f/2 FE Zero-D lens. 4 seconds f/5.6, ISO 800.

Jim Logan invited me to photograph the Headless Horseman in Sleepy Hollow Cemetery in early October. This wasn’t the first time—it’s nearly an annual tradition that I enjoy very much. Each time I challenge myself to light it differently, and this year we were extra lucky to have clear skies (very unusual!) plus the conjunction of Mars and the moon (what luck!). 

After consulting PhotoPills, we set up where the moon would rise. I brought along five Nanlite PavoTubes and lit a scene that covered a large area, as the horse sometimes wanders. 

I used my wireless Phottix Aion remote intervalometer to trigger my camera, and walked around with a CTO-gelled speedlite to highlight the horse and rider. The final touch was inserting a Nanlite Pavotube 6C 10" tube light into the pumpkin to illuminate it from within. 

Fortune smiled upon us! The moon rose, the planets and satellite aligned, and this magic moment unfolded in front of my camera.

Lance Keimig

Mesquite Sand Dunes, Death Valley National Park. Nikon D750 with a Nikon 14-24mm f/2.8 lens. 30 seconds, f/8, ISO 400.

Experiencing sunset followed by the slow fade into darkness along with the full moonrise in the sand dunes of Death Valley is unforgettable. Death Valley is one of my favorite parks, and I think moonrise in the sand dunes is one of the very best parts of any visit to the park.

After walking about a mile from the road to get into the dunes and then cresting over the first ridge, it feels as if the dunes go on forever and that I am alone in the universe. That sensation can be at times both calming and exhilarating. The landscape is vast, but also intimate. It can be challenging to photograph––especially if one is trying to accurately record the essence of the experience.

On this particular night, I allowed myself to get lost in the experience, and hadn’t set up a shot for when the moon rose over the horizon. As a result, I wasn’t ready when it happened. The best light lasts only a few minutes, and it was rapidly slipping away from me. 

Full Stop. Breathe. Be present in the moment. Any pressure I feel is self-imposed. I stopped dead in my tracks, realizing that I had been hurrying to find “The Shot” when the reality was there was no one image to be made. The images were all around me and I had to choose.

Backlighting by the moon with soft light scraping across the surface of the dunes was the common element to every image I saw. I composed, planning in the field to later crop to panoramic proportions. I decided to let the moon blow out, and exposed to keep some detail in the darkest areas in the sand. In the end, it was a straightforward shot, but captured the sensation of being there, alone, in the moonlight.

Tim Cooper

Moon over Trona Pinnacles National Natural Landmark. Nikon Z 6 with a Nikon 14-24mm f/2.8 lens, light painted with a Luxli Viola. 20 seconds, f/5.6, ISO 1600.

For many night enthusiasts, if the night doesn’t have a Milky Way, it isn’t a night to photograph. I love night photography. Any night. Any time of the month.  I enjoy the challenge of making images under various conditions. And one of my favorite challenges is shooting under the full moon.

Moonlit landscapes provide limitless possibilities. I can use the moonlight as the key (main) light, which renders the scene as a near duplicate of a daytime image, or I can use it to simply fill in the shadows of my favorite light painting scheme. I can draw out texture or emphasize shape in the foreground, or I can shoot directly into the moon and use it as backlight.

One of my favorite techniques mimics the popular sunburst technique used in daylight photography. On a clear moonlit night, I simply point my camera directly into the moon and stop down to f/5.6 or f/8. The smaller aperture renders the moon as a moonburst. Shutter speeds under these conditions can still be short enough to render star points, and a decent exposure can be made at lower ISOs, keeping high exposure noise to a minimum.

Chris Nicholson

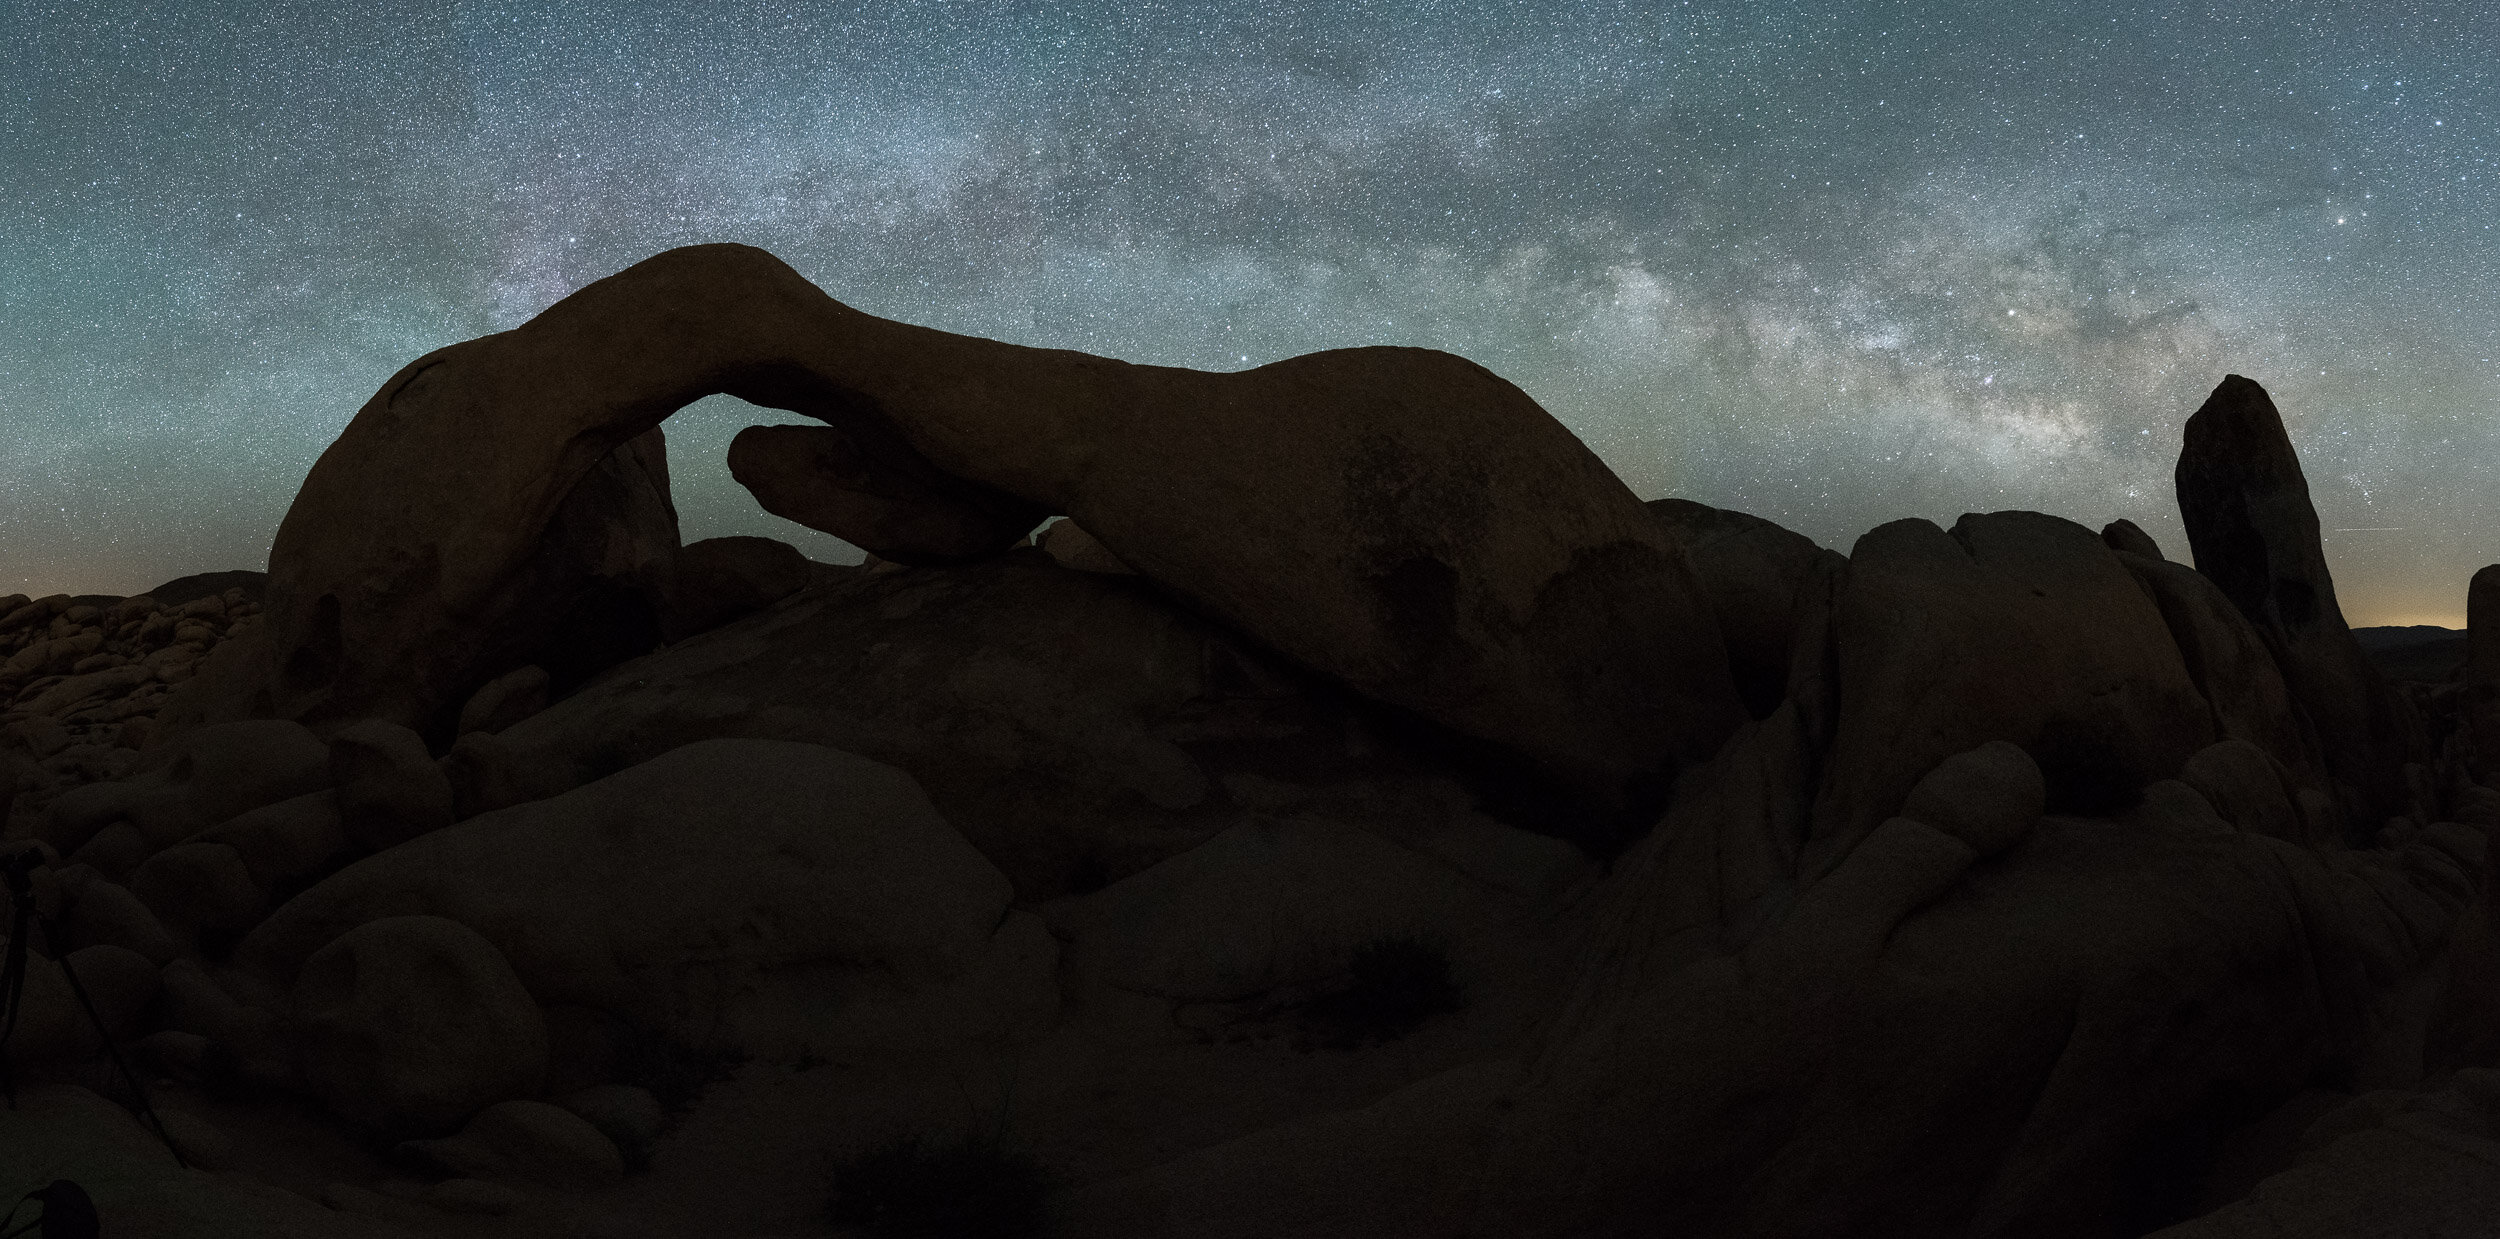
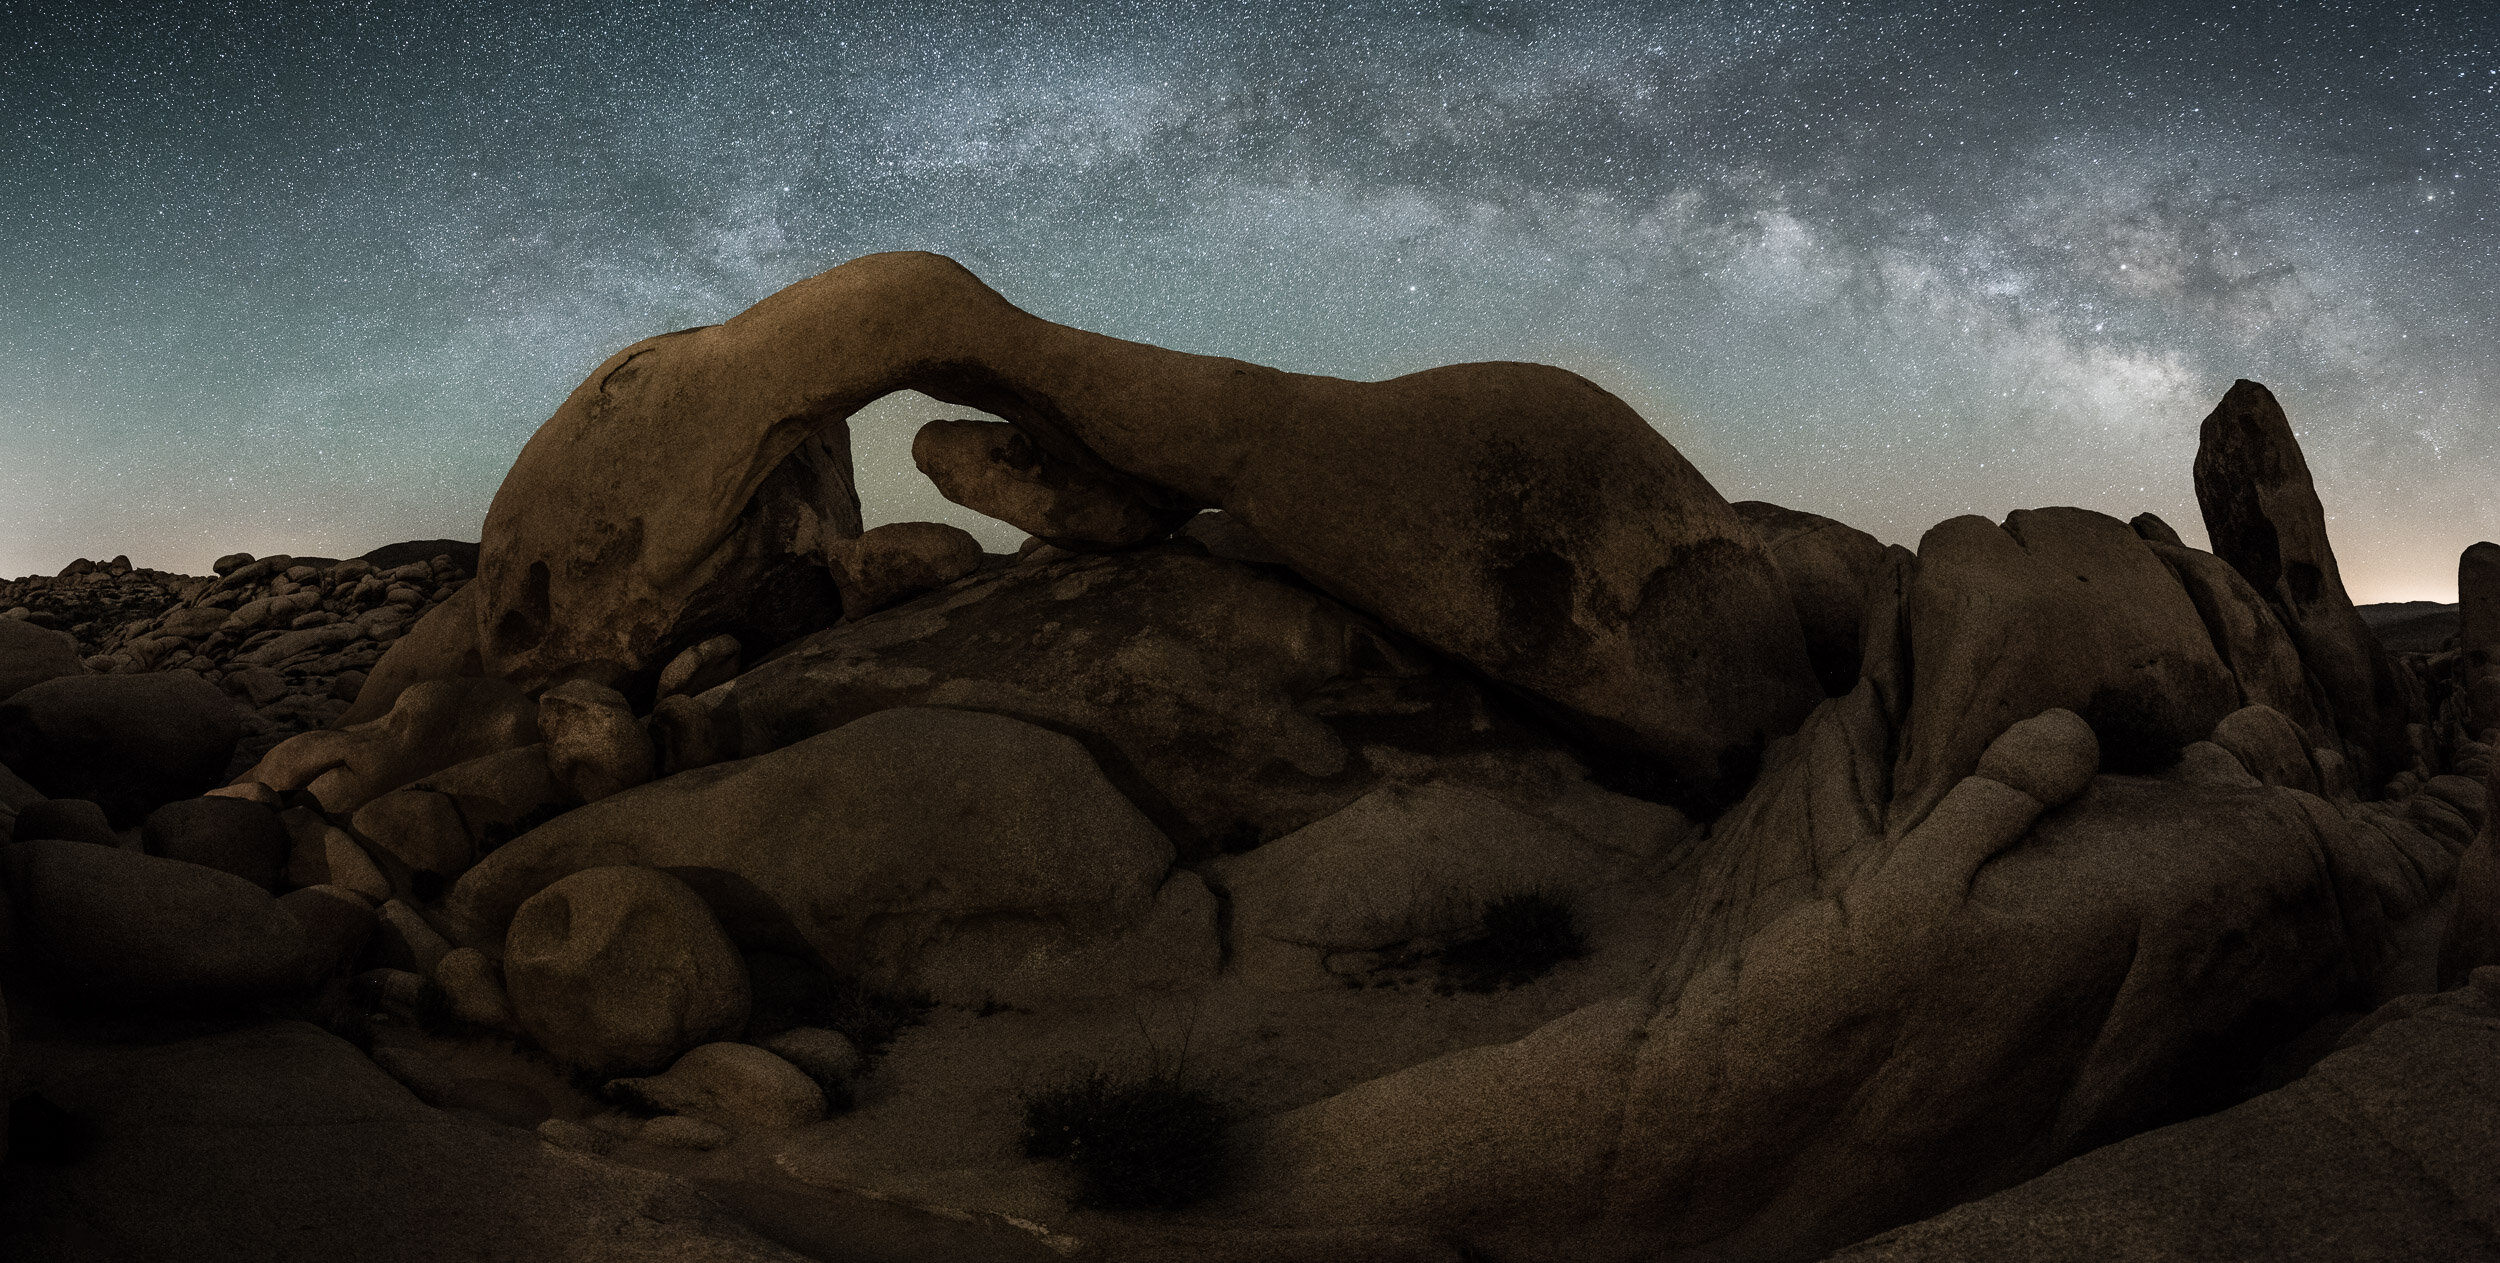
Lathe Arch and Mount Whitney, Alabama Hills National Scenic Area. Nikon D5 with an Irix 11mm f/4 lens. 30 seconds, f/11, ISO 3200.

I love shooting the moon, so it’s hard to pick just one moon image. So rather than spending an inappropriate amount of time searching through my images (OK, I admit—after spending an inappropriate amount of time searching through my images), I decided to show a photograph I made just this past week.

This actually started as a challenge from Lance. I was in Alabama Hills National Scenic Area in California with Tim and our workshop group, and Lance told me to see if I could get a photo of Lathe Arch with Mount Whitney in the background. He was setting me up, for sure. The arch is small—about two feet high—and photographing it from said angle requires wedging yourself into a steep crevice in the rock.

I guess I kind of cheated. I used an Irix 11mm f/4—a superwide but rectilinear lens that allowed me to set up superclose to the arch, so that I could use horizontal rather than flat rock to balance my tripod. Still, it wasn’t easy—the tripod legs were flat to the ground, two of them spreading precariously close to creeping into the frame, and the third extending precariously over the edge of the crevice.

Of course, there was light painting too, and that required some calisthenics to jump up and down and over rocks so that I could work in foreground light, as well as background light from two angles, in a short enough exposure to keep the moon from trailing into an oval. This is why I wear good trail shoes when shooting.

And hey, I got the shot! With the moon. Thanks to a challenge from a friend.

Gabe Biderman

Supermoon and bridges in New York City. Nikon D750 with a Tamron 150-600mm f/5-6.3 lens. 1/2 second, f/11, ISO 400.

I began my official supermoon chase in earnest in 2016. Everything aligned perfectly on November 14, which would feature the biggest supermoon since 1948. The moon would rise at 5:14 p.m., but as much as I love New York City, there isn’t much of a horizon line here. I used PhotoPills to find the best spot, which I determined to be on the southern shores of the East River, at Pier 17, where views of the Brooklyn, Manhattan and Williamsburg bridges align.

As the day of the moon event drew near, I chose to share the experience as a National Parks at Night photo walk with B&H Photo. Our friends from Tamron brought a couple of 150-600mm lenses in Nikon and Canon mounts, which we set up on Wimberley Gimbal heads so people could easily track the moon.

The biggest challenge was the cloudy sky. The moon rose, but we couldn’t make out anything against the cityscape. Then one hour later the moon found an opening in the clouds and peeked out for exactly two minutes.

I was able to make eight exposures during that time, ranging from 1/4 second to 6 seconds. The 1/2-second exposure ended up being my favorite, as it revealed detail in the moon as well as the surrounding clouds. The moon is as big as the arch of the Williamsburg Bridge, and I love the abstract layers of the beams of the Brooklyn and Manhattan bridges. 

It was a thrilling two minutes. I loved pre-visualizing and then waiting for that moment. I imagine this might be close to what wildlife photographers feel when they are hidden quietly in the brush and waiting for perfection to happen. I got my supermoon.

Wrapping Up

Have you shot the moon? We’d love to see your images. Feel free to share in the comments, on our Facebook page or by tagging @nationalparksatnight on Instagram!

Gabriel Biderman is a partner and workshop leader with National Parks at Night. He is a Brooklyn-based fine art and travel photographer, and author of Night Photography: From Snapshots to Great Shots (Peachpit, 2014). During the daytime hours you'll often find Gabe at one of many photo events around the world working for B&H Photo’s road marketing team. See his portfolio and workshop lineup at www.ruinism.com.

UPCOMING WORKSHOPS FROM NATIONAL PARKS AT NIGHT

Five Questions: Star Trails Under Moonlight, Coma, Great Smoky Mountains and More

Many of you like to ask questions about night photography. And guess what! We kinda like answering questions about night photography. That’s how we roll. So let’s … um … roll!

This installment of our “Five Questions” series features inquiries about star trails under moonlight, a very dim light panel, coma testing, Lightroom panels, and Great Smoky Mountains National Park.

If you have any questions you would like to throw our way, please contact us anytime. Questions could be about gear, national parks and other photo locations, post-processing techniques, field etiquette, or anything else related to night photography. #SeizeTheNight!


1. Star Trails in Moonlight

Star trails on a moonlit night, Yosemite National Park. © 2020 Tim Cooper. Nikon Z 6 with a Nikon Z 24-70mm f/4 lens. Ten stacked exposures shot at 2.5 minutes, f/9, ISO 100.

Question:

Last night I reviewed some star trail photos. Several were long exposures under moonlight, which turned out very bright—out of the camera they looked like daylight. Which would be better—lowering the ISO (from 400), closing down the aperture (from f/4), or using a neutral density filter? — Kathy E.

Answer:

In the circumstances you describe, the thing to do would be to go down to ISO 100 and also stop down to f/5.6 or f/8. Full moon exposures of 4 to 6 minutes at f/8 and ISO 100 are about right, depending on the desired effect.

If adding light painting, one might consider adjusting the base exposure up or down to manage the ratio of existing to added light. If longer star trails are desired, then combine multiple exposures in Photoshop until the trails reach the desired length. It’s possible to stop down further to get longer shutter speeds, but if you stop down too much then dimmer stars won’t show up.

There’s really no reason to use a neutral density filter for this situation—it only increases the odds of problems with flare or general loss of image quality from lesser glass in front of the lens, or from dirt, finger prints or condensation. The only time I use ND filters at night is when shooting long exposures of the moon streaking through the frame. — Lance

2. Seeing Coma

Question:

I read your blog post about measuring lens coma, and I want to compare the Sigma 14-24mm f/2.8 with the Zeiss 18mm f/2.8 and the Zeiss 25mm f/2.0 (I own both of the latter). What magnification in Lightroom should I use when comparing the images from these three lens? When I zoom to 11:1 (the greatest magnification), I really can’t tell what I am looking at because the stars just look like little boxes. — Hadley

Answer:

So glad you are inspired to run your lenses through the paces. Awesome. I recommend 4:1. If stars are not round at that magnification, then you’re probably looking at coma. — Matt

3. A Very Dim Light

Question:

During one of your presentations at B&H’s OPTIC Imaging Conference, there was a recommendation for a portable light that could dim to levels lower than most other lights available. Unfortunately I didn’t write it down. Can you share this gear recommendation? — Jason L.

Answer:

Thanks for watching our class during OPTIC! The light we were referring to is the Luxli Viola 2. When used with the Luxli Composer app, you can drop the intensity to as low as .5 percent.

For Low-level Landscape Lighting we typically use the Viola at .5 to 2 percent. It also optionally comes with a diffusion panel that would dim it down a touch more. — Gabe

4. Solo Panels

Question:

When I am in Lightroom’s Grid mode and have the Folders panel open, the Collections panel is all the way underneath and requires a lot of scrolling to get to. Is there a way either to lock the Collections panel in position so it is always visible at the bottom while the Folders panel is expanded, or to place the Collections panel above the Folders panel? — Marc

Answer:

If you right-click (PC) or control-click (Mac) in the dark gray title area of any panel, you can select “Solo Mode.” This will enable a feature that always collapses all of the tabs except the one you are using. In addition to solving your specific problem, this keeps the whole Lightroom interface cleaner and easier to work with. — Lance

5. Smoky Spots

Newfound Gap, Great Smoky Mountains National Park. © 2019 Matt Hill. Nikon Z 6 and a Nikon 70-200mm f/2.8. 871 Seconds, f/4, ISO 200.

Question:

My daughter and I are planning a trip to Great Smoky Mountains National Park for four nights. We would appreciate your recommendations for the best night, sunrise and sunset photography. My daughter is expecting our first grandchild and I am looking forward to taking a few maternity photos in Cades Cove, so any thoughts on that would be great too. — Susan E.

Answer:

For sunrise and sunset, you’ll want to be at the overlooks. Clingmans Dome is good for both (especially with clouds in the valley), and the overlooks on the southern half of Newfound Gap Road can be good. Because you’re in the mountains, you need to be up higher to see the sun break the horizon. Also, this is technically outside the park, but the overlooks on the Foothills Parkway (also a administered by the National Park Service) can be good.

Not for sunrise and sunset itself, but for shooting in the post-sunrise and pre-sunset light, I can’t recommend Cades Cove enough. I could spend a whole week shooting just in there. It’s a great place for those maternity photos—just drive the loop road and you’ll find far more locations than you can use. Also look at the two dirt roads that cut across the valley (Hyatt and Sparks Lane), as they’re quieter and rather scenic.

For night photography, Cades Cove is great, but no cars are allowed after sundown, so you’d have to walk. You’d be looking at anywhere from 2 to 11 miles roundtrip, depending on how much you wanted access to. (You could also go in on a bike.)

For stars, again, get to the overlooks and/or to Clingmans Dome. You can also find some open skies along Little River Gorge Road and in the meadow next to the Oconaluftee Visitor Center. If open skies aren’t important and you’d just like some things to light paint, try the abandoned resort town at Elkmont.

Finally, because you’re staying near Gatlinburg, you might want to try the Roaring Fork Motor Nature Trail. It’s a part of the park that many visitors don’t go to because it’s not off the main park road, but is certainly good for photography, especially under overcast skies. — Chris

Chris Nicholson is a partner and workshop leader with National Parks at Night, and author of Photographing National Parks (Sidelight Books, 2015). Learn more about national parks as photography destinations, subscribe to Chris' free e-newsletter, and more at www.PhotographingNationalParks.com.

UPCOMING WORKSHOPS FROM NATIONAL PARKS AT NIGHT

Going Gradual: A Guide to Low-level Landscape Lighting

Pemaquid Point Lighthouse. One Luxli Viola light, mounted on a stand out of the frame, camera-left. This image could have been made with traditional light painting, but walking on the wildly uneven rock below Pemaquid Point Lighthouse with only a sliver of moonlight wasn’t fun. Taking the easy way out by working with a stationary light seemed the prudent thing to do. I wanted to show the texture of the rock without distracting from the reflection in the foreground. · Nikon D750 with a Sigma 24mm f/1.4 Art lens. 386 seconds, f/4, ISO 1600.

Any regular reader of our blog will know that all five of us use the Luxli Viola as an added light source in many of our images. In this week’s post, I’ll be discussing using a Luxli or similar light source versus a flashlight, and more specifically explaining the difference between light painting and the newer technique called Low-level Landscape Lighting, or LLL.

“Light painting” has become an umbrella term that many people use to describe any addition of light to a night photograph. In practice, light painting is simply using a hand-held light source that is usually moving to illuminate part or all of a scene during a long exposure. It’s a time-tested technique that has been employed by photographers for decades. It’s fun, it’s versatile and it’s effective. I still use it more often than any other technique in my own work.

Alabama Hills. In order to get the depth of field required for this image at 22mm, I needed to stop down to f/7.1. I also wanted to keep the shutter speed as short as possible to make sure that the stars would not trail. Moonlight and ISO 6400 allowed for an exposure time of just 4 seconds, which isn’t much time to run around with a flashlght, so LLL was my best option for lighting. · Nikon Z 6 with a Tamron 15-30mm f/2.8 lens. 4 seconds, f/7.1, ISO 6400.

LLL is a technique that was developed and evolved concurrently with astro-landscape photography over the past eight years. As opposed to traditional light painting, LLL utilizes very dim constant light sources that are usually maintained in a fixed position during the entire exposure, or possibly even for an entire night. LED panels that feature adjustable brightness and color temperature—such as the Luxli Viola—mounted on a tripod or light stand are the most common light source used for LLL, but any dim light can be used.

The goal of LLL is generally to leave the light on during an entire exposure in order to match the brightness of the foreground in an astro-landscape scene with the brightness of the sky, thus creating a realistic-looking image that requires minimal post-processing.

Advantages of LLL

Why go through all that instead of wielding a flashlight for a few seconds? LLL presents a few advantages.

Again and Again

One big advantage is repeatability. Because the light is fixed, it will be the same from one image to the next, unlike light painting where it can be very difficult to repeat complex lighting from one frame to the next.

Arch Rock Panorama with Milky Way, Joshua Tree National Park. This before-and-after example shows how LLL can be used to create completely natural looking lighting in astro-landscape images. When making a panorama, having consistent lighting for each frame is critical. I made this image during a workshop collaborating with many of the participants. By using three Luxli Violas in fixed positions at the lowest brightness setting, everyone in the group was able to nail this difficult shot. · Nikon D750 with a Tamron 15-30mm f/2.8 lens. 20 seconds, f/3.2, ISO 6400.

Time Constraints

Night photographers are these days faced with two additional challenges when photographing by starlight, and the LLL technique helps with both of them.

The first problem is one of a technical nature. Astro-landscape exposures typically range from 15 to 30 seconds, which does not leave much time for light painting, especially if a scene is large, treacherous or complex. Imagine trying to light from three or four different positions during a 20-second exposure while navigating uneven rocky ground by starlight!

It’s possible to light various parts of a scene in different exposures and combine them in post-processing to form a final image, but that technique requires a substantial amount of time at the computer in Photoshop, and some people (such as myself) prefer to do the work in the field.

Space Constraints

The second problem has more to do with people than photography. With increased numbers of photographers and non-photographers alike out enjoying nature and our national parks at night, large numbers of bright flashlights being waved around willy-nilly has ruined numerous masterpieces. National Parks at Night has always stressed communication and collaboration during our workshops to enable groups of people to photograph together without getting in one another’s way, but not everyone is as considerate as our awesome workshop participants!

The Rattle Dragon, Borrego Springs. Nine stacked frames, each shot at 3 minutes, f/8, ISO 320. Ricardo Breceda‘s amazing 350-foot serpent in the Anza Borrego desert photographed with three Luxli Viola lights on stands to illuminate the sculpture. I could have used traditional light painting techniques for this image, but lighting such a large creature from different angles was more easily achieved with fixed-position LLL. · Nikon D780 with a Nikon 24-120mm f/4 lens.

Many people who use LLL are striving for images that don’t look like any light has been added to their images. Their goal is to add just enough light to balance the foreground exposure with the sky and call it done.

For me, old habits are hard to break. Although I use and love my Luxlis on almost every night shoot, my own technique is more of a hybrid of LLL and light painting. I’ve been known to mount a Luxli on a boom arm and hold it over my head while walking along a clifftop or under redwood trees. In other situations I might use a Luxli mounted on a stand, or propped against a rock to light part of a scene, and light the rest of the image with a flashlight. As much of my work is done where the human-made and natural environment intersect, I’m not necessarily trying to make my images look completely natural. I try to make them look more interesting with interesting light.

Regardless of the technique you use to light your night shots, the goal is the same––either to add emphasis and draw the viewer’s attention to a particular part of a photograph, or to fill in dark and underexposed areas to make for a better exposure.

LLL Gear

If you are ready to jump in and give LLL a try, you could rest your light source on a nearby rock or tree branch, or you could start with just one panel light on a second tripod—but more than likely you’ll soon end up with two or three lights and accompanying stands. The Impact LS-RL7 Reverse Legs Light Stand is a good option, as is the Manfrotto MS0490A Nanopole. And if you want the lightest of stands, the Nanopole comes in a Carbon Fiber version that weighs in in at a tidy 1.8 pounds.

I mentioned the Luxli Viola at the beginning of this article as NPAN’s LED panel of choice. It is one of the more expensive LED panel lights available, but the quality of the light, the variability of color temperature (as well as the ability to create almost any color you can imagine) and the useful app that allows for remote control of one or multiple Luxlis all make it more than worth the cost. The Viola also comes with a mini ball head that makes aiming the light right where you want it much easier.

The Luxli Viola, the LLL tool of choice for all the NPAN instructors in most situations.

A couple of budget options to get you started are tea lights from a dollar store or diffuse inflatable camping lights, but you probably won’t get good color from them.

LLL Tips

So, how do you light the landscape with low-level light? The basic concepts of LLL and traditional light painting are similar. The primary difference is that your light or lights are stationary, and usually much dimmer than light painting tools. Here are a few guidelines:

  • Light from 45 to 180 degrees from the camera, never from the camera position.

  • Compose, then focus, then determine your base exposure, then add light where needed.

  • Make test exposures, review the results, make adjustments.

  • Move the light, be mindful of shadows, adjust the intensity as needed.

  • If you are using a Luxli or other variable color tool, match or contrast the color of your light to the overall scene.

  • If using a Luxli, consider pairing it with their free Composer app, which allows you remotely change the intensity, color temperature and hue, rather than having to walk back and forth between the light and the camera to make changes.

  • Work with a partner, or even in a small group, sharing the lighting and the work.

Lady Boot Arch, Alabama Hills. Here’s another before and after example. The full-ish moon was rising behind the rock on the right. I was more in the mood for star points than trails, so I needed to keep the exposure short. The landscape was full of narrow crevices that seemingly were designed for twisting ankles and banging knees. I used light painting on a different version of this image that night, running like a nutcase between the formations during the short exposure, but that wasn’t an option for this shot. One light was on a stand high to camera-right, and another was leaning against a rock to the left of the arch. · Nikon D780 with an Irix 11 mm f/4 lens. 25 seconds, f/8, ISO 3200.

Wrapping Up

Regardless of the tools you use, Low-level Landscape Lighting is an essential technique to have in your night photography toolbox.

If you’re inspired to get out and try this, or if you’ve done it before, we’d love to see your images. Share your images in the comments section or on our Facebook page, or post them on Instagram and tag us (@nationalparksatnight).

Lance Keimig is a partner and workshop leader with National Parks at Night. He has been photographing at night for 35 years, and is the author of Night Photography and Light Painting: Finding Your Way in the Dark (Focal Press, 2015). Learn more about his images and workshops at www.thenightskye.com.

UPCOMING WORKSHOPS FROM NATIONAL PARKS AT NIGHT

How to Deal With Light Pollution, Part III: Creativity

Note: This is the third in a three-part series about one of the most common questions we get: How do you deal with light pollution? We have three answers: with filters, with post-processing, with creativity. In this week’s blog post, Chris Nicholson discusses the latter of those solutions: using light pollution creatively.


As Matt and Lance showed in our two previous blog posts, you can quite effectively mitigate light pollution in your night photographs, either by using filters or post-production techniques. There’s a third way too: Instead of avoiding light pollution, find ways to use it to create images you couldn’t create without it.

Many folks believe, innately, that the key to creativity is having the mental space to relax and to work free of boundaries. But the reality is that the opposite is more often true—discomfort in process triggers ingenuity. Sure, easy conditions are conducive to productivity, but they don’t challenge your brain, and they don’t test and stretch your limits.

In fact, psychology studies have shown that most people’s minds are at their most creative when creative mental space is limited. Why? Because unwelcome boundaries force us to seek alternatives and solutions we might otherwise not.

This is precisely why working with light pollution, rather than trying to eliminate it, can lead you to thinking and photographing outside your normal box, and can result in some work that might pleasantly surprise you.

The approach is basically adopting a tone of “If you can’t beat ’em, join ’em.” Or maybe we can say about light pollution, “If you can’t lose it, use it.”

Below are a few ways you can employ this strategy.

Backlight the Horizon

If you’re shooting on a dark night in a dark location, grand landscapes can sometimes be challenging to photograph. Why? Because the horizon can get lost in the exposure when the dark landscape blends with the dark sky. But when light pollution is in the background, it will silhouette the horizon, backlighting the interesting things that lie at the transition from earth to sky.

Figure 1 is an example of this. I was shooting the Milky Way from high in the tundra of Rocky Mountain National Park—high enough that the grand mountains below were relatively small in the background. Framed against a dark horizon, they would have been much harder to discern in the composition. However, the light pollution from nearby Denver helped—it provided the backlight necessary to create separation between the mountains and the stars.

Figure 1. Milky Way in Rocky Mountain National Park. Nikon D810 with a Nikon 24-70mm f/2.8 lens. 15 seconds, f/2.8, ISO 8000.

Silhouette a Subject

In precisely the same way that light pollution can backlight a horizon, it can also backlight a nearer subject, and you can use that to silhouette distinct objects in your composition just like you might with a sunset.

I made the photograph in Figure 2 on the outskirts of Borrego Springs, California. It’s of two of Ricardo Breceda’s famous iron sculptures that dot the surrounding desert. The horizon light is pollution from a distant town. In this image, that light pollution not only helps define the horizon, but also separates the sculptures from the background and artistically defines their shapes without revealing their details.

Figure 2. Borrego Springs, California. Nikon D5 with a Nikon 24-70mm f/2.8 lens. 16 minutes, f/8, ISO 400.

Light pollution is caused not only by distant cities—it can also be a local issue. Bright streetlights, nearby power plants, passing car headlights, etc., can all throw unwanted light into your night scenes. Instead of avoiding them as intrusions, keep your mind open to incorporating them into your compositions.

Car headlights were a “problem” in Joshua Tree National Park when I was shooting there one night in 2017. I kept waiting for occasional vehicles to pass before starting and re-starting star exposures, because the headlights were spilling unwanted light on the trees and rocks. But then I noticed how those lights were backlighting those same trees and rocks, as well as the dust in the high-desert air. So I changed my strategy from waiting to shoot between cars to waiting for cars to come around the distant bend and backlight the landscape. The result is the photograph in Figure 3 (with a little extra light painting on the leaves).

Figure 3. Joshua Tree National Park. Nikon D5 with a Nikon 24-70mm f/2.8 lens, light painted with a distant car and a Coast HP5R flashlight. 15 seconds, f/4, ISO 6400.

Light the Clouds

One of my favorite ways to use pollution also solves another night photography problem: overcast skies. A solid ceiling of clouds can prove challenging at night, particularly in new-moon conditions when they can make for a dead sky. But if there’s a little light pollution nearby, that can illuminate the underbelly of those clouds and give you an interesting background to work with.

That’s precisely the visual dynamic that I liked when creating the photograph in Figure 4. Lance and I were shooting with a few participants of our 2019 workshop in Cape Cod. Clouds rolled in, obscuring the stars. But the clouds were catching the lights of nearby Provincetown, Massachusetts, creating a moody background for the lighthouse.

Figure 4. Highland Lighthouse, Cape Cod National Seashore. Nikon D5 with a Nikon 14-24mm f/2.8 lens, light painted with two Luxli Viola LED panels. 30 seconds, f/4, ISO 1600.

Go Surreal

One of the reasons most night photographers don’t like light pollution is because it doesn’t look natural—it doesn’t look “real.” But rather than avoiding light pollution for that reason, you can deliberately use it to create surreal images.

A fine example of this is an image (Figure 5) that Tim shared in a recent blog post on color. He was shooting in the San Francisco area on a foggy night, and the fog was saturated with the colored lights from the city. But rather than correct or avoid the orange sky, he used it to create a hypnotic, dreamlike, apocolyptic-type background.

Figure 5. San Francisco. © 2019 Tim Cooper. Nikon Z 6 with a Nikon Z 24-70mm f/4 lens, light painted with a Coast HP7R flashlight. 15 seconds, f/4, ISO 800.

Seize the Light Pollution!

There are surely countless other ways you can use light pollution to create unique night imagery. Even if working this way is not your normal style, it is still a good creative exercise. Again, anything that squeezes our boundaries or forces us out of them is good for creativity.

I’m not suggesting that including light pollution in your photographs is always the correct solution, but it should be a method you’re comfortable employing. This approach is just as valid as using filters or post-production to deal with the same problem. All three strategies are tools that are good to learn how to use, so that you can always be ready with the best solution for whatever creative problem you need to solve in a given situation.

What are some ways you’ve found to be creative with light pollution in your night photographs? We’d love to see! Share your images in the comments section or on our Facebook page, or post them on Instagram and tag us (@nationalparksatnight).

Chris Nicholson is a partner and workshop leader with National Parks at Night, and author of Photographing National Parks (Sidelight Books, 2015). Learn more about national parks as photography destinations, subscribe to Chris' free e-newsletter, and more at www.PhotographingNationalParks.com.

UPCOMING WORKSHOPS FROM NATIONAL PARKS AT NIGHT