The Z 6 is the Best Camera for Night Photography

Let’s not bury the lead. The Nikon Z 6 is the best camera for night photography.

Bold statement, I know. We live in a golden age for night photography, when there aren’t many “bad cameras” for photographing in low-light scenarios. Last December I tested the current batch of full-frame mirrorless cameras for a night photography series produced by B&H Photo. All three cameras I tested—the Canon EOS R, Nikon Z 6 and Sony a7R III—performed admirably. In fact, none of them would hold me back from producing excellent work during the day or night.

At that time I was “dating” a lot of camera systems. I really liked the Fuji X series because of the smaller bodies and lenses. But I was noticing a granular quality to my higher-ISO images that was troublesome for me. My maximum usable ISO for dark sky work with the X system was 6400, which worked most of the time.

The other camera in my bag is the Nikon D750. This is one of my all-time favorite night cameras. The colors and sharpness perfectly match my work. Yes, it is a 5-year-old camera, but guess what? It has damn good image quality and is a full-frame camera that costs $1,099 refurbished or $1,496 with a free year of Adobe’s Photography Plan. It’s hard to disregard that, even if it is a second camera.

Still, the more I have used the Z 6, the more I like it—enough so that I felt compelled to call it the best for the type of work I do, and to write down why.

What I like in a Night Camera

Before we get into exactly what I love about the Z 6 in particular, let’s go over what I look for and recommend in a night camera in general.

A lot of cameras are good—heck, these days a lot of cameras are great! I know this first-hand, because while working at B&H I’ve been lucky enough to try a wide variety of what’s on the market. But it takes a special set of features for a camera to be great at night photography. Below I’ll run through what I believe those features to be, and then I’ll go over how the Z 6 checks (or, in some respects, doesn’t check) those boxes.

It has to fit just right

When standing at the edge, be comfortable with your gear.

First off, choosing the right camera is like shopping for shoes. Style points count, but the bottom line is it has to fit you and your needs. It has to be ergonomic to hold and be an extension of your eye, heart and hand. The camera, as well as the many buttons that decorate it, has to be “one with you” and not get in your way of seeing and creating.

Every camera has a learning curve, but if after a month of heavy use you are still struggling with what the buttons do, or if you feel uncomfortable with it, then it is not the best camera for you.

High ISOs are a must

Capable high ISOs are the next big factor. You need to like the image quality at 6400—otherwise, you will not be shooting the Milky Way. If you can get to ISO 12,800 or 25,600 comfortably, that’s even better.

Almost every camera from the last 3 years can get to ISO 6400 without the image being too grainy or noisy. Almost every camera also has ISO settings above 6400, but very few have good image quality beyond that point. (We’re not going to get into image quality charts and the like, but a little later in this post I will share real-world night photos and we will compare ISOs between competing cameras.)

The Nikon Z 6 at ISOs 12,800, 25,600 and 51,200.

Testing high ISOs is very subjective. You and I could own the same camera and I could love it at 12,800 with some gentle noise reduction in post, while you could absolutely hate the same. We all have different thresholds. Get to know and understand yours.

Test your camera at 6400, 12,800, 25,600, and all the stops in between. Bring the images into Lightroom and zoom to 100 percent, and drag the Luminance slider to see how it balances removing noise versus losing detail. If you are seeing color in that high ISO noise—splotches of red, green and blue—then push the color slider to the right until it is removed. You can be more aggressive with the color noise slider as there is no loss of image detail, even at 100 percent.

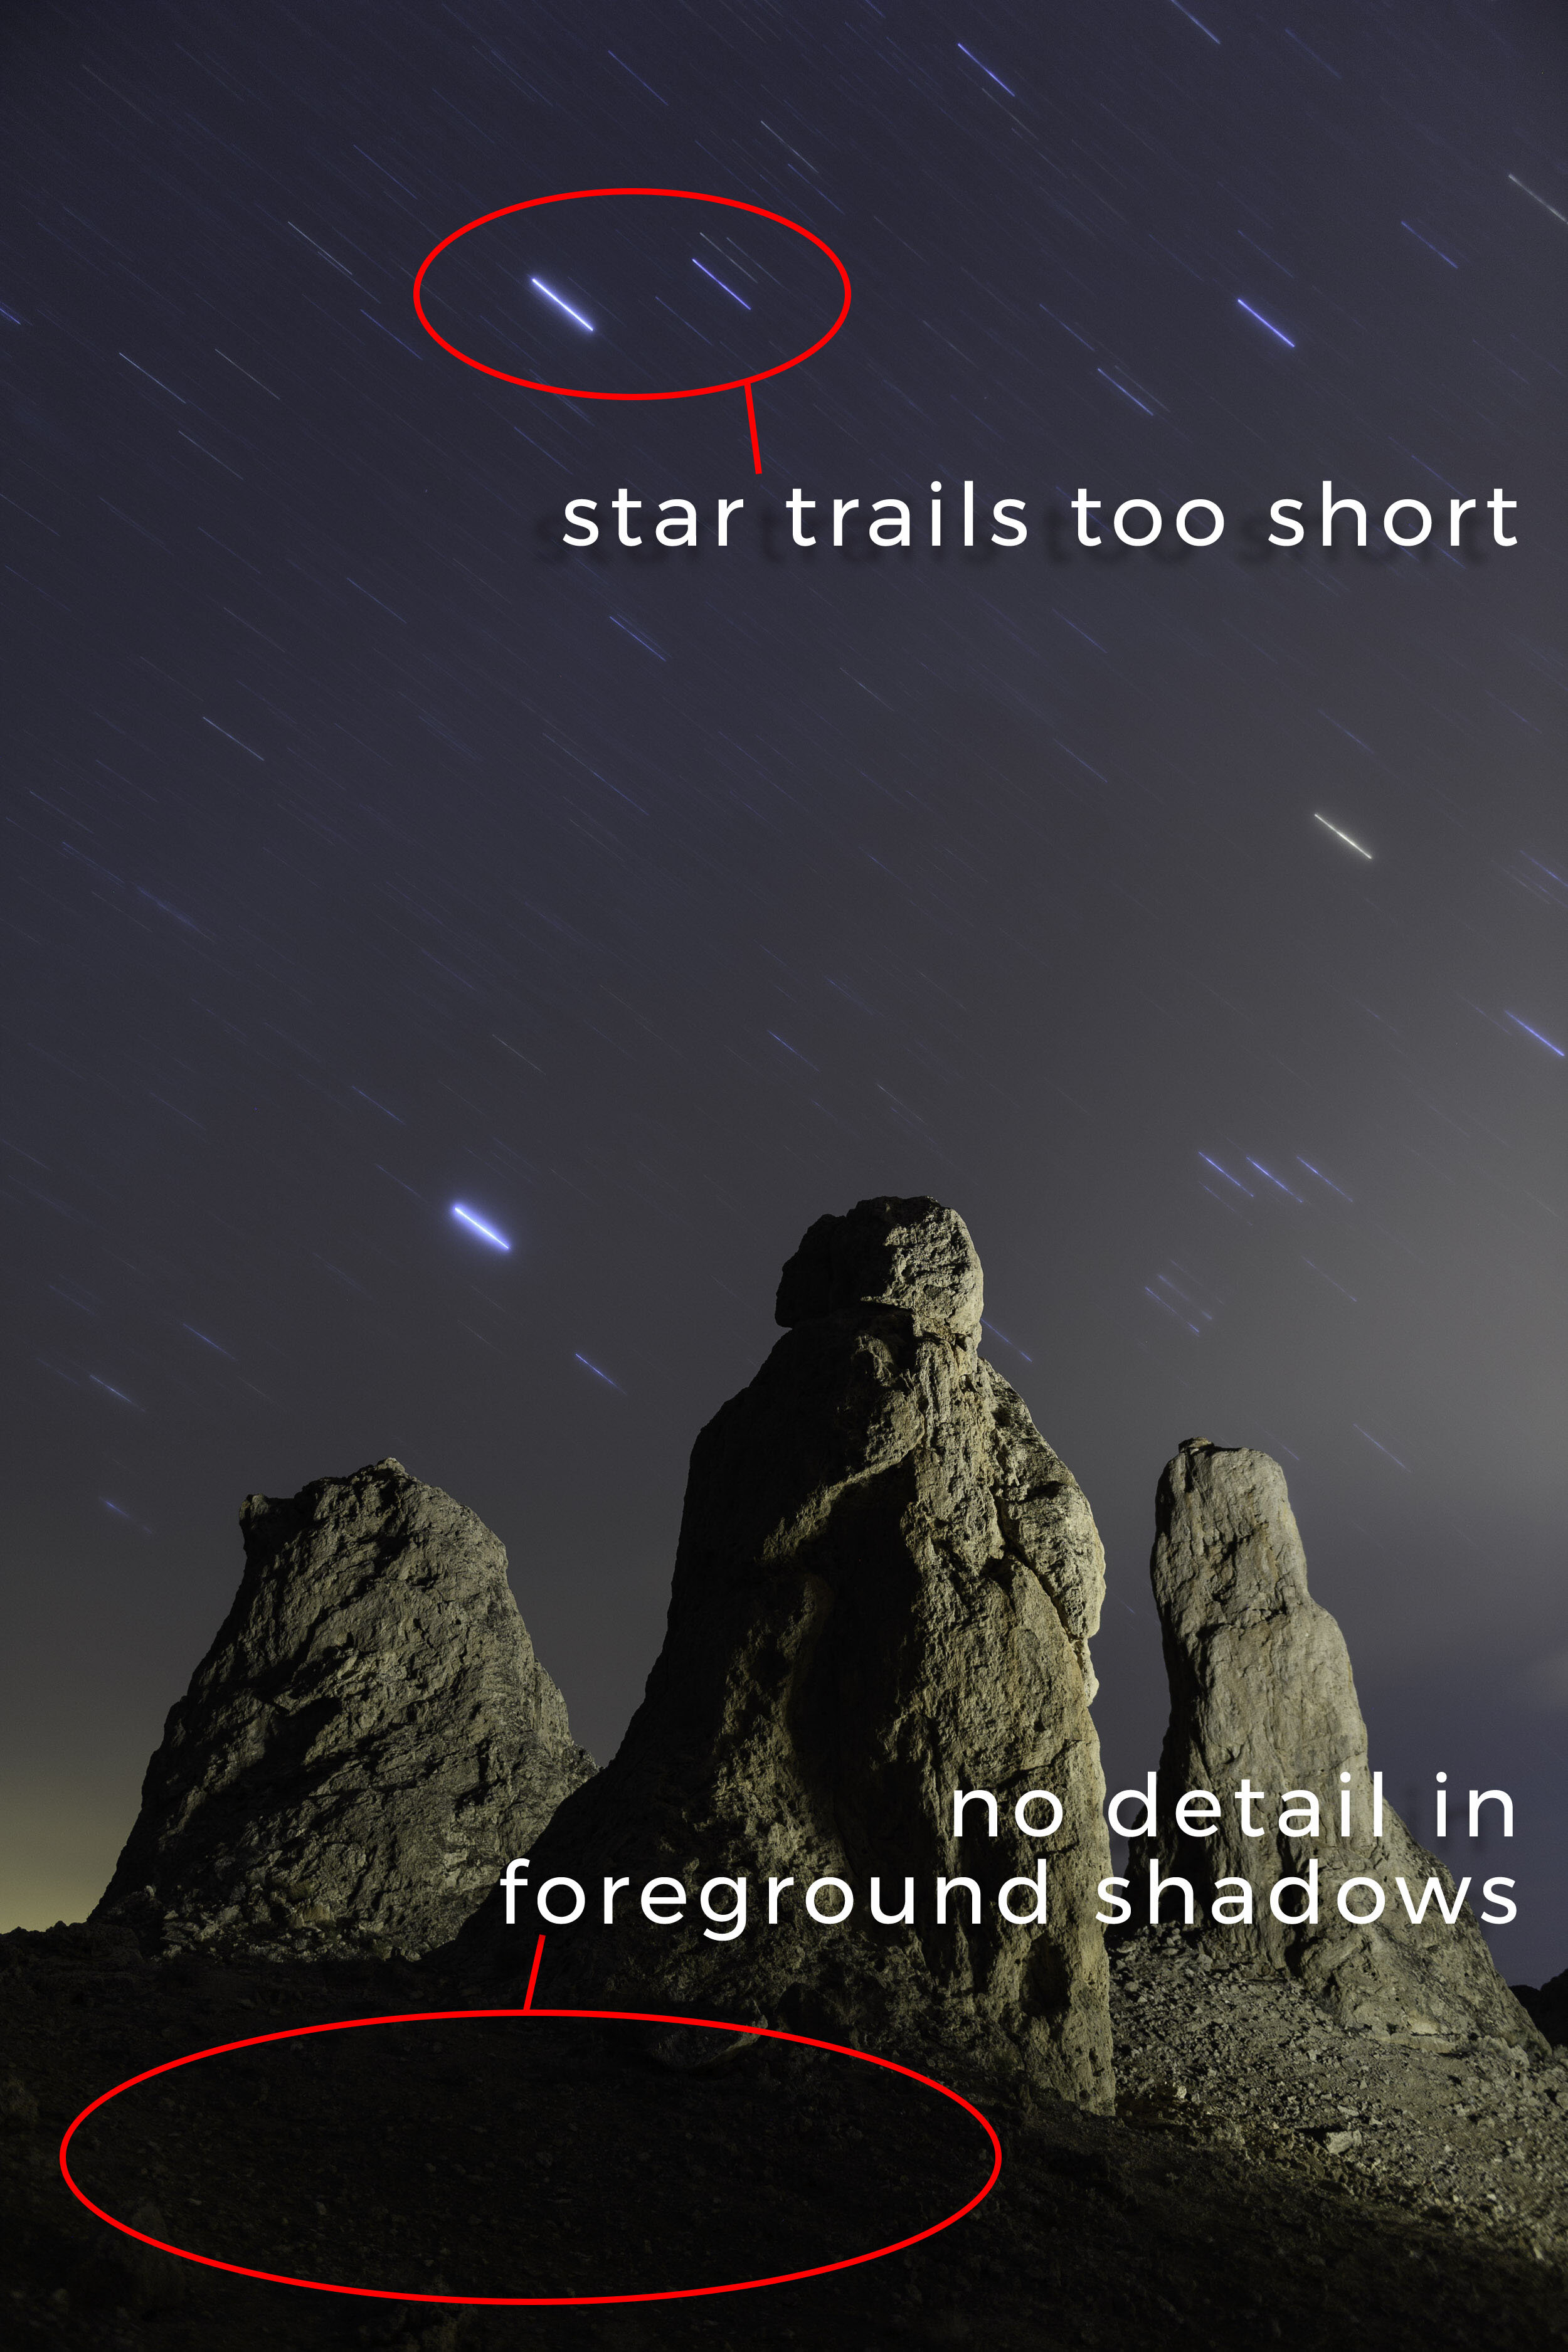
How well can the camera see in the Dark?

One of the biggest frustrations with dark-sky night photography is that it’s hard to see anything through the viewfinder, EVF or LCD screen. DSLRs have a slight edge here. When you turn on a DSLR, the meter information inside the viewfinder is actually pretty bright and makes it hard to look through. However, you can adapt in two ways, both of which are excellent solutions for composing in the dark:

  1. If you turn off the camera and look through the optical viewfinder without all the internal lights, then you can see pretty well.

  2. A little trick Chris Nicholson taught me (which Lance Keimig taught him) is to shine a flashlight through the back of the optical viewfinder and the light coming out of the other end (i.e., the lens) will shine onto the scene in front of you illuminate exactly what is in the frame.

But you can do those things only with a DSLR. For a mirrorless camera, seeing in the dark is a struggle. For the most part, the EVF or LCD screen can’t “gain up” for us to see anything. So we have to take multiple high ISO test shots just to “see” what is in the frame.

(However, in one of Sony’s latest firmware upgrades they introduced Bright Monitoring in their A7 and 6000 cameras. This is a game-changing feature for night photographers—but it could also use some further tweaking. It does very well in most rural dark scenarios but in really dark-sky scenes like Bortle 1 or 2 with no moon, you will still see very little.)

What lenses can you use?

A wide and fast lens is mandatory for any sort of astro-landscape photography—so the camera needs to be able to accommodate.

Our favorite night lens is the Irix 15mm f/2.4. It is an inexpensive, manual focus lens that has a click stop at infinity, and infinity is accurate. The lens comes in three mounts: Nikon F, Canon EF and Pentax. I have used adapters to mount the Irix on Fuji, Nikon Z and Sony without any issues, but rumors are swirling that Irix is working on mounts for Sony E, Nikon Z and Canon EOS R.

That being said, it is good to have a little variety in your lens choice. Wide fast zooms such as a 14-24mm f/2.8 or 16-35mm f/2.8 are great. A sharp 24-70mm f/2.8 would be my third choice.

That combo would fulfill most of my visionary needs on any given night, but unique lenses and fast primes that match the way I see can be inspiring. A wide tilt-shift lens, or a fisheye/superwide zoom such as the Nikon 8-15mm or Canon 11-24mm f/4, can add an extra oomph to compositions. I’m also a sucker for the Zeiss Batis lenses for Sony and Zeiss’ standard razor-sharp manual focus lenses.

Why I Love the Z 6

OK, it wasn’t love at first sight. But as a Nikon user, I was pretty excited to test the Z 6 and its rumored high ISO capabilities. Then my initial tests blew me away, so I purchased one last January.

We’ve had way more ups than downs, and we’ve been living together nicely for the last 9 months. I’m still waiting for the “perfect” Nikon Z lens (more on that later), but while waiting I’ve noticed that some of my favorite photos I’ve made this year have been with my Z 6. Below is the breakdown of our “relationship.”

Comfort

It is a super-comfortable camera for me. The grip fits nicely in my hand. I really like the thumb rest on the back of the camera, as it helps with the overall balance. The camera is light for a full-frame mirrorless, and is easy to carry on your shoulder for long periods of time.

Controls

The menu system follows the same logic as its DSLR predecessors, so as someone who has used Nikon for years, this camera was a cinch for me to pick up and start shooting. The buttons are easy to navigate and use. I also like the touch screen for zooming and swiping through images. (However, I do not like the touch screen for triggering the camera.)

I’m a big fan of the LED top screen that gives me all the information I need to know: shutter speed, aperture, ISO, battery life, burst mode and shots left. This is the digital version of the LED screen on the top of most DSLRs. It doesn’t draw as much juice as the screen on the back, and it grants easy access to that information for making adjustments.

Memory Card

I have no gripes over the single memory card slot. I have yet to fill up my 64GB XQD card on any given night. And believe me, I’ve shot for many hours!

Power

Battery life is solid. The Z 6 uses the same tried-and-true ENELb-15 battery that all the Nikon prosumer DSLRs use. Consequently, I can bring the same battery and dual charger for both my Z 6 and D750. The Z 6 draws more power because of the constant LCD/EVF use, but I have yet to need more than two full batteries on a given night.

High ISO

This camera is the current champ for high ISO. The Sony a7S II is close, but the big separator is that the Z 6 is a 24-megapixel camera and the a7S II is only a 12-megapixel. That’s double the megapixels, which provides finer detail and smoother tonal transitions. You are not going to make large prints with an image from the a7S II unless you are finessing a lot in post.

Negatives (Not the Film Kind)

On the flip side, I do have gripes with the Z 6—which is OK, because there is no perfect camera.

Lens Lack

First and foremost is this plea: Nikon, hurry up and make some more lenses!

My favorite Z lens right now is the 14-30mm f/4. I love the compactness and I really don’t miss the extra stop of an f/2.8 version because I can go to those higher ISOs without worry (more on that later). I did test the 14-30mm against the F-mount equivalent, the Nikon 14-24mm f/2.8, which is one of my all-time favorite lenses. The cost difference is minimal right now—the f/2.8 F lens is currently $1,895 and the f/4 Z is $1,295. I don’t see much loss in image quality with the latter, so I’m torn. A 14-24mm f/2.8 Z-mount is in the works, but I assume it will be over $2,000.

One might argue that I could just use any F-mount lens I want by employing the FTZ adapter. But I’m not a fan of this tool. When I mount a camera body to a tripod and want to take off the FTZ adapter and lens, the FTZ mount gets in the way. To remove the FTZ mount and lens, I have to take the camera completely off the tripod, then swap lenses. This is definitely annoying.

(I applaud Canon for what they did with their offering of four different adapters, including ones that have a built-in neutral density or circular polarizer filter. This is great especially when you want to adapt superwide-angle lenses—which don’t take screw-on filters—to a mirrorless camera.)

Non-Articulating Screen

I like cameras with articulating arm screens instead of just the tilting-up-or-down version found on most bodies, the Z 6 included. Yeah, I understand that is adding more “fragile” components, but the articulating LCD does a few things I love:

  • I can always flip my screen and protect it from scratches.

  • People want their cameras to emulate their phones. Let’s face it, phones did a great job of copying the best functions of cameras; time for camera companies to take it back!

  • I’m not a selfie guy but I do like taking self-portraits and putting my camera in low and different angels. The articulating angle arm gives more options.

The articulating arm screen that flips out (left) is much more functional than a screen that just tilts (right).

Lightroom Tinkering

Nikon hard-bakes some very aggressive noise reduction that gets automatically applied upon import to Lightroom. The amount of reduction depends on the ISO.  I definitely suggest taking a good look at this automated noise reduction and customizing it to taste. With Z 6 images, the default noise adjustments are as follows:

  • For ISO 6400 it applies 43 points of luminance, 75 points of detail, 10 points of color.

  • For ISO 12,800 it applies 46 points of luminance, 75 points of detail, 10 points of color.

  • For ISO 25,600 it applies 49 points of luminance, 75 points of detail, 10 points of color.

  • For ISO 51,200 it applies 52 points of luminance, 75 points of detail, 10 points of color.

This is a bit aggressive. I would definitely go in and cook that to taste. I’ve found that zeroing out the amount of luminance and color noise and then adding 10 to 30 points of each cleans up things nicely and retains the detail.

Z 6 Compared to the Others

So there you go—a feature-by-feature breakdown of why I love the Z 6 (despite the few things I would change about it). But why do I say it’s better for night photography than the other options out there?

There are lots of features we can compare, but the point here is about night photography, therefore the feature we care about most is performance in low light. So let’s take a close look at the high ISOs of the latest full-frame mirrorless cameras. (There haven’t been many DSLRs released in the last year, except Canon’s recent EOS 90D, which I haven’t been able to test yet. Besides, mirrorless is the future.)

Note: To see the full-resolution versions of the comparison images below, visit here to download.

Sony a7R III

Let me preface this by saying that it is really difficult for a high-megapixel camera (over 30 megapixels) to produce clean ISOs above 6400. Think about it. All the full-frame cameras have a fixed amount of space in which to fit millions of pixels—the more that you cram in, the smaller the pixels get, and their “well” to receive light also gets smaller. Algorithms continue to get better but the sweet spot for a full-frame night camera is 24 to 30 megapixels.

That being said, the a7R III performs really well. There is no doubt why this camera has been incredibly popular for Sony.

The full-frame views of all these shots look good, but when we zoom to 100 percent and pay attention to the granularity of the sky and shadow regions, that’s when we notice a difference.

  • 6400: Normal noise. Looks normal with no loss of detail in the brick and woodwork.

  • 12,800: Acceptable noise. We can definitely see grain in the sky as well as in the wood and brick. But a gentle use of noise reduction (say, 20 points) would make this an acceptable ISO to use in the field.

  • 25,600: Too much noise. This is where the a7R III breaks for me. It looks like we are shooting through a nylon stocking. There is noise from top to bottom. An aggressive amount of noise reduction (with a subsequent loss of detail) would be needed to make this work for me.

Canon EOS R

The EOS R has the same sensor as the Canon 5D Mark IV, which isn’t a bad thing, as that has been a popular night camera for Canon users.

  • 6400: Acceptable noise. But it looks like ISO 1600 or 3200 in the film days. Applying noise reduction by 10 to 15 points should clean that up just fine.

  • 12,800: Too much noise. While I was testing, a car drove by and lit up the scene, but we can still see a heavy layer of noise over the whole image. Finessing the noise and detail could salvage the photo, but this would really be my breaking point if I was a Canon user.

  • 25,600: Yeah, no. Lots of noise and grain here. I would need to be aggressive in removing it and thus lose a lot of detail. Best to not go this far.

Nikon Z 6

Here’s why it’s better than the rest.

  • 6400: Minimal noise. I’m impressed—it’s cleaner than any other camera I have tested at ISO 6400. I’d set noise reduction to 5 or 10 points, and then it looks almost like ISO 800.

  • 12,800: Normal noise. It looks like the competition’s ISO 6400. Not much loss of detail at all. I’d set luminance and color noise reduction between 10 and 20 to make it even cleaner.

  • 25,600: Acceptable noise. Definitely seeing the noise, but I can work with it. Setting the luminance and color noise to 20 or 30 points, the situation is remedied with minimal loss of detail. I would still try to slightly overexpose my image in this scenario, as opening up shadows in post-production would create more troublesome grain.

  • 51,200: Too much noise. This is my breaking point with the Z 6. We are getting that layer of grain over the entire image and losing detail. I can be aggressive with my noise reduction and might be able to work with an image, but chances of making it good enough for a large print are minimal.

Wrapping Up

For night photographers, creating great images at high ISOs is a must. I found the top three full-frame mirrorless cameras to be quite capable of ISO 6400, and I might even dip into 12,800.

The Z 6 separates itself by getting 1 to 2 stops better with cleaner ISOs. And that for me is a game-changing camera for night photography. It means I can pretty much shoot in any dark sky condition, even with an f/4 lens, and come away with excellent image quality.

Is it a perfect camera? No, but nothing is. Bedsides the excellent high ISOs, the other winning points are:

  • the comfort of the camera

  • familiar menu system

  • adapting to a lens ecosystem that I am happy with

I’m looking forward to more native Z-mount lenses coming in the near future and hopefully a new FTZ adapter that doesn’t get in the way of my tripod work. And above all, I’m looking forward to the Z 6 enabling me to seize the night better than I ever have before.

Have you tried the Z 6 at night yet? Are you happy with it? Let’s continue the conversation in the comments section below or on our Facebook page.

Gabriel Biderman is a partner and workshop leader with National Parks at Night. He is a Brooklyn-based fine art and travel photographer, and author of Night Photography: From Snapshots to Great Shots (Peachpit, 2014). During the daytime hours you'll often find Gabe at one of many photo events around the world working for B&H Photo’s road marketing team. See his portfolio and workshop lineup at www.ruinism.com.

UPCOMING WORKSHOPS FROM NATIONAL PARKS AT NIGHT

How I Got the Shot: Star Trails and Tufa Spires at Trona Pinnacles

Star Trails and Tufa Spires, Trona Pinnacles, California. Nikon D5 with a Nikon 24-70mm f/2.8 lens, light painted with a Coast HP7R flashlight with 1/2 CTO and -1/8 green gels. 20 minutes, f/2.8, ISO 100.

I’ll admit—Trona Pinnacles National Natural Landmark was not in my crosshairs. I was not aiming to photograph it, nor even to visit. I really had never even thought about the place. But while planning a Death Valley workshop with my friend Susan Magnano last year, she asked if afterward I’d be interested in shooting at Trona with her for a couple of nights. I’m always happy to spend time with Susan (if you knew her, you would be too), so I said yes.

And gosh am I glad I did.

The Place

Trona Pinnacles is a 3,800-acre piece of BLM land that’s accessed via a 5-mile dirt road in the Southern California region of the Mojave Desert. Not far from Death Valley National Park, not far from Alabama Hills, Trona features one of the most surreal landscapes of the whole Owens Valley.

The primary photography targets are the 500-plus tufa spires that rise as much as 140 feet from a dry bed in the Searles Lake basin. Standing amid them, you could be forgiven for thinking you’re on another planet—the area looks so much like a foreign world that it’s been used on numerous occasions to depict exactly that. If you’ve watched sci-fi films and TV shows such as Battlestar Gallactica, Lost in Space and Planet of the Apes, then you’ve seen Trona Pinnacles.

It’s a great place for photography. The formations can be mixed and matched and juxtaposed to create endless possibilities for compositions. The groups of pinnacles are far enough apart to make for a relatively expansive park, yet close enough to make walking around relatively easy, and the landscape is open enough to provide plenty of space to move around and create angles for light painting.

Star Circles over Trona Pinnacles, California. Nikon D5 with a Nikon 24-70mm f/2.8 lens. 31 minutes, f/4, ISO 100.

The Scout

On our first night of shooting, I mostly focused on the grand landscape—the pinnacles as a foreground for big-sky compositions. On our second night, I honed in on the rock formations as primary elements of more intimate compositions. The image at hand is one of those, and was the second-to-last that I made on the trip.

During our daytime scouting, this was exactly the kind of composition I’d been looking for: a group of three pinnacles that juxtaposed nicely to form a triangle effect. My first preference was to find a triad in front of where the Milky Way or North Star would be, but this was the group I liked the best in terms of the shape they combined to create.

With the afternoon sun shining on the landscape, I walked around the pinnacles to find the best spot for the tripod, and made a rock note about where that spot was so I could find it hours later at night. (What’s a rock note? I placed three golf ball-size rocks next to the tripod feet, kind of like I was marking my ball on the green. They were pretty easy to find later, and I knew exactly where to set up.)

Then I strolled around the scene again, envisioning the angles I could light paint from—not only where the light would look the best, but also where I could safely walk in the dark.

The Shoot

After first shooting night scenes in other places we’d scouted, Susan and I returned to this spot at about 12:45 a.m. The moon had set a few hours earlier, so aside from a little of light pollution from the community of Trona to the north and the city of Ridgecrest to the west, we were working in pretty dark conditions.

Figure 1. The base exposure before light painting: 15 seconds, f/2.8, ISO 8000.

Figure 1. The base exposure before light painting: 15 seconds, f/2.8, ISO 8000.

I set up my tripod, mounted my Nikon D5 and 24-70mm f/2.8 lens, and quickly found the composition I’d visualized earlier. I shined a Coast HP7R flashlight on the front spire, which was plenty of light for the D5’s autofocus to lock onto. We’d been shooting for a while, so I already knew what the base exposure would be: 15 seconds, f/2.8, ISO 8000. I fired a test shot (Figure 1) to make sure everything looked right.

I knew the spot I wanted to light paint from, but the one thing I hadn’t been able to test in daytime was the light itself. Now that it was dark, I could start doing that.

When light painting by myself (Susan was a few hundred yards away working on her own photograph), I like to use a wireless shutter trigger—specifically, the Vello FreeWave Micro. This allows me to get into position before firing the camera, rather than pressing the shutter button and running into the landscape to start lighting. (Another option is to use a timer, but I sometimes find that from a distance I don’t hear the shutter open. I also might not be in position when the camera fires, or conversely might be standing around waiting for it to fire. The wireless release solves all those issues for me.)

I made a few test exposures, adjusting the lighting strategy with each (Figure 2). I’d fire, light the pinnacles, return to the camera to see the results, then get into position and start again. (This is a great way to stay in shape.)

My concern in this particular composition was lighting each spire about equally, but with the front-and-center one just a little brighter. They look close to together in the image, but they were actually far enough apart, and at different enough distances from the light source, that each required a different amount of light. For each formation, I just counted how long I was lighting it—perhaps 2 seconds for the first, 3 seconds for the second, 4 seconds for the third. (I don’t recall the exact amount of light I used for each—the concept is more important than the specific number.)

Figure 2. Different light painting trials (all of them failures—albeit positive failures, because they led to something that worked).

Once I got the timing down, I tried changing the color temperature of the light. For the initial test shots I was using my HP7R with a gel combination of 1/2 CTO and -1/8 green (see Tim’s post “Level Up With Light Painting: Correcting the Color of Your Flashlight”). Just to be sure that’s what I liked best, I also tried a few without the color correction, opting for the naturally cool temperature of the LED flashlight (Figure 3).

Figure 3. Testing a cooler color temperature.

I decided I liked the warm look better (Figure 4), as it nicely complemented the warm tones of the clouds reflecting the street lights of Ridgecrest.

Figure 4. The light painting approach I settled on—or so I thought.

Going Long

The next step was to adapt the lighting strategy for a long exposure. I wanted to shoot for 8 minutes, which with a focal length of 31mm and facing west I thought would give me star trails long enough to be compositionally relevant. To get my exposure from 15 seconds to 8 minutes, I dropped the ISO from 8000 to 200. (The 1/3 stop less of exposure was to compensate for the light reflecting off the clouds, which had grown a little denser.)

Figure 5. To test the light painting for the long exposure, I kept the shutter open just long enough to test what I was adding with my flashlight. The idea was to keep the test short by evaluating only that one piece—I didn’t care if the background went to black.

At the new, less sensitive exposure, clearly a few seconds of light would not have been enough to illuminate the foreground. But how much light was right? I obviously didn’t want to use an 8-minute exposure to find out, especially if I needed two or three tries, which would have resulted in 16 or 24 minutes of testing. That’s not time spent well.

The good news is that for a test shot, I don’t need to care about the background—just the light painting. So I opened my shutter, tried the light, then closed the shutter. The background was nearly black, but I could see if the light painting was correct. Lucky me, it was! (Figure 5. I hardly ever get this right on the first try.)

At this point I felt ready to fire the long exposure. I turned on Long Exposure Noise Reduction, opened the shutter, applied my tested light painting, and waited out the rest of the 16 minutes (8 minutes of shutter time plus 8 minutes of LENR).

Once the camera was finished cooking, I looked at the result on the LCD (Figure 6). The exposure was right, as was the light painting. Alas, the stars were too short. Another issue I noticed is that the ground in front of the pinnacles was completely black, which I didn't like.

Figure 6. Problems to solve for the final exposure. 8 minutes, f/2.8, ISO 200.

Figure 6. Problems to solve for the final exposure. 8 minutes, f/2.8, ISO 200.

I didn’t want to spend another half hour on a photo I'd thought was almost done, but I preferred that idea to investing all that time and not getting the image right. So I went at it again.

I turned off LENR (so as not to unnecessarily double the test-exposure time), dropped the ISO to 100 and started re-testing the light painting. First I shined some light on the ground, adding just enough to reveal a bit of detail—which took me three tries to get right. Then I re-tested the light on the formations (compensating for the lower ISO), combining it with the foreground light to make sure everything would look good in the final, even longer long exposure (Figure 7).

Figure 7. Testing some light to draw out detail in the foreground shadows. The first take was too much light, the second just about right, and the third combined the new foreground light painting with the light on the spires.

Once I was (relatively) confident the painting approach was sound, I turned on LENR again, opened the shutter, set a timer for 16 minutes, light painted, strolled around gazing at amazing night skies for 12 minutes, then closed the shutter. When the LENR finished, I finally had my shot (Figure 8).

The Final Image

Taking the time in the field to work out the kinks meant that the final image required very little post-processing—just some basic tweaks in Lightroom’s Basic panel to optimize contrast and color.

Figure 8. The final image with 20-minute star trails and all the light painting.

Want to shoot this great space with us in 2020? We have one ticket left for our Trona Pinnacles & Alabama Hills workshop. Sign up today!

Chris Nicholson is a partner and workshop leader with National Parks at Night, and author of Photographing National Parks (Sidelight Books, 2015). Learn more about national parks as photography destinations, subscribe to Chris' free e-newsletter, and more at www.PhotographingNationalParks.com.

UPCOMING WORKSHOPS FROM NATIONAL PARKS AT NIGHT

The Simmer Dim: Photographing in Twilight that Lasts Till Morning

What if I were to tell you that one of the best experiences a night photographer can have is to travel to a time and a place when the surrounds hardly get dark at all? The idea is not one of fantasy, but rather one of fancy. I much enjoy shooting in twilight, and with time to plan the travel properly, one can shoot in it all night long.

That time? Within a few weeks of summer solstice. That place? The further toward the north or south pole, the better.

Stones of Stenness, Orkney, Scotland. Canon 5D with a Nikkor 28mm f/3.5 PC lens. 30 seconds, f/8, ISO 800.

Chasing Twilight

Traveling to a far-northern destination in May or June (or to a southern one in November or December) may seem like an odd choice for a night photographer. It doesn’t get fully dark north of 47 north latitude for several weeks a year. To note:

  • Above the Arctic Circle, at about 66 degrees north, the sun never sets at all around the summer solstice.

  • Between 61 north and the Arctic Circle, (which includes Scandinavia, parts of Alaska, and Canada, Iceland and Greenland) the sun sets, but never gets more than 6 degrees below the horizon in high summer, which means the sky never grows darker than civil twilight.

  • Between 53 and 61 north (the United Kingdom, parts of Alaska and Canada), summer nights in June are spent in nautical twilight.

  • Between 47 and 53 north (much of Europe, China, Ukraine and the northern U.S.), it doesn’t get darker than astronomical twilight.

Yet all of these are great locations for night photographers. Just why is that?

Dornee, Kyle of Loch Alsh, Scotland. Canon 5D, Canon EF 50mm f/2.5 macro lens. 4 minutes, f/22, ISO 100.

To many contemporary photographers, night photography is all about the Milky Way, which we need dark skies to photograph. But there’s much more to night photography than that, which I’ve written about previously (see “Beyond the Milky Way” and “The Night Photography Mindset.”)

To that end, this article is about making the most of nautical and astronomical twilight, especially when it lasts through the night—which is exactly what it can do in many of those places mentioned above. (You can read a rundown of the different stages of twilight on EarthSky, or in Tim’s blog post “Out of the Blue: The Importance of Twilight to the Night Photographer.”)

Dusk That Never Quite Ends

One of the places that enjoys this phenomenon is Scotland, and it’s the Scots—especially those from Orkney and Shetland—who call this phenomenon “Simmer Dim.” This is one of my favorite times to photograph, especially when I’m lucky enough to shoot in those northern Scottish isles. (Which is exactly why we’re running a night photography tour in Orkney next May!)

Lerwick, Shetland, Scotland. Canon 5D Mark II, Zuiko Shift 24mm f/3.5 lens. 10 seconds, f/8, ISO 100.

Why do I love Simmer Dim? Imagine spending an entire night in twilight—that enchanting time between daylight and darkness when the earth’s atmosphere scatters the last rays of the sun’s light to create deeply saturated colors in the sky. It’s nothing short of magical. Under normal twilight conditions, there’s only a brief window of opportunity when the light is perfectly balanced for both sky and ground—but during Simmer Dim, that balance may last for hours.

I’ve been fortunate to photograph during Simmer Dim on many occasions, but there was one night in particular in early July 2007 that I’ll never forget. I was leading a photo tour of Orkney, and the weather had been rather gloomy for days with a dense fog that just wouldn’t break. The fog was so thick that it had begun to dampen our spirits, but we decided to go into Stromness—Orkney’s second largest town—to see if we could find a picture for the making. It was amazing!

The fog held the glow and the colors of the streetlights low in the sky, and they were perfectly balanced with the natural luminance of the twilight. We photographed all night until the sky began to lighten further around 3 a.m. We suddenly found ourselves hoping that the fog would last or come back the following evening. It did, and we spent the next night in Kirkwall—the largest town on Orkney—photographing through the night and into the morning again.

Tips for Twilight Photography

Photographing in twilight can be a little different depending on whether your environment is natural or settled—or, more precisely, whether it contains artificial lighting. In nature, twilight often calls for the use of light painting or graduated neutral density filters, as the light level at the ground is usually several stops darker than the sky. In urban areas, especially small towns and villages, the streetlights and sky require similar exposures during twilight, which means you can usually keep your filters in the bag.

In nature, such as one of our Beautiful National Parks:

  • Use a 2- or 3-stop graduated neutral density filter to even out the exposure between the foreground and sky.

  • Or, make multiple exposures for foreground and sky and combine them in Photoshop.

  • The color of light changes quickly at dusk, so consider using auto white balance. Or, do what Tim and Matt do, which is to use Daylight white balance to render colors “as they are” even if they’re not “what we expect.” These are both valid approaches to the same problem, albeit with different results.

  • Use an incandescent flashlight or other warm color temperature light source to contrast with the cool blue of twilight.

  • Keep an eye out for vampires.

In an artificially lit environment:

  • Look for a balanced exposure between the ground-level illumination and the sky.

  • Manually set your white balance. Choose a setting that makes your foreground look the way you want it.

  • Utilize the blinking-highlights feature to help maintain important highlight details in your exposure.

  • Make multiple exposures of the same scene at different stages of twilight.

  • Keep an eye out for hipsters.

Finding Simmer Dim

In the Northern Hemisphere, we’re past the Simmer Dim for 2019. Our Southern Hemisphere friends can look forward to it at the end of the year, but aside from Antarctica and the southern tip of South America, there’s not a lot of land that sees the effect.

Either way, it’s never too early to plan a trip for Simmer Dim 2020, and regardless, twilight in general is great for low-light photography year-round. Twilight is often dark enough for light painting, and is a great time to get better color saturation into your images. So get out there early and give it a go!

A Simmer Dim Gallery

Below is a selection of ten images from Simmer Dim shoots I’ve done, including the all-nighters mentioned above. For notes on the gear used and the exposures, download the accompanying PDF.

If you’ve shot in the Simmer Dim, please share your stories and images in the Comments section below or on our Facebook page. (And if you haven’t, come join us in Orkney next May!)

Lance Keimig is a partner and workshop leader with National Parks at Night. He has been photographing at night for 30 years, and is the author of Night Photography and Light Painting: Finding Your Way in the Dark (Focal Press, 2015). Learn more about his images and workshops at www.thenightskye.com.

UPCOMING WORKSHOPS FROM NATIONAL PARKS AT NIGHT