How I Got the Shot: Dueling Dinos in Borrego Springs

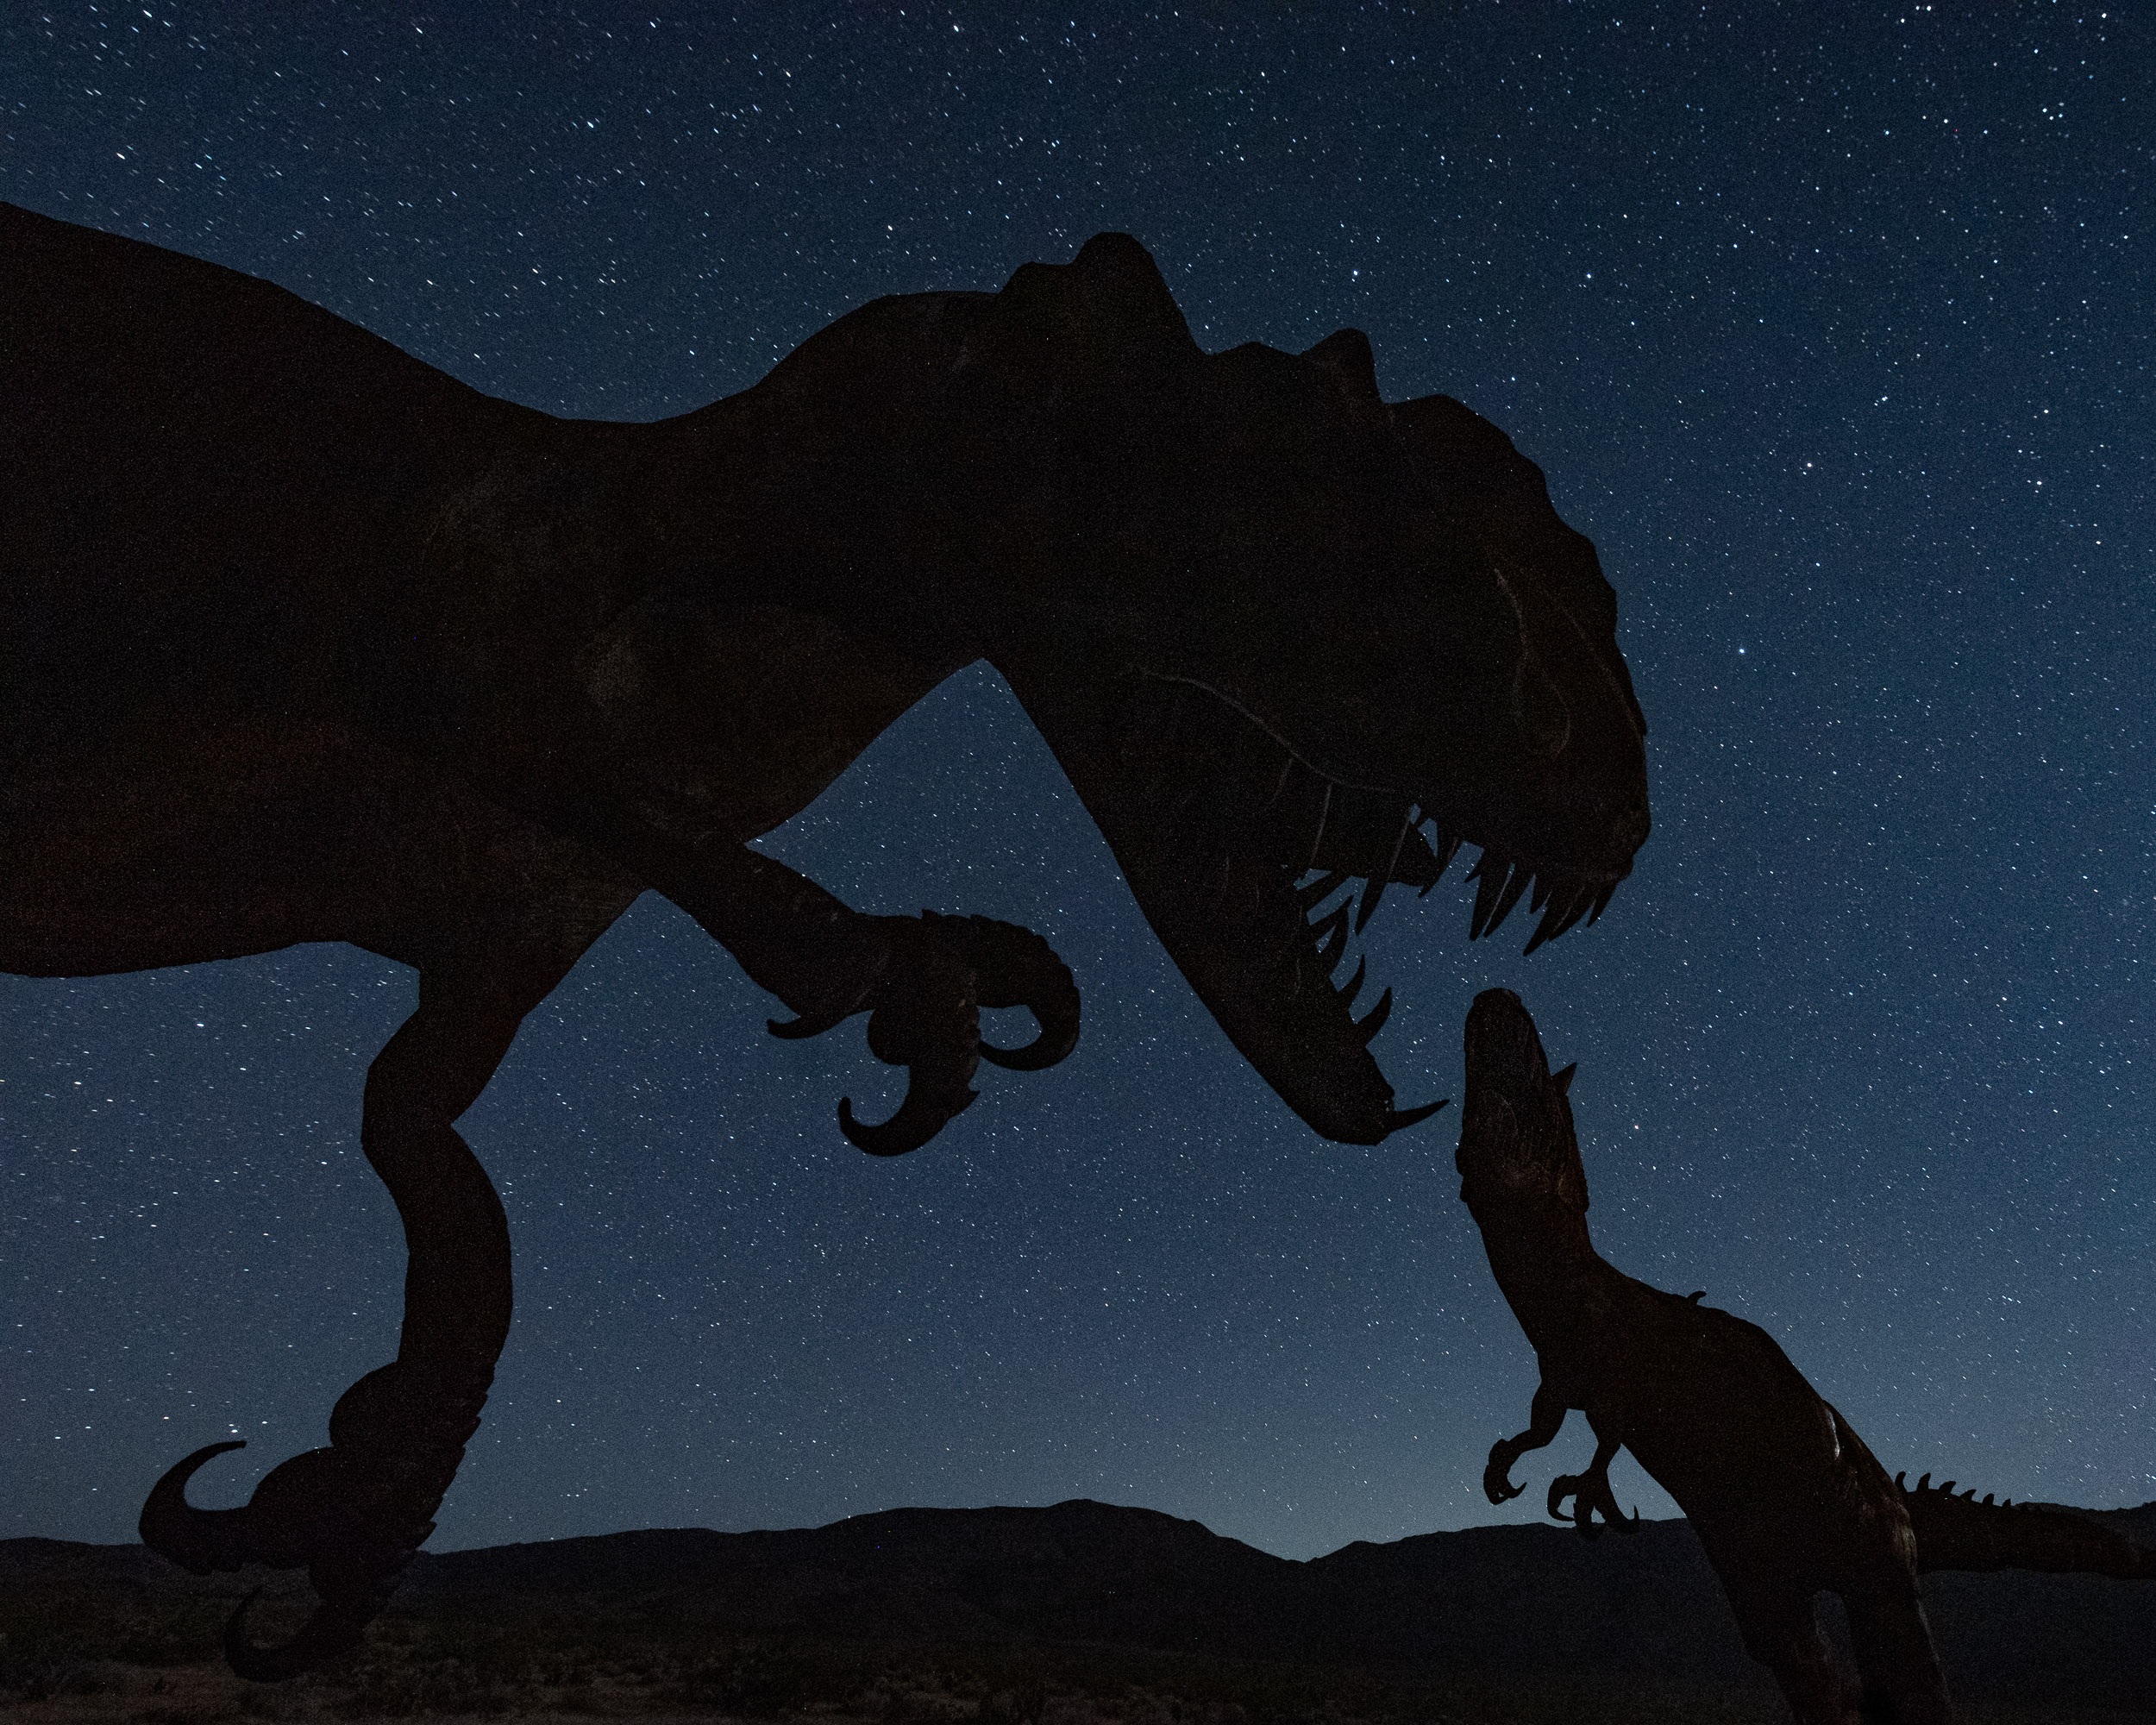
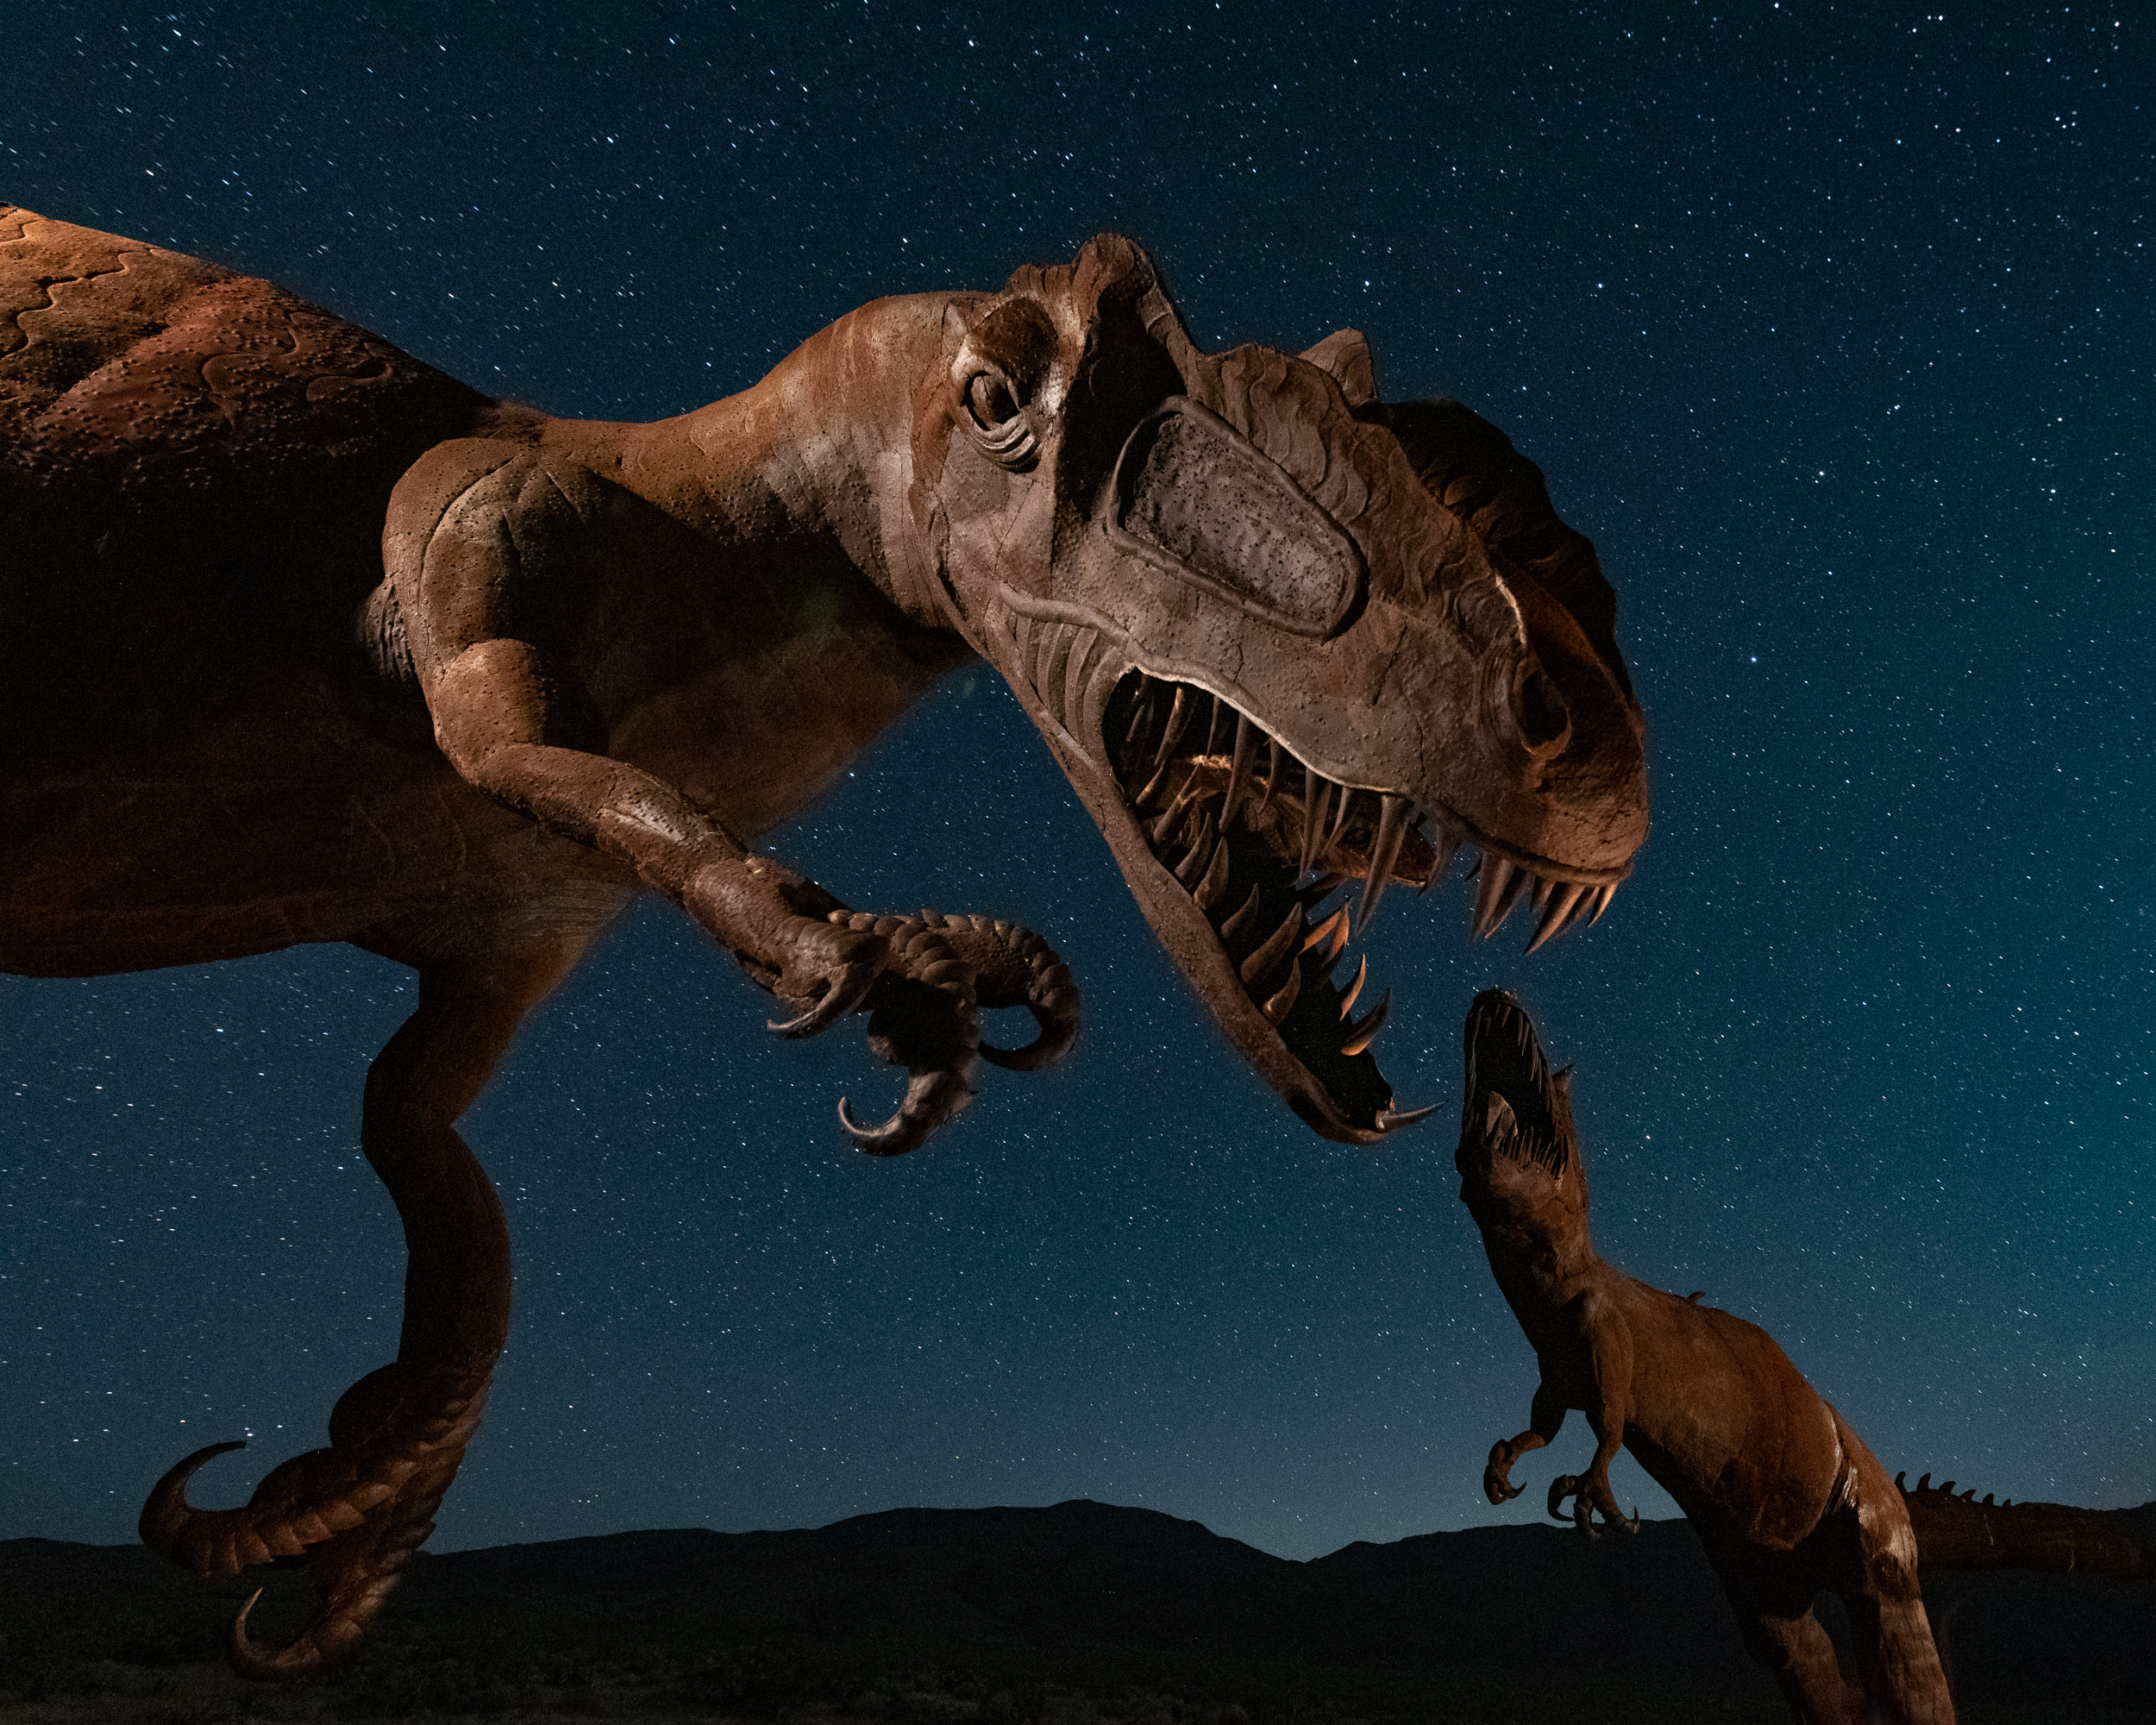
Dueling Dinosaurs, Borrego Springs, California. Nikon D750 with an Irix 15mm f/2.4 lens, lit with a Luxli Viola and Maglite Mini. 25 seconds, f/4.5, ISO 4000.

The Location

Ricardo Breceda’s metal sculptures in Borrego Springs, California, are intense and dramatic with or without light painting. They are incredibly fun to shoot. The 130 sculptures are spread out over about 8 miles of desert, but two of my favorites are a pair of giant dinosaurs that stand together in eternal battle.

The relationship between these two makes for some great composition options. The two dinosaurs are about the same size and roughly 40 or 50 feet apart, although they don’t appear that way in these images. I set up the camera to make it look like the near dinosaur was about to bite off the head of the more distant one.

You can find Ricardo’s two dinosaurs right here.

The Exposure

I was collaborating with Cutler Connaughton, one of our workshop participants when we partnered with Atlas Obscura this past May. We placed our cameras very close together, as there was very limited space to get the alignment just right.

After determining the composition, we focused and decided on the ambient exposure. I was using an Irix 15mm f/2.4 lens, which I can usually shoot at f/2.8 and get incredibly sharp results. But in this case I needed to stop down to f/4.5 for more depth of field. The 400 Rule told me that my longest usable shutter speed for star points with the 15mm was 25 seconds, so I set the ISO accordingly to get an adequate background exposure. Final exposure: 25 seconds, f/4.5, ISO 4000.

This is the final composition without any added light. I thought that it worked as a silhouette, but knew it could be improved with a suggestion of detail. I don’t want to reveal everything with my lighting—I want the viewer to be left with questions. If you have all of the answers with a quick glance, there’s no need to keep looking at the image, and I want to keep eyes on the picture as long as possible. Nikon D750 with an Irix 15mm f/2.4 lens. 25 seconds, f/4.5, ISO 4000.

The Lighting

This exposure left the dinosaurs completely silhouetted. We needed to add light.

We turned on a Luxli Viola and set it to 10 percent power and 3000 K, and mounted it on a hand-held Elinchrom boom arm. I wanted to use a warm color balance to bring out the rust color of the steel sculptures, which would contrast nicely with the cool natural light.

Ten percent brightness provided just enough intensity to accomplish what we needed during the exposure, while still providing a good amount of control over the added light. Turning up the power of the Luxli would have gotten the job done in less time, but would have been less forgiving if my positioning wasn’t perfect while painting. Every decision I make when creating an image is a compromise, balancing the various elements required to make the shot work.

The Shoot

Cutler triggered both cameras, while I experimented with the lights.

We made a total of 47 exposures of this setup! Refining the composition took five frames, as we had to have our cameras nearly touching and the tripod legs overlapping to make it work. The rest of the exposures involved making slight modifications in the lighting. It’s not unusual for me to make six to 10 variations to get an image just right, but this one required a lot of perseverance.

The sequence of 47 exposures that Cutler and I made together. The final version actually occurred about two-thirds of the way through the sequence, but we kept at it because we weren’t confident that we had what we were after.

The lighting involved four steps from four different positions, and three of the four steps were done with a single light source during the 25-second exposure. I could have set up multiple lights in fixed positions or lit each part of the scene in separate exposures, but I needed the exercise! I ran from one spot to the next over and over again, reviewing the results with Cutler and making mental notes each time for the next exposure.

The first light position was about two feet behind and over the right shoulder of the foreground dinosaur. This is the main light in the image, and even slight variations in position altered the overall appearance dramatically. The light was about 10 feet off the ground, which is why I was using the boom arm.

I couldn’t tell you how much light was added from each position, but I had good control over the process, and that’s what’s important.

The second light position was just out of the frame from camera-right, and slightly behind the foreground dinosaur. The purpose here was to backlight the teeth of the beast to emphasize its ferociousness.

For the third position, I ran further to the right and behind the second dinosaur to light that one. I wanted to show texture as well as detail, so it was important to light from an oblique angle.

Cutler took care of the last detail (from the fourth position), which was to light the left claw of the foreground dinosaur with an incandescent Maglite Mini flashlight, just enough to separate it from the background. The color balance of the Maglite Mini is a little warmer than the Luxli, but against the monochromatic rusted steel, this isn’t noticeable. If Cutler had been using an LED light, the color difference would have been obvious. The mini-Mag was a good choice for this task also because it was both dim and focusable.

I recommend that people count seconds in their head when they light paint to get a repeatable and consistent effect in the image. I’ve been doing this for so long that I work by what feels right rather than actually timing the light in each position. For this image, I couldn’t tell you how much light was added from each position, but I had good control over the process, and that’s what’s important.

The final image, before and after being lit as described in the text. Nikon D750 with an Irix 15mm f/2.4 lens. 25 seconds, f/4.5, ISO 4000.

Location Lighting  vs. Light Painting

Other photographers might have approached this scene differently. Most would probably not have run around tripping over rocks and waving a light on a stick in the dark, but that’s just the way I roll.

Using fixed-position lights on stands would certainly lead to more consistent results, and most likely fewer overall exposures to get to the end result. To me though, that is simply location lighting, and not light painting. The difference is more than just semantics––light painting is an active process that requires a different skill set than location lighting. Both are valid approaches, but the former is what makes my creative juices flow.

The line between light painting and location lighting has blurred in recent years. The term Low-level Landscape Lighting (LLL) has come to be used to describe static lighting in astro-landscape photography (ALP). This is partly out of necessity, and partly due to the development of new technologies such as the Luxli panel light.

When working at the high ISOs required for star points in ALP, it’s difficult to light from multiple positions during a brief 15- to 30-second exposure. With short exposures at high ISOs, it’s also hard to control traditional light painting tools like the venerable Coast flashlights, because they are just too bright for such a sensitive sensor. The amount of time required to adequately illuminate most subjects with a bright light at ALP settings is just a fraction of a second.

This is an outtake, initially overlooked because I was excited about the original concept. This one was made at the very end of the sequence—it was actually the last shot of the night. After I felt like I had finally nailed the shot we were originally going for, I decided to try a couple of other ideas just to see what would happen. Which one do you like better? Nikon D750 with an Irix 15mm f/2.4 lens. 25 seconds, f/4.5, ISO 4000.

Final Thoughts

I always tell our workshop participants that there is no wrong or right way to do things in night photography. That’s what makes this such a great medium––it’s incredibly flexible and adaptable to different visions. I don’t try to teach people to do what I do, but how to develop their own techniques and methods to make images that get them excited.

The bottom line is that it doesn’t matter if you do long or short exposures at low or high ISOs, or light with flashlights, strobes or an army of Luxli lights. What does matter is that photographers find a way of working that leads them to grow and that leads them to images that excite them.

Lance Keimig is a partner and workshop leader with National Parks at Night. He has been photographing at night for 30 years, and is the author of Night Photography and Light Painting: Finding Your Way in the Dark (Focal Press, 2015). Learn more about his images and workshops at www.thenightskye.com.

UPCOMING WORKSHOPS FROM NATIONAL PARKS AT NIGHT

Oreos and More: 16 Ways to Celebrate the 50th Anniversary of the Moon Landing

Houston, Tranquility Base here. The Eagle has landed.
— Neil Armstrong

It’s here. The Big 5-0. Fifty years since a person first touched a world beyond our home.

I don’t remember this happening. I was still a year and a half from—as my grandfather would say—being even a twinkle in my parents’ eyes. I wouldn’t be born until the latter half of 1971, and I’d grow up in a world where humankind had already made a giant leap toward the stars.

Yet here I am, in 2019, marveling that this ever happened and celebrating that it did.

How am I celebrating? Well, mostly by conversing with my 6-year-old daughter about it. Last night we talked about Neil Armstrong, Buzz Aldrin and Michael Collins, and we looked at pictures of the lander and the rover and the rigid U.S. flag.

And now I remember that “moon” was one of her first words, and how she would delight at seeing it in the night skies of Astoria, Queens, where she lived her first few years, and how when she was 3 she would love to say, “Look, the moon is a crescent, like a croissant!” And how she, even more than me, will grow up thinking that not walking on the moon is just a faint remnant of history.

Before going to bed, she asked if she would ever get to walk on the moon too, and I said maybe. Then I changed my answer. “Yes,” I said, “if you want to walk on the moon, then I’m sure you’ll find a way.”

She will—she’s that kind of kid—determined, unburdened by the nuisance of obstacles. Kind of like that trio of moonwalkers 50 years ago, and kind of like the thousands and thousands of scientists and technicians who helped lift them to the beyond.

Then she asked, “Daddy, can we do it together?”

Gosh, I hope so.


16 Ways to Celebrate

Not many things are celebrated by a majority of the world at once. The moon landing was one of the few, and its semicentennial also will be recognized globally. You won’t be able to escape it on the news today—heck, you can’t even escape it on our blog.

If you can’t beat a party, then you might as well join one. What can you do to be festive today? Below are 16 ideas.

1. Eat Some Oreos

Nabisco recently released limited edition Marshmallow Moon Oreo Cookies. Not only are they as yummy as the rest of the best Oreos, but the package glows in the dark! In stores now—if you can still find them.

(Might we also suggest Milky Way and Mars bars? Moon pies? Tang?)

2. Explain Dynamic Range

Moon-landing conspiracy theorists point to many pieces of evidence that a half-century ago NASA produced nothing more than a big show on a sound stage. One of their Exhibits A is that no stars appear in the sky in Buzz and Neil’s photographs from the surface. So for fun, go find a moon-landing denier and explain that the reason no stars appear is because film couldn’t handle the vastly different exposures of the bright surface of the moon and the darkness of space in one perfectly exposed frame. (Lunar module payload didn’t have space for split-ND filters. Duh.)

3. Watch the Movie

Whether on TV, or at a movie or IMAX theater, watch Apollo 11, the full-length documentary released earlier this year. It’s back in theaters this weekend, is streamable on multiple platforms (Amazon, Google Play, YouTube, et al.), and will be broadcast on CNN twice this evening.

4. Read About a Progmatic Woman

You may have seen this in 2015, but it’s worth a revisit. Check out Wired magazine’s profile of Margaret Hamilton, who, working in “a man’s field,” came to be instrumental in leading the development of the software that powered the Apollo missions. She was such a pioneer in coding that she even co-coined the term “software engineer.” See “Her Code Got Humans on the Moon—And Invented Software Itself.”

5. Shoot with Neil & Buzz

The New York Times put together an outstanding interactive digital walk-through of the moon landing, along with photographs the astronauts made both on the surface and on the flights to and fro. It’s hard to describe this experience—you’ll need to check it out yourself. See “Apollo 11: As They Shot It.”

Neil, this is Houston. Did you get the Hasselblad magazine?

Roger, Houston. … We’re in the process of using up what film we have. We’ve probably got another half an hour’s worth of picture-taking.

6. Relive the Landing in 3D

Go to your local bookstore and buy Mission Moon 3D: A New Perspective on the Space Race by David Eicher, editor of Astronomy Magazine. The book features stereoscopic versions of famous and lesser-known photographs of the 1960s space race, lending unique visual access to one of the greatest stories of the 20th century. 3D viewing glasses included.

7. Listen to Brian May

On January 1 of this year, the legendary Queen guitarist released a composition called “New Horizons.” The song is really a celebration of the titular NASA space probe that buzzed a Kuiper belt object, but we’re including it here because May, also an astrophysicist, designed the 3D viewer that comes with the book mentioned in the previous paragraph. Yes, really. Plus, the song could have easily been about flying to the moon for the first time, right?

8. Also Listen to Pink Floyd

Because now that I’m mentioning it, Dark Side of the Moon will be in your head. Also, it’s where Michael Collins spent half his time 50 years ago today, while he circled over his moonbound friends. (“There is no dark side of the moon, really. Matter of fact, it’s all dark.”)

9. Immerse Yourself in The Atlantic

If you’re not tired of reading (thank goodness, that means you’re still reading this post), then click over to the website for The Atlantic and peruse their 14-article series reflecting on the lunar landing, titled “They Went to the Moon.” Pieces include:

  • “What Is the Apollo 11 Landing Site Like Now?”

  • “Your Smart Toaster Can’t Hold a Candle to the Apollo Computer”

  • “The Most Compelling Photo of the Moon Landing”

10. See What Neil Armstrong Saw

Using NAC images, moon topography, trajectory data and all sorts of other neat technology, the Lunar Reconnaissance Orbiter Camera folks created a video simulation of what Armstrong saw when the lunar lander was lunar-landing. Check it out on the Arizona State University website.

11. Mail a Letter

Head to the post office (before noon—today’s Saturday!) to buy some First Moon Landing commemorative stamps, and use one to send a letter to somebody who’d like to receive a letter from you. Better yet, make it a postcard and tell them you’re vacationing on the shores of the Sea of Tranquility.

12. Watch a Monument Prepare for Liftoff

If you’re in Washington, D.C., head to the National Mall for the National Air and Space Museum’s “Apollo 50: Go for the Moon” show, which will culminate with an image of the mission’s full-scale, 363-foot Saturn V rocket projected on the Washington Monument.

13. Build Your Own Lunar Lander

Seriously! Lego lets you do it, and the job entails just 1,087 pieces. (If you count only 1,086, watch where you step with bare feet.) The NASA Apollo 11 Lunar Lander kit will set you back only $100. Think that’s a lot? NASA spent $240 million on each of theirs. Kit includes Lego Neil and Lego Buzz.

14. Build Your Own Moon!

Four Point Puzzles produced a beautiful 1,000-piece, two-foot circular puzzle of the full moon based on the highest-resolution photo NASA has made to date. (We encourage Four Point to make an easier version based on a waning crescent.)

15. Attend an Event

The U.S. is celebrating the moon landing anniversary everywhere (except the moon, ironically). If you’re interested in learning more about this historic moment, or seeing if you can score some green cheese, look for an event near you. (Know that today is not your last chance—many of these programs run longer into the year.) NASA and Space.com are here to help, with a list of ongoing events and exhibits, from Houston to Cape Canaveral, from the mountains to the prairies, from sea to shining sea.

16. Finally, Photograph the Moon

Last, but absolutely not least, get outside with your camera tonight and photograph that big gray ball in the sky. Want some help? See our blog posts:

Your Turn!

How will you be observing or celebrating the 50th anniversary of the first manned moon landing? Share in the Comments section below or on our Facebook page. We’re all in this together. Party on.

Chris Nicholson is a partner and workshop leader with National Parks at Night, and author of Photographing National Parks (Sidelight Books, 2015). Learn more about national parks as photography destinations, subscribe to Chris' free e-newsletter, and more at www.PhotographingNationalParks.com.

UPCOMING WORKSHOPS FROM NATIONAL PARKS AT NIGHT

Five Questions: Very Large Files, Pollution Filters, Fuji lenses and More

This installment of our “Five Questions” series features inquiries about large image files, light pollution filters, lenses for Fuji, organizing files in Lightroom and old Canon cameras..

If you have any questions you would like to throw our way, please contact us anytime. Questions could be about gear, national parks or other photo locations, post-processing techniques, field etiquette, or anything else related to night photography. #SeizeTheNight!


1. Giant Files Missing from Lightroom

A 4 GB, 38-layer PSB file from Matt. Files this big don’t show up in the Lightroom catalog.

Q: I have run into an issue with large file sizes when image stacking. In Lightroom, after I choose Open as Layers in Photoshop, the final layered file is greater than 2 GB. I saved it in PSB large document format. The file was saved to the disk, but is not showing up in my Lightroom catalog like PSD files do, nor does it show up in the Import window in Lightroom. It looks like Lightroom cannot see the file at all. So I tried flattening the file, but then I got a moiré pattern in the image. Have you seen this before? What is your process for saving and working with very large Photoshop files? — Craig

A: That is correct—for some reason, Adobe hasn’t allowed Lightroom to see PSB files. So your options are to either work with that file only in Photoshop, or to flatten it so it saves as a smaller PSD file.

But yes, flattening can occasionally create its own challenges. We have seen that moiré issue with stacked photos before. It happens sometimes, but not others, and we haven’t been able to identify a pattern of when or why. We’ve asked others who are Adobe-knowledgeable, and haven’t found an answer—but we’ll keep trying! What I can tell you is that the moiré seems to happen more often when working with images from higher-resolution cameras, and that sizing down the image a little before flattening seems to help. — Chris

2. Filtering Light Pollution

Light pollution from Miami over Everglades National Park. Nikon D3s, Nikon 17-24mm f/2.8. 20 seconds, f/2.8, ISO 6400. © 2013 Chris Nicholson.

Q: Do you use light pollution filters of any kind? I don’t remember any of you mentioning them, and I don’t see them in your gear list. Are they just a scam? It seems like such a filter would help when you can’t get to a dark sky area. — Brien

A: Night sky filters mostly help with color shifts from light pollution, and can increase contrast in the sky. We’ve tried a couple of them, but have not tested them scientifically––yet. There will be a blog post comparing them for effectiveness before too long.

That said, I think the general consensus is these filters they can improve skies somewhat, but probably don’t provide $250 to $300 worth of improvement, which is what they tend to cost. I wouldn’t call them scams, but I also probably wouldn’t call them a great investment if resources are limited.

If you decide to try one, please let us know what you think by sharing in the Comments section or on our Facebook page. — Lance

3. Night Lenses for Fuji

Q: I own a Fuji X-T2 and have a 14mm f/2.8 lens. I notice that at least one of you has posted photos using an X-T2 with their 10-24mm f/4 lens. These photos look great. I have been looking at that lens and/or the Fuji 16mm f/1.4 to get a stop or two of additional light, given that the tests I see appear to indicate the corners are much softer at f/1.4, better at f/2 and pretty good at f/2.8. My interest in the 10-24mm is the flexibility and range down to 10mm, but I am concerned about the stops of light I would give up. What is your experience with these lenses, and do you think I should instead look more deeply at a Samyang or Rokinon 12mm or 10mm? — Larry G.

fuji lenses.jpg

A: Several of us have been shooting with Fujifilm since the X system came out, and our two favorite lenses for the night are the Fuji 10-24mm f/4 and the 16mm f/1.4.

The 10-24mm gives an excellent zoom range that’s good for including lots of night sky. The f/4 does limit light, which makes it challenging for Milky Way shots, but if you were to shoot at ISO 6400 or 12,800 and use Starry Landscape Stacker, then you could get away with it. However, the 16mm f/1.4 would be our preferred Milky Way lens for Fuji—it’s an excellent focal length and you can shoot wide open or stop down to f/2 without a worry.

That being said, if I were to buy into the Fujifilm lens system now, I’d have to give their new 8-16mm f/2.8 lens some serious consideration. It’s wider, faster and heavier than the 10-24mm, but the f/2.8 aperture gives it the versatility to shoot in any day or night situation.

On the higher end of tried-and-tested night lenses, I’d also recommend:

For budget and manual focus lenses:

  • I’m not a fan of the Rokinon/Samyang lenses—I’ve had too many with soft, out-of-focus edges. (Though I might try Samyang’s new 10mm f/2.8.)

  • Matt and I both own the inexpensive 7Artisans lenses—the 12mm f/2.8 is pretty good and Matt really likes his 7.5mm f/2.8 fisheye.

Finally, with adapters, any lens can be at your disposal:

  • Our favorite night lens is the Irix 15mm f/2.4 that comes in Canon, Nikon and Pentax mounts. It’s manual focus with a click stop at true infinity, it has hyperfocus markings, and you can lock your focus. It comes in two versions: Firefly and Blackstone. Optically they’re the same, but the Firefly is polycarbonate and the Blackstone is magnesium alloy. The former is lighter, and is best for hikers and photographers who are otherwise weight-conscious; the latter is more rugged, made for extreme situations, and has engraved fluorescent markings that are easy to read at night. — Gabriel

4. Organizing Photos in Lightroom

Q: I really want to move into Lightroom, but I do not organize my images by date. It just won’t work for me because I really want to group photos by place and such so I can look at a “place” together with all times I’ve been there. I know that’s what collections are for, but I cannot even begin to fathom reorganizing everything into dates and collections. Can I use Lightroom that way? — Therese I.

A: You’re in luck, because the Lightroom engineers designed the catalog to be pliable enough to use in whatever way feels comfortable to individual photographers. So when organizing photos, do whatever makes sense to you.

There are two strategies I see most often:

  • Organize into folders by date, and use keywords, collections, etc., to catalog and find them. This is what I do. That works very well for the way I think, because I have a very good memory for dates—show me an image of mine and I can tell you the month and year I shot it. A folder in my catalog might be “2016-05-20_Acadia.” So I do have location info in the folder name, but it’s only secondary. However, this approach doesn’t necessarily work so well for a fair number of other people whose brains don’t categorize information the same way mine does. Many other folks tend to …

  • Organize images into folders by region, country, city, etc. So there might be a folder structure of United States -> Southwest -> Arizona -> Grand Canyon. Using this strategy, you could still search by date, as that info is built into the metadata.

Really, it just comes down to which way your brain tracks these things better. Like I said, I’m in Group 1, as are Gabe, Matt and Lance. Tim is in Group 2. Lightroom is flexible enough to make your own system within the confines of the software. The important thing is to pick a strategy that is easy enough to implement while effective enough to be useful, and then to be diligent about sticking with the procedure you choose so that you can always find your images quickly and effortlessly. — Chris

5. Old Canon vs. New Anything

1561852319_1346734.jpg

Q: What is your thought on the Canon XSi for landscape and night photography? I was thinking of upgrading to a their DLSR cameras, but was wondering if a Nikon camera would be a better option. — Nichole P.

A: The Canon XSi is more or less an entry level camera from 2008, and, to put it mildly, would be a subpar choice for night photography. We recommend a current camera that is at least one notch up from entry level.

To an extent, it matters what kind of photography you’d like to do. If you want to photograph the Milky Way, then the above recommendation is a minimum, and we’d encourage you to step up to a full-frame camera like the Canon 6D Mark II, or even the original 6D (which you could get on eBay for about $500) if you are on a tight budget. Over at Nikon, the D750 is an outstanding value, or the D5500 or D5600 would be OK.

Most importantly, I recommend buying a current generation camera. Even with lower-priced models, current cameras are far superior to those that were made even just a few years ago. — Lance

Chris Nicholson is a partner and workshop leader with National Parks at Night, and author of Photographing National Parks (Sidelight Books, 2015). Learn more about national parks as photography destinations, subscribe to Chris' free e-newsletter, and more at www.PhotographingNationalParks.com.

UPCOMING WORKSHOPS FROM NATIONAL PARKS AT NIGHT

Sliding Into Sharper Skies: Lightroom Brings Texture to Night Photography

Lightroom’s new Texture slider.

Back in May, Adobe introduced a new slider to the Presence area within the Basic panel in Lightroom’s Develop module. This new tool was originally intended to be a “smoothing” slider that would soften skin texture somewhat more naturally than the Clarity slider does. But during development, the engineers found that while it was great at smoothing skin tones, it could also be used to add texture to our photographs.

Thus, the new Texture slider is aptly named. It really does enhance texture in our images! But as with all new photography tools, we wanted to push its limits and see what else it can do, particularly for night photography. As it turns out, when paired with the Dehaze slider, Texture can really enhance the look of our night photographs.

For those of you looking for a quick read, that about sums it up. By adding in a fair amount of Dehaze and a little Texture, your night skies will come alive! In the example below, Dehaze was set to +44 and Texture to +5. These are by no means default settings, as each camera produces different files and each scene requires its own approach. This does, however, give you starting point.

For those of you looking for a deeper understanding, read on.

A Deeper Understanding

The general effect of the Texture slider is somewhere between Clarity and Sharpening. To fully understand how this slider works, let’s take a look at all the sliders that enhance detail and contrast in our images: Sharpening, Texture, Clarity and Dehaze. We’ll begin with Sharpening.

Understanding Sharpening

Each of the aforementioned sliders, in essence, increases contrast. It’s the areas they increase contrast in that separates them from one another. Sharpening, on one end of the scale, adds contrast at the pixel level. Dehaze, at the other end, is much broader in its application of contrast. Let me show you what I mean.

Sharpening increases apparent sharpness by finding an edge, and then darkening one side and lightening the other. This increases contrast around that edge, making it appear sharper. The images below show an unsharpened enlargement (11:1) of a night sky, and the same section after adding Sharpening. Notice how the stars appear to have a dark ring around them? This is the contrast being added by the sharpening slider.

Also notice that even the pixels in the sky without stars have been sharpened. This look is what makes an over-sharpened image look “false.” Lowering the value of the Detail slider can correct this negative effect. The images below show the sky sharpened with Amount at 150 and Detail at 25, and the same image with the Detail slider lowered to 2.

Finally, let’s look at the real comparison. The images below are completely unsharpened and then sharpened with Amount at 150 and Detail at 3.

As you can see, the adjusted image has an increased apparent sharpness in the stars without appearing to be over-sharpened in the surrounding sky.

Of course, you would never want to sharpen your images at a magnification of 11:1. And the slider settings presented are not what I would necessarily suggest. These magnifications and settings were used to better help you understand the concept of sharpening. Sharpening should be done at magnifications of 1:1 or 1:2. Experiment with each magnification to suit your taste. Likewise, experiment with your sharpening sliders, keeping your Amount higher and Detail lower.

Note: The other sliders in the Sharpening box are Radius and Masking. The Radius slider controls how large the “halo” around the edge becomes. A higher Radius equals a thicker halo ring; a lower Radius setting creates a more natural look (a setting of 1.0 could be your benchmark). Adobe defines Masking as: “Controls an edge mask. With a setting of zero (0), everything in the image receives the same amount of sharpening. With a setting of 100, sharpening is mostly restricted to those areas near the strongest edges.” So increasing your Masking slider relegates the sharpening to only the areas with well-defined edges—which is typically the place we want the sharpening to effect.

Congratulations! You’ve made it through it a quick primer on Sharpening. The reason I dove a little deep here is that a basic understanding of Sharpening helps create a better understanding of the other contrast controls—Texture, Clarity and Dehaze.

Understanding Dehaze

Now, let’s jump to the other end of the spectrum with Dehaze. While Sharpening adds contrast on the pixel level, Dehaze increases contrast across your image on a much broader scale. The following images are at a 4:1 magnification. We see a comparison of no contrast controls applied, versus the Amount slider in Sharpening increased to the maximum of 150, versus Dehaze set to +100. (Again, these adjustments are not recommendations, but rather exaggerations to show the effect.)

Contrast added with Sharpening.

Contrast added with Dehaze.

Below, let’s look at those two contrast adjustments side by side—Sharpening at 150 and Dehaze increased to the maximum of +100.

The Dehaze slider is actually increasing contrast between the sky glow and foreground. Compared to Sharpening, notice how Dehaze makes the foreground darker and the sky glow brighter. This makes the foreground and sky more separate from one another (i.e., there’s more contrast between them).

You can also see how Sharpening actually brightens the foreground and adds texture throughout. It does not, however, significantly separate the sky glow from the foreground.

Below is another example, comparing the image straight from the camera with a version with Dehaze set to +60.

This really shows how Dehaze darkens the sky around the Milky Way. Again, this is a broader application of contrast as opposed to Sharpening’s more localized approach to separating individual stars from their surroundings. For our night skies, the Dehaze slider can be simply magic. (See more on this in my 2018 blog post “Dehaze: The Night Photographer's Secret Weapon.”)

Note: Along with an increase in contrast, the Dehaze slider also significantly increases contrast and somewhat darkens the whole image. After pumping up Dehaze, it’s not uncommon for me to decrease the blue saturation and increase Exposure.

So What About the Texture Slider?

The Texture and Clarity sliders fall between Sharpening and Dehaze. The breakdown of the different sliders looks like this:

  • Sharpening. Pixel-level addition to contrast around the edges. No real increase in saturation. Can increase grain and noise in the image.

  • Texture. Edge contrast added on a broader scale than Sharpening. Increases the apparent texture without the amplification of grain or noise that is sometimes accompanied with Sharpening. No noticeable saturation increase. The net effect is one of increased sharpness.

  • Clarity. Contrast added throughout the image on a broader scale than Texture. Looks more like an increase using the Dehaze slider but with slight sharping of the edges and no noticeable increase in saturation. The net effect is one of increased local contrast.

  • Dehaze. Adds contrast and saturation across a broader area of the image. Virtually no sharpening effect added. Separates especially well in brighter, low-contrast areas. This is why it works so well on our night skies.

  • Contrast. The broadest application of contrast. Also adds saturation. It does not take into account bright areas or dark areas, nor does it control edges. It’s the bludgeon of contrast controls with a very heavy-handed effect. Consider this to be an image-wide increase in contrast.

So the Texture slider is really like a less focused Sharpening slider. It creates edge sharpness without increasing noise and grain. You can see the effect here:

Used in combination with the Dehaze slider, Texture can produce night skies that are both crisp and colorful. However, like with the Sharpening slider, you should adjust with a soft hand. Kid gloves. A little goes a long way.

Putting it All Together

The following is a workflow that I used to process a recent image from our Bryce Canyon National Park workshop. Figure 1 shows the image captured with a Luxli Viola at camera left to illuminate the foreground. The Luxli output was balanced to complement the Milky Way in the background. The exposure was 15 seconds, f/2.8, ISO 6400.

Figure 1. Bryce Canyon National Park. Nikon Z 6, Nikon 14-24mm f/2.8 lens at 14mm, light painted with a Luxli Viola. 15 seconds, f/2.8, ISO 6400. Unprocessed.

Figure 2 shows the image after basic Lightroom adjustments—I decreased Blacks to -32 and increased Whites to +4.

Figure 2. Blacks -32, Whites +4.

Then, as we see in Figure 3, I added a local adjustment on the foreground using the Adjustment brush and increased the Texture to +45. This increased the sharpness and texture of the hoodoos in the foreground. (This is the type of application that Texture is actually designed for—adjusting actual texture in a surface.)

Figure 3. Local Adjustment of the foreground, Texture +45.

The last adjustment was to the sky only, increasing Dehaze to +30, Exposure to +35 and Texture to +3. Figure 4 shows the final image.

Figure 4. The final image with another local adjustment of the sky: Dehaze +30, Exposure +35,Texture +3.

Everyone will develop their own special recipe of slider settings for their night skies. And indeed these may even change from one scene to the next. The important thing to keep in mind is the effect of these settings. A better understanding of what each slider produces will arm you with the knowledge to craft a truly fine photograph.

Tim Cooper is a partner and workshop leader with National Parks at Night. Learn more techniques from his book The Magic of Light Painting, available from Peachpit.

UPCOMING WORKSHOPS FROM NATIONAL PARKS AT NIGHT