Keep the Noise Down (Part I): How to Take an ISO Test with your Camera

One aspect of night photography that is particular to the camera you own is its tolerance for or its ability to repress, avoid or use high ISO noise to your advantage.

In this blog post, I teach you how to run your own High ISO Noise Test, resulting in a series of images that reveal when your camera has undesirable high ISO noise.

But first, let's identify High ISO Noise. (For those of you who already know, feel free to jump to "Preparing for the Test," below.)

What is High ISO Noise?

But what about quality?

Your digital camera provides the best-quality image at its native ISO, or the lowest number on your camera's ISO scale. On my current camera, the Nikon D750, this is ISO 100. On my previous camera, the Nikon D700, it was ISO 200.

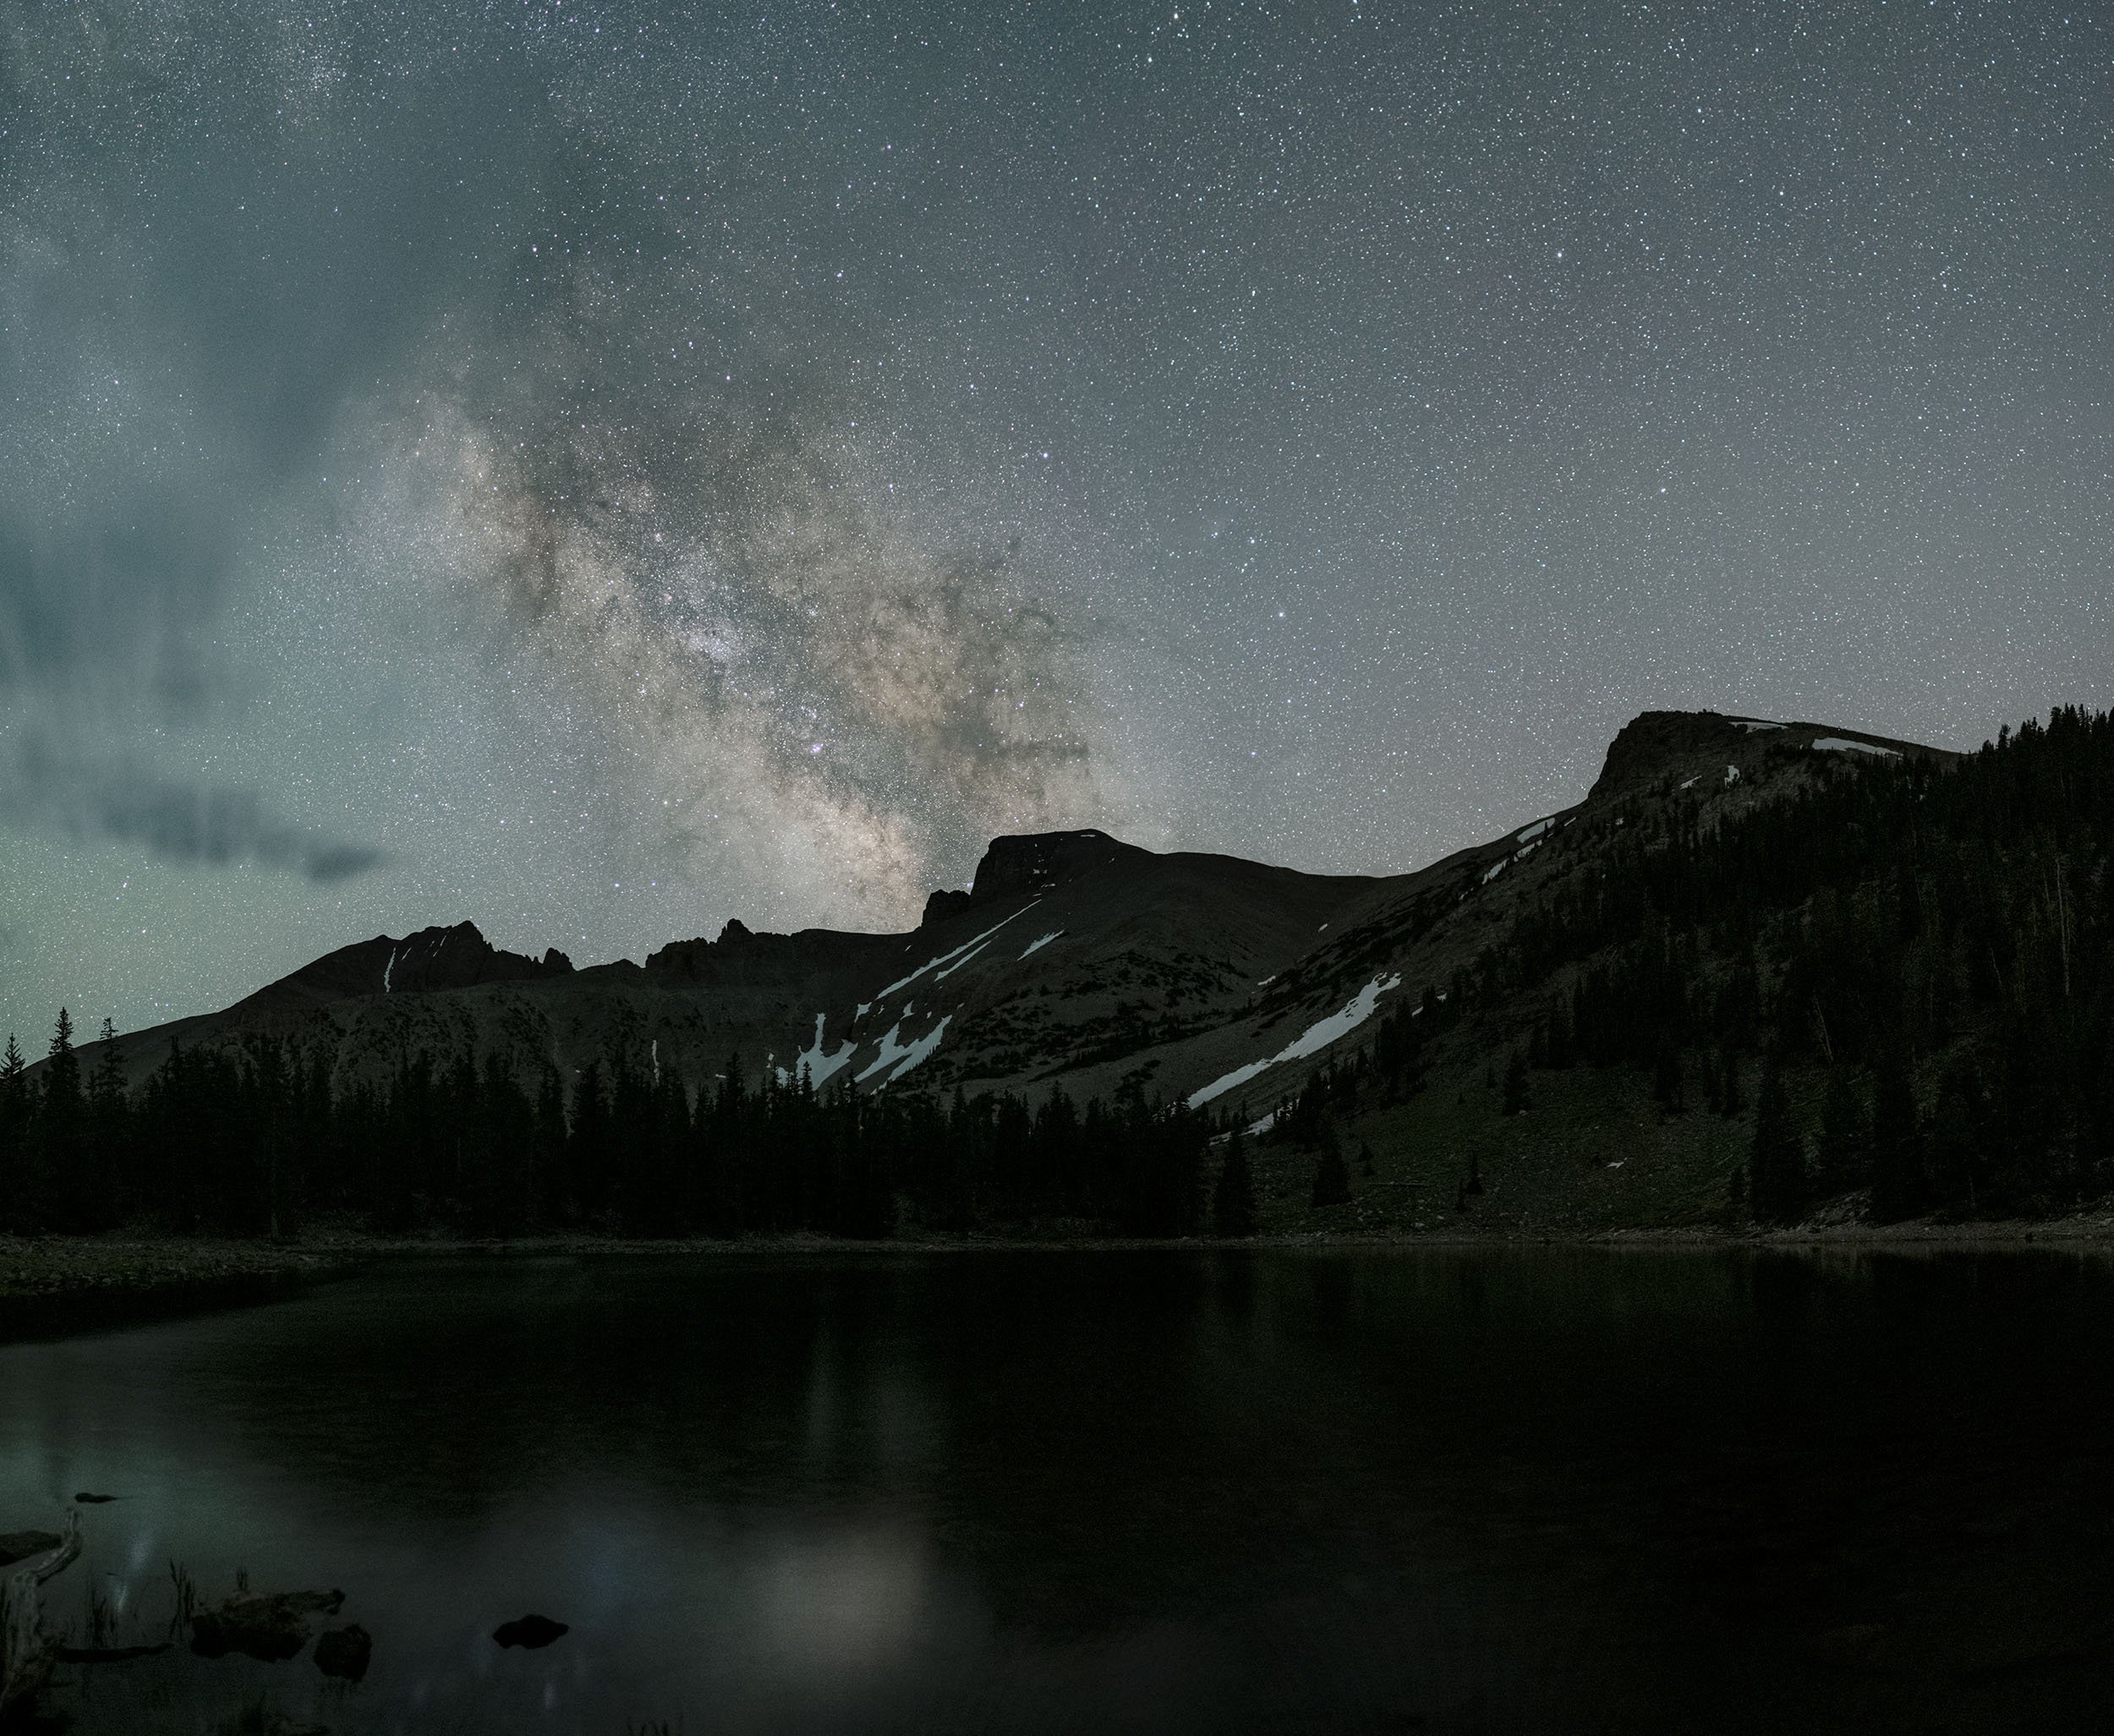
But we can't always use the highest-quality ISO to capture star points and the Milky Way, because the amount of time required to get a proper exposure exceeds the 400 Rule.

How about saving time?

The Six-Stop Rule, or High ISO Test, also saves you valuable time in determining a correct exposure. More about that in our blog post "Save Time by Using High ISO Testing to Set Up Your Night Shots," by Lance Keimig.

Even more about High ISO Noise

In another of our previous blog posts, "Testing Your Camera’s Tolerance For Long-Exposure Noise," Tim Cooper points out, "Long-exposure noise is virtually impossible to fix via post-processing." That's why it's essential for you to test your camera's high ISO capabilities at many temperatures, and to know when and at what temperature it creates undesirable results.

But what about LENR?

LENR (long exposure noise reduction) is necessary only when heat buildup causes hot pixels—the red, green or blue pixels scattered throughout a long exposure brought on by heat building up on the imaging sensor. You can combine LENR with an educated high ISO practice, but its purpose is different and separate from high ISO noise reduction or avoidance.

Preparing for the test

You'll need the following gear:

  • your camera + lens + battery with enough power

  • tripod

  • intervalometer

You will need your intervalometer to minimize camera shake when activating the shutter, and for those longer exposures at the lower ISOs.

Where to perform your test

I suggest testing in a few scenarios. Choose a scene with some deep shadow areas, some midtones and some highlights to gauge when and where high ISO fails or excels. Possibilities include:

  • at home, in a dim to dark room

  • outdoors

  • in a rural or wilderness area

  • with your lens cap on

When to perform the test

I suggest testing your camera at many temperatures, including the following ranges:

  • 90 degrees and above

  • 80 to 89 degrees

  • 65 to 79 degrees

  • below 65 degrees

Camera settings

Here are some vital settings to help you establish a consistent high ISO test:

  • RAW capture (not JPG)

  • manual color balance (match the main light source in front of your camera)

  • manual mode (or B mode for certain Canon models)

  • one focal length (no changes if you use a zoom lens)

  • one aperture (no changes)

  • if DSLR (not mirrorless), cover the back window of your eyepiece to prevent light from bouncing in from the rear (some cameras have this capability via a small switch near eyepiece)

  • long-exposure noise reduction (LENR) disabled

  • high ISO noise reduction OFF (or if off is not available, set to Normal)

What to photograph

Ideally, I'd include an X-Rite ColorChecker Passport or ColorChecker in your test scene, but if you don't have one, no sweat.

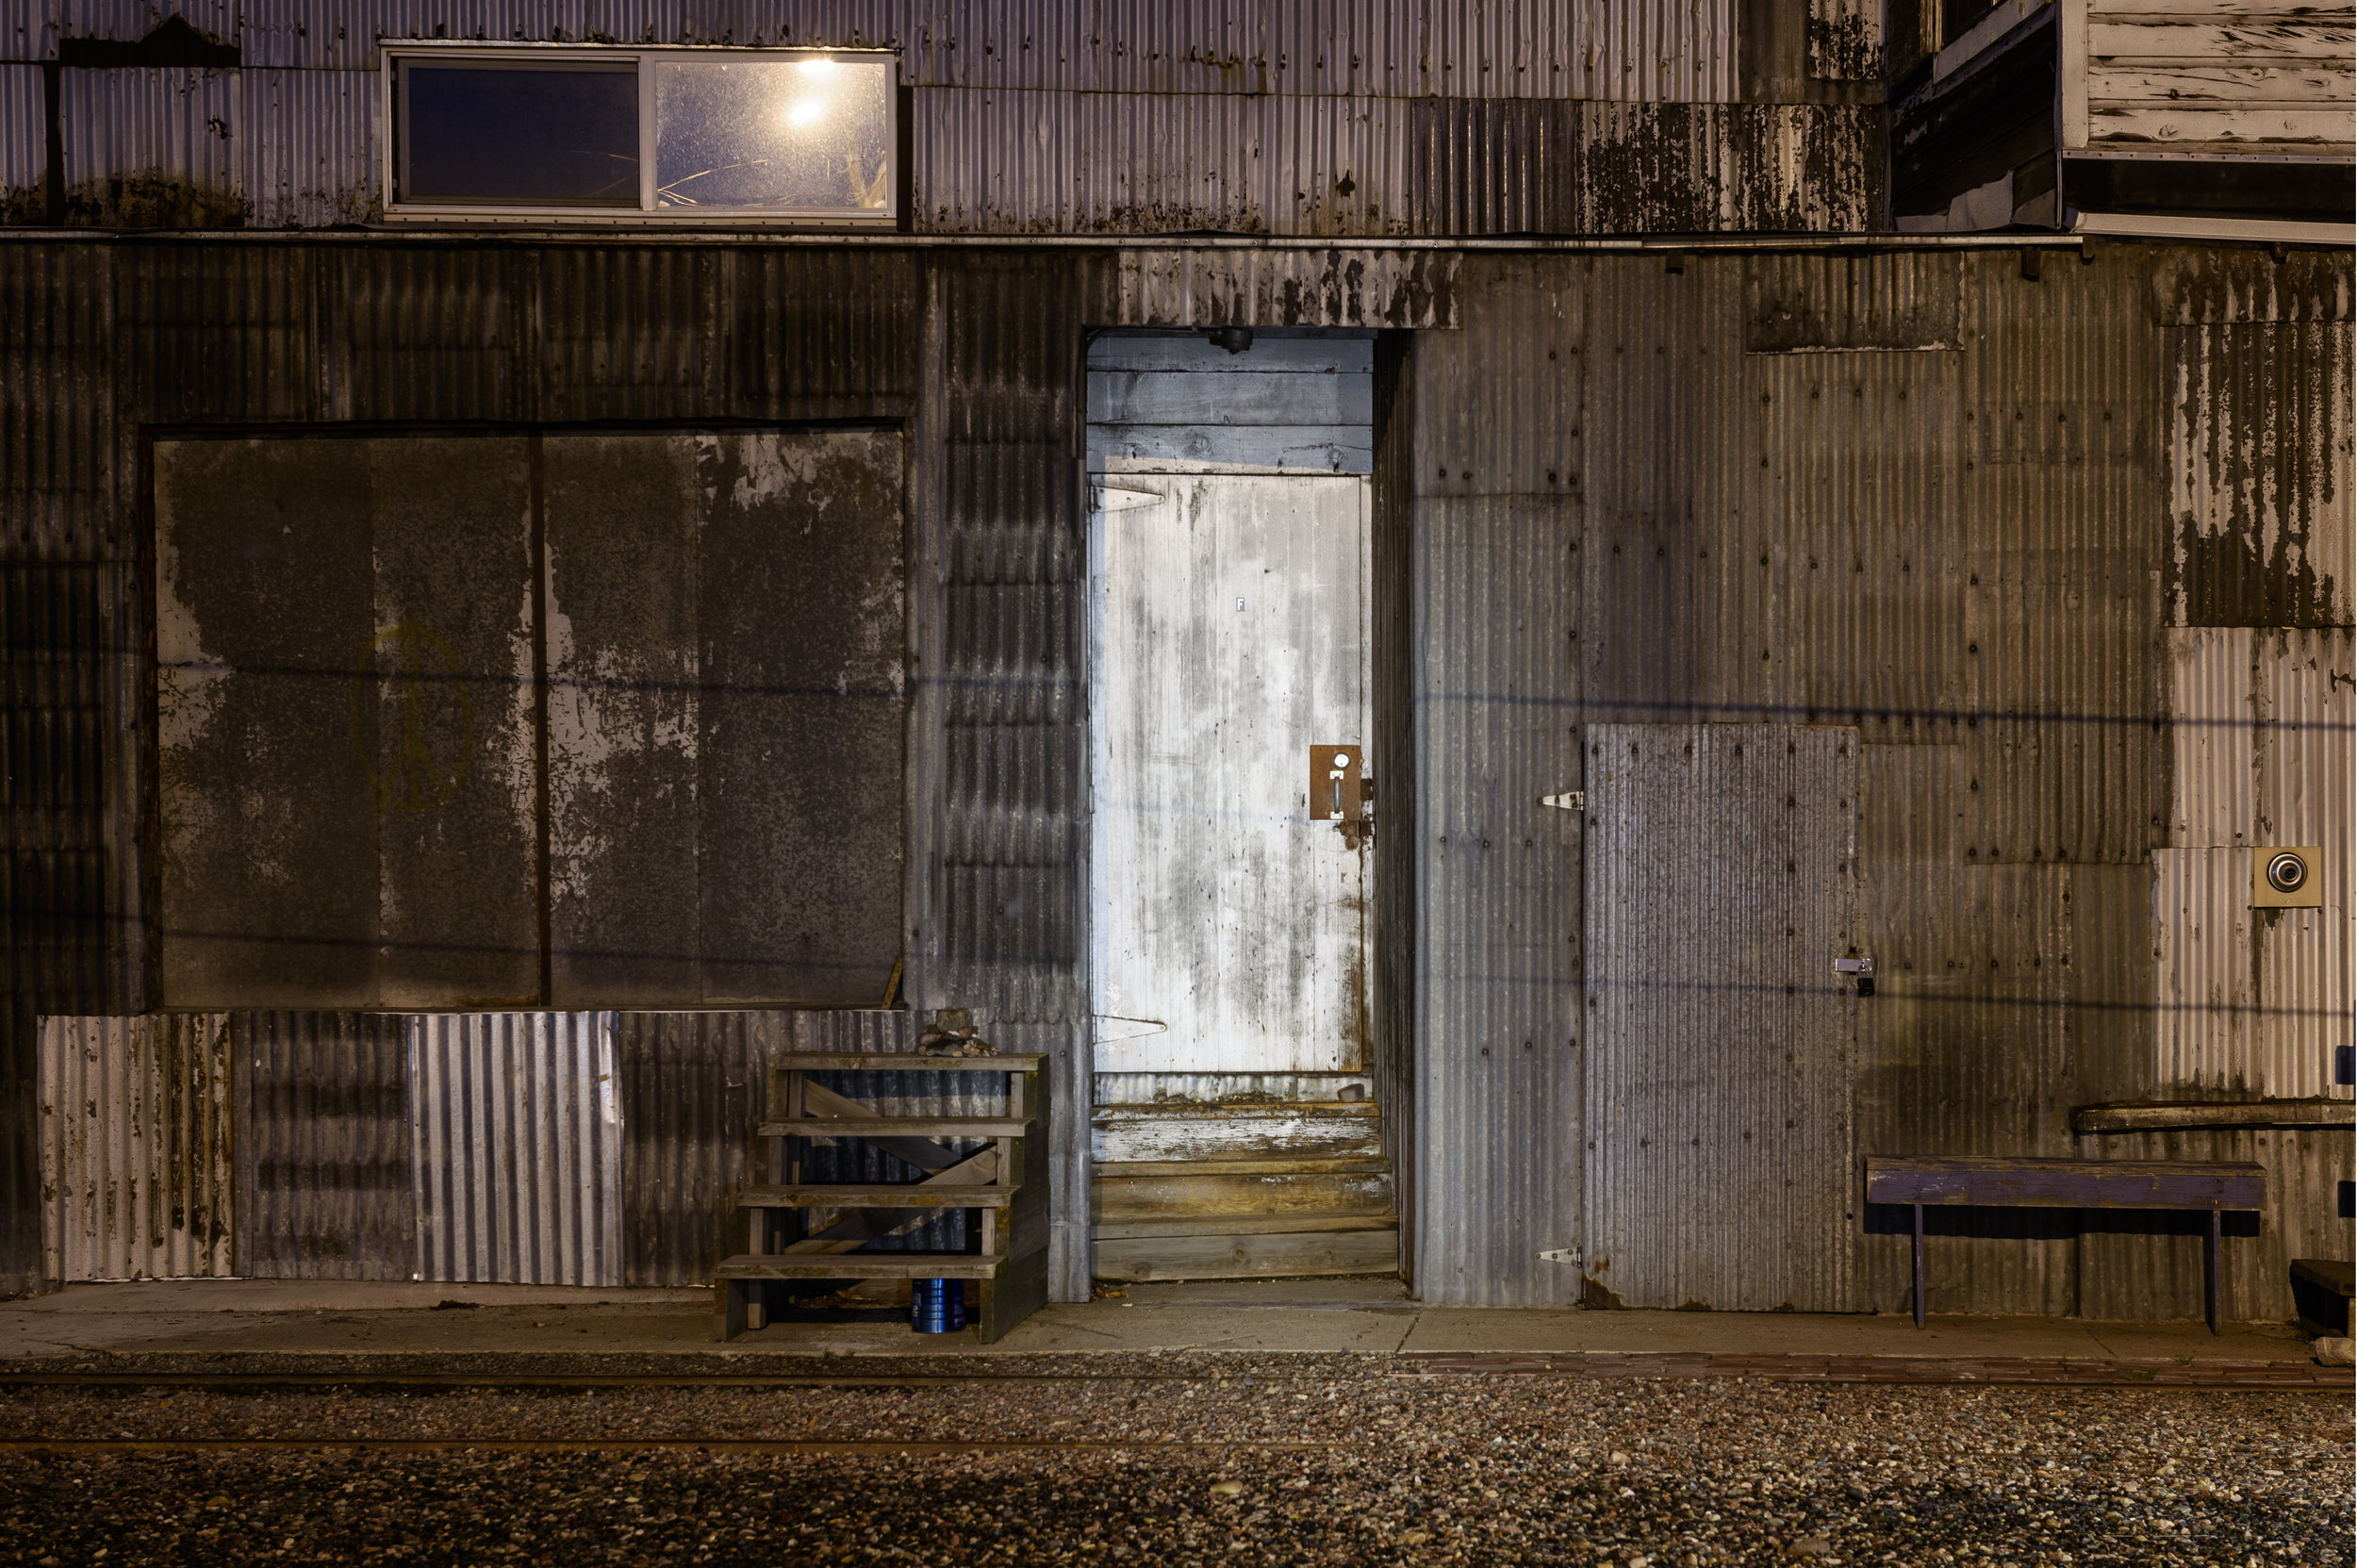
In your scene, don't stress composing for aesthetics. Frame your image to include sky and foreground, highlight and shadow, and those transitions from light to dark. It's in those gradient areas in bright and dark areas, and in flat areas of same color and brightness, that you'll see high ISO noise appear first (and worst!).

Shooting the test

Shoot a test exposure at ISO 6400. Ideally you'll try for an aperture that yields you somewhere around 1 to 4 seconds at ISO 6400. Why? Well, when you get to the longer, quality exposures, each second at 6400 will become minutes, so it's just a matter of budgeting your time and how much performing an ISO test is worth to you versus shooting something non-technical.

I like testing all available ISOs on my camera, even if some of them are ridiculous. It's good to know by seeing what the results are.

On my D750, the ISO I tested are: 51,200, 25,600, 12,800, 6400, 3200, 1600, 800, 400, 200 and 100.

That's ten exposures. Each of them (in this order) is double the previous one's time in shutter speed.

My first test exposure in this scene tested at 6400 at 8 seconds. So I ramped up to 51,200 and started there, and then proceeded in order from shortest exposure to longest exposure.

Here is the table of exposures I made at 50 degrees F:

ISO 51,200 25,600 12,800 6,400 3,200 1,600 800 400 200 100
Aperture f/5.6 f/5.6 f/5.6 f/5.6 f/5.6 f/5.6 f/5.6 f/5.6 f/5.6 f/5.6
Time (seconds) 1 2 4 8 15 30 60 120 240 480

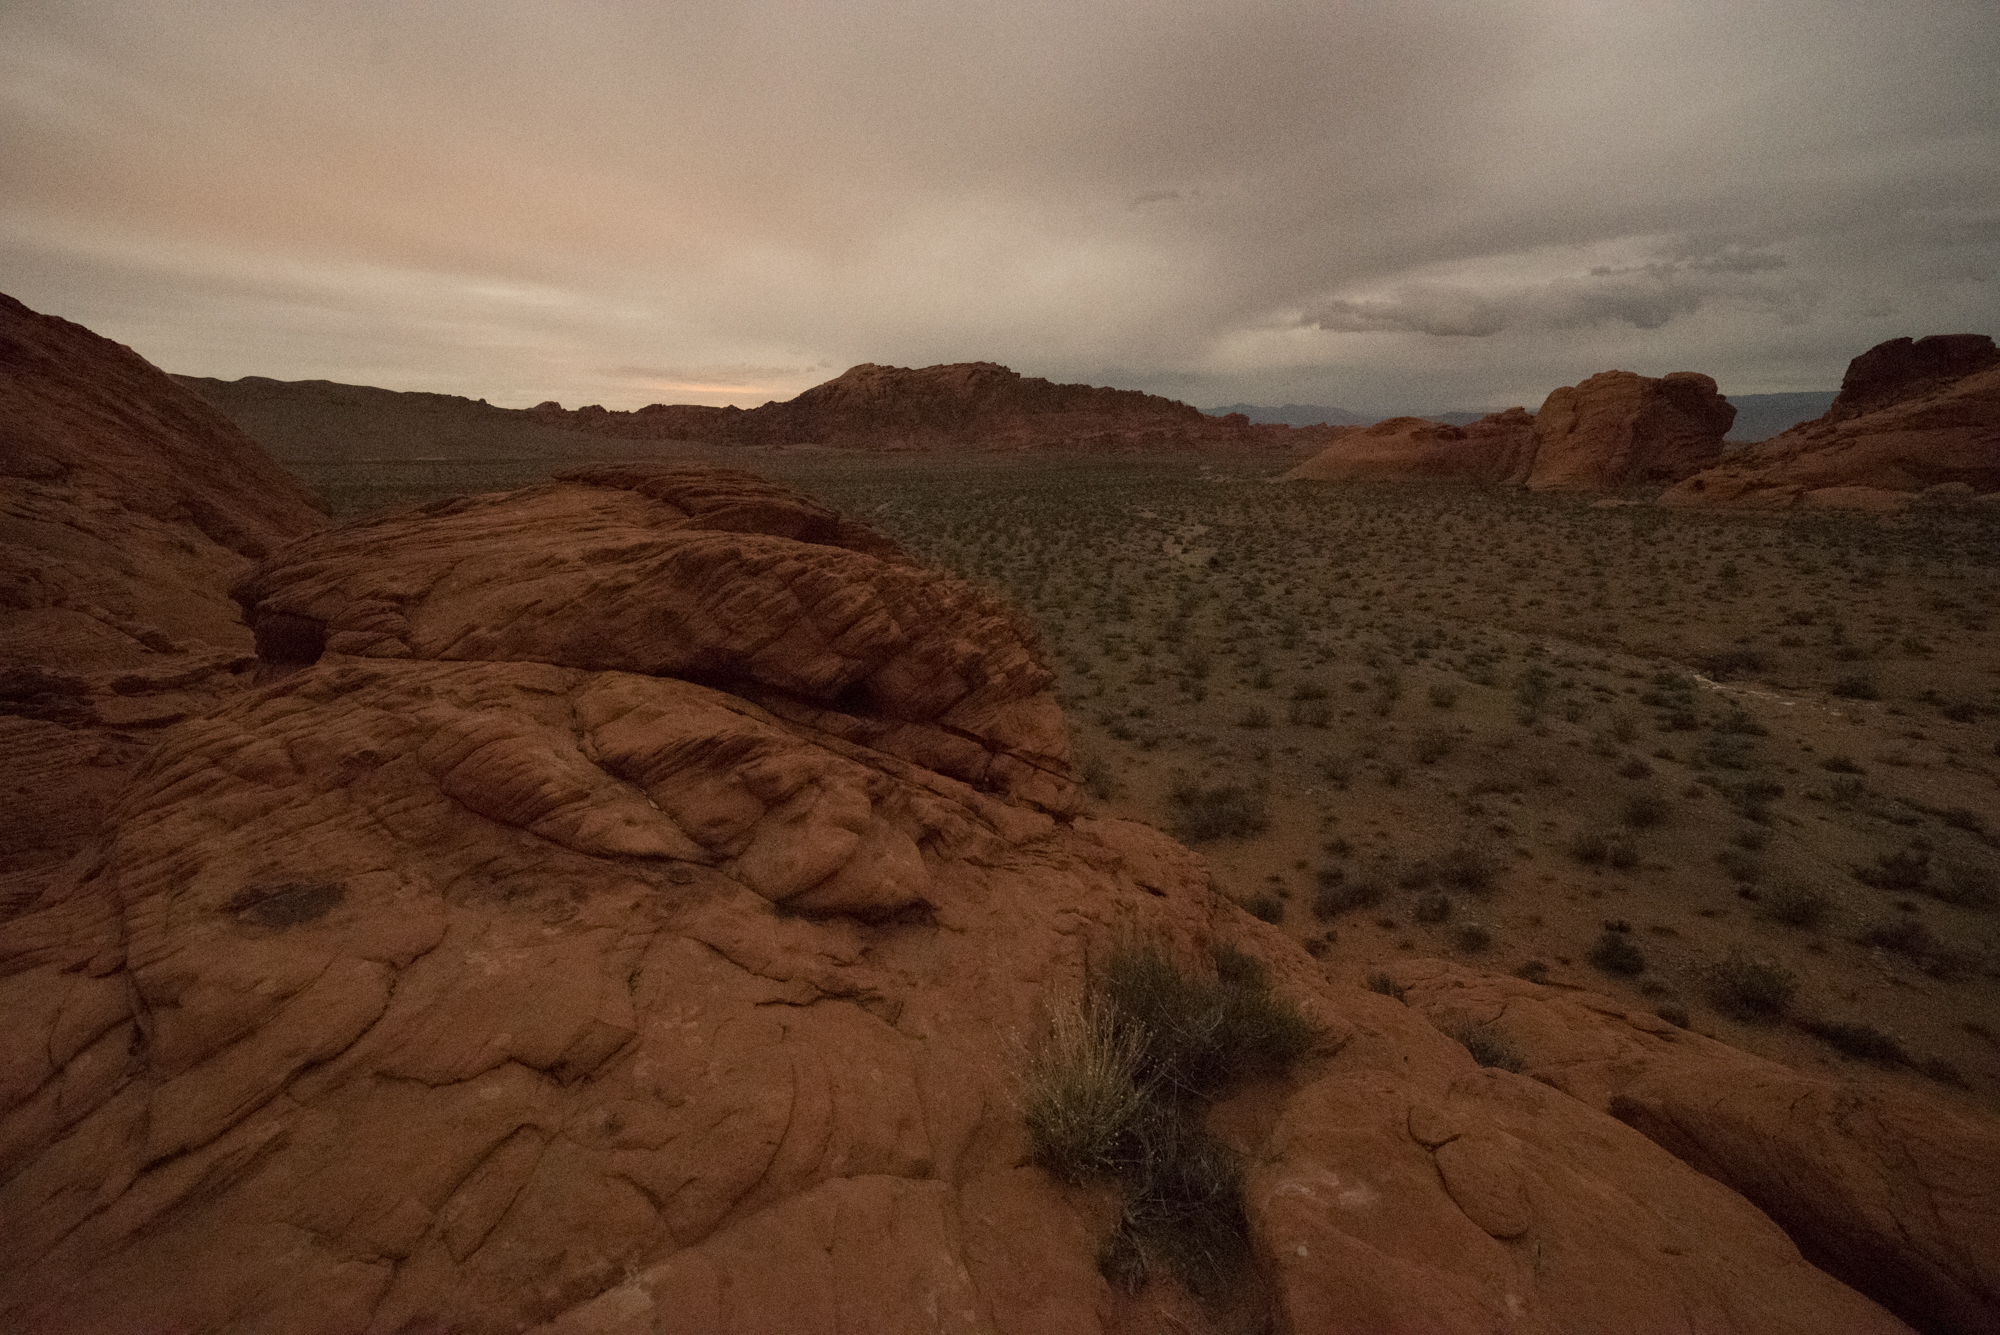
Here's the RAW (unprocessed) image sequence:

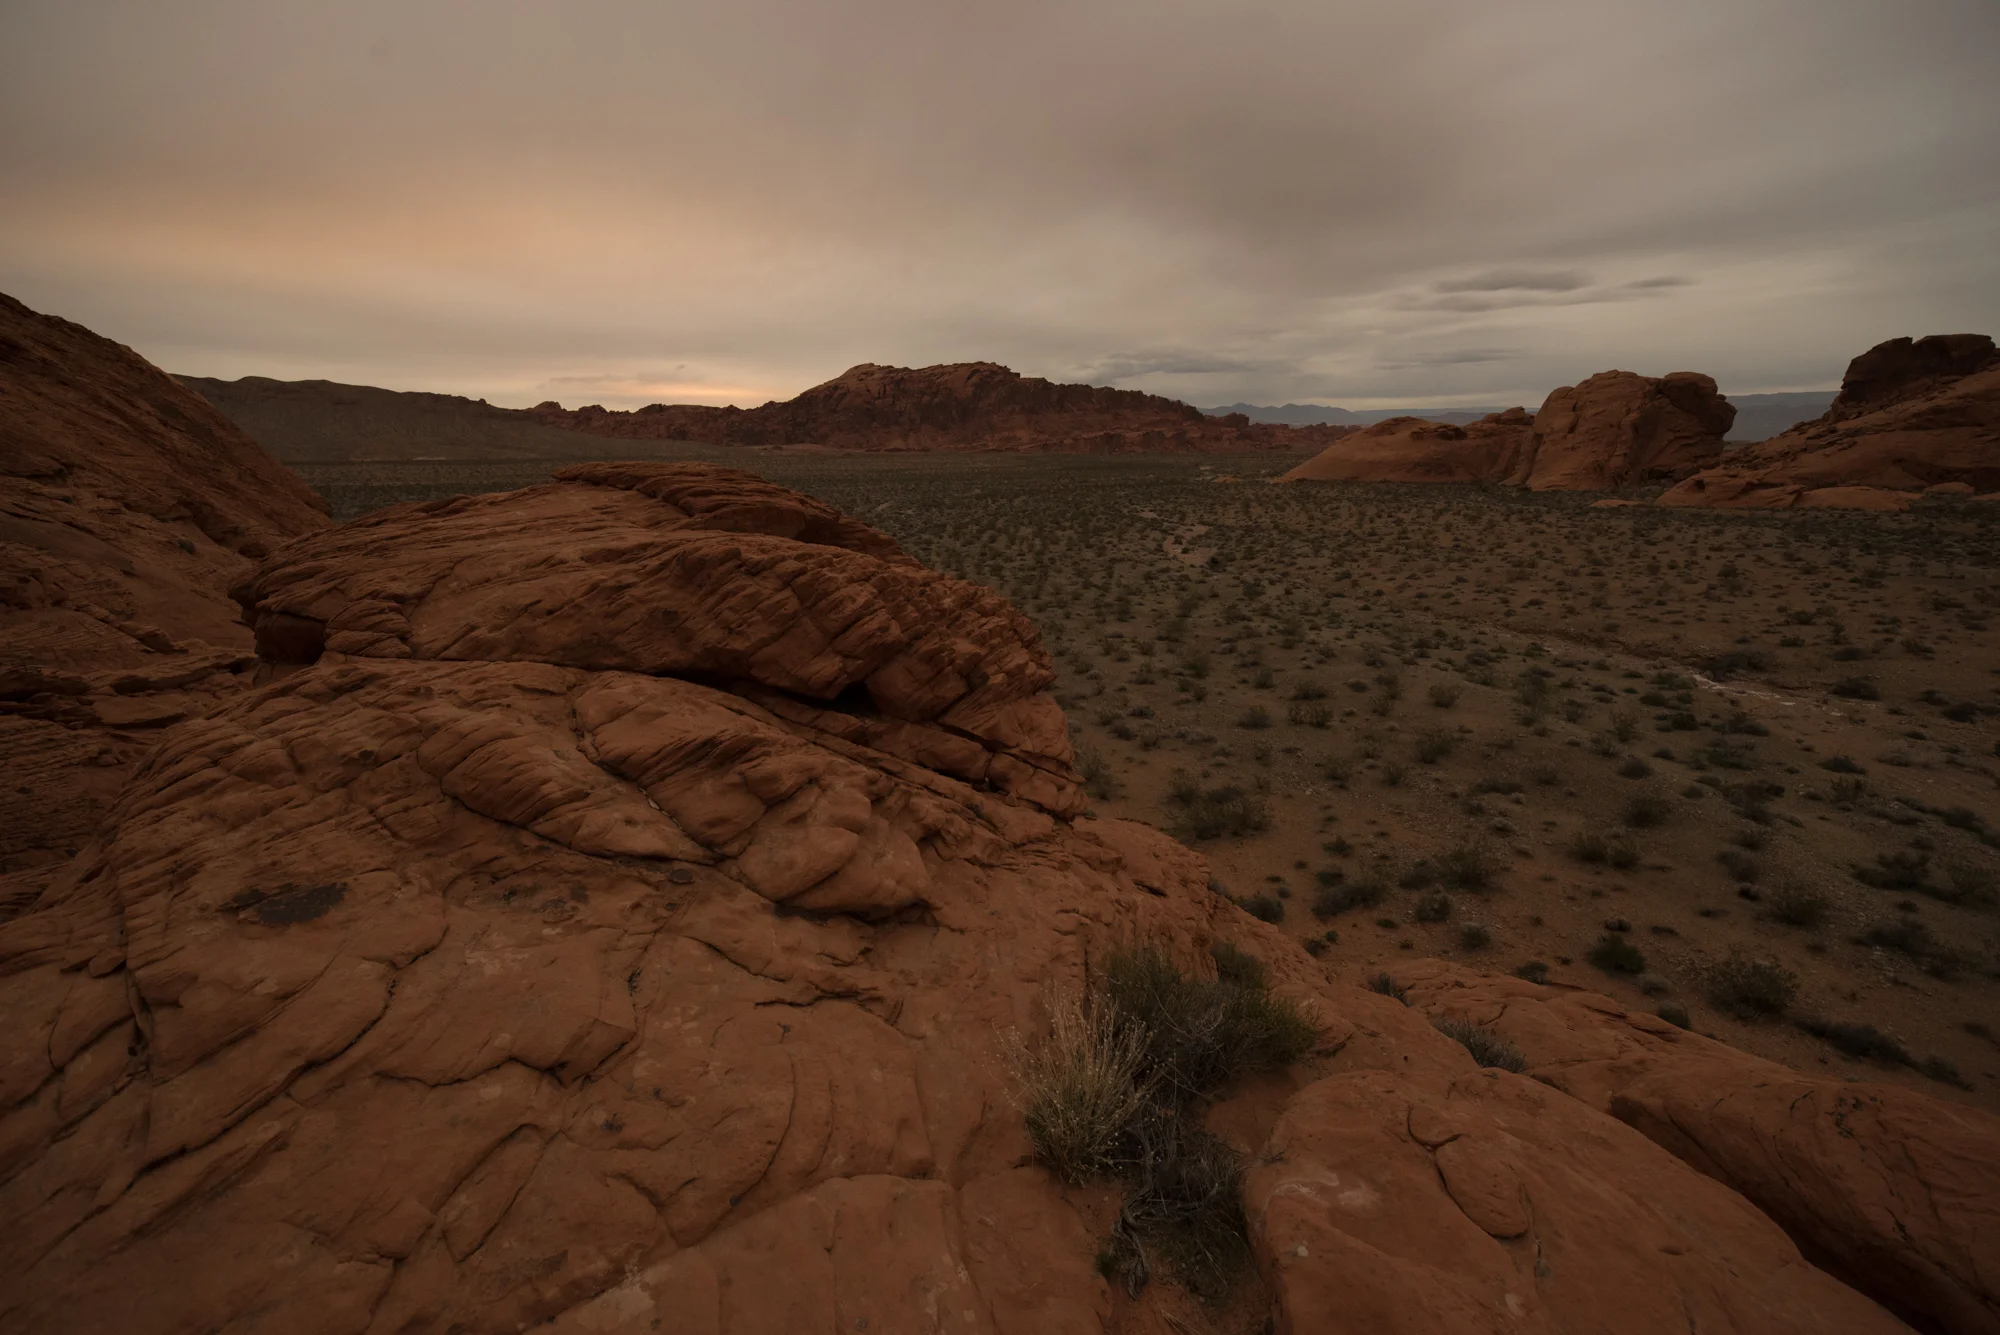
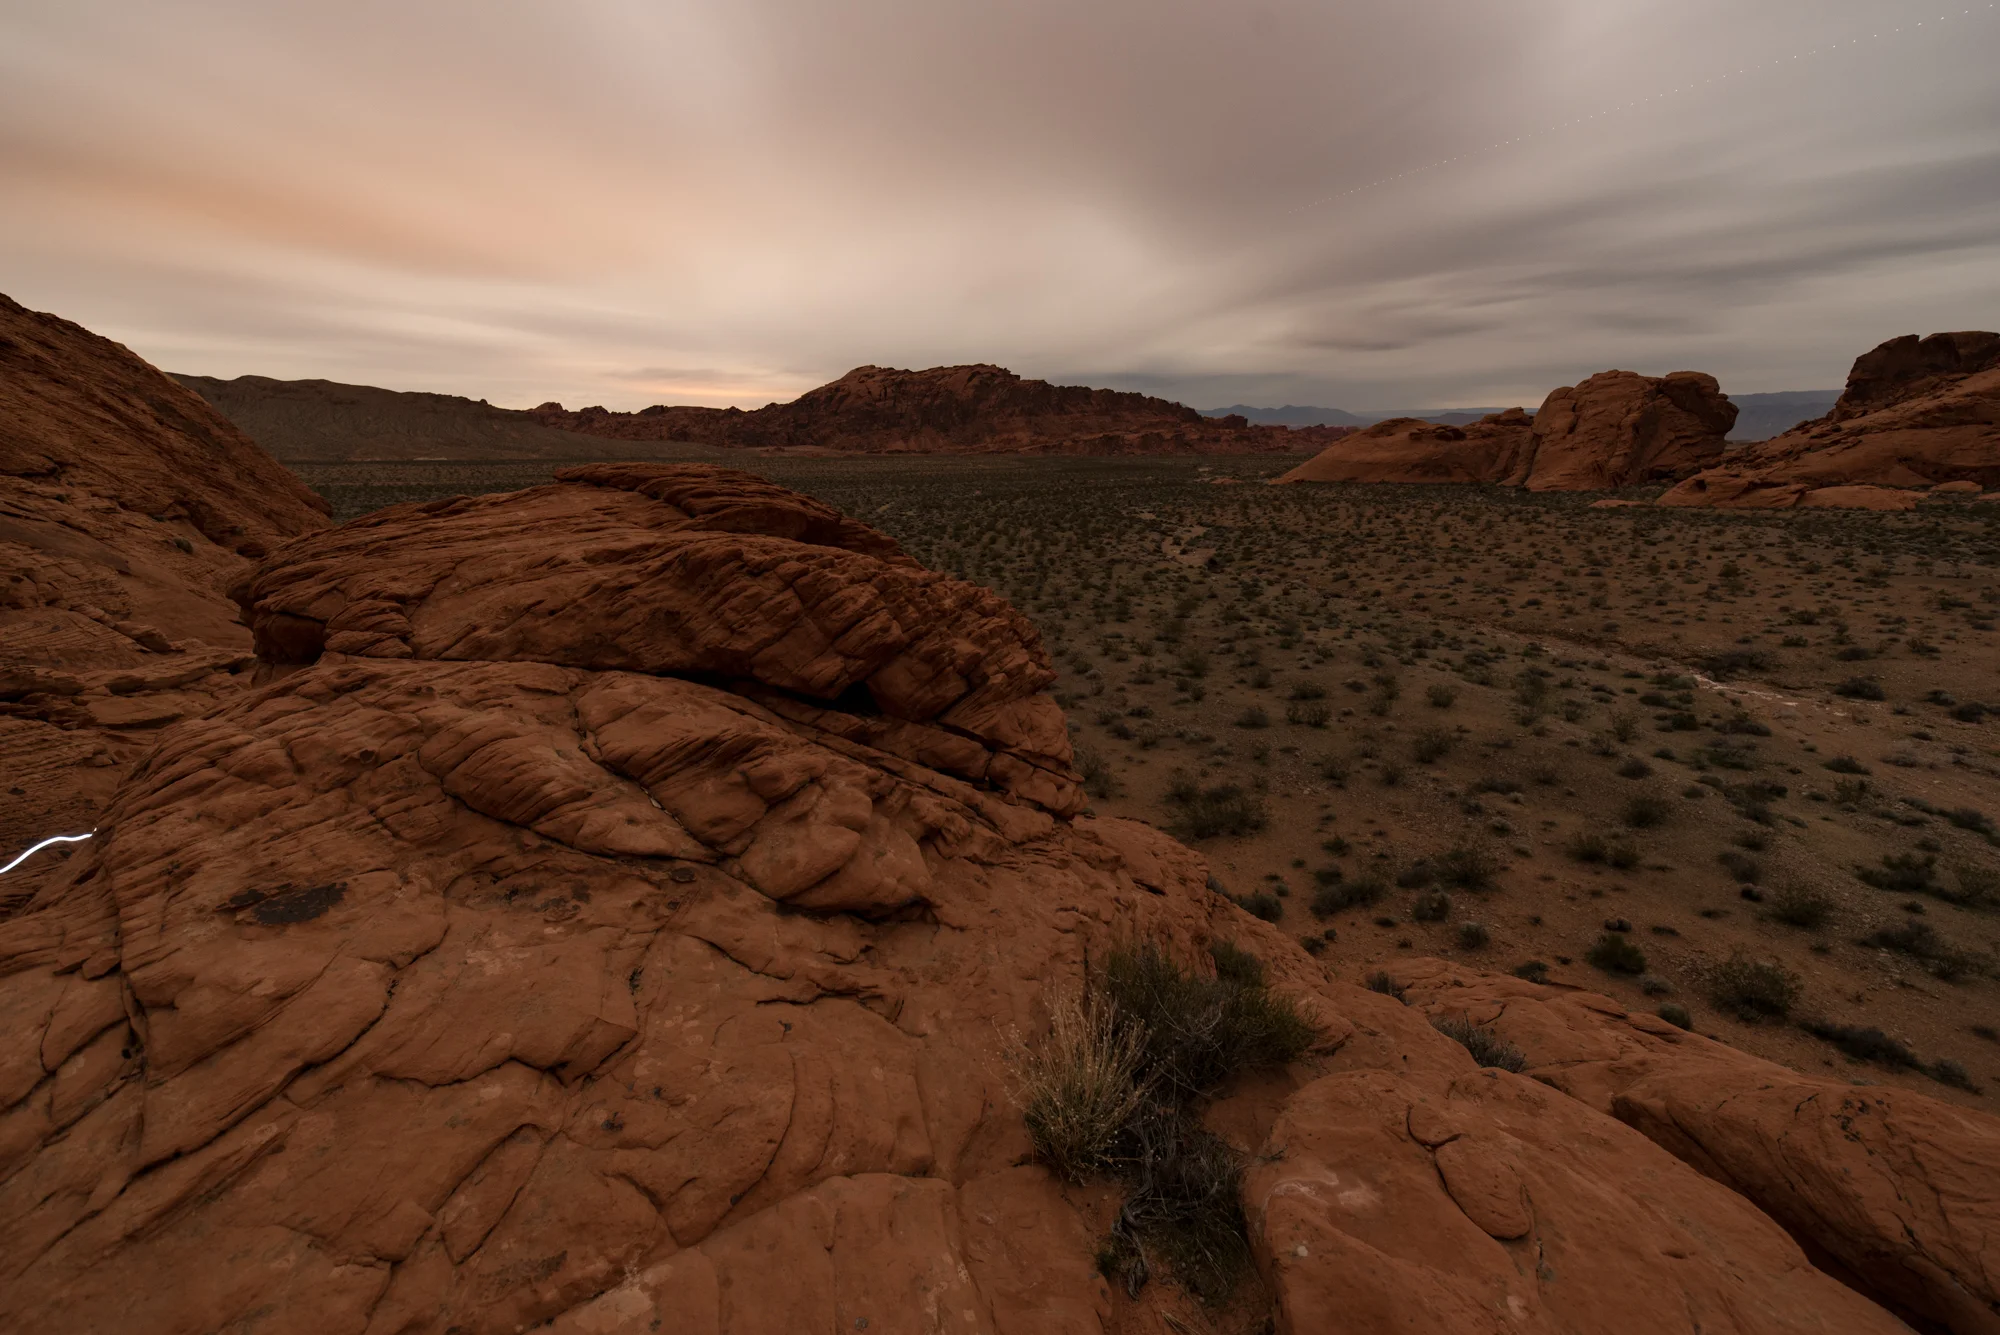
And after doing some minor post-processing, here is the resulting series of ten images:

So what do I do with this?

Great question! Examine the images and learn from what you observe. I'll go into deeper detail in the next post, including:

  • How to spot high ISO noise

  • When to avoid high ISO noise

  • When high ISO noise is OK

Homework

  1. Go shoot at least two high ISO sequences at temperatures that differ by at least 10 degrees F.

  2. Import into your editor of choice. (Power tip: I add all my high ISO tests into a collection in Lightroom called "High ISO Tests" so I can review them quickly.)

  3. Start looking for when noise changes to a level you find acceptable.

After doing your homework, read Part II of this article: Examining Your High ISO Photographs.

See more about Matt's photography, art, workshops and writing at MattHillArt.com. Follow Matt on Twitter Instagram Facebook.

Upcoming workshops from National Parks at Night

Capturing Clouds of Light: How to Photograph the Aurora Borealis

I recently led a few photo tours to Iceland to photograph the northern lights, and our groups each had the good fortune to experience several nights of clear skies and brilliant displays of aurora.

It's an amazing experience, both to photograph and simply to see. One of the high seasons for aurora is nearly upon us, so I chose to write a primer on how to tackle this exciting genre of night photography.

Where and When to Find Aurora

The aurora borealis, as the northern lights are also known, occurs when electrically charged particles from the sun are carried by solar wind toward Earth and collide with gases in the upper atmosphere. Those gas particles—most commonly oxygen (green aurora) and nitrogen (pink aurora)—are “excited” by the collisions, and release photons of light.

Earth’s magnetic field deflects most of the solar particles, but that field is weakest at the poles. This is why the aurora is mainly seen near the polar regions. (Toward the South Pole, they're called the aurora australis, or southern lights.) In general, the chances of viewing the aurora in the Northern Hemisphere are best at latitudes above 55° N, and between the months of September and March. Historically, March and October are the best months for aurora viewing.

There are a number of apps to help locate the aurora. The one we at NPAN have used the most is Aurora Forecast. Some of the newer apps seem to have more favorable reviews, and may be worth trying. Whichever app you choose, set the preferences to send you an alert for a Kp rating of 5 or higher, for middle latitudes if you live at or below 55° N latitude, and high latitudes above 55° N. Kp is the unit of measurement for geomagnetic conditions responsible for the aurora.

Aurora and sodium-vapor, Reykjavik, Iceland. 20 seconds, f/4, ISO 2500.

Aurora and sodium-vapor, Reykjavik, Iceland. 20 seconds, f/4, ISO 2500.

The frequency of clear skies is also a big a factor in seeing the aurora, but broken cloud cover can add a lot of visual interest in aurora photographs. The phenomenon can appear at any time when the sky is dark, but the best viewing times are typically from 10 p.m. to 2 a.m.

Solar activity peaks and falls on an 11-year cycle. The winter of 2012-13 was the peak of the current cycle, which was theoretically the best chance to see auroral activity for the next decade. Luckily for us though, there has been plenty of auroral activity every winter since 2012.

Iceland lies between 64° and 66° N, and is ideally suited for viewing and photographing the aurora. Despite being so far north, its position on the Gulf Stream keeps the winters relatively mild compared to other good aurora-viewing places such as Scandinavia and Alaska. During my two Iceland tours in 2015, we had good viewing conditions and good sightings for nine out of 17 nights, and really spectacular displays on three of those nights.

Photographing the aurora is relatively straight-forward once you understand the basics. The remainder of this article is intended to provide the basic information required for aurora photography.

Prepare for the Cold

It’s obvious that you’ll be photographing in cold weather conditions, and there are a few things you can do to protect yourself and your equipment from the cold.

Warming hut. 20 seconds, f/5.6, ISO 3200.

Warming hut. 20 seconds, f/5.6, ISO 3200.

Dress in layers, making sure that your innermost layer is synthetic rather than cotton. Synthetic fibers wick moisture away from the body, keeping you warm and dry. Dress as if it will be colder than it really will be. Standing around for hours on end will make you feel much colder than if you were active or if you were outside for only a short while.

Your best options are:

  • heavyweight merino wool and synthetic-blend socks
  • insulated boots with wool or sheepskin liners
  • long underwear
  • lined pants, wind pants or long underwear with ski pants

Make sure your neck is covered, and find just the right hat. The best bet for your hands is flip-top mittens with chemical hand warmers and potentially thin, form-fitting glove liners. (We particularly like the Trigger Mitt by our friends at Vallerret.) If you’re going to Alaska, or somewhere frigid, extreme cold weather clothing can be expensive, but is essential.

Camera gear for Aurora Photography

Photographing the aurora tests the limits of our gear, so this is a case where using the best equipment really makes a difference in the quality of your images.

Cameras and Lenses

Cameras with full-frame sensors are ideal, as are fast, ultrawide-angle lenses. Cameras such as the or D750, Pentax K1, Sony A7R2 or A7S2, and Canon EOS 6D or EOS 5D Mark IV are particularly well-suited to this work. The next best option is an APS-C camera, such as the Nikon D500. But if you will be using an APS-C camera, I recommend sticking with newer models that perform better at high ISOs.

Fast, wide to ultrawide angle lenses in the 14mm to 24mm range are the most useful for full-frame cameras, and those manufactured by Samyang under the brand names of Samyang, Bower and Rokinon offer a great value for about one-third the price of the comparable Canon and Nikon lenses, and they suffer less from coma at wide apertures. It’s recommended to test these lenses thoroughly after purchase, as quality control is notoriously inconsistent.

The best zoom lenses for this type of photography are the Tamron 15-30mm f/2.8 and Nikon 14-24mm f/2.8. A lens hood is helpful not only for preventing flare, but also for protecting the front element from frost and condensation.

Wellhead and aurora. 30 seconds, f/4, ISO 3200.

Wellhead and aurora. 30 seconds, f/4, ISO 3200.

Tripods

A sturdy tripod is essential of course, and those with three leg sections are generally more stable than those with four or five. One exception to the three-section leg rule is the Gitzo Series One Traveler. This is one of our favorite travel tripods, as it packs small and is incredibly sturdy. A more economical alternative is the Manfrotto 190Go! Carbon Fiber Tripod Kit with Ball Head.

Insulated leg sections are easier to handle, especially on aluminum tripods. Ball heads are better suited for this work than traditional pan-tilt heads because they can be adjusted quickly to track quickly changing aurora.

Miscellaneous Gear

Since exposures are generally 30 seconds or less, a remote release or intervalometer is helpful, though not required. In fact, the cables can freeze and break in extremely cold weather, so if the temperature is below zero F, you’re better off without one. If you are working without a remote release of some sort, be sure to use the 2-second delay on the self-timer to avoid camera movement when depressing the shutter button.

The only other equipment you’ll need is an extra camera battery or two. You’ll want to keep your extra batteries close to your body in an inner pocket, as they will not last as long in the cold. You can also consider connecting to an external power supply with the Tether Tools Case Relay Camera Power System.

Remove any filters from your lenses, and be sure to use your lens hoods, which will help minimize frost or condensation buildup on the front element. A neoprene beer/soda cozy with the end cut off can be used to hold one or two chemical warmers to your lens, which also can prevent the lens from fogging over.

Lastly, you'll want some flashlights. We recommend carrying at least two: a dim or preferably red one (such as Coast's FL75 headlamp) for finding things in your bag or making adjustments to your camera, and a very bright flashlight to use as a focusing aid or for light painting. (As usual, we can't recommend the Coast HP7R enough. Use the coupon code “parksatnight” for 25 percent off of all merchandise at CoastPortland.com.)

Ambient Light and Aurora Photography

Ambient light from towns and cities will obscure all but the brightest aurora displays, so make sure you are well away from urban areas. That said, the distant glow from streetlights or the last glow of a fading sunset on the horizon can add another element of color to your photographs. Sodium-vapor streetlights reflecting off of low clouds is another possibility to add contrasting color to aurora photos.

Aurora and sodium-vapor clouds. 20 seconds, f/3.5, ISO 3200.

Aurora and sodium-vapor clouds. 20 seconds, f/3.5, ISO 3200.

Lunar phase and lunar elevation in the sky both have a profound impact on night photography in general, and on aurora photography in particular. Photographing without any moonlight will mean primarily silhouetted foregrounds, and longer exposures at higher ISOs. Photographing under a full moon will mean much brighter foregrounds (especially if there is snow on the ground), shorter exposures at lower ISOs and fainter aurora in your photographs.

You can photograph the aurora at all phases of the lunar cycle, and the results will vary fairly dramatically; it’s just a matter of what kind of images you are looking for. My preference is to photograph between the first quarter and waxing gibbous phases, as there is sufficient moonlight to illuminate the landscape without overpowering the aurora. The first-quarter moon rises around noon, sets around midnight, and then rises about 45 minutes later each day until it is full. The full moon rises at about sunset and sets at about sunrise.

If you include interesting foreground elements, you may want to add light painting, especially when there is little or no moonlight present.

Camera Settings and Exposure for Aurora Photography

Aurora photography pushes the limits of even today’s best DSLR cameras. Because of the low light levels, and the need to keep exposures relatively short due to the moving nature of the aurora, you’ll be photographing at the highest usable ISO of your camera and the widest aperture that will yield sufficient sharpness and depth of field.

Determining your highest usable ISO is simply a matter of testing your camera by making a series of low-light exposures at increasing ISOs, and then scrutinizing the shadow areas of each exposure, preferably by making final-size prints of the images. (See Matt Hill’s post, “Keep the Noise Down: How to Take an ISO Test with your Camera.”) For me, 1600 is the highest ISO I use for print-quality images and 6400 for web-quality with my 5D Mark II.

Similarly, you’ll want to test your lenses for coma at wide apertures. A form of optical distortion, coma causes stars to appear as if they have “tails” like a comet, or sometimes like a bird in flight. Test your lenses by shooting starry skies at maximum aperture and then stopping down in half- or third-stop increments until you get to f/5.6, and then looking at the resulting images at full magnification for signs of coma. It’s generally found near the edges of the frame in images shot at or near maximum aperture. The Canon and Nikon 24mm f/1.4 lenses both suffer from fairly severe coma problems. (Coma is another topic we will discuss in more detail in the future.)

Aurora photography pushes the limits of even today’s best DSLR cameras.

Exposures for aurora photography range from approximately 30 seconds, f/2.8, ISO 6400 for faint to average aurora on a moonless night, to 4 seconds, f/4, ISO 800 for bright coronal aurora on a full-moon night. The intensity of the aurora can vary dramatically—sometimes it’s barely visible to the naked eye but shows up nicely in photographs, and sometimes it can be so bright as to illuminate the landscape.

Determining exposure is accomplished by viewing a combination of the RGB histogram and the blinking highlight indicator. At a minimum, you should have a histogram that shows no shadow clipping—it can be a left-biased histogram, but the histogram should not be touching the left edge of the graph. Images with more exposure will have cleaner shadows with less noise. Ideally, you should not have to lighten your image in post-processing. Use the blinking highlight indicator to make sure that you are not overexposing the aurora or any highlights created by light painting. Use the LCD image preview primarily for confirming composition and focus.

Key camera settings

Here’s a rundown of the camera settings most important to photographing aurora, and my recommendations for how to set them.

  • Set file quality to RAW.
  • Use your camera’s highest usable ISO setting, hopefully between 1600 and 6400.
  • Set white balance to between 3700 K and 4100 K when shooting under moonlight, or between 4000 K and 5500 K when there is no moon.
  • Set your camera’s Long Exposure Noise Reduction (LENR) to Auto (if available) or on.
  • Enable your camera’s RGB histogram to use as the primary exposure determinant in natural light.
  • Enable the blinking highlight indicator to ensure that you do not clip the aurora.
  • Set the LCD brightness to “auto” or reduce it manually to almost the lowest setting.
  • Set exposure mode to Manual.
  • Set focus to Manual.
  • Turn off IS/VR lens functions
  • For focusing, use magnified Live View with the assistance of a flashlight to illuminate your focal subject, or use conservative, well-executed hyperfocal distance.

For more information and a complete list of camera settings, download my PDF “Basic Camera Settings for Milky Way and Aurora Photography.”

Getting Out There

As with any type of photography, you’ll get better results with experience and practice. It’s very helpful to have a basic understanding of night photography, and to be completely familiar with your equipment before departing toward one of the poles. Simply working in the cold and darkness complicates photography exponentially, so do your homework, and be prepared. Don’t expect to get perfect results on your first attempt.

Taking a moment to enjoy the aurora.

Taking a moment to enjoy the aurora.

Photographing the northern lights can be like photographing a close friend or family member’s wedding: You’re so focused on the task at hand that before you know it, the event is over and you’ve completely missed out on the experience! Make sure that you take some time to simply step back, look up, and enjoy the magnificence of this special phenomenon.

Note: National Parks at Night's 2017 Westfjords, Iceland, Photo Tour is sold out, but there are at least a half a dozen U.S. national parks with opportunities to photograph aurora borealis, (and a few national parks in Iceland that we won't get to on this year's trip). To get early notifications of our 2018 workshops and tours, be sure that you are signed up for our mailing list.

Lance Keimig has been photographing at night for 30 years, and is the author of Night Photography and Light Painting: Finding Your Way in the Dark (Focal Press, 2015). Learn more about his images and workshops at www.thenightskye.com.

UPCOMING WORKSHOPS FROM NATIONAL PARKS AT NIGHT

Level Up With Light Painting: Correcting the Color of Your Flashlight (Part II)

Note: This is the conclusion of a previous post, “Level Up With Light Painting: Correcting the Color of Your Flashlight (Part I).”


In my last post on flashlight color I demonstrated how LED flashlights produce a cooler light than I prefer. I went on to show you how to analyze and correct the color using simple gels from the Roscolux Swatchbook.

In that post, the filtration I worked out for my favorite flashlights—the Coast 300-lumen Coast HP7R and 185-lumen Coast HP5R—was a Roscolux 1/2 CTO combined with a 1/8 minus green. This combination works well when my Nikon’s white balance is set to Direct Sun (Daylight on a Canon). Night photography, however, often requires a significant deviation from our common white balance settings.

Finding the Fix

Direct Sun white balance has an approximate Kelvin temperature of 5500. Although, as I mentioned in my last post, Lightroom may display your Kelvin temperature higher or lower depending on Adobe’s interpretation of your camera. Adobe interprets my Nikon’s D4s’s white balance as 4900 K. For the remainder of this post I’ll refer to the Kelvin setting on the camera rather than Adobe’s interpretation.

When using the Direct Sun white balance setting, subjects photographed under average midday sunlight will be rendered properly with regard to color. If, however, your white balance is set to Direct Sun and you photograph a subject under a different light source, the subject will take on the color cast of that light source. For example, for the photo in Figure 1, I kept my camera set to Direct Sun white balance while photographing under the heavy orange cast of the sign lights. Figure 2 shows the color-corrected version at 2000 K.

Figure 1. 5500 K (Direct Sun) white balance

Figure 2. 2000 K white balance

Lowering that white balance had the effect of adding in a blue cast, counteracting the orange/yellow cast it had before. Now imagine if I had used my somewhat blue LED flashlight to paint the people in the foreground. After color correction, the subjects illuminated by the flashlight would be even more blue due to the lower Kelvin temperature.

So while the filter combination I used for my flashlight worked well with Direct Sun white balance, that same filter combinations would turn the flashlight light to blue when using white balance settings typical of night photography.

Finding the Filters

How to resolve this issue? Once again I turned to my X-Rite ColorChecker chart for my visual tests. I began by setting my camera’s white balance to Tungsten, which is roughly 3200 K. This is a setting I often use for night photography. Next I light-painted the chart with my standard filtration of 1/2 CTO combined with a 1/8 minus green. This produced the color in Figure 3.

Figure 3. 3200 K white balance, Coast HP7R filtered with Rosco 1/2 CTO and 1/8 minus green filter gels

Figure 3. 3200 K white balance, Coast HP7R filtered with Rosco 1/2 CTO and 1/8 minus green filter gels

The chart is noticeably cool due to the lowered white balance setting of 3200 K. So I experimented with a variety of gels, looking for the right mix to produce a more accurate color balance. After experimenting, I settled on a Roscolux Dark Bastard Amber, which when added to my 1/2 CTO and 1/8 minus green, produced the effect we see in Figure 4.

Figure 4. 3200 K white balance, Coast HP7R filtered with Rosco 1/2 CTO and 1/8 minus green plus Dark Bastard Amber filter gels.

Figure 4. 3200 K white balance, Coast HP7R filtered with Rosco 1/2 CTO and 1/8 minus green plus Dark Bastard Amber filter gels.

You can see that new combination of filters has produced a color cast that is neutral to slightly warm when shooting with Tungsten white balance.

Putting This Into Practice

For the last step, I took a new clear plastic filter from a Coast LF100 filter kit and again traced and cut out a 1/2 CTO, a 1/8 minus green and a Dark Bastard Amber, and taped them all to the filter. Now I can easily interchange the two plastic filters (one with my original gel combo and the second with the original combo plus Dark Bastard Amber) when I change my white balance from Direct Sun to a Tungsten.

Figures 5 through 8 show a real-world example of how this affects the color of a scene. In Figure 5, my camera’s Direct Sun white balance produces an overly orange image due to the sodium vapor lights (common in most city lighting) illuminating the building.

Figure 5. Direct Sun white balance

Figure 5. Direct Sun white balance

Figure 6 shows the same scene after I changed my camera’s white balance to Tungsten (3200K). Notice the nearly neutral color of the metal and white door.

Figure 6. Tungsten white balance

Figure 6. Tungsten white balance

For Figure 7 I kept the white balance set to Tungsten and illuminated the door with my unfiltered flashlight. The door becomes very blue due to the cooler white balance setting.

Figure 7. Tungsten white balance with unfiltered flashlight illumination

Figure 7. Tungsten white balance with unfiltered flashlight illumination

Figure 8 shows the same scene with my camera still on the Tungsten white balance setting, but light-painted with the flashlight gelled with the 1/2 CTO, 1/8 minus green and Dark Bastard Amber combination.

Figure 8. Tungsten white balance with filtered flashlight illumination

Figure 8. Tungsten white balance with filtered flashlight illumination

Of course, Tungsten white balance is not the only setting I use for night photography. My night settings range from 3200 K to 5500 K, with 3800 K being the setting I use most often. So, you may ask, why did I run my test at 3200 K if use 3800 K more often? In a word, warmth. I like my flashlight illumination to be somewhat on the warm side. A gel that produces a neutral cast at 3200 K will produce a warmer cast at 3800 K. Just how I like it!

Remember, no LED flashlight will produce perfect color. But, with a little testing and experimentation, you can create your perfect color for your light-painting illumination!

Learn more techniques from Tim Cooper’s book The Magic of Light Painting, available from Peachpit.

UPCOMING WORKSHOPS FROM NATIONAL PARKS AT NIGHT

Game-Changer: The Best New Piece of Gear for Night Photographers

While night photography has been reaping the rewards of the continual improvement in cameras, lens, tripods and flashlights, there have been very few gadgets that have come out and revolutionized the way we approach night photography. Well, I’m here to share that the Case Relay by Tether Tools does just that. It is the best new piece of gear for night photographers.

The Case Relay gives you power, and lots of it. The constant bane for photographers—during the day or night—is running out of juice. Once I’ve got my shot all set up on the tripod for a series of long exposures, I dread having to take the camera off mid-stream just so I can replace a battery. And good luck realigning the shot!—especially during a time-lapse when you have an extensive rig set up.

The Tether Tools Case Relay Camera Power System.

The Tether Tools Case Relay Camera Power System.

With the Case Relay, you replace your regular battery with the Tether Tools Camera Coupler, which looks exactly like your battery with a cord at the end. That cord connects to the Case Relay. The other end of the Case Relay has a 6-inch USB cord that can be plugged into one of the many USB battery packs on the market.

The Case Relay isn’t just a conduit of power, but actually has its own secondary internal 1200 mAh battery built inside. This allows you to hot-swap your USB battery packs without missing a shot. When you tap into a 10,000 mAh battery—like the Tether Tools Rock Solid—you are tapping into a long night of shooting on one battery. The Rock Solid has two USB out ports, so we can also power our phones in the field!

I like adding a little grip and protection to the Rock Solid battery pack with a protective silicone case that comes in black or orange. The final ingredient that literally ties all these items together in a very organized and neat way around your tripod is the StrapMoore.

My first test of night with the Case Relay System


Normal
0


false
false
false

EN-US
X-NONE
X-NONE


 <w:LatentStyles DefLockedState="false" DefUnhideWhenUsed="true"
DefSemiHidden="true" DefQForm…

My first test of night with the Case Relay System—4 1/2 hours of shooting stars, trains and people lighting up the scene, all stacked into this one image. And I still had plenty more power to tap into.

I’ll be transparent here: We have a sponsor relationship with Tether Tools. But I’m not plugging their product because we have a relationship; we pursued that relationship because I absolutely love this product for how it changes my approach to night photography.

We recently made a video demonstrating the unlimited power of the Case Relay during my last Bannerman Island workshop with Matt Hill. I was shooting for eight hours and … not to give away the ending … but I still had juice in the tank!

So if you are into shooting time-lapses, long star trails, or just for many hours during the day or night, I think you’ll find the Case Relay Camera Power System to be a must-have tool to bring on your shoots.

(Note: There are several components to assembling your very own Case Relay System, so to help, we have organized all the pieces you’ll need on our Gear page.)

Gabriel Biderman is a Brooklyn-based fine art and travel photographer, and author of Night Photography: From Snapshots to Great Shots (Peachpit, 2014). During the daytime hours you'll often find Gabe at one of many photo events around the world working for B&H Photo’s road marketing team. See his portfolio and workshop lineup at www.ruinism.com.

UPCOMING WORKSHOPS FROM NATIONAL PARKS AT NIGHT