Level Up With Light Painting: Correcting the Color of Your Flashlight (Part III)

In 2017 I wrote a two-part blog post titled “Level Up With Light Painting: Correcting the Color of Your Flashlight,” which discussed the color biases of flashlights and how to filter them to neutralize that color when shooting at different white balance settings.

In the first part I talked about the pros and cons of LED flashlights, color theory, white balance, testing your flashlight’s color and how to fashion your own custom filters. This all revolved shooting at Daylight white balance.

In the second part I followed up with how to filter Coast HP7R and HP5R flashlights to provide a neutral color when the white balance is set to 3200 K. This is a common setting for shooting in urban areas at night, as most streetlights and other city lights are rendered overly orange when white balance is set to Daylight.

In both of those posts I used a decidedly unscientific method of performing the color tests. While the results were close to accurate, this past summer I decided to look for more precision, so I set about running color tests with the aforementioned flashlights (my favorite two to use). Now I can paint with neutral light at any white balance.

The Color Tests

For this I needed a color meter. Admittedly, color meters are expensive and not generally used by the average photographer. They are, however, an invaluable tool in commercial/advertising photography and in the film industry. Since I don’t own one, the generous folks at MAC Group arranged to loan me a Sekonic C-800 SpectroMaster. (Thank you, MAC Group! Your gracious loan benefits us all.)

My goal for the tests was to determine the proper filtration for the HP7R and HP5R with a camera set to the white balances most often used for night photography. (For a rundown on these, see Matt’s post “How to Choose the Right White Balance for Night Skies” and my post “Making the Move to Manual White Balance.”) I tested each of nine white balance settings (5500, 5000, 4800, 4500, 4200, 4000, 3850, 3500 and 3200 K), with each flashlight set at both high and low power. I then determined which Lee Filters gels would neutralize the color while also adding a little warmth to the light.

Then we put all the results into a guide to assist other night photographers who would like to remove unwanted color casts from their Coast lights. You can download the guide by clicking here or on the image below.

Click image to download

While the chart is extensive, I would suggest not getting too wrapped preparing for all the options—it’s unlikely that you’ll be shooting at nine different white balances. For my kit, I created filters for 3850 K and 3200 K for each of my flashlights. This gives me enough flexibility for most situations I encounter.

When shooting on a white balance setting of Daylight, I use my 3850 K filter combination to add slight warmth to my flashlight. When setting my camera’s white balance to 3850 K, I use the 3850 K filter combo for a neutral light or the 3200 K filter combo for a warmer effect. Likewise, when using the 3200 K filter with the camera’s white balance set at 3200 K (i.e. Tungsten), the flashlight provides a nice neutral color.

Putting it into Practice

Let’s look at an example of this in action.

My favorite white balance for capturing the Milky Way is 3850 K. Why? Because when shooting night skies using Daylight (about 5500 K), even in dark sky environments it’s not uncommon for the resulting image to have an orange cast to it. Using 3850 K creates a cooler, more natural look to the sky while maintaining some warmth in the colors of the galaxy.

In Figure 1 you can see the result of shooting the Milky Way in Death Valley National Park with my white balance set to Daylight compared to 3850 K. The latter better represents how I want the night sky and the Milky Way to appear in a photo.

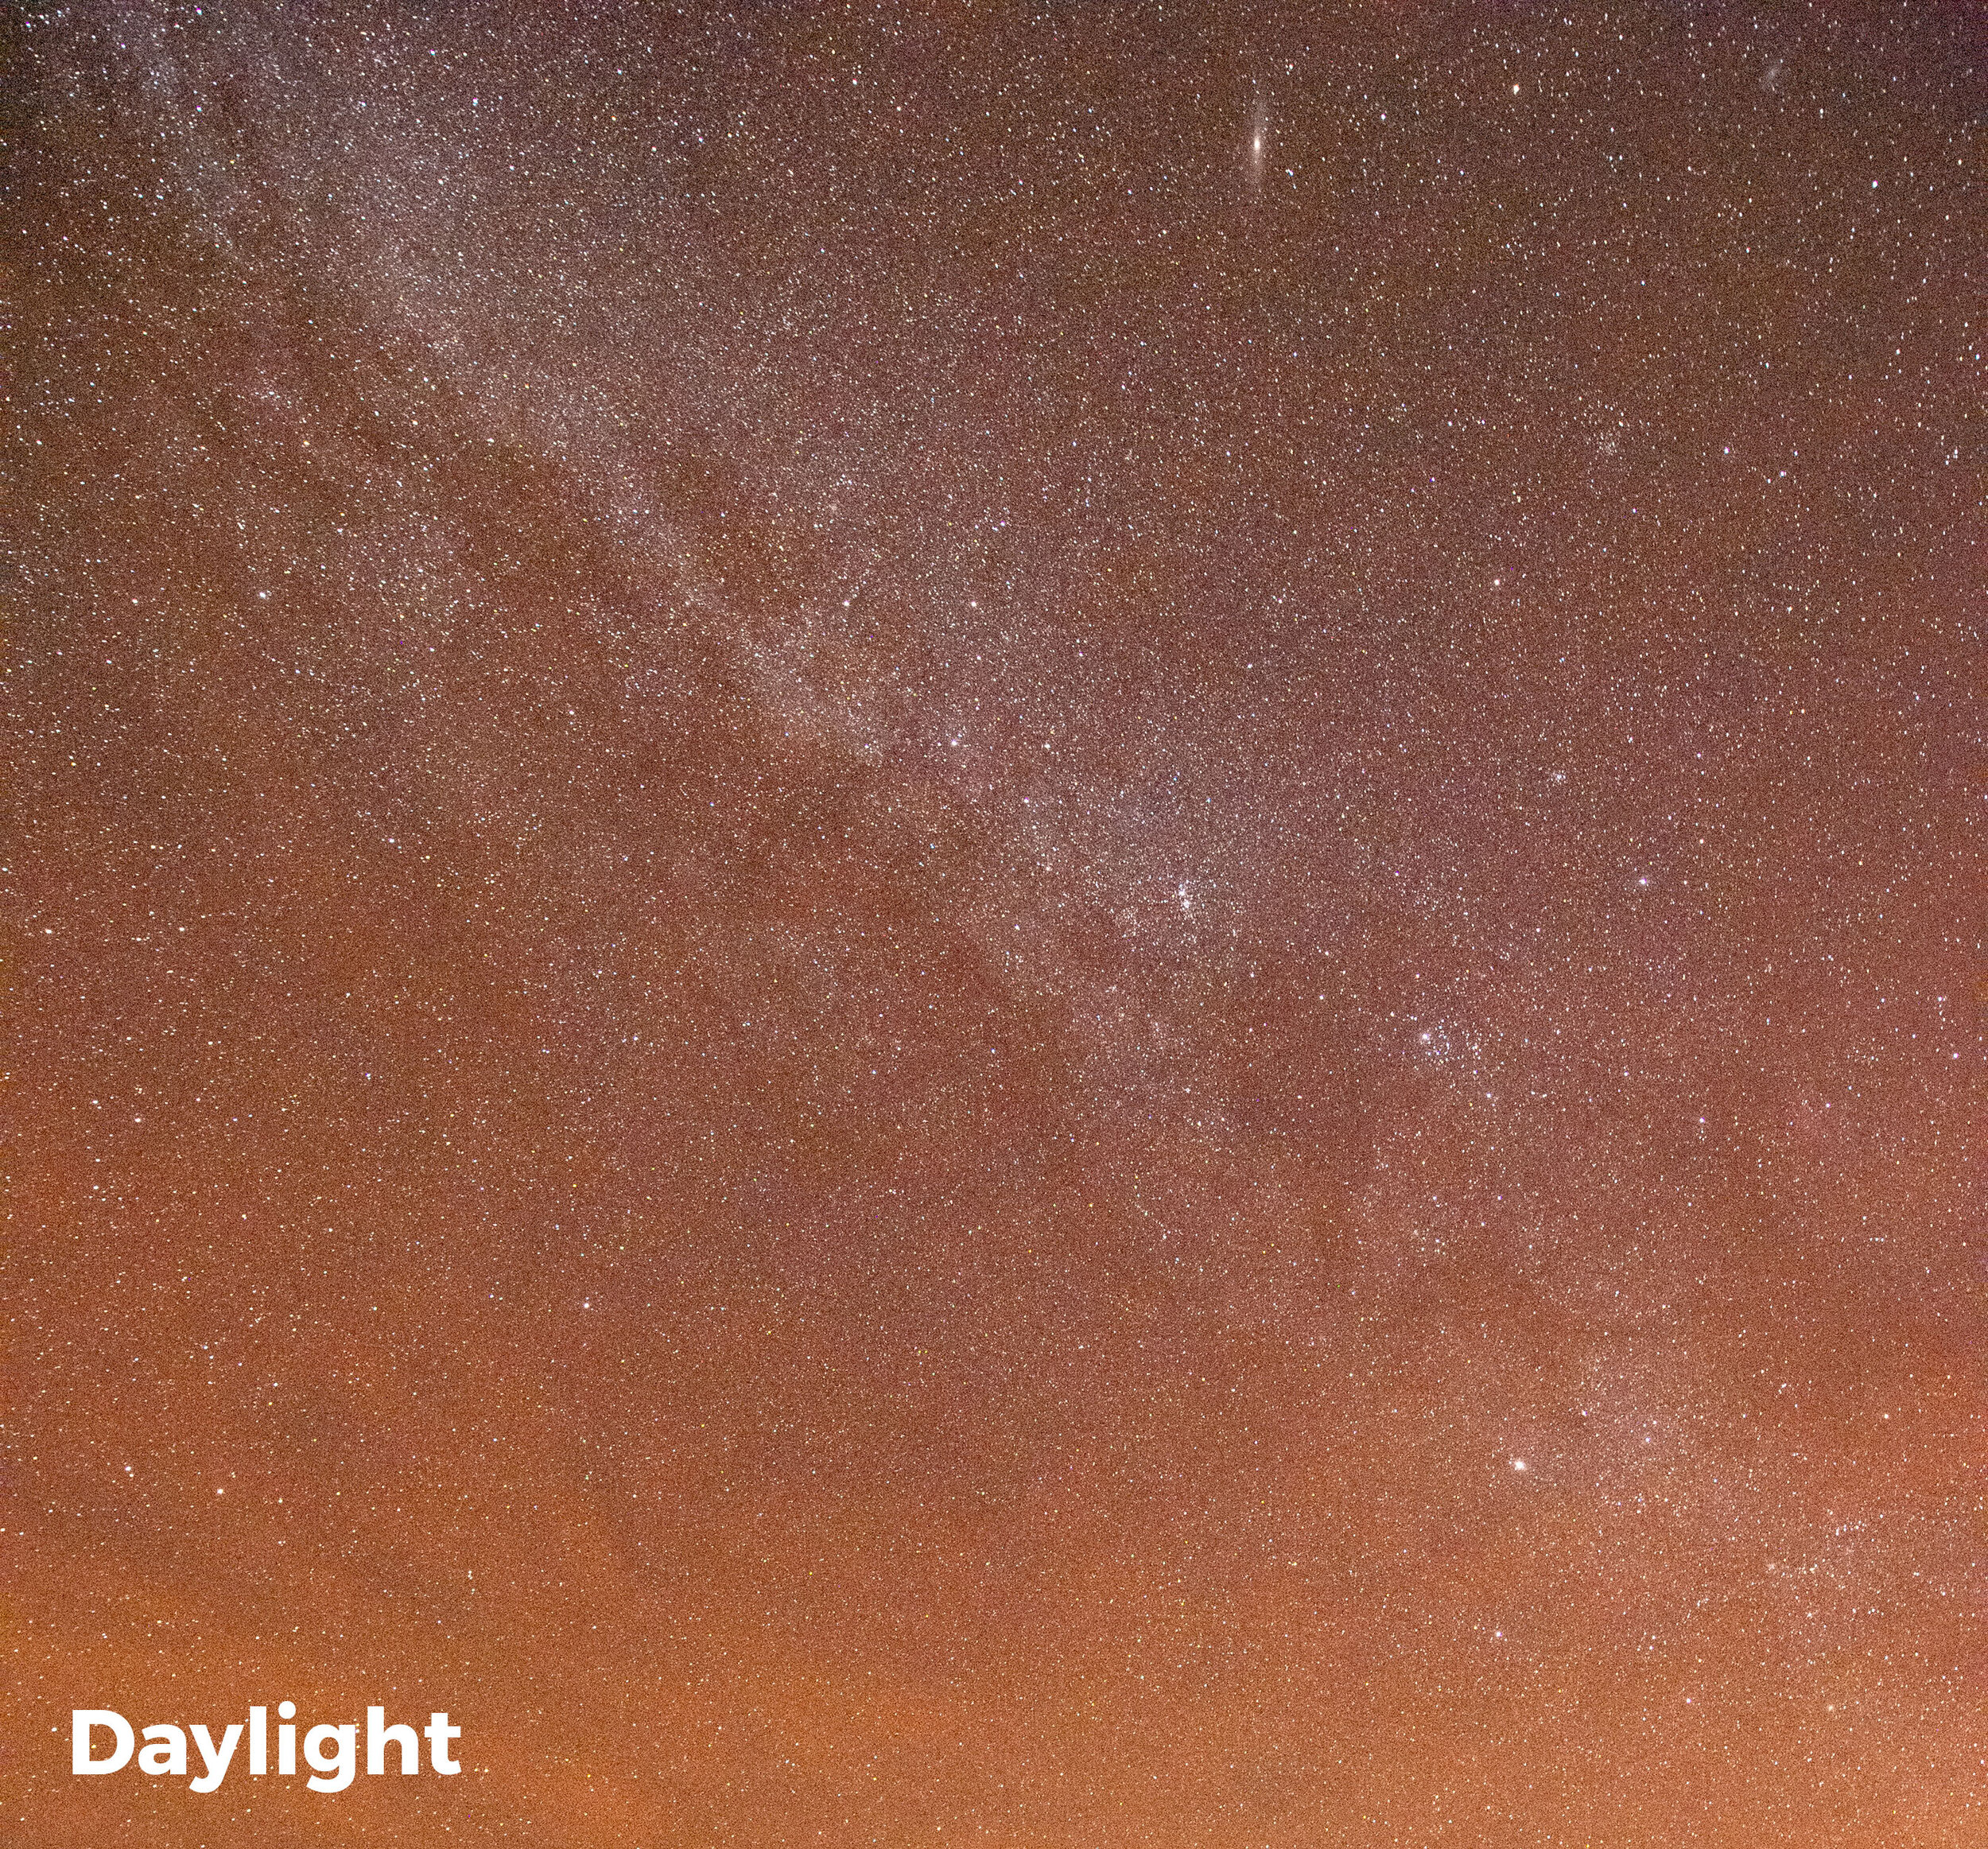
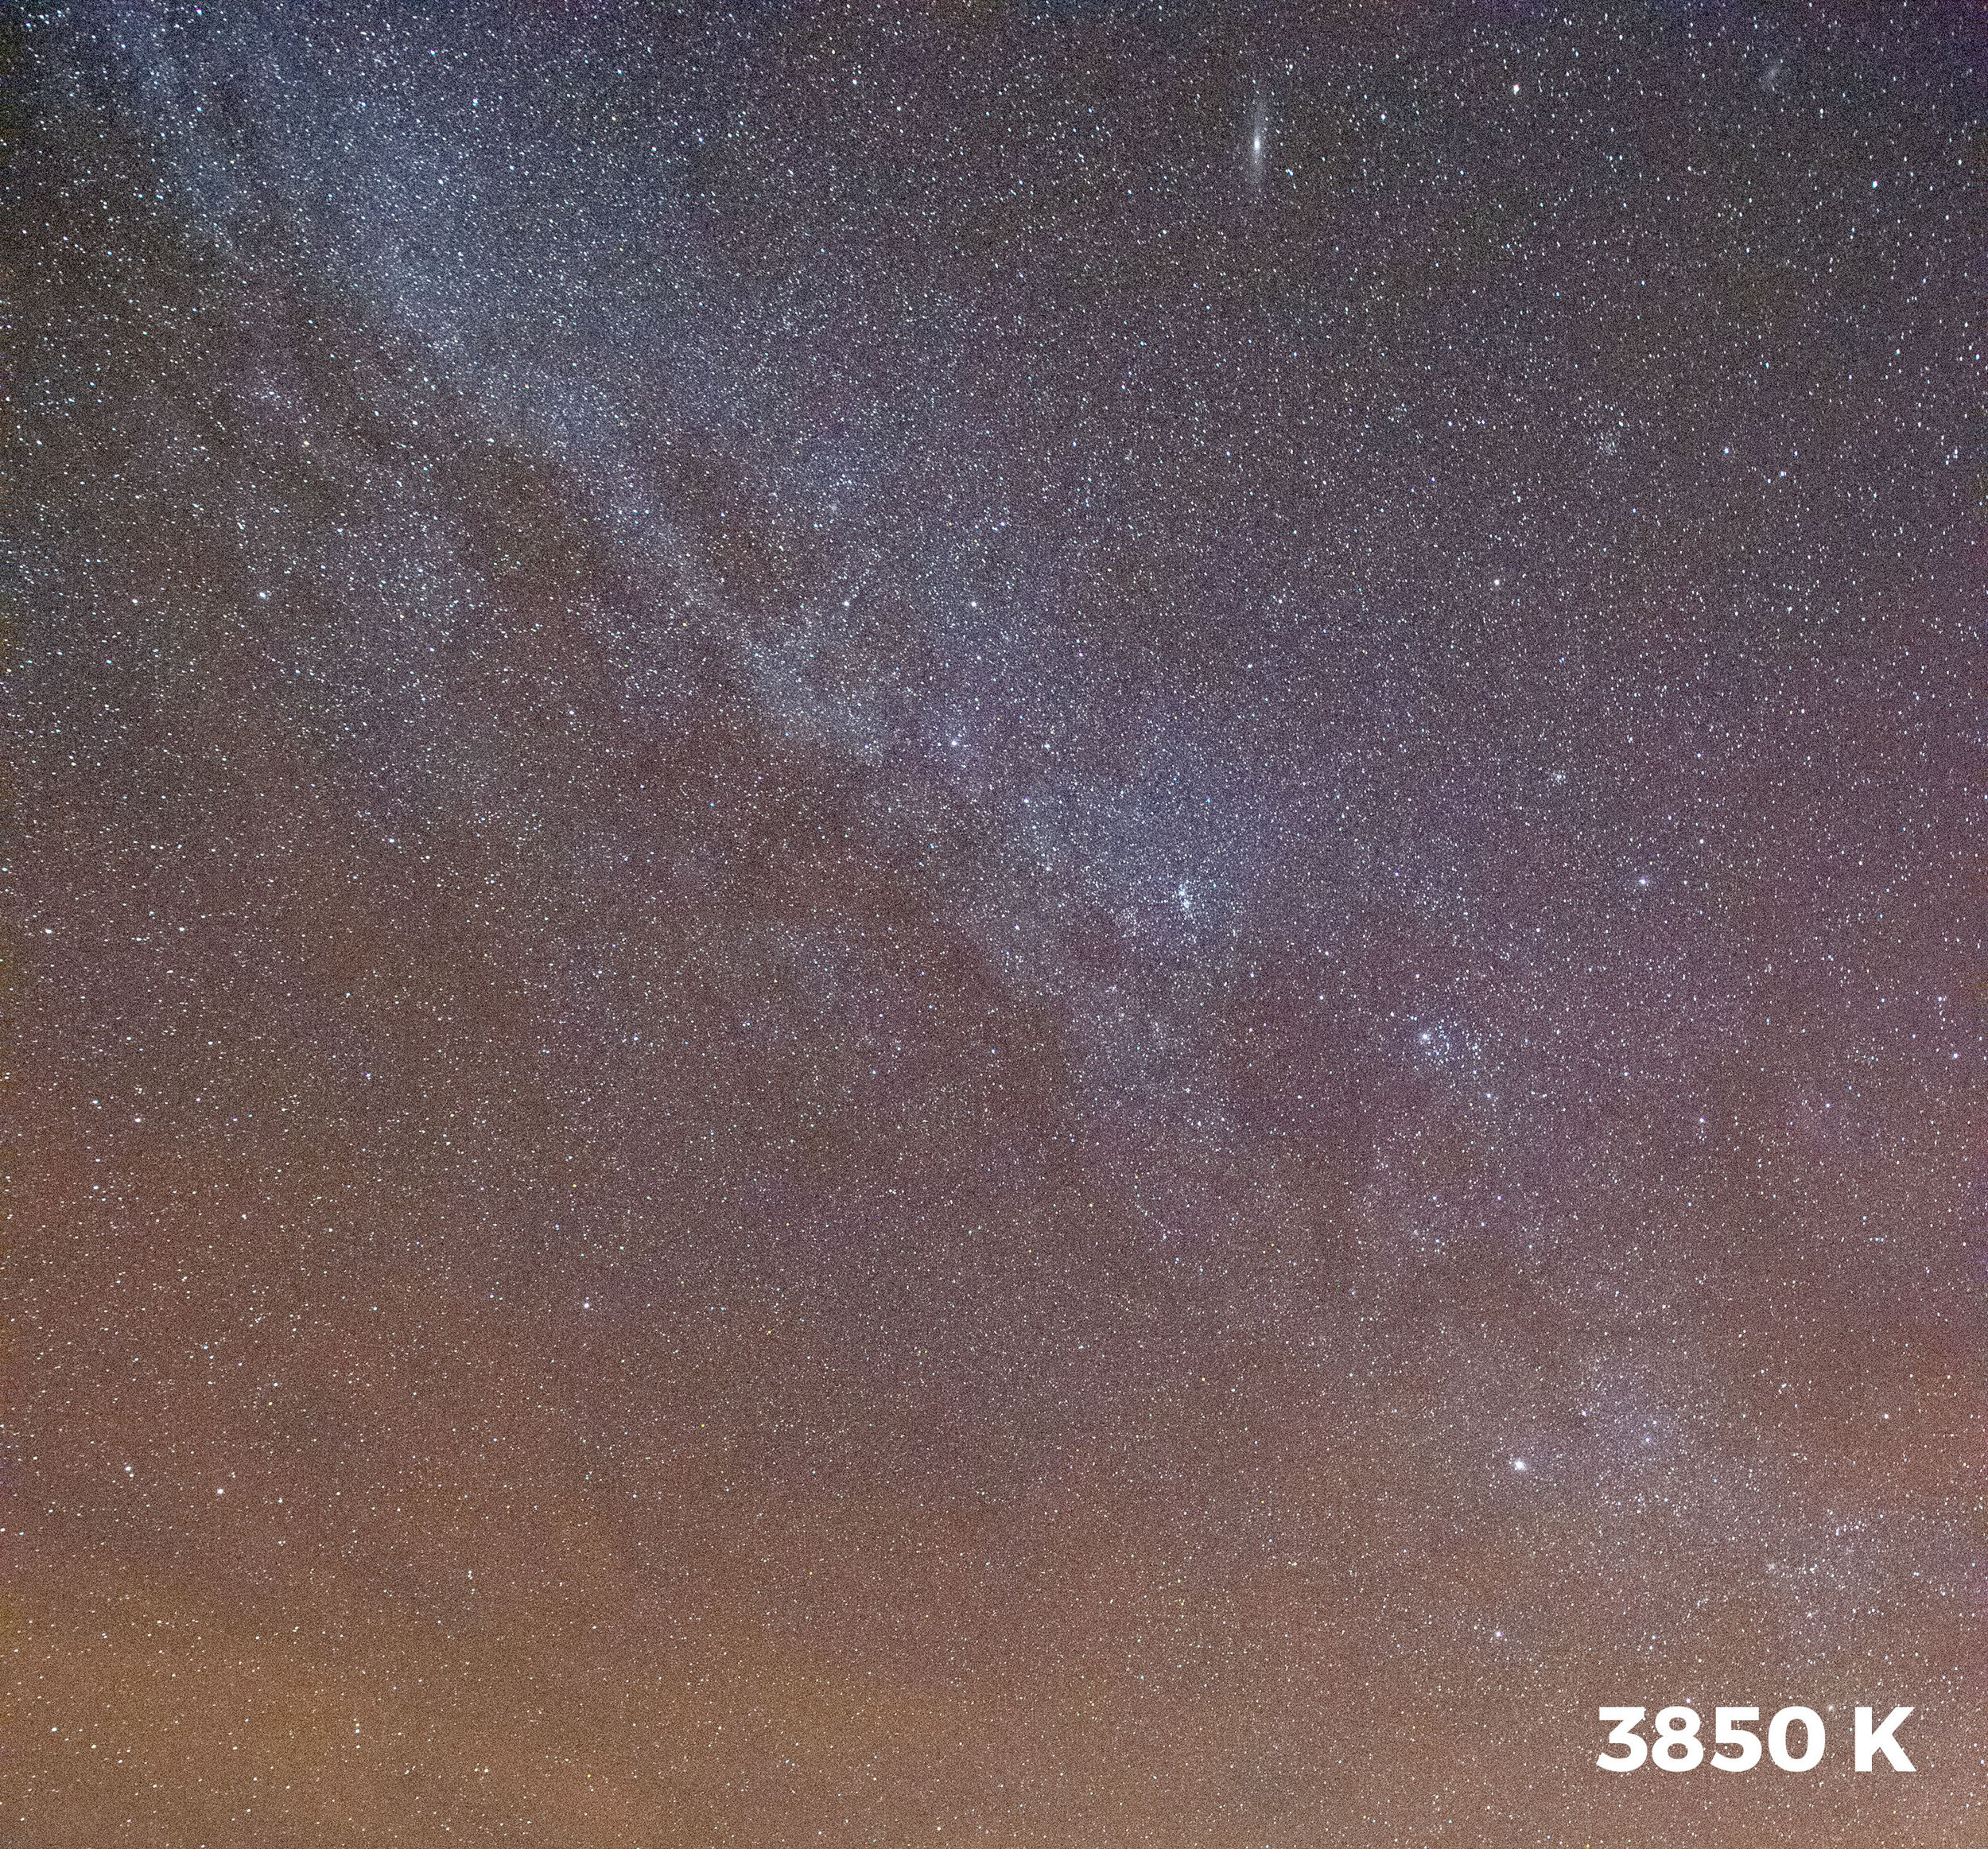
Figure 1. The color difference between shooting the Milky Way at a Daylight white balance versus 3800 K.

If shooting the Milky Way is all I wanted to accomplish, setting my white balance to 3850 K would provide great results. But for those who know me, you know I love light painting!

At Death Valley’s Devils Cornfield, I captured the first image (left) in Figure 2 with a white balance setting of 3850 K. For the light painting I used the low-power setting on my Coast HP5R. Notice the overly blue/green effect that the unfiltered flashlight created?

To get my added light to accurately render the colors of the scene, I filtered the flashlight to look good at that white balance of 3850 K. According to my test results, that meant I needed a combination of 1/2 CTO + 1/8 CTO + 1/4 Minus Green.

That fixed the incorrect color cast, but I really wanted my flashlight to put out a slightly warmer rather than neutral color, because I like the visual effect of warm light. So instead of using the filter combo for 3850 K, I used the combo for a 3200 K setting: 3/4 CTO + 1/8 CTO + 1/4 Minus Green + 1/8 Minus Green. That gave me exactly the color I was hoping for (Figure 2, right).

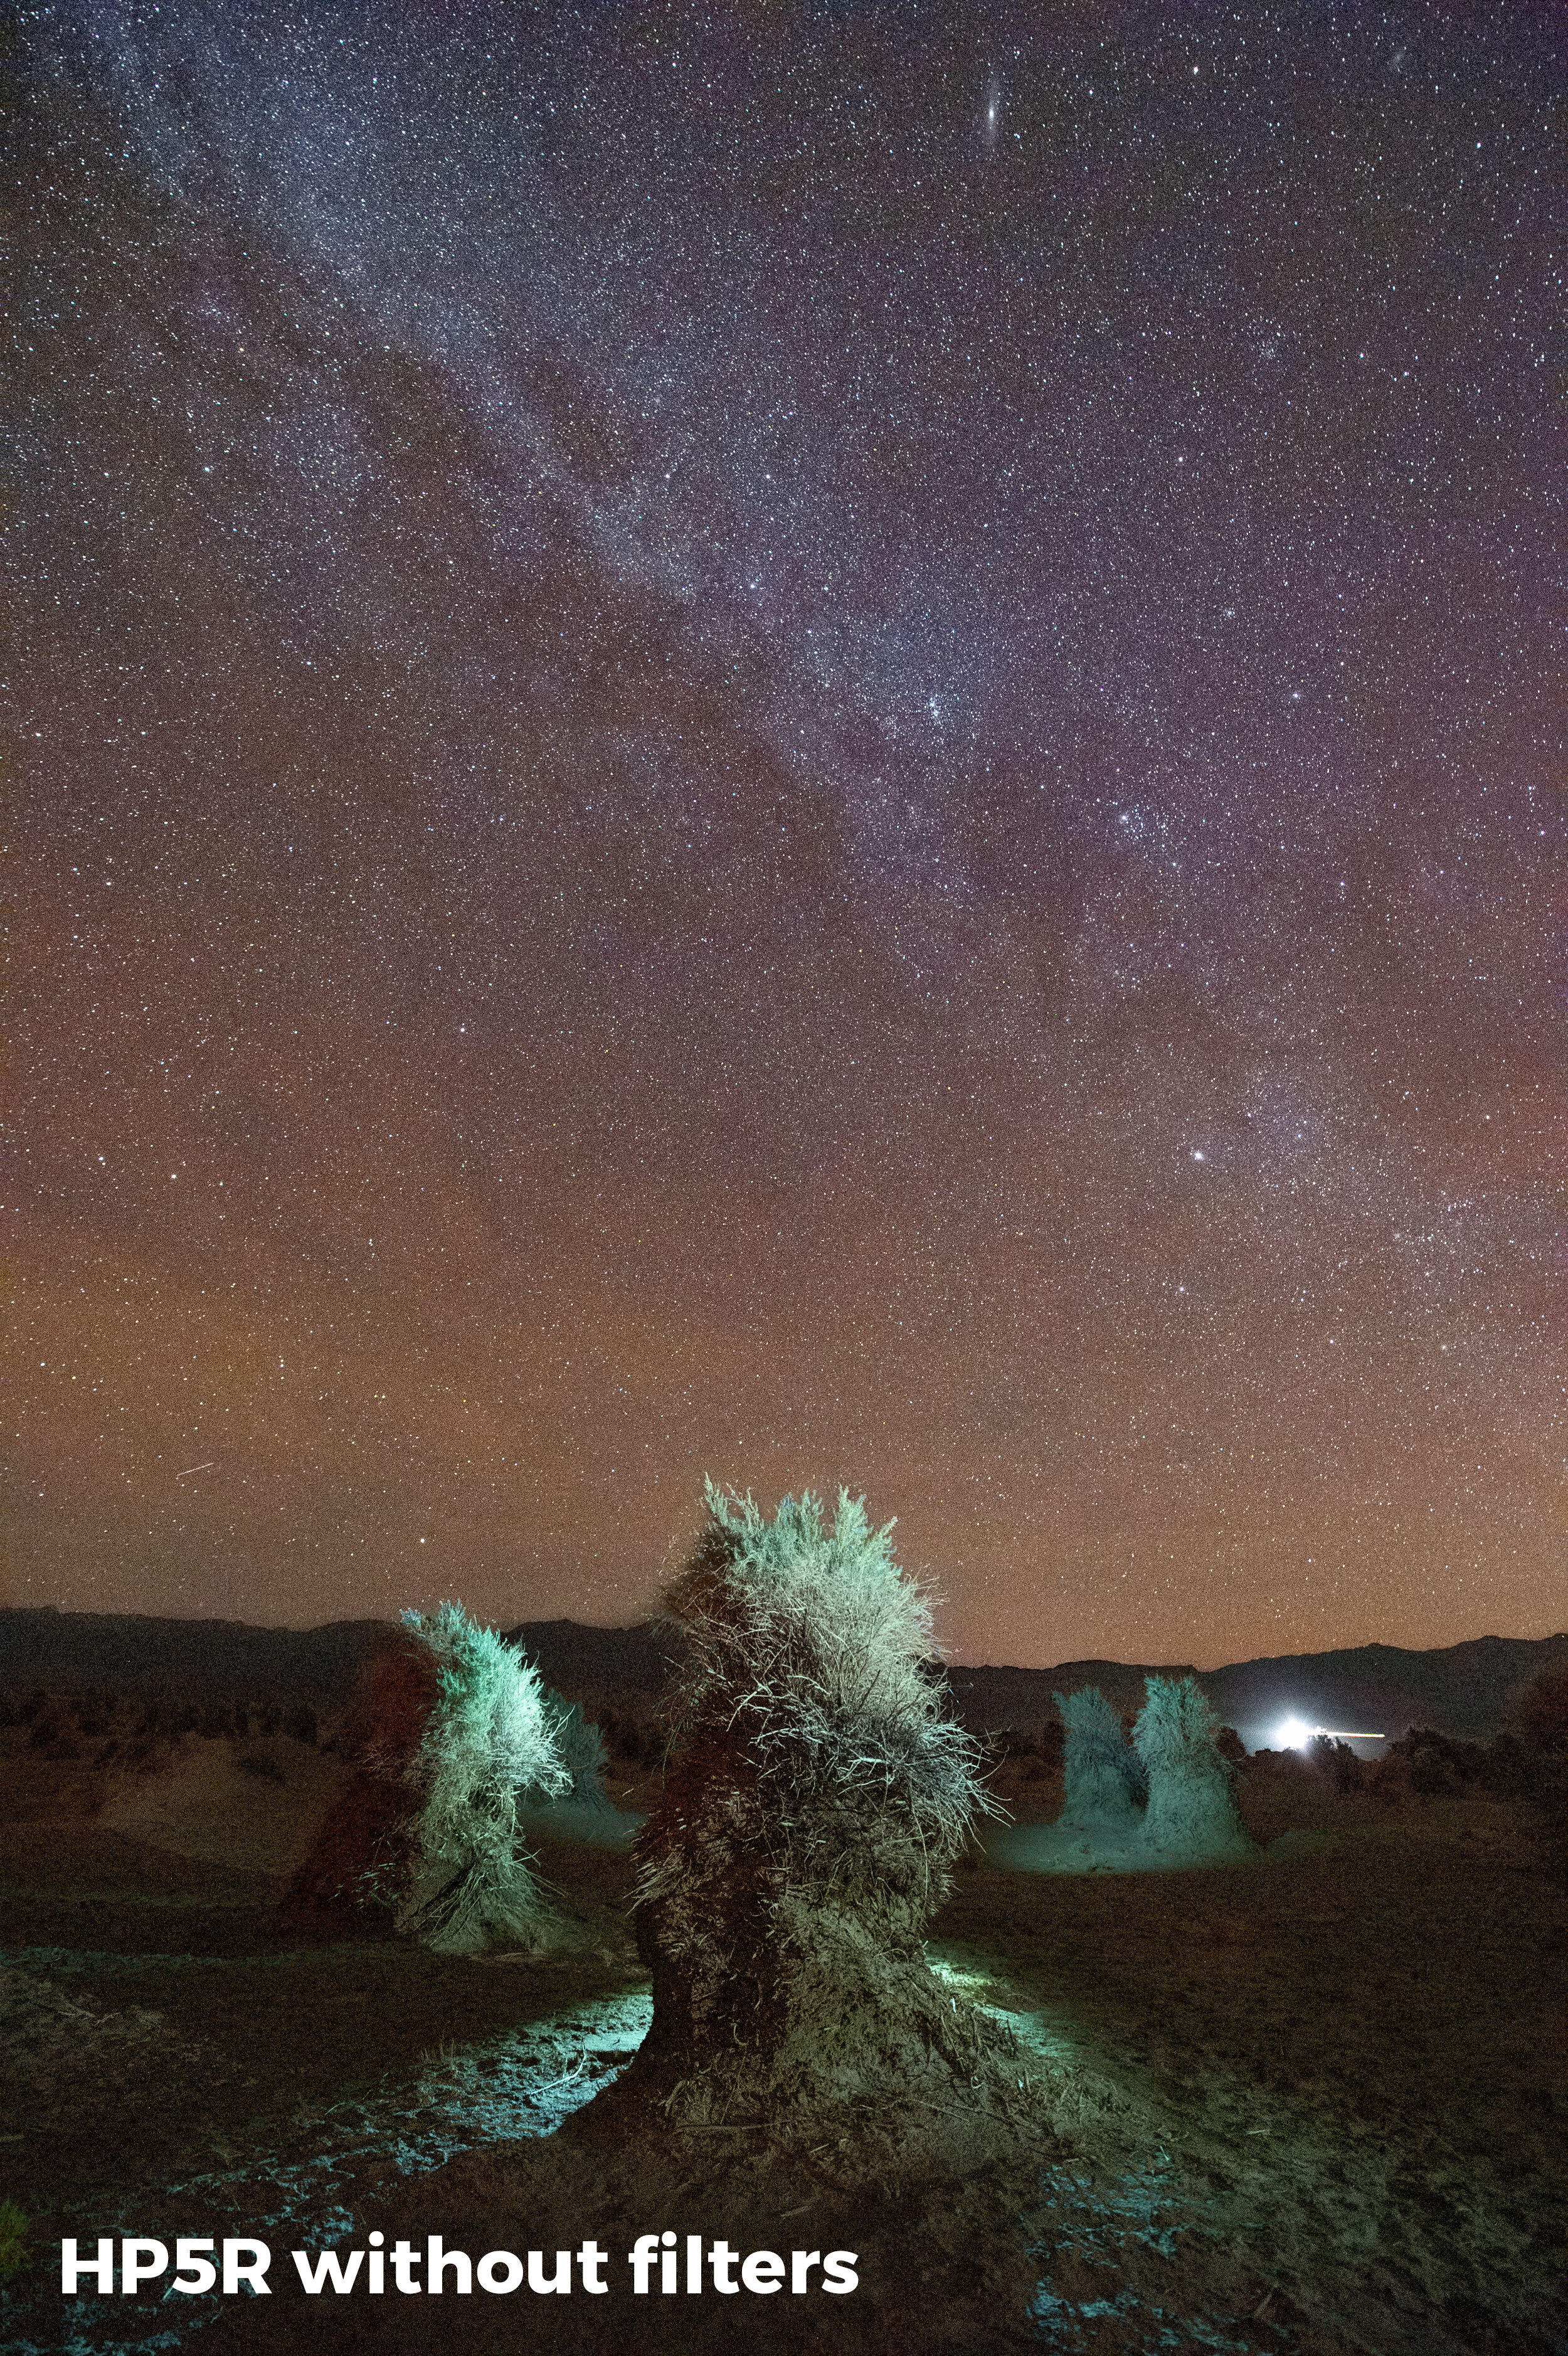
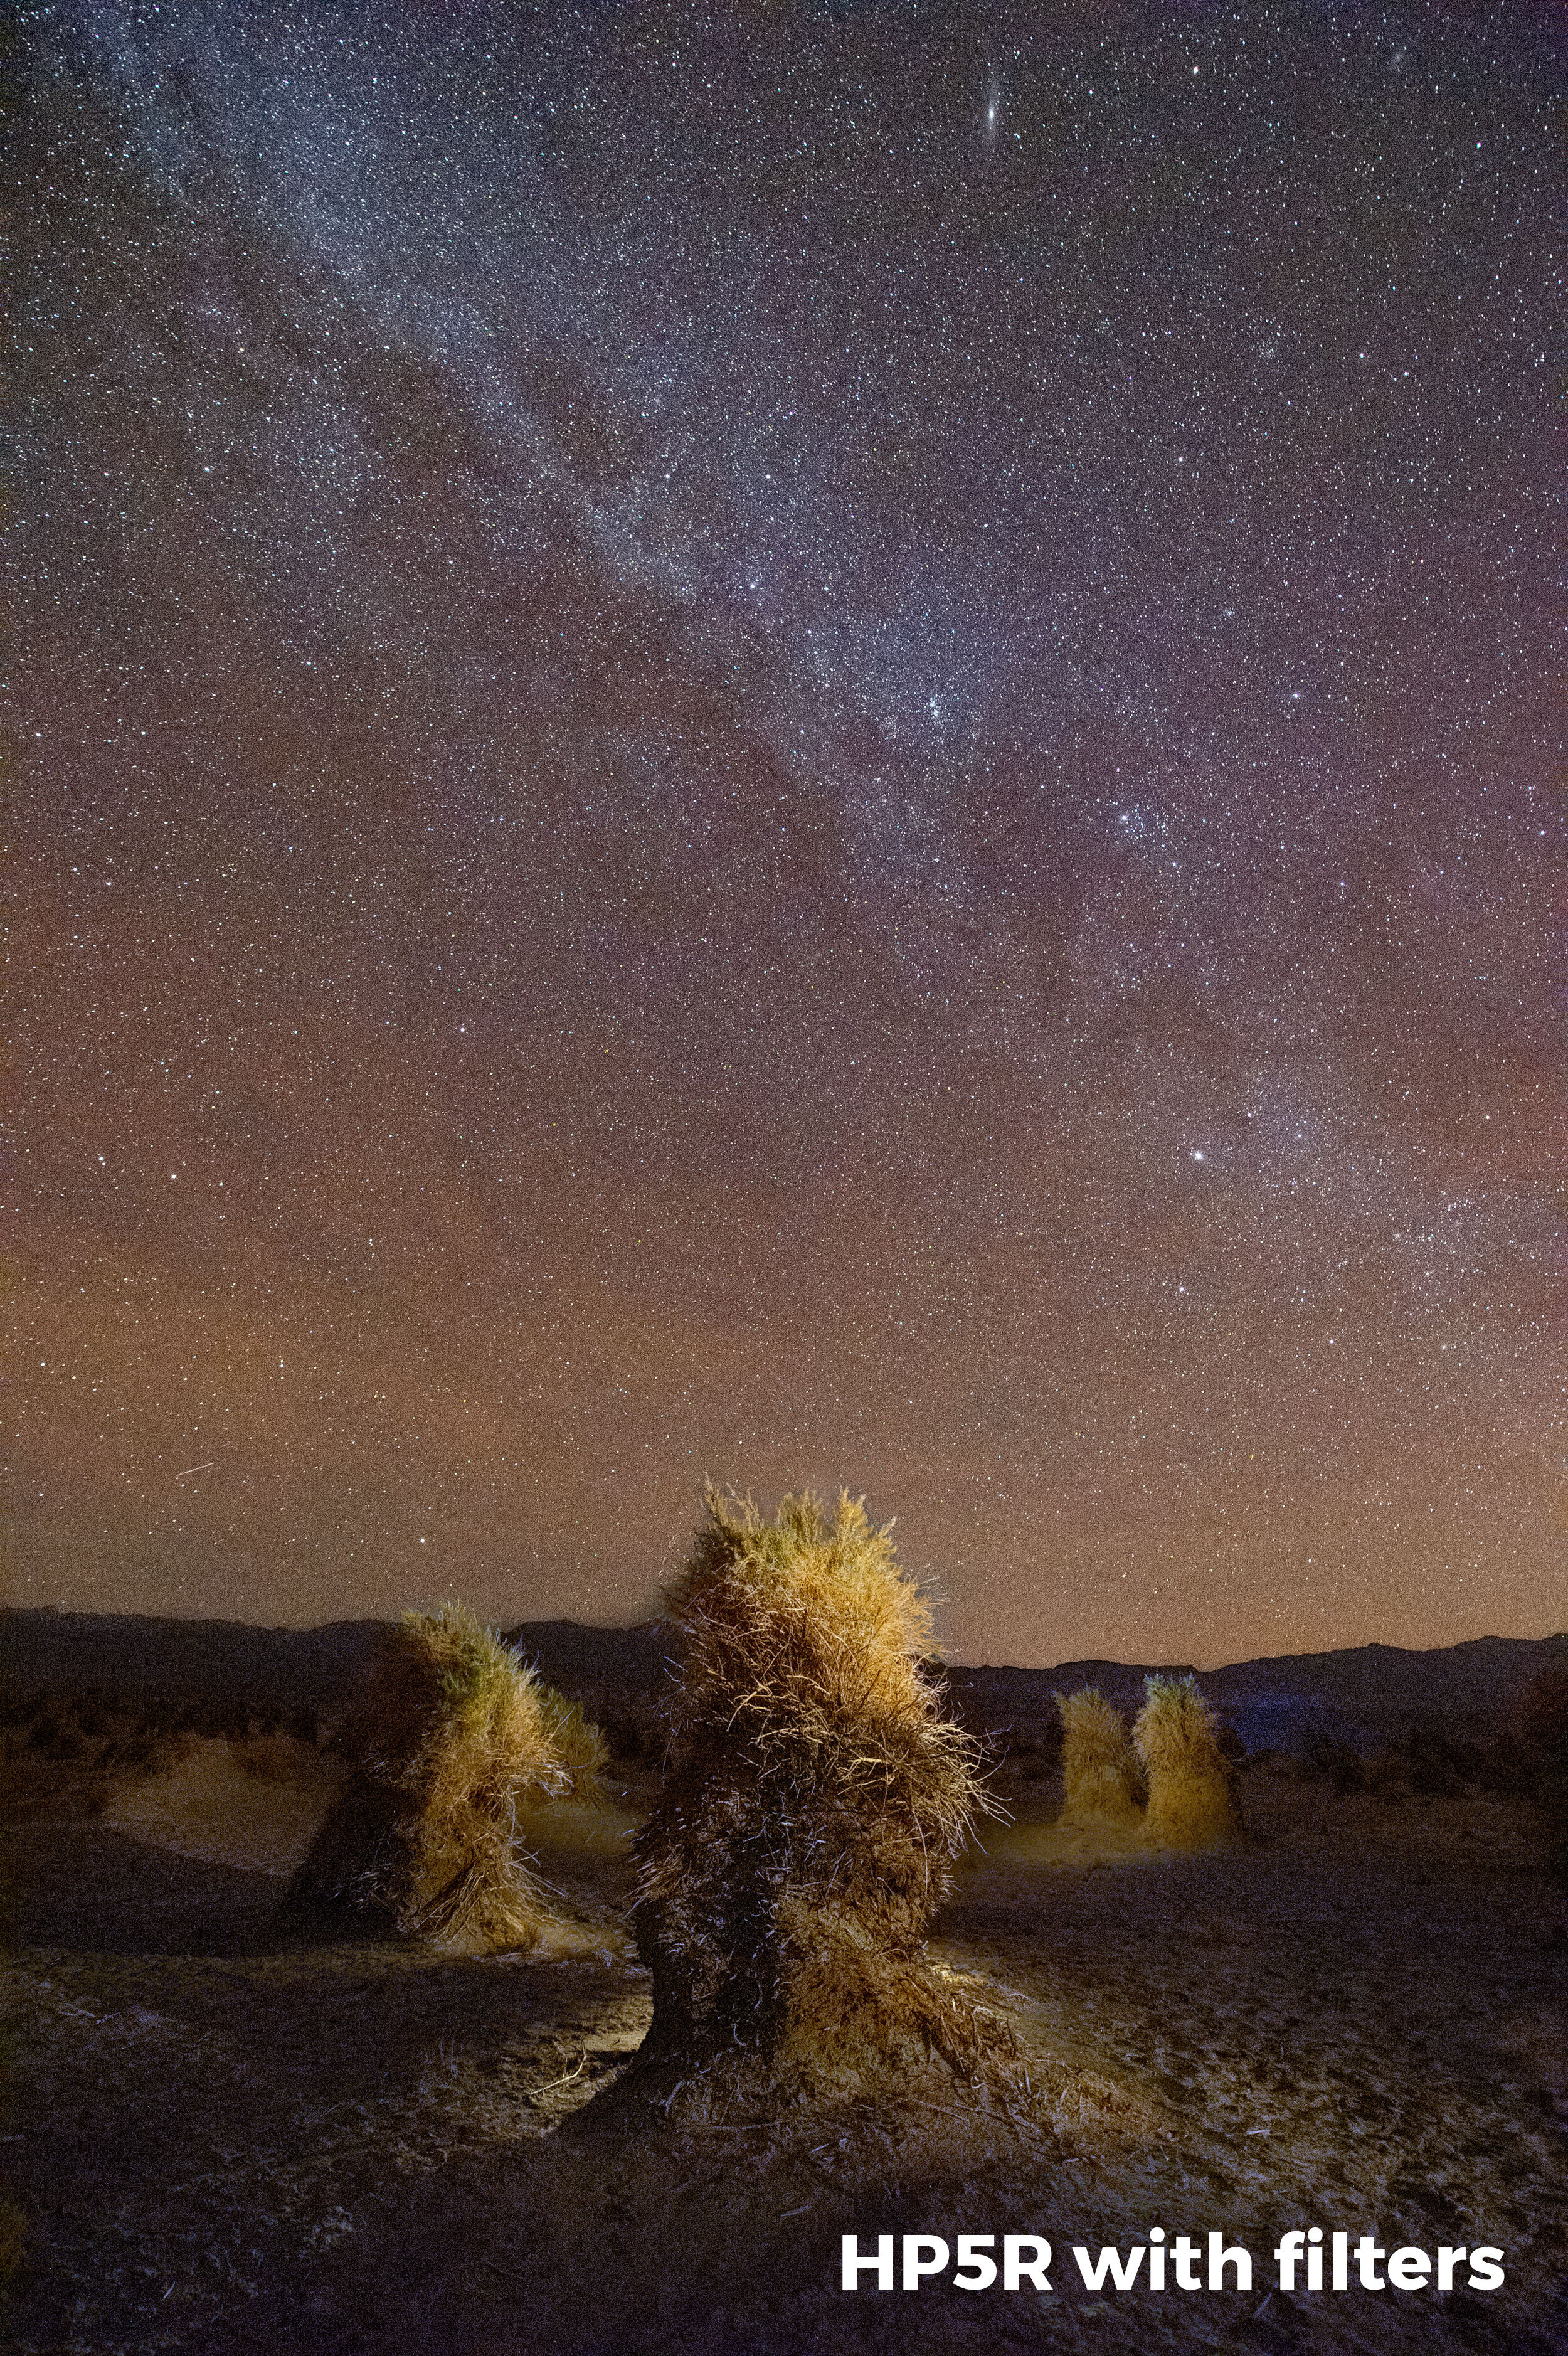
Figure 2. Devils Cornfield, Death Valley National Park. Nikon D4s with a Nikon 14-24mm f/2.8 lens. 20 seconds, f/4, ISO 6400, with a white balance of 3850 K. Light painted with a Coast HP5R unfiltered (left), and filtered (right) with Lee 3/4 CTO + 1/8 CTO + 1/4 Minus Green + 1/8 Minus Green gels.

One last point: It can be a bit tedious to hold filter gels in front of a flashlight while running around in the dark. The solution? I create a “disc” filter that attaches right to the front of the flashlight. To see how I do this, look back on Part I of this series.

Tim Cooper is a partner and workshop leader with National Parks at Night. Learn more techniques from his book The Magic of Light Painting, available from Peachpit.

UPCOMING WORKSHOPS FROM NATIONAL PARKS AT NIGHT

Putting Pictures to Paper: How Printing Can Make You a Better Photographer

Last year Gabriel Biderman wrote a post about making printing part of your photographic process. I loved it. Then this past week our partners at Bay Photo Lab hung out with us during our night photography workshop at Golden Gate National Recreation Area.

Both of these things brought my thoughts back to my earliest days of photography, and got me thinking about why we printed then and how the print compares to the modern digital equivalent. It also led me to thinking about how printing is more than just another way to show our images in yet another medium. Printing can actually make you a better photographer.

Patrick (above, at left) from Bay Photo visited our workshop in San Francisco last week, to help spread the word about how important printing can be to improving photography skills. Me (right), more than a few years ago, loading my 4x5 camera with film—in the days when a print was the only final format.

A World of Myriad Media

Printing was always a huge part of my creative process. An image wasn’t complete until I mounted and framed the finished print and shared it with others. So how does that differ from today?

Well, these days we share our work a bit differently. For many, the final destination may very well be Facebook, an iPhone or an Instagram account. The share is so much faster. Immediate. And share we do. Perhaps we even overshare.

This rarely happened before—because printing took so much longer (and was much more expensive and time-consuming), it was inevitable that we wouldn’t be able to show as much of our work. Only the best images made it out of the darkroom or returned from the lab. This made us much more selective about what we presented to the world.

Modern tech has now made it fairly easy for us to us get our images in front of others. This ease, in turn, has made it tempting to share a lot more images. In many ways, this is good. It gets us out shooting, which provides the practice we need to get better, hones our skills at seeing light, and helps us improve our composition skills.

The downside is feeling compelled to put out images even when we know they are not our best. Today’s climate certainly rewards those who share frequently. But we have to remember the old adage: You are only as good as the weakest photo in your portfolio.

The majority of anyone’s images are just that—kinda weak. No one makes awesome images every time they pick up their camera. Most of our work is simply the attempt at making stunning images, but the true masterpieces are far between and few.

That being said, photography is one of those art forms that has many uses. As such, many of us don’t strive for a masterpiece with every exposure. A selfie in front of the Lincoln Memorial means something completely different than the same shot without you in it. There are as many reasons to take photographs as there are to share them. We just need to consider which work we want to share, how we want to share it, with whom, and for what reason. Your family will be most forgiving of technical errors in an image showing your vacation in Europe, while the audience at the coffee house may be decidedly more critical, and the visitors at a gallery more critical still.

Chris Nicholson recently made a 40x60 Bay Photo Xposer print of one of his Big Bend National Park images—just to put in his living room.

So, Why are We Printing?

To my mind, there are three good reasons for making a print:

1. To celebrate your masterpieces.

They are not easily achieved. Be proud of the hard work you’ve invested to create them. There is no reason to make prints of every snap you’ve made. But it’s really nice to honor your best pieces by creating prints of them. Putting them in books or placing them up on your wall will ensure they live on.

2. To slow yourself down.

It will take extra time, knowledge and money to make prints, so you will want to be selective. You will want to be more deliberate during the culling process. Really get in and examine your images. For each photograph you’re considering committing to paper, ask yourself:

  • Is it sharp?

  • Is the light right for the scene?

  • How was your timing?

  • Could you make a better photo if you returned?

When you’re spending more time and money on printing your photos, you may find you become much pickier.

In 2010, Lance Keimig printed for a Simmer Dim exhibit at New England School of Photography, showcasing his work from Scotland.

In 2010, Lance Keimig printed for a Simmer Dim exhibit at New England School of Photography, showcasing his work from Scotland.

3. To become a better photographer.

Yup, creating prints will make you better. How? Through attention to detail. A good-size print won’t hide the flaws in your photo. In fact, it may highlight them. It’s beyond frustrating to spend a lot of money to get a large print made only to find out that there’s a technical problem with the shot—that it’s out of focus, for example, or that you missed a bunch of dust spots in the sky.

On the bright side, this type of lesson really hits home. It teaches you to be more careful so that the same mistake will not happen again. (On the other hand, when simply replacing an online photo with a fixed version, the inconvenience barely registers. No pain, no gain.)

Printing as a Way to Improve

Another part of the problem of oversharing our less-than-stellar work arises from the way we view the images. The small screens of the phone and tablet—and the small sizes of the images shown on them—do a great job at hiding imperfections. They don’t hide poor composition or uninteresting imagery. This makes it difficult to ascertain the quality of craftsmanship. We can cheat, or we can post images that we wouldn’t otherwise show. As it turns out, it’s not hard to hide poor technique on an iPhone.

The print however, can shed an extra ray of light on laziness and negligence.

Attendees of our 2018 Sloss Furnaces workshop had their favorite images printed for an exhibit at the national historic landmark’s visitor center. Photo © Ron Clemmons.

Now, take that same less-than-stellar image and try to make a print.

  • Does it look the same?

  • Does it have the same impact?

  • Will it stand up to the continued scrutiny of being viewed every day?

  • Is it as good as you thought it was, now that you see it large?

Making prints will make you a better photographer. The person who spends time perfecting the craft and paying attention to detail will ultimately produce far better photography.

And I don’t mean just technically superior imagery. I also mean more meaningful photography. The whole process of slowing down and working in a more meticulous manner will not only benefit your technical chops, but it will also improve your composition and seeing skills. That, arguably, is even more important.

As Gabe says, “Seize the print!”

Tim Cooper is a partner and workshop leader with National Parks at Night. Learn more techniques from his book The Magic of Light Painting, available from Peachpit.

UPCOMING WORKSHOPS FROM NATIONAL PARKS AT NIGHT