How I Got the Shot: Puente Nuevo, Ronda at Night

Puente Nuevo, Ronda at Night. Nikon Z 6II with a Nikon Z 24-70mm f/2.8 S lens at 40mm. Foreground: shot with a 10-stop neutral-density filter at 20 seconds, f/11, ISO 100. Sky: 460 stacked frames shot at 3 seconds, f/8, ISO 800.

The Location

Dream location—conquered!

The rich history of Ronda, Spain, dates to the Neolithic Age. The Phoenicians, Romans, Muslims, Christians and the Spanish have claimed this remote outpost as their home. The Spanish Inquisition, Napoleon War and Spanish Civil War all had major impacts on the town. Ronda is proudly known as the birthplace of the modern style of bullfighting and has influenced and attracted such artists as Orson Wells and Ernest Hemingway to call it home.

Beyond this colorful past, what attracted me to Ronda were the images of this cliff-clinging town and the historic bridges that unite the old and new settlements over the 400-foot-deep gorge known as El Tajo. The most famous of the three bridges is the Puente Nuevo, or New Bridge, that was completed in 1793. (Imagine how old the older bridges are!) It could be one of the most dramatic bridges in the world and definitely one of the most photographed sites in Spain.

Figure 1. Puente Nuevo, or New Bridge, is in the mountaintop city of Ronda, Spain. (Satellite imagery courtesy of Google Earth.)

I had an image of this in my notes as a place to visit if I ever went to Spain again. Truth be told, that image has been in mind for a long, long time. I had been dreaming about Ronda and the New Bridge since I was a child.

One of my favorite children’s books growing up was Ferdinand the Bull, the story of a gentle bull who refused to fight. Ferdinand was from the Andalusia region of southern Spain, and there is a scene in the book where they send Ferdinand off to fight in Madrid. The illustration backdrop is Puente Nuevo!

Figure 2. The image I remember so well from Munro Leaf’s The Story of Ferdinand, illustrated by Robert Lawson.

The Shoot

In researching the town and looking at pictures of Puente Nuevo, I found very few pictures of the bridge at night, and none with stars. This is because the bridge is lit by sodium vapor floodlights that make it difficult to see anything in the pitch-black night sky.

The typical prime time to take photographs of Puente Nuevo is when the sun sets directly opposite the bridge, basking it with golden light, or during civil twilight when the sky is still a bright rich blue that perfectly complements the golden floodlights (Figure 3). But I’m always one for a challenge, so I set off to capture it at night.

Figure 3. Twilight at Puente Nuevo. Nikon Z 6II with a Nikon Z 24-70mm and a 10-stop neutral density filter. f/2.8 S lens at 40mm. 20 seconds, f/11, ISO 400.

My strategy was this: Combine a twilight blend with a star stack. This is a fairly common technique, but it would definitely prove to be difficult given the high contrast between the lit bridge and the surrounding darker rocks and sky.

So I hiked down the gorge to a vantage point I liked and shot the bridge during twilight. This foreground shot perfectly balanced the bridge and its lights (which had just come on) with the rocks and waterfall that were lit by the ambient light of twilight. I shot a few more frames and chatted with rock climbers and other folks coming down the path as I waited more than an hour for the stars to come out.

An additional challenge was the inky black sky of the moonless night. Having even a little moonlight would have helped the visual transition from a bright bridge to a more illuminated sky.

Yet another challenge was the lack of stars in the frame. With my naked eye I could see one star in my composition. I could have shot wider to include a bigger part of the sky that was unaffected by light pollution, but then the waterfall would have been too small and lost in the image. I chose a tighter 40mm focal length to get the viewer into the landscape, and I left one-fifth of the composition for the sky.

I could have opened my aperture to f/2.8 or gone to a high ISO to help my camera record more of the fainter stars, but that would have resulted in more of the streetlight spilling into the sky. Instead I chose an aperture of f/8 to control the direct light from the lamps and an ISO of 800 so the stars would retain some of their color and not blow out (Figure 4).

Figure 4. My first test shot was at 15 seconds, f/8, ISO 800. Note the spill of the streetlights into the night sky. I wanted to limit that so that blending in Photoshop would be easier. A 3-second shutter speed was the right balance, as it kept the bridge lights from not bleeding into the sky and still recorded more stars than my eyes could see.

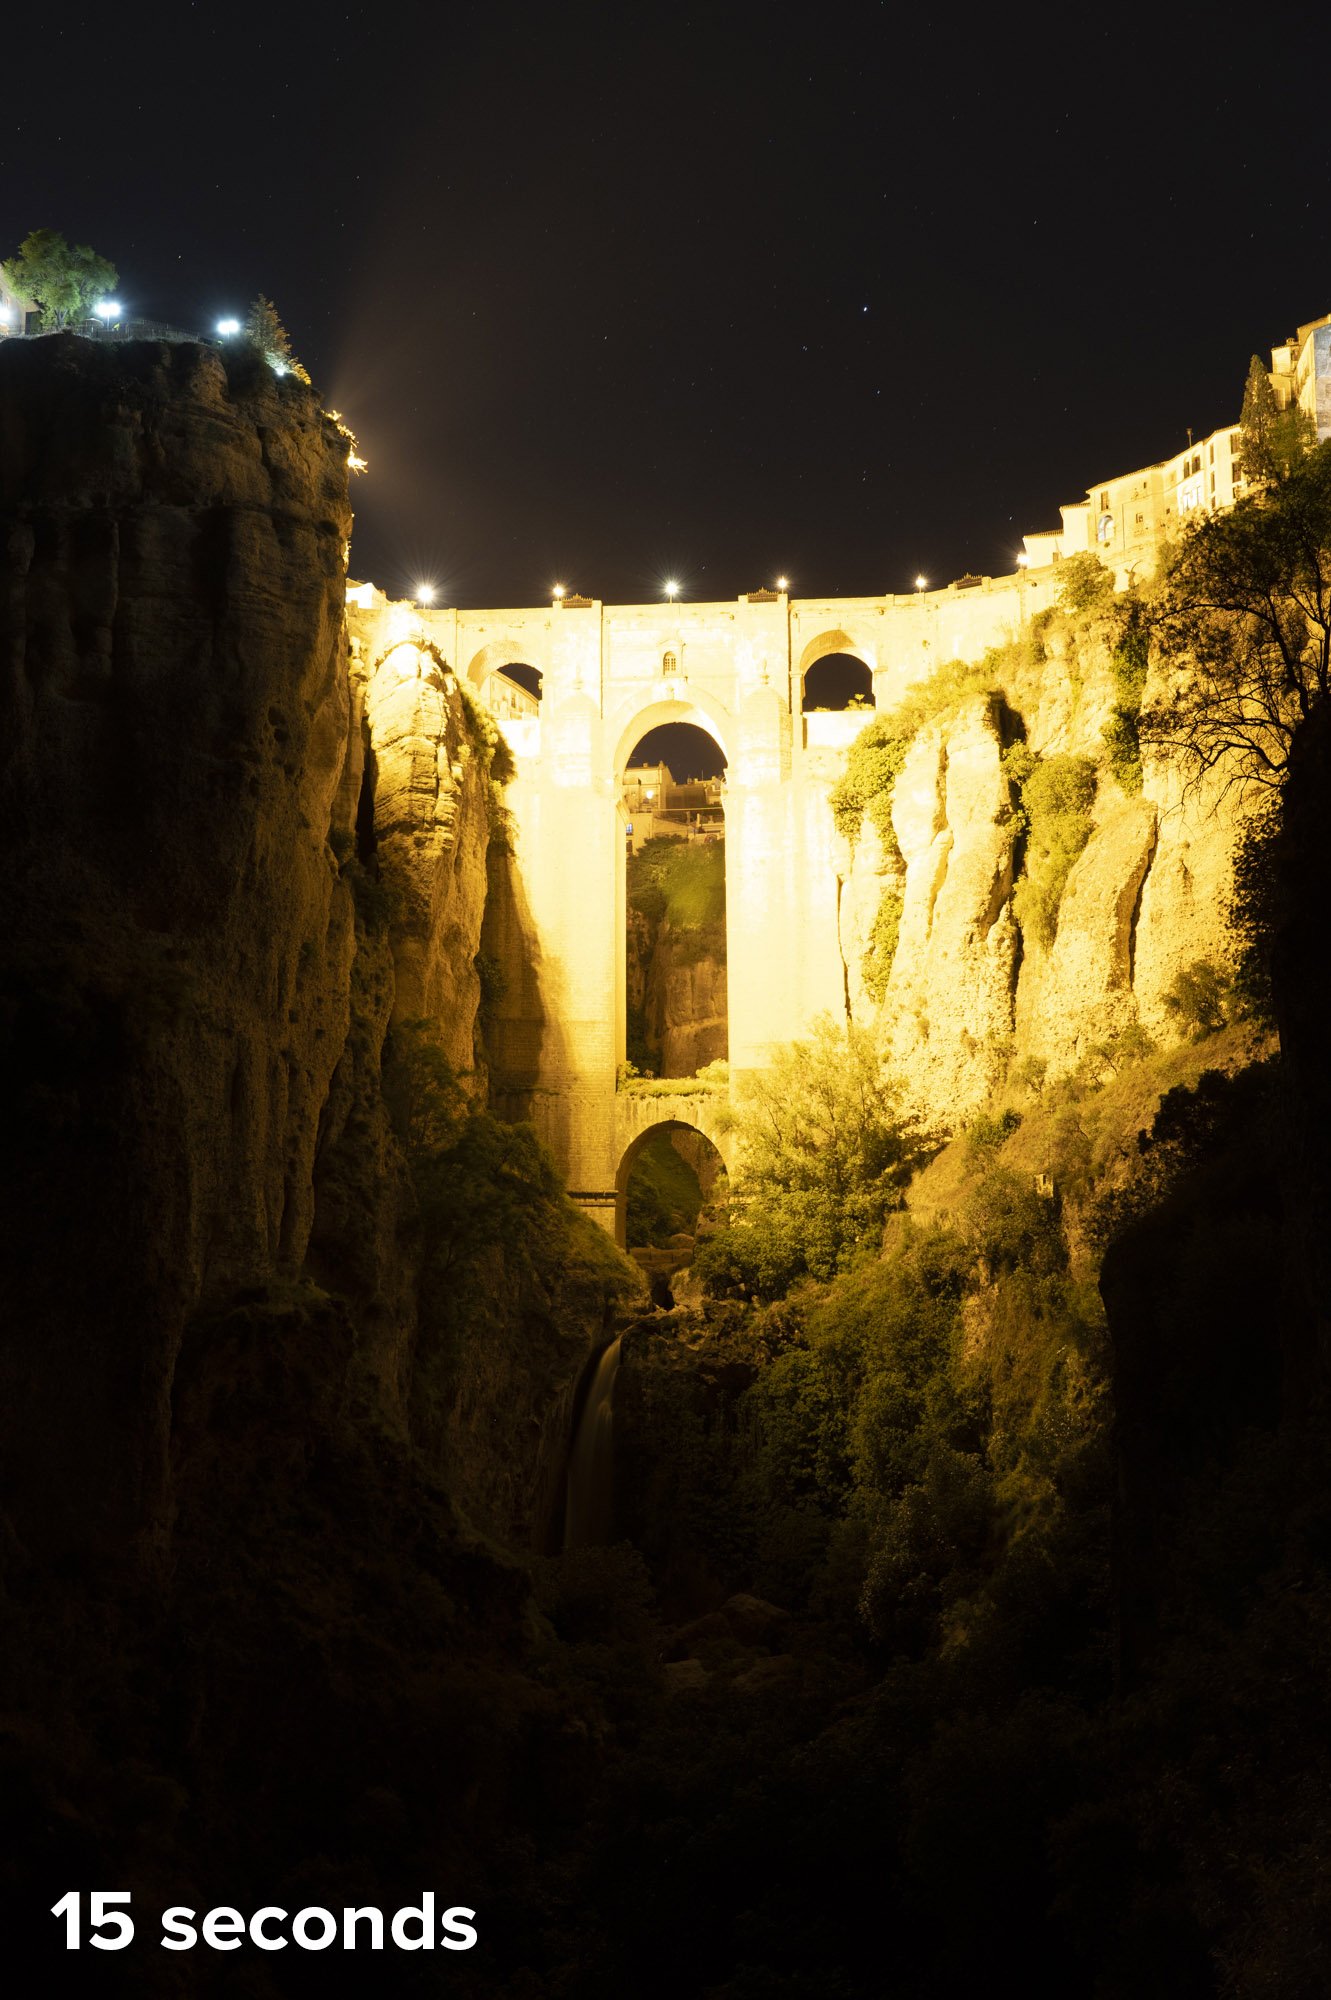
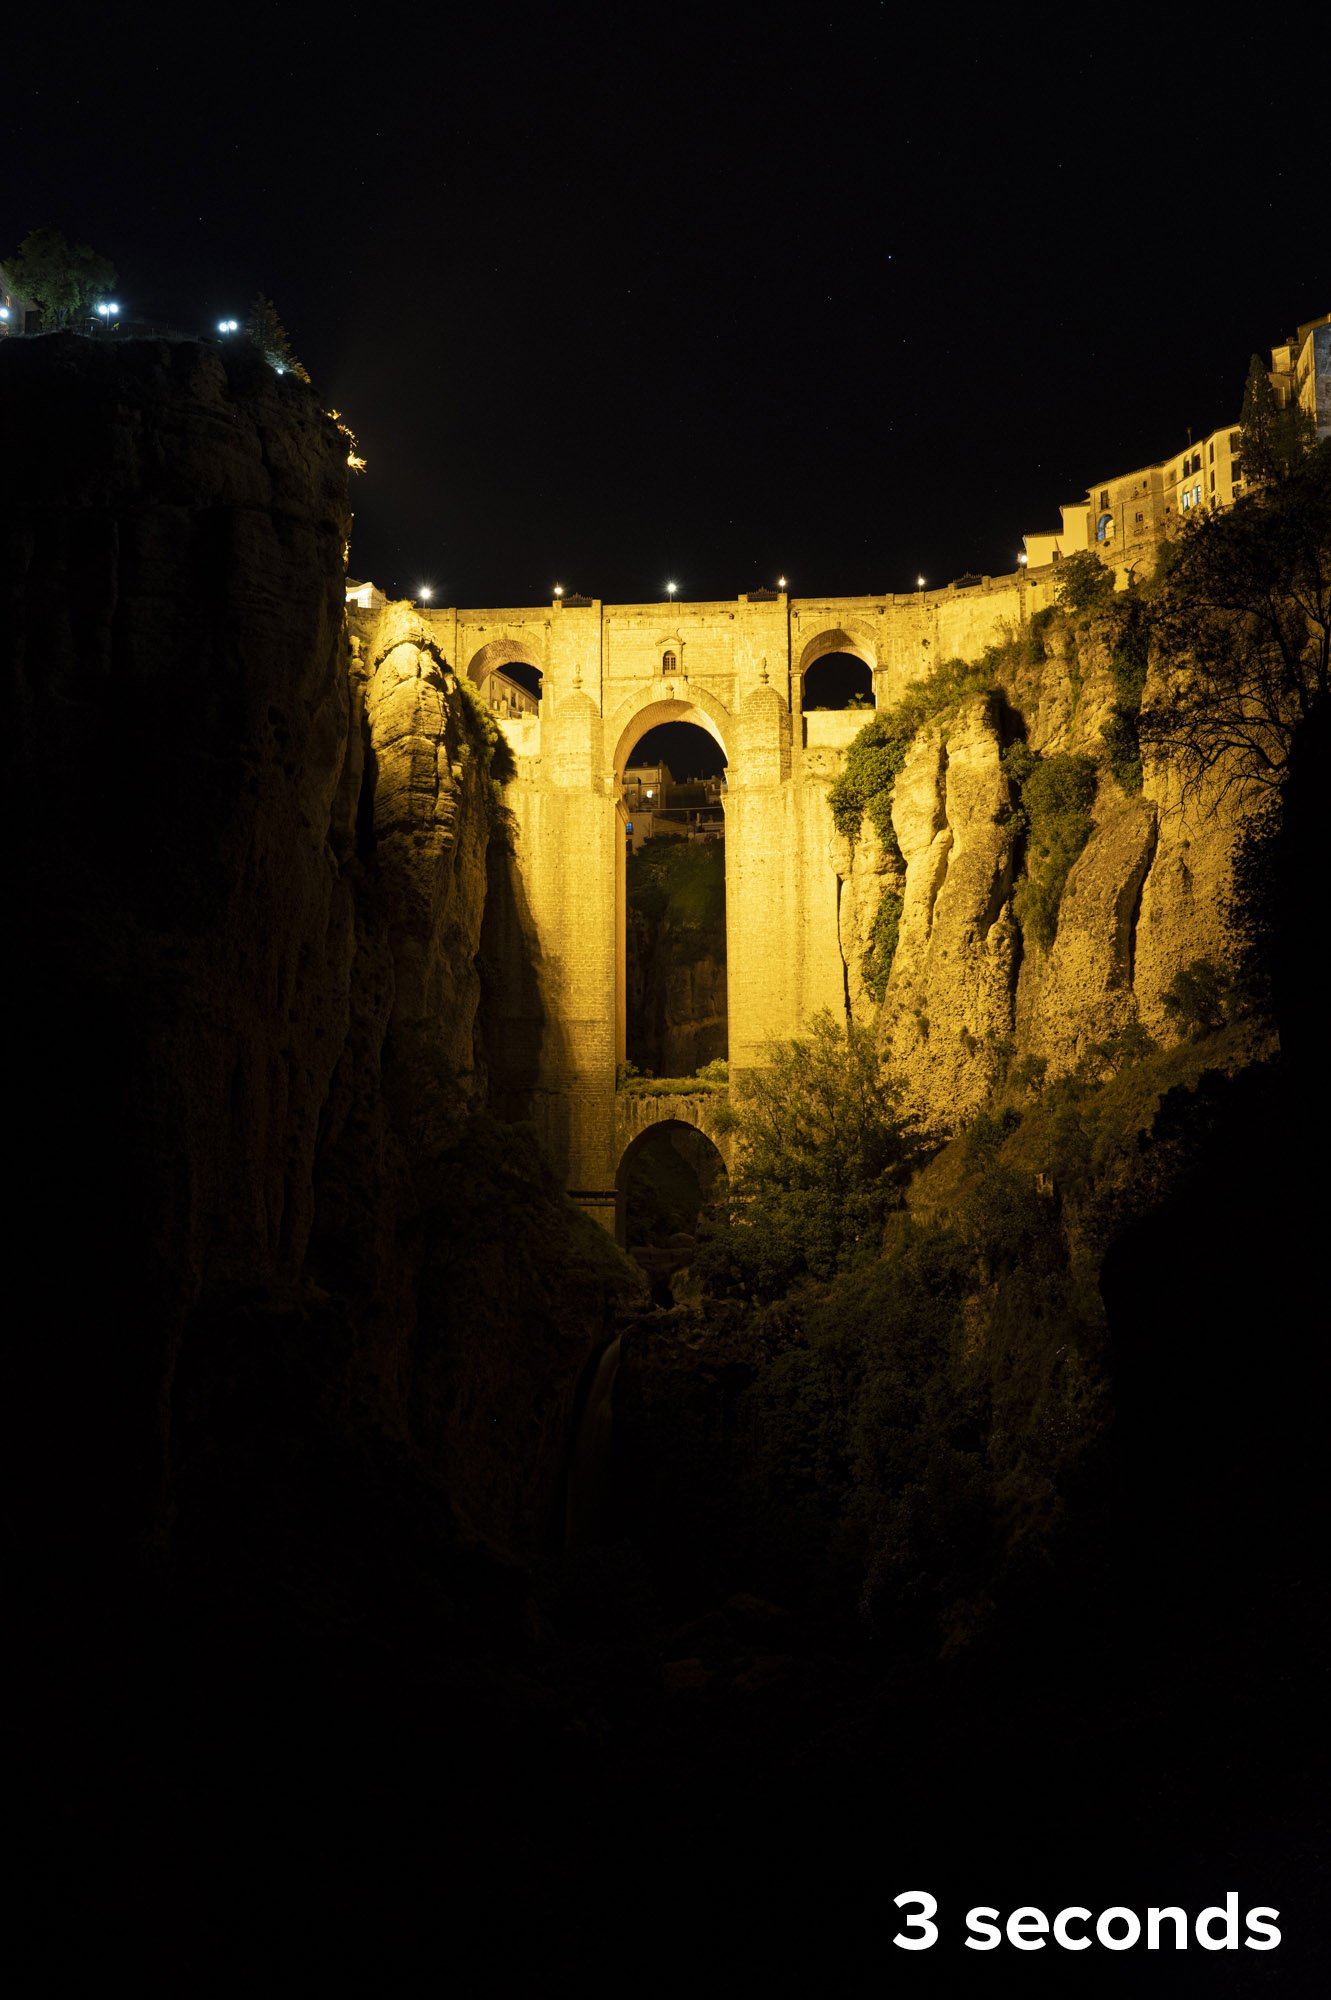
It definitely felt weird to think of star-stacking a series of 3-second exposures. I would need a lot of frames to create a lengthy trail. But I felt this exposure gave me the best balance to blend everything together to create the final photograph that I was envisioning.

I was facing east, the only angle possible for this shot, so I knew the stars would trail downward toward the left. I planned for at least 1 hour of exposure, because I knew that would yield nice long star trails. I was shooting with my Nikon Z 6II, which is a 26-megapixel camera. With my shutter speed at 3 seconds, I used the built-in intervalometer to continually take successive shots.

As busy as this location is during the day, I bumped into only three people during my shoot. It is a bit of a hike down to the lookout, and people just don’t explore at night. So I dangled my feet over the fence and thought of Ferdinand the bull and all the historic places I had visited in Ronda that day.

After half an hour my eyes were adjusted enough and I could see that the brightest star had most likely moved out of the composition. That star had started in the middle of the frame, and because I was zoomed in with a 40mm focal length it had traveled a considerable distance to yield a long star trail. So even though I really didn’t see many other stars, I felt confident I had what I needed to put it all together in post.

The Post-Production

After loading the frames into Lightroom, I made only one adjustment: I turned off the automatic lens corrections. I always advise turning this off for stacking stars, otherwise you run the risk of creating moiré in the final stacked image. I was using 460 frames, which would result in about a 30-minute total exposure for the star trails.

Even though I have a fairly new souped up MacBook Pro M1, to stack 460 30-megabyte files would have definitely caused it to choke. So I stacked the images in sets of about 100 to create a series of five star trail images. Each stack followed this process:

  1. Select the frames in Lightroom.

  2. Choose Photo > Edit In > Open as Layers in Photoshop.

  3. In the resulting Photoshop file, select all the layers by clicking on the first, scrolling down, then shift-clicking on the last.

  4. Change the blend mode to Lighten.

  5. If desired, review the individual layers to edit out plane trails, stray light, etc.

  6. If desired to save hard drive space, flatten the layers.

  7. Save and return to Lightroom.

I then brought each of the five flattened stacks into Photoshop as layers, and used the Lighten mode on them to connect all the trails (Figure 5).

Figure 5. My five sequential star-stack images combined into one long stack.

Finally, I added the twilight shot as the top layer, and I and used a variety of masks and adjustment layers to match the exposures and blend them together as one cohesive image.

In the final photograph (Figure 6), look at the foreground areas outside what’s being illuminated by the streetlights. They are very dark, and that’s why I needed the twilight shot—just to bring out a little bit of detail in the rocks, waterfall and the rest of the foreground to make the overall image more pleasing, and to complete the visual story.

Figure 6. Nikon Z 6II with a Nikon Z 24-70mm f/2.8 S lens at 40mm. Foreground: shot with a 10-stop neutral-density filter at 20 seconds, f/11, ISO 100. Sky: 460 stacked frames shot at 3 seconds, f/8, ISO 800.

All in all this photograph took me about 1.5 hours of post-production work—the same amount of time I committed to shooting the image in the field!

Wrapping Up

Ferdinand didn’t want to fight, but I didn’t mind fighting all of those obstacles to get the shot that reminded me of one of my favorite stories from boyhood.

I’m pretty happy with it. I set out to create a complex photograph of a dream location under conditions I couldn’t control. I put my stamp on it, and hopefully inspired you to seize the night no matter what the scenario!

Gabriel Biderman is a partner and workshop leader with National Parks at Night. He is a Brooklyn-based fine art and travel photographer, and author of Night Photography: From Snapshots to Great Shots (Peachpit, 2014). During the daytime hours you'll often find Gabe at one of many photo events around the world working for B&H Photo’s road marketing team. See his portfolio and workshop lineup at www.ruinism.com.

UPCOMING WORKSHOPS FROM NATIONAL PARKS AT NIGHT

New York Minutes: Our Day-to-Day as Reps of the Night at OPTIC 2022

This week, a lot of things were nice to get back to, all at once. It was nice to be back in New York City, nice to be back among a large group of like-minded people, and it was nice to be back at OPTIC.

In one way or another, the National Parks at Night crew has been involved in every OPTIC Imaging Conference. I was a speaker at the inaugural event in 2015, and that’s where and when Matt Hill and Gabriel Biderman talked to me about joining this new little company they wanted to put together. (More on that later.) The next year all five of us (the aforementioned plus Tim Cooper and Lance Keimig) presented together for the first time ever, on OPTIC’s Main Stage. And every year since one or more of us has served as speakers, portfolio reviewers, photo-walk leaders, etc.

We couldn’t be more grateful. B&H Photo, which produces the conference along with Lindblad Expeditions, has been one of our most loyal and ardent supporters since even before Day 1. We strive to meet their hospitality with a dedication to bring our very best to educating attendees about night photography and everything that goes into it.

This year, OPTIC was held as an in-person event for the first time since 2019. A recap of how we engaged:

The Conference

OPTIC began with 2 days of conferencing at The New Yorker hotel on Manhattan’s west side, just a block from the B&H Superstore. More than 40 presenters were on the Main and Second stages (for the live audienc, plus livestreamed to offsite attendees), including Night Photo Summit speakers Jess Santos, Susan Magnano and Erik Kuna.

On the second morning, Matt, Gabe and I delivered a 1-hour presentation titled “Nine Steps to Becoming a Better Night Photographer.” We covered ideas such as not rushing through a setup, learning about astronomy and investing in quality gear that’s capable of night capture. (You can see our presentation at the very beginning of the Day 2 recording.)

While all those presentations were happening, attendees were also busy visiting exhibitors on the show floor, including us. We hosted a table right in the corner of the main room, where we had the pleasure of meeting dozens of potential new workshoppers as well as reconnecting with many New York-area workshop alums.

We also enjoyed reconnecting with our brand partners Manfrotto and Tether Tools. Our friends from Luxli were there too, as well as those from Nikon, Sony and more.

The Photo Cruise

This year’s NYC Harbor Sunset Cruise was once again hosted by Canon. The boat pushed up the Hudson River for a bit, then headed south into the Upper Bay where the group enjoyed and photographed a stunning sunset behind the Statue of Liberty. We got to chat with scores of attendees and sponsors, enjoying a beautiful evening out with friends old and new.

The cruise was also a special moment for Matt, Gabe and I, as we realized it was the first time the three of us had been on the deck of that boat together since 2015—when they invited me to help launch NPAN with them. So we had a nice little seventh-anniversary moment, complete with hugs and a photo (see above).

The Photo Walks

The conference always includes a photo walk, and this year saw us back at one of our favorite NYC photo haunts, Brooklyn Bridge Park. Our good friend David Brommer and a few of the other OPTIC speakers led attendees during a daytime shoot, and then Matt, Gabe and I took over for sunset and twilight.

About 40 photographers first joined us for ice cream at Ample Hills Creamery (priorities!), and then we wandered the waterfront of the East River, photographing passing boats and the Manhattan skyline. We worked our way south to our final location, the famous spot for photographing old pier pilings in front of the East River with the skyscrapers of the Financial District in the background. (See the video above.)

The twilight shoot was scheduled to end at 9 p.m., but if you know us then you know that didn’t happen—we stayed until well after 10:00, helping folks photograph the scene with the millions of twinkling lights of the city at night.

Wrapping Up

All good things must end, just as OPTIC 2022 did on Wednesday. If you had to miss the conference, individual videos of the presentations (including ours) will be live on the B&H Photo YouTube channel within the next couple of weeks.

If you were there, we’d love to see your photos. Post them in the comments or on our Facebook page, or tag us on Instagram (@nationalparksatnight).

OPTIC is one of the most dynamic conferences any of us has ever been a part of, and we absolutely recommend you attend in the future. Be sure to watch the B&H social channels, as well as ours, for news about future dates. (Including—ready for a teaser?—a big OPTIC announcement for later this year. Stay tuned!)

Chris Nicholson is a partner and workshop leader with National Parks at Night, and author of Photographing National Parks (Sidelight Books, 2015). Learn more about national parks as photography destinations, subscribe to Chris' free e-newsletter, and more at www.PhotographingNationalParks.com.

UPCOMING WORKSHOPS FROM NATIONAL PARKS AT NIGHT

The Many Ways that PhotoPills Helps a Night Photographer

It’s been not even a week since Gabriel Biderman and I returned from teaching at PhotoPills Camp on the beautiful Mediterranean island of Menorca, and I still think about the adventures and the camaraderie with new friends and colleagues.

I’ve also been thinking a lot about how much knowledge PhotoPills provides to night photographers. The app has become so ubiquitous in my workflow that I’d come to take it a little for granted. Spending a week with people who are learning to master it—and seeing their wonderment at the creative options the app enables—made me consciously appreciate again all that this tool can do.

It also reminded me of a blog post idea that’s been sitting in a corner of my mind for years: “The Many Ways that PhotoPills Helps a Night Photographer.” That’s what we’re covering below.

Know When Darkness Will Fall

Anticipating darkness can be relatively important for night photography. PhotoPills tells you when the sun will set, when the different phases of twilight will begin and end, and when the sky will finally be as dark as it can be. Then it tells you all that info in reverse, all the way to the next sunrise. And it does this for any day of any month of any year, for wherever on Earth you want to shoot.

Want to shoot in Bryce Canyon National Park tonight? PhotoPills tells you all you need to know about sunset, moonrise, astronomical twilight, Milky Way visibility times and more.

Find the Milky Way

PhotoPills’ most famous feature is probably its ability to help you visualize where in any given scene the Milky Way will appear, whether tonight or any night in the future, whether you’re on location or scouting from half a globe away.

You can use the Planner to scout ahead of time, or use the Augmented Reality (AR) mode to overlay the Milky Way right on the scene that’s in front of you. Find where and when it will be for the photo you want to create, then just be there.

In a daytime scout in Death Valley National Park, Night AR showed exactly where the Milky Way would be at 10:04 that same night. Or, more importantly, it showed what time the Milky Way would be exactly where I wanted it for this composition. Nikon D5 with an Irix 15mm f/2.4 lens. 20 seconds, f/2.8, ISO 6400.

Find the Moon

PhotoPills helps you do the same with the moon. I love photographing in moonlight, as well as including the moon in a composition when it’s relatively near the horizon. The Planner, the Moon and the Night AR pills all help with that.

The moon can move around in the sky quite a bit from night to night, and might not appear in the same place at the same time for half a decade. That makes guesswork just a little more than hard, but PhotoPills makes guesswork unnecessary.

In Acadia National Park, Night AR showed precisely where the moon would rise over the Atlantic coast. Nikon D3s with a Nikon 24-70mm f/2.8 lens, light painted with a gelled Coast HP7R flashlight. 4 seconds, f/5.6, ISO 800.

Find an Eclipse

Every now and then the moon creeps into Earth’s shadow, and every now and then the moon blocks sunlight from reaching us. You’re probably more likely to win the lottery than to catch an eclipse by happenstance, so if you want to photograph one, you need inside information. PhotoPills gives it to you.

Want to photograph an eclipse sometime in the next few decades? PhotoPills holds eclipse data, for both the solar and lunar varieties, through the next 28 years. So there’s no excuse to miss the annular solar eclipse on May 31, 2049, nor the total lunar eclipse on October 29, 2050.

The eclipse information in the Planner helped me anticipate this total lunar eclipse composition over Price Lake on the Blue Ridge Parkway. Nikon D5 with a Nikon 24-70mm f/2.8 lens. Three blended frames: 15 seconds (sky), 30 seconds (foreground); 1/4 second (moon), all at f/2.8, ISO 6400.

Find a Pole Star

If you’ve been doing night photography for more than a minute, then you probably know how to use the Big Dipper to find Polaris, or how to use the Southern Cross to find Sigma Octantis, so that you can photograph star circles. (If not, join us for a workshop and we’ll point you in the right direction.)

However, if you’re scouting in daylight, none of those stars will help you find anything, because you can’t see them. So turn on Night AR, the PhotoPills feature that plops a sky map over anything your device’s camera is aimed at. Included in that overlay is the point in the celestial sphere that all the surrounding stars appear to revolve around, allowing you to strategize star-circle composition hours before the sky is dark enough to shoot them.

In Menorca (during PhotoPills Camp!), Night AR showed that the North Star would center right above this stone wall that I’d had my eye on. Nikon D5 with a Nikon 14-24mm f/2.8 lens. Sky: 8 stacked frames shot at 8 minutes, f/8, ISO 1600. Blue-hour foreground: 30 seconds, f/8, ISO 400.

Envision Star Trails

Not all star trails are circles—some are curved or diagonal lines that stretch across the skies of our non-pole-star compositions. If you’re experienced and have a good optical imagination, you may be able to visualize which way those stars will appear to be moving based on which direction your camera is facing. Or you can look at PhotoPills.

In Night AR, all those lines that appear over your scene are the celestial arcs that stars will be moving along during long exposures. You can see exactly which way those stars will trail, and discern whether that might help or hinder your composition.

This view of Moro Rock in Sequoia National Park faces southeast, and the arcs of the lines in Night AR mimicked the shape that I could expect from star trails in the frame. Nikon D5 with a Nikon 14-24mm f/2.8 lens. Sky: 18 stacked frames shot at 5 minutes, f/5.6, ISO 1600. Blue-hour foreground: 10 seconds, f/5.6, ISO 400.

Calculate a Long Exposure

When you’re setting up a star-trail photo, your exposure (or your cumulative exposure, if you’re stacking) will be relatively long—perhaps only five minutes, or perhaps a few hours. But testing a 2-hour exposure to see if it’s correct takes way too long, which is why we recommend running a high ISO test.

Once you know your high ISO exposure, how do you convert it to an equivalent long exposure? You can use the Six-Stop Rule as a shortcut for simple conversions, or you can use PhotoPills’ Exposure calculator for more complex ones. You have a good test shot at 10 seconds, f/2.8, ISO 25,600? In a fraction of a second, PhotoPills will tell you that your 45-minute exposure should be at f/8 and ISO 400.

In Colorado’s Uncompahgre National Forest, I was able to use the Exposure pill to quickly calculate a 15-minute exposure with better depth of field based on a test exposure shot wide open at ISO 6400. Nikon D5 with a Nikon 24-70mm f/2.8 lens. 15 minutes, f/5.6, ISO 250.

Calculate a Shorter Exposure

When you don’t want your stars to trail—even a smidge—you need to know the maximum shutter speed you can use before that happens. The 400 Rule is a useful shortcut to that information, but it’s not entirely accurate and doesn’t account for every variable that can affect the result.

What does? The enormously complex algorithm known as the NPF Rule. Use that, and your stars will stay as tiny little dots in the dark sky, just like you want them to. No one is doing NPF calculations in their head—you need a calculator, and PhotoPills has one in its Spot Stars pill.

For this Milky Way photo in Joshua Tree National Park, I used the Spot Stars pill to calculate an NPF Rule shutter speed that would render the stars as supersharp pinpoints. Nikon D5 with a Nikon 14-24mm f/2.8 lens. 10 seconds, f/2.8, ISO 12,800.

Determine Hyperfocal Distance

Of all the ways to focus in the dark, using hyperfocus is the hardest to master and the most surefire to work in every situation. Because of the latter, learning the technique is worth the investment.

The calculations for determining a correct hyperfocal distance are too complex to tackle in the field with pencil and paper, so a microchip is necessary. PhotoPills will do all that math for you and report the data in a table or in a streamlined chart, depending on which format makes more sense to you.

Even with that assistance, hyperfocus is a complex concept that is also incredibly abstract. PhotoPills makes it easier to understand and to apply by making the information concrete: Using AR, it can overlay the hyperfocal distance, as well as the near and far focal planes, onto the scene you’re standing in front of. You still need to measure in the real world to be sure of accurate results, but seeing that display goes a long, long way to understanding how this technique will help you nail focus and maximize depth of field.

In Big Bend National Park, PhotoPills Augmented Reality gave me a preview of how I could use hyperfocus to get the foreground brush and the background stars all sharp, even at f/4. Nikon D3s with a Nikon 14-24mm f/2.8 lens, light painted with a Coast HP7R flashlight. 92 stacked frames shot at 25 seconds, f/4, ISO 5000.

Figure Out Pano Panel Widths

If you photograph Milky Way panoramas, or if you’ve investigated how to, then you’re aware that the frames need to overlap by about one-third to one-half.

When actually shooting, many photographers guess that third or half, or they eyeball something in the scene to approximate how far to pivot the camera from one frame to the next. But some photographers like to be more precise and overlap by an exact increment, using degree measurements etched into their tripod-head bases.

In order to do that, you need to know how many degrees wide your frame is, which is based on the size of the camera sensor and the focal length of the lens. This requires referencing manufacturer data, and—once again—running calculations.

The PhotoPills FoV (field of view) feature can do that all for you. Just enter your camera and lens models, and the app will pull the pertinent numbers out of its database and tell you how many degrees wide your frame is. Divide by 2 or 3, and you know exactly how many degrees to rotate your camera between pano panels.

For this Milky Way pano at California’s Mono Lake, I used PhotoPills to determine that the ideal rotation for my camera between frames would be about 35 degrees (75 divided by 2, rounded). Nikon D5 with a Nikon 14-24mm f/2.8 lens. Sky: 6 stitched frames shot at 15 seconds, f/2.8, ISO 12,800. Foreground: 6 stitched frames shot at 30 seconds, f/2.8, ISO 12,800.

Plan for a Meteor Shower

To photograph a meteor shower successfully, you need a lot of info to help plan when to be outside: dates of the shower, the date and time of peak activity, the moon phase, when the moon rises and sets, twilight times, etc. It’s also helpful to know the shower’s radiant—that is, the point in the sky where the meteors appear to originate.

I’m sure you’ve seen the pattern by now, but I’ll write this anyway: PhotoPills has all that info. You can view a year-by-year chart of all the Class I, II, III and IV meteor showers for the rest of this century and beyond. The chart and the more detailed info pages that follow include all the info mentioned above—plus more, including easy-to-read bar graphs depicting how good each shower will be for photography.

As for the Planner and that stellar AR feature I keep mentioning, they also work with meteor showers. View all the above info on the map from home, or stand in the place you want to shoot, and you can see where the radiant will be at any time.

This year the Eta Aquariids and Gemenids were predicted to be the best for photography. We can see this quickly by viewing the “energy bar” to the left of the shower name.

Wrapping Up

So there you go, a long list of tasks that PhotoPills can help you with when photographing at night. The app does more too, including a whole host of cool things for daytime photographers. Moreover, it does most of these things without needing an active cell or Wi-Fi connection.

By the way, we teach all of this—almost the whole app, in fact—on our PhotoPills Bootcamp workshops. Our next of those will be at Bryce Canyon National Park at the end of this month, and a couple of spots recently opened. If you want to learn all the ways that PhotoPills can help you become a better photographer, sign up now!

Also keep your eye on this blog. All of the National Parks at Night instructors use PhotoPills, and it’s inevitable that we’ll write about the app in this space from time to time. We will certainly cover some of the above features in more detail in the future.

How have you used PhotoPills to create better night photography? We’d love to see those images. Feel free to post them in comments section or on our Facebook page, or tag us (@nationalparksatnight) on Instagram. Be sure to tell the story of how you used the app to scout the shot!

Chris Nicholson is a partner and workshop leader with National Parks at Night, and author of Photographing National Parks (Sidelight Books, 2015). Learn more about national parks as photography destinations, subscribe to Chris' free e-newsletter, and more at www.PhotographingNationalParks.com.

UPCOMING WORKSHOPS FROM NATIONAL PARKS AT NIGHT