Controlling Highlights in Urban and Suburban Night Photography

I love shooting suburban night scenes. Which is a good thing, because I live in an awesome place for it: the historic, charming, picture-perfect village of Catskill, New York.

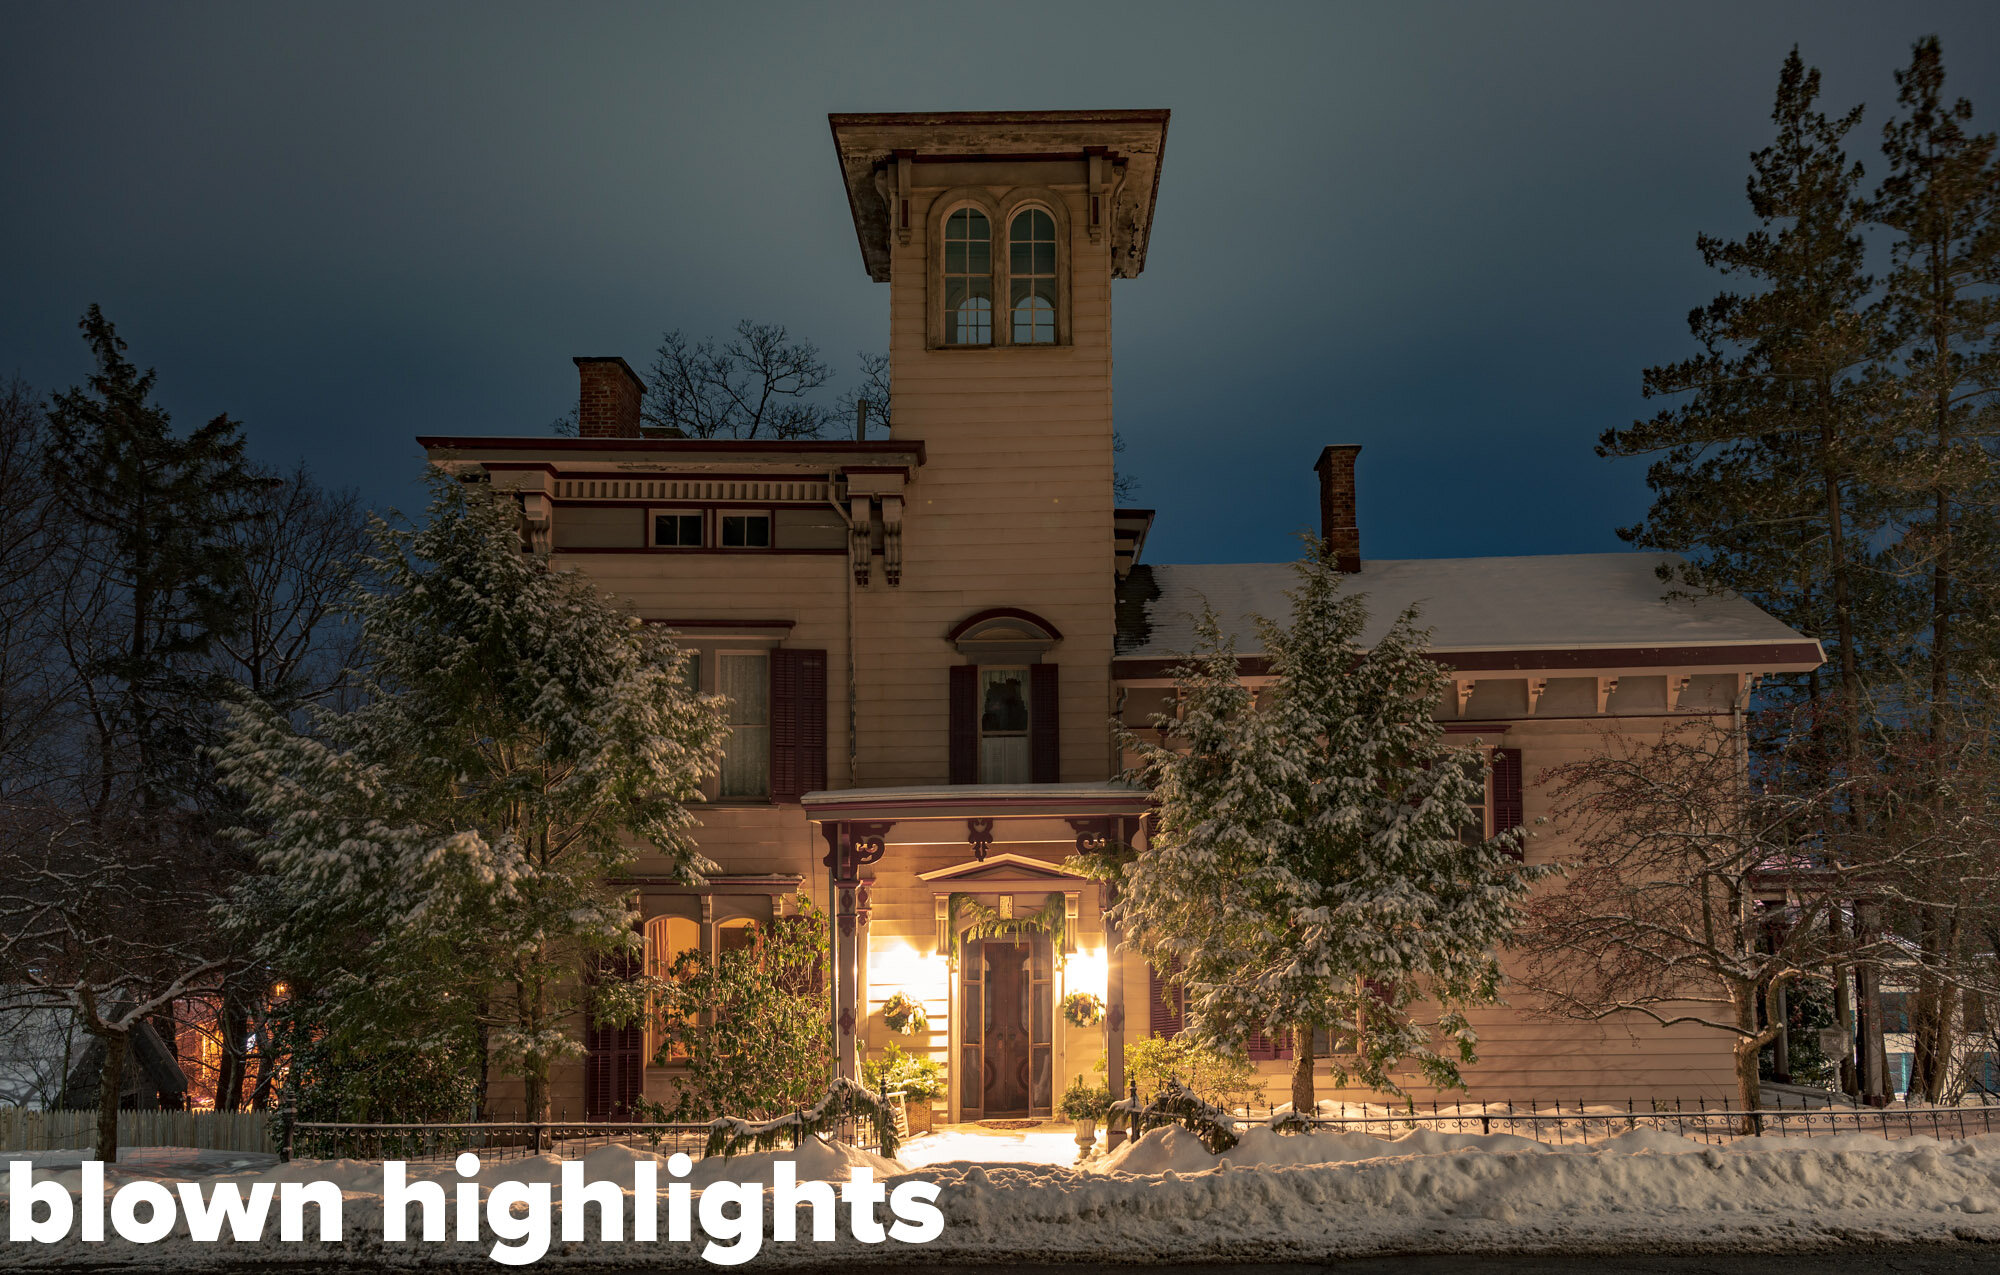
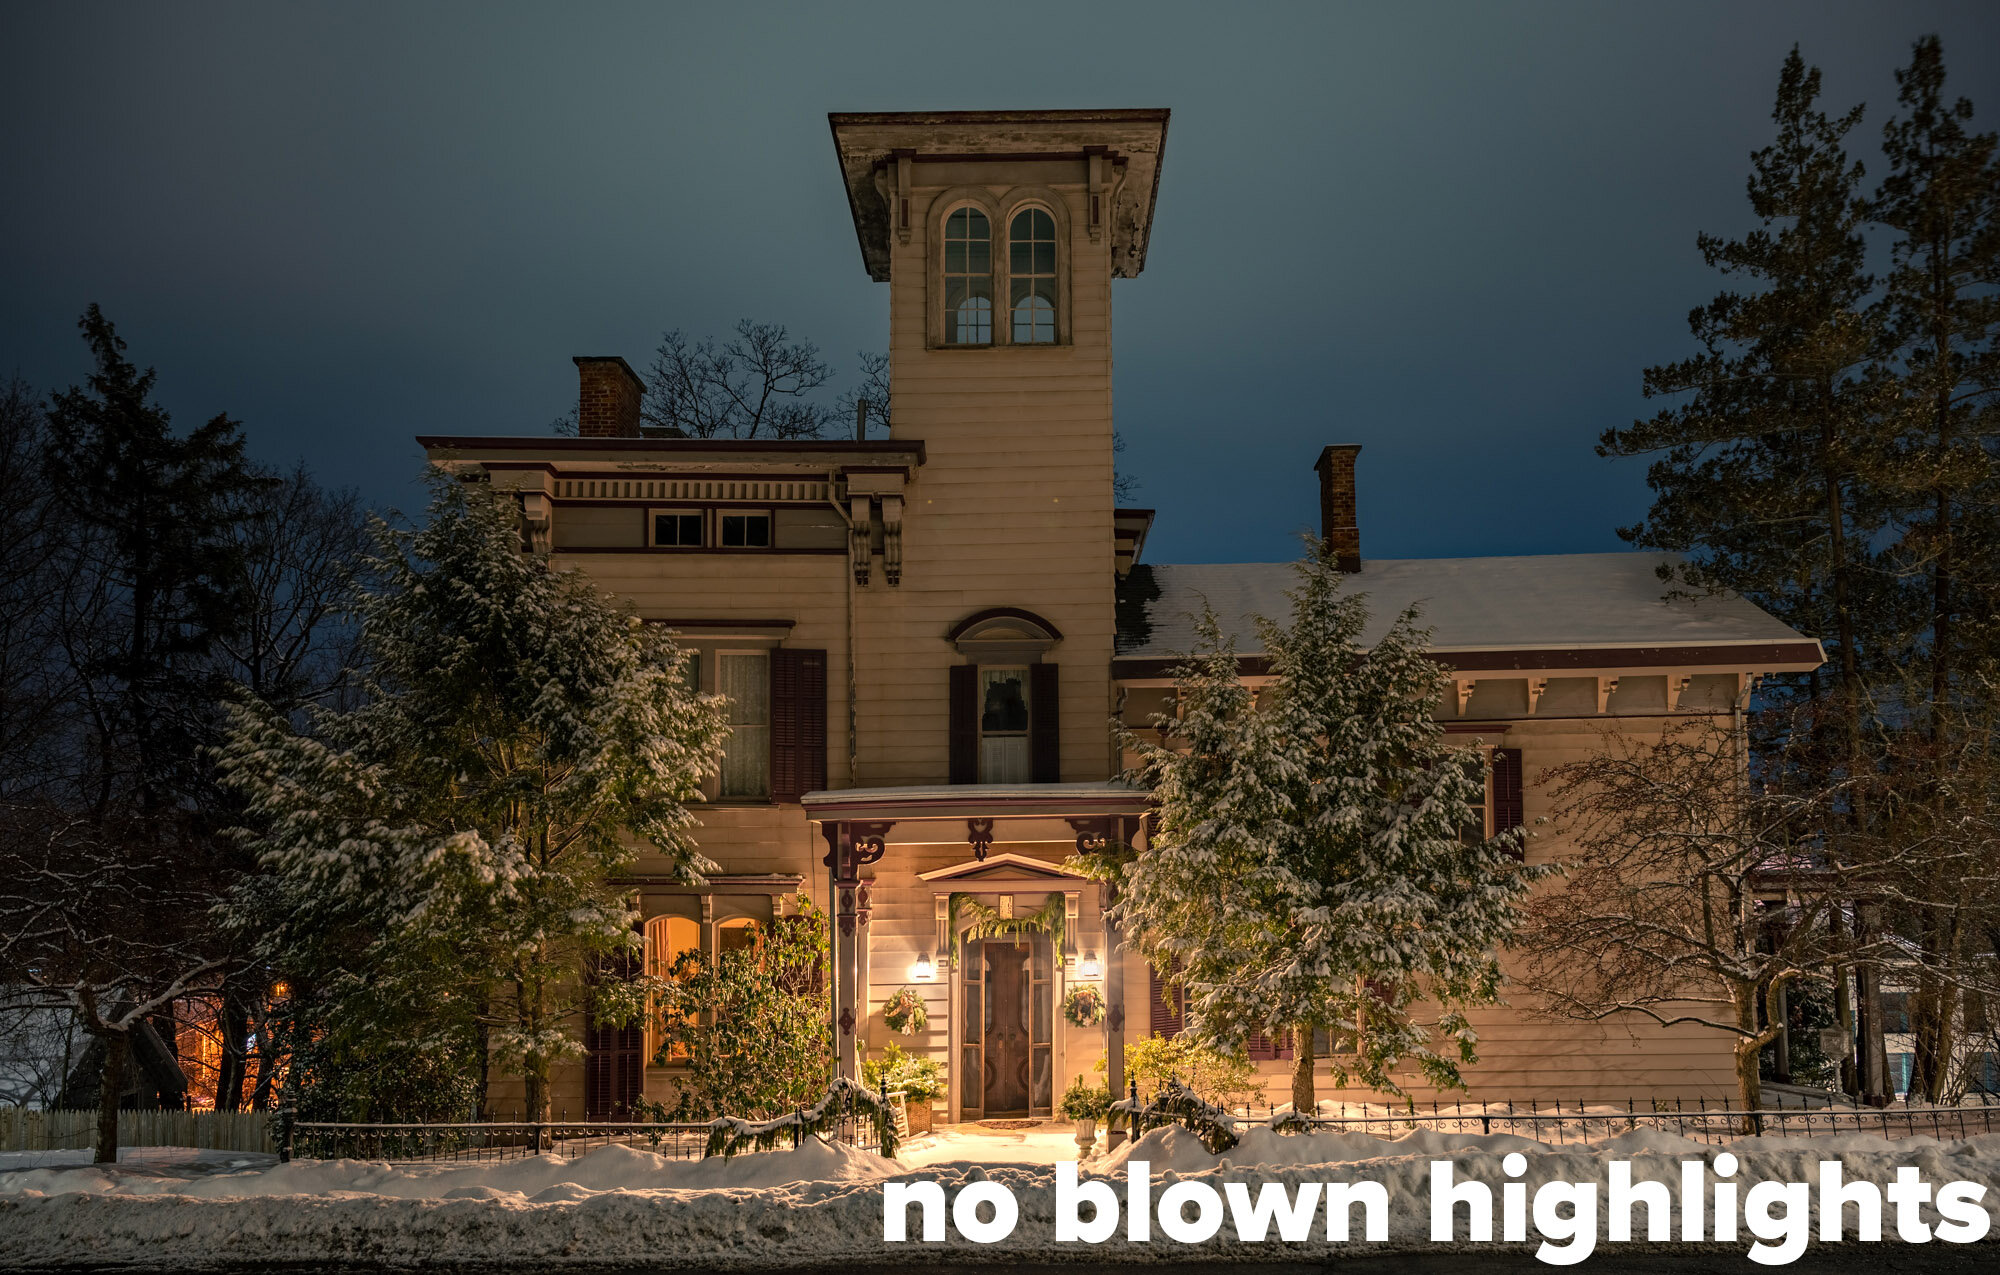
But working a suburban environment (and especially an urban environment) at night comes with a major challenge: artificial lights. Wherever we find artificial lights at night, we also find blown-out highlights in photos.

While working on my #CatskillNights project, it’s common for me to see a cool home that looks great to the naked eye but that doesn’t look so great in a single exposure. The dynamic range between the brightest brights and the shadow details are just too far apart.

Castle in the Snow, Catskill, New York. Nikon Z 6II with a Nikon 24-70mm f/2.8 S lens at 24mm. Four merged frames shot at 30, 10, 3 and 0.6 seconds; f/5.6; ISO 100.

How do we control this? By shooting multiple images at different exposures and combining them during post-processing into an HDR image.

But you must shoot it right on scene to have a chance of processing it right in post. So let’s begin with:

Getting it Right in Camera

First up, try to strategically hide visible light sources behind columns or trees. That will save you lots of highlight headaches. Why? Because it’s not the light that’s causing the problem—it’s the light source. It’s the bulb, the lamp, the streetlight itself. If you can hide those things behind objects in the composition, they go from being a problem to being magic.

If you can’t do that, no worries. Read on.

For my first frame, I shoot for an ideal overall exposure that has clear shadow detail. The highlights will blow out. That’s fine. For now, essentially you just want your camera’s histogram not to collide with the left side (Figure 1). Don’t worry about the right.

Figure 1.

For my second frame, I stop down 1 to 2 stops to rein in some highlight data, and then I inspect the image. And the histogram. Then I shoot more frames. I keep reducing the shutter speed by 1 to 2 stops until the highlights retain color and tonality.

Nikon Z 6II with a Nikon 24-70mm f/2.8 S lens at 24mm. 30 seconds, f/5.6, ISO 100.

10 seconds, f/5.6, ISO 100.

3 seconds, f/5.6, ISO 100.

.6 seconds, f/5.6, ISO 100.

To be extra sure, I zoom to 100 percent to ensure there is detail. If I don’t see highlight detail, I stop down further and make another exposure.

Below is an example of how a single shot can have terrible highlight transitions, versus a processed HDR composite. Look at the first image around the lantern and note the missing details on the wall, then look at the second image and note the complete details on the wall. It’s subtle when it’s right, but blatantly obvious when it’s wrong.

That’s it, really.

Make a great overall exposure and keep reducing your shutter speed until you get beautiful light sources with no highlights blowing out.

Also, you may notice that I shot every image in this post at ISO 100—because that’s the native ISO of the Z 6II. Do the same. Find your camera’s native ISO and shoot there. Cameras produce images with the widest possible dynamic range at native ISO, which is essential for this type of work.

You might consider getting fancy with your skies in a final, longer exposure (knowing you can mask the bottom half out in post—see Tim’s blog post on this in the near future). You could also create star trails, or points, or make really interesting cloud streaks. The sky is the limit (hee-hee).

Below are three more straight-out-of-camera image sets that show how I bracketed exposures to set myself up for a good night HDR final image. Each starts with the good overall exposure and ends with the frame that has decent highlight detail.

Processing the HDR Raw Materials

Thanks to constant improvements in software, making natural-looking HDR images is easier than ever. Many software vendors offer HDR options. I will be limiting this demo to how I use Adobe Lightroom Classic.

(Note: I find that using Adobe Photoshop for HDR is less intuitive and flexible—for me, anyway. I prefer the DNG workflow of Lightroom, and having only rasterized images coming back from Photoshop is too limiting.)

In the Lightroom grid mode, I select all the images in the sequence, right-click (Control-click on a Mac) and choose Photo Merge > HDR (Figure 2).

Figure 2.

In the HDR dialog (Figure 3):

  1. I toggle Auto Settings on and off to see which gets me closer to my goal. More often than not, Auto settings “on” is better for me.

  2. As for Auto Align, I always leave it on—no harm in doing so.

  3. For most nights, setting Deghost to “none” works fine for me. Unless there is a stiff wind or other movement in critical areas.

Figure 3.

Once I click “Merge,” a task is created inside Lightroom, the job will be processed, and the merged image will appear in the catalog alongside the other images (Figure 4).

Figure 4.

Now for the magic of editing.

For urban/suburban images, I first neutralize the color temperature and then warm it up a tad. (Tap the W key to activate the White Balance Selector, click on something white, then use the Temp and/or Tint sliders to warm to taste.)

Figure 5.

That gives me a good starting point for marching through the rest of my processing process:

  1. I go straight to Profile and change it to “Adobe Landscape.”

  2. I start sliding the Dehaze slider to the right. Pushing Dehaze also adds saturation, so …

  3. I usually pull back the Saturation slider a tad.

  4. I try lightly lowering Contrast.

  5. I usually drop Highlights down and push Shadows up.

  6. I make sure the black point is at the dead left of the histogram to get rid of any muddy shadows.

After doing those top-level edits, I use Transform (Figure 6) to straighten any vertical keystone effects from having used a wide angle lens tipped upward.

Figure 6.

Finally I do highlight control. Using a local brush, I make sure the visible light sources are believably detailed. I may lower the exposure, highlights or whites a little bit to taste. Or not at all. I am just looking for some details and hue in the light sources (Figure 7).

Figure 7.

I aim to shoot every light bulb to render it perfectly, yet to also make it look like a light source participating in the illumination of the scene. It’s a delicate balance to pull off naturally. Too much detail equals too much fake.

Less Has Been More

I have noticed that I’ve had a lot of success with HDR composites that are made from only two images. One that’s a solid general exposure and one that’s for extreme highlight control.

Why is that? I’m convinced the dynamic range of my Nikon Z 6II is so expansive that I have enough information to make a decent exposure of everything except for the light-source highlights. So I’ve found myself shooting fewer frames for sequences—and if I shoot more frames, they’re strictly for highlight control and not for revealing shadow details.

Here are some examples, each showing the good overall exposure followed by the highlight-control exposure followed by the final HDR:

I tested that theory by processing only one of the best single exposures to the best of my ability, then processing an HDR, and comparing. Noticing the areas of the image that actually needed to be improved really locked in for me how I need to shoot to make a “meh” urban photo into a banger.

Do the same. Test your particular camera to learn how you need to expose to make this all happen. Note that the older your camera is, the less dynamic range it probably has, so the more frames you’ll probably have to shoot to get good detail throughout the exposure.

Summary

It’s pretty simple to make gorgeous HDR images in urban and suburban areas:

  1. Get a good overall exposure, ignoring blown-out highlights.

  2. Get the highlights right in camera—shoot as many images as you need to get detail in them.

  3. Combine the images in Lightroom.

  4. Cook to taste (tastefully).

Have fun out there and be safe!

Matt Hill is a partner and workshop leader with National Parks at Night. See more about his photography, art, workshops and writing at MattHillArt.com. Follow Matt on Twitter Instagram Facebook.

The Conversation Continues …

See Matt and Lance talk more about “Controlling Highlights in Urban and Suburban Night Photography” in our #BlogChat YouTube program:

UPCOMING WORKSHOPS FROM NATIONAL PARKS AT NIGHT

Three Days of Night: A Wrap-Up of the Very First Night Photo Summit

Note: Missed the Night Photo Summit but want to catch up? For access to videos of all the presentations until February 2022, buy a Replays ticket!


Some honesty: In the weeks leading up to our Night Photo Summit, we sounded confident in our marketing. But behind the scenes, we had no idea how this would go.

We knew the speakers would be amazing—we know almost all of them personally, know they’re good people, know they always bring their best (which is among the very best in the business).

We knew that night photography is exciting to learn about, exciting to do—and that it’s hard to go outside and do it right now, at least the way we used to at this time last year.

We knew that even in the best of years, mid-winter is a time when people are looking for something new to do inside, and a weekend of e-palling around with other night photographers could more than satisfy that need.

However, that’s about all we knew. All five of us at National Parks have spoken at conferences, summits, exhibitions, trade shows, photo festivals, etc., and two of us have extensive experience on the industry side of these events. But we had never built our own event of this size, on our own, from bottom to top. Doing so felt like we were standing at one edge of a canyon wondering how to get to the other. While in some ways we were crossing a familiar bridge, in many other ways we were leaping with hesitant faith.

Now that the Summit is over, we can look back and see the results. It was an experience. It was hard work, but enjoyable work. And in the end? We feel it went great.

When we say we’re happy, that can mean different things, and it does mean different things. We were happy with a lot: the quality of the programs, the vitality of the speakers, the enthusiasm of the attendees, the participation of the sponsors. But the biggest metric of success? The number of smiles at the end.

The group shot from the “Under the Stars” closing session party.

The People

We’re happy to report that about 350 people, representing six continents, attended the first Night Photo Summit—which, as far as we know, was the first online night photography conference ever. To see 350 people there? At the very first event of its kind? Wow.

Each of you made the effort worthwhile, because each of you brought a unique energy, each of you contributed a bit of what made this collective experience special. Many have reached out in the past week to express thanks, but the gratitude genuinely goes both ways.

We couldn’t have done this without you. We started building this Summit, but you finished it. All 350 of you helped, all 350 of you brought your passion and curiosity, all 350 of you coalesced to make this conference what it really was: a community that grew closer over an extraordinary long weekend, together sharing the joy of something we all love.

The Speakers

Again: Wow.

Thirty speakers joined us to help lead this adventure, and all of them delivered some of the best educational and inspirational content we’ve ever seen concentrated into one conference. Of course, we’re not surprised—we know these people, and we knew they’d be good. Still, our lack of surprise doesn’t hinder us from being amazed.

The speakers spanned all sorts of disciplines. They brought expertise in night photography, obviously, but also in travel, astronomy, preservation, activism, environmentalism, technology, creativity, outdoors skills and more. The tapestry of knowledge and wisdom they wove was nothing short of uplifting and exhilarating, and it was beyond everything we and the attendees could wish for.

The 35 speakers of the 2021 Night Photo Summit.

The Sponsors

Don’t let any skepticism of commercialism fool you—the sponsors weren’t there just to sell to an audience. Their support made the Summit more viable, but more importantly, their contributions made it an even better experience.

The Night Photo Summit sponsors offered 33 giveaways valued at over $5,000.

Every sponsor provided giveaways for attendees, from lenses to monitors to software to books and more—33 giveaways worth over $5,000. Many sponsors also offered show specials on their services and gear, most of which attendees still have access to (some of the deals don’t expire for months!). And many of the sponsors also provided programs for the attendees: talks on calibration, light painting, star trackers, night photography filters, and so on.

Clearly, the sponsors weren’t just advertisers—they were a critical part of the team.

What’s Next?

If you weren’t able to join us, we have great news: You still can!

Replays of more than 45 sessions are available for 24/7 streaming until February 2022.

The Night Photo Summit Course Catalog of video replays.

The Night Photo Summit Course Catalog of video replays.

The Night Photo Summit registration fee covered not just the three days last weekend, but also streaming access to videos of all of the sessions for one year. Anyone can still buy a ticket to watch and learn from and be inspired by all of that content. Just visit nightphotosummit.com or click the button below to join the fun.

As for what happens in the future, beyond the replays? Well, we maybe need to rest a bit, and think a bit, and plan a bit. But we promise that we have no intention of being done with the Night Photo Summit. It will be back.

Until then, know that we are filled with gratitude for everyone who was involved—those who worked behind the scenes, those who encouraged us, those who supported us, those who joined us on stage, and especially those who joined us from the comfort of their homes and coffee shops around the world. We hope that the education we provided helps bring your night photography to new heights, and that the inspiration we offered helps you shine even brighter among the stars.

Chris Nicholson is a partner and workshop leader with National Parks at Night, and author of Photographing National Parks (Sidelight Books, 2015). Learn more about national parks as photography destinations, subscribe to Chris' free e-newsletter, and more at www.PhotographingNationalParks.com.

UPCOMING WORKSHOPS FROM NATIONAL PARKS AT NIGHT

Yesterday's News, Today's Muse: Shooting Night Photography on Film

News flash!

There is a little bit of a film renaissance going on, right now!

I can tell you that I’ve been enjoying loading up my classic cameras again and taking them out for more day and night adventures.

I learned night photography on film in the 1990s, back when it was seen as a very difficult and archaic process that yielded more misses than hits. However, when you succeeded, it felt like a majestic home run! Without the instant feedback and resources on the internet, night photographers in the film days would write copious amounts of notes from all their trials and errors, and they would use specific films that played better to longer exposures.

Digital certainly made night photography easier and more accessible for people to master. On the other hand, there’s a series of benefits to photographing night with film: the exciting uncertainty of shooting on analog can push you to pre-visualize, challenge yourself and add a dash of nostalgia to your photographic experience.

Sutro Baths. Mamiya 7 with a 43mm lens, shot on Fujifilm Acros 100 under a full moon. 8 minutes, f/8.

Why Shoot Film for the Night?

Night photography is a fairly slow and laborious process. Digital technology has sped up that process and given us immediate feedback to adjust our decisions on exposure and light painting in the field. But have those advantages made you more complacent as well?

Film definitely pushes you to pre-visualize and to slow down even more. You’ll think about every decision before clicking the shutter, and that isn’t a bad thing.

With digital, there are relatively few limits to the night sky—either in the field or later in post-processing. You have the tools to switch from color to black and white, and to stack images so that everything from 6 inches to the infinite stars is in focus.

With film, your options are limited—but that can force you to be more creative. There is something to be said for heading into the field with a very specific vision, and film locks you into one palette for the night. (Or at least for 10 to 36 frames.)

Speaking of vision, I also love the variety of film cameras that are geared to let you to see in a different way, whether it is a true panorama camera, the square frames of a twin lens reflex, or even a pinhole camera.

You can embrace these limitations, and just “roll” with film!

Parroquia de San Miguel Arcangel. This is a rare night photograph taken with a zone plate (pinhole type). Shot on Polaroid Type 59 4x5 color film that has notoriously bad reciprocity failure. Note how the direct light sources from the church reflect the zone plate lens. 4x5 Zero Image Pinhole camera with an f/45 zone plate. Approximately 4 minutes, f/45, ISO 100.

Logistics of Shooting Film

There are some specific logistics to shooting film that we need to get an initial grasp of.

Reciprocity Failure

The main logistical obstacle is reciprocity failure. A digital sensor’s ISO can be adjusted from 50 to 51,200 and beyond. The ISO of film is less pliable. Film is optimized for the ISO it is rated for and can suffer from reciprocity failure during long exposures at very low light levels.

A film’s emulsion is made up of a layer of silver halide chemicals that “react” to light and etch the image onto the film. Common chemistry tells us that a chemical reaction is most potent at the beginning and loses its potency over the course of the reaction. Ergo, the longer an exposure, the less sensitive the film’s silver halide layer becomes to light. The breakdown can start in as soon as 1 second, and it accelerates as the exposure gets longer. Each type of film is made up of different chemistry and therefore reacts differently, so each has a reciprocity failure chart that is often printed inside the box or found on the manufacture’s website.

Developing Time

Another issue is controlling the highlights of night images on film. Because we are inherently overexposing most scenes to get more detail in the dark shadows, we need to be careful not to blow out our highlights. In digital we can take multiple shots and use HDR techniques and blend them together. That would be more laborious with film.

A better option to control the contrast of the scene is by altering the way we expose and develop the film. The old adage of exposing for the shadows and developing for the highlights is the key to success.

There are different strategies depending on how much contrast is in the scene. In moonlight, the best technique is to reduce the development time by about 10 percent. The extreme contrast found in artificially lit locations can be even more problematic. In these situations, an extended development time with reduced agitation in a diluted developer will yield the best results. Experimentation combined with accurate notes will allow you to develop a personalized system to both get consistent results and to customize your look.

(Of course, not everyone who shoots film also develops it. If someone else is doing the darkroom work, discuss all these options with them to achieve the best end results.)

I also recommend dedicating a roll of film to only night photography, as opposed to mixing night and day exposures. Brightly lit daytime frames and dimly lit nighttime frames require different development times for the best image quality, so if you were to shoot them both on the same roll, then one or the other would suffer from incorrect processing.

Film Choice

Two of my favorite films are Fujifilm Acros 100 and Kodak Tri-X 400. The reciprocity failure compensation for each is drastically different, and the slower speed of the Acros handles longer exposures much better than Tri-X. When I meter and add reciprocity compensation on a moonless night, I’m looking at a 4- to 6-hour exposure with Acros—but any decent exposure under those conditions is impossible with Kodak Tri-X!

Reciprocity Failure Chart. A comparison of reciprocity compensation for two of my favorite films, Fuji Acros 100 and Kodak Tri-X 400.

If you have a favorite film, research the technical data prior and do your own exposure tests to figure out how much you need to adjust your initial evaluation of a scene.

For example, most films start to suffer reciprocity failure between 1 and 10 seconds. But with Acros (as well as with most of Fuji’s color slide films), reciprocity failure doesn’t begin until after 2 or 3 minutes.

Another choice is whether to work with color. When working with film, I shoot pretty much exclusively with black and white. I love bringing the monochromatic look wherever I go. When we shoot digital, we often default to color and forget about the strong lines and compositions that black and white can emphasize even more—but with analog that’s a more conscious decision, because the whole process starts with choosing which film to use.

Metering

This leads up another important question: How do you meter for night exposures?

This was the biggest frustration pre-digital. Most internal meters in film cameras can’t accurately gauge dim scenes at 3 EV or lower. Handheld meters perform a little better, with the best ones working well at as low as -3 EV. (For reference, 0 EV would be the equivalent of a subject lit by dim ambient artificial light, and -3 EV would be a subject under full moonlight.)

Today’s digital meters are way more sensitive, especially considering that we can raise the sensitively of a camera to ISO 6400 and beyond and still get a very accurate reading. Because of this, when I’m shooting film at night, I often shoot with a second setup that’s digital. I meter with the digital and then apply those settings and add the required reciprocity factor for the film, and that gives me an excellent starting point. Even with this relatively accurate approach, I definitely advise bracketing your exposure to be sure you get an exposure you like and can work with.

My go-to full-moon exposure with Fujifilm Acros 100 is 8 minutes at f/8. One day after the full moon, I add one stop of light—i.e., 16 minutes at f/8 or 8 minutes at f/5.6. For me, a productive night is to finish a roll of film, but honestly I often have time for only 8 to 10 frames.

Cannon Beach. Wisner 4x5 Technical Field Camera, shot under a full moon on Fujifilm Acros 100. 30 minutes, f/11. Acros is a fine-grain film that allows short exposures in dimly lit scenes, and it lets you extend exposures in dark, moonlit scenes without much loss in reciprocity.

Which Film Camera is Best for You?

The Mamiya C220.

I like to recommend cameras that are not battery dependent, or ones for which the battery is solely for powering the meter. I also, for night work, highly recommend medium format cameras over 35mm. If you are averaging only 8 to 12 framers per night, it could take three nights to finish a roll of 35mm film, whereas you could finish one roll of medium format’s larger film in one night, and you’ll also get better image quality.

Both Matt Hill and I shot many nights with our beloved Mamiya 7, which yields a large negative and has a bright rangefinder that makes it easy to compose in dark environments. However, the battery in the Mamiya 7 is notorious for draining quickly with long exposures. And that battery also controls the shutter, so if it drains in the middle of your exposure, you’re not only done for the night, but you’ve also ruined your last shot. I always kept a spare battery in my bag for one-night shoots, and brought several extra on longer road trips.

The Mamiya 7 is still expensive even on the used market, so if you are new to this and don’t have an old film camera on hand, I recommend the Mamiya C220 twin lens camera. No batteries, no meter needed. It produces a nice square negative, and it’s one of the few twin lens cameras that had interchangeable lenses. These can often be found for under $400 in good condition and with a lens.

Thomaston, Maine. Mamiya C220 with an 80mm lens, shot on Fujifilm Acros film. 8 minutes, f/5.6.

The Urban Night on Film

So far this film thing probably seems like it’s loaded with a lot of factors that need to be juggled. But most of the considerations I’ve mentioned so far have been for dimly lit scenes, or moonlight—and those are the most challenging night conditions for film. On the flip side, you can shoot film with fewer concerns in brighter lit urban scenes:

  • Color shifts and reciprocity failure don’t come into play much under streetlights.

  • The shorter exposures are easier to meter.

  • The brighter scenery is easier to see through your viewfinder.

All of this means you can be more productive, because you can shoot more frames!

In the urban environment, color film can be fun to experiment with, or you can see your city in a black and white noir look.

Red Hook. Rollei Rolleiflex 2.8E TLR, shot on Fujifilm Acros 100. This was shot at probably 1/2 second or less. The well-illuminated crooked street light provided ample light for even a slow 100-speed film.

Red Hook. Rollei Rolleiflex 2.8E TLR, shot on Fujifilm Acros 100. This was shot at probably 1/2 second or less. The well-illuminated crooked street light provided ample light for even a slow 100-speed film.

Olympic Stadium, Montreal. Voigtlander Bessa R, shot on slide film that was then cross-processed to get even more grain and some trippy colors.

Final Thoughts

Film can be fun. It can push you out of your comfort zone and make you study the night light and the view in front of you in a way that digital probably won’t. You can also embrace the reciprocity failure and shoot for very long, continuous star trails without the need to do any stacking in post.

I’ve also been very impressed with what Jason Defreitas is doing with film and star trackers. The Milky Way was impossible to shoot on film because of the low light levels and reciprocity failure, but Jason has done some beautiful astrophotography on film.

Bannerman Armory, Pollepel Island, New York. Mamiya 7 with a 43mm lens, shot on Fujifilm Acros 100 film. 90 minutes, f/11.

I will say that digital has made me a better film shooter. As I mentioned earlier, when I go out with my combined digital and film setup, I can use the former to quickly find the right exposure for the latter. And because the film exposure tends to be so long, I then use the digital camera to keep shooting, which keeps my overall productivity up.

I hope I’ve inspired you to dust off a film camera you might have sitting on the shelf and to seize the night— with film!

Note: Want to learn more about classic cameras and film photography? Our friends at B&H Photo are celebrating Classic Camera Week from February 8 to 12. Gabe will be hosting several online events where he talks to camera collectors and pros who shoot film, discussing best camera choices. A there will be a happy hour on Thursday to raise a toast to everyone’s favorite film cameras! To learn more about B&H’s week of programming, click the link above.

Gabriel Biderman is a partner and workshop leader with National Parks at Night. He is a Brooklyn-based fine art and travel photographer, and author of Night Photography: From Snapshots to Great Shots (Peachpit, 2014). During the daytime hours you'll often find Gabe at one of many photo events around the world working for B&H Photo’s road marketing team. See his portfolio and workshop lineup at www.ruinism.com.

UPCOMING WORKSHOPS FROM NATIONAL PARKS AT NIGHT