It’s hard to believe that we are entering our fourth year of leading night workshops to beautiful and spectacular places. But here we are, announcing our adventures for the next year.
We threw our dream darts all over the globe, from the mysterious giant stone Moai statues of Easter Island to the sand dunes of Morocco. In between, volcanoes, canyons, towers, ghost towns, lighthouses and great, smoky mountains will be our subjects under the stars.
We will also offer a trio of National Parks at Night firsts:
- our first backcountry camping adventure
- our first urban night workshop
- our first dedicated post-processing course
Oh, and did we mention we are going to Cuba and will tour the country in the very cars we love to photograph there?
So come dream with us and dedicate some time to leveling up your night visions!
Note: Several workshops have already sold out, as we announce them to our alumni and email list first. However, if that workshop truly speaks to you, be sure to sign up for the waitlist! There is no fee to do that, and we’ve had many waitlisters become happy alumni!
A Trio of Trip Types
We offer three styles of learning experiences: our Passport Series and Adventure Series, and our brand new skills development workshops.
Passport Series
At Passport Series workshops, we take you to a national park and teach you how to interpret the night sky against a variety of landscapes and lighting elements. We often have these cherished locations to ourselves and offer classroom time as well as hands-on education.
Adventure Series
At Adventure Series workshops, we take you to other fascinating natural wonders that may be on or near national and/or protected lands in in the U.S. or beyond! These workshops may have a little less “classroom” time and a bit more field time as we are constantly exploring beautiful places during the day and night.
Skills Development
In 2019 we’re introducing the skills development workshops, designed to kick up your processing power in Lightroom and Photoshop! We will guide you to get your photographs organized and looking better than ever before. It’s time to take it to the next level. Five nights and six days of skills improvement, plus a little shooting at night and then applying what you learned to those RAW files during the day.
The Amazing Destinations
You can click on any of the links below to learn a lot more about all the workshop locations. For a quick read about what each experience will entail, read on …
| Dates | Location | Series |
|---|---|---|
| January 20-25 | Post-Processing Intensive in the Catskills | Skills |
| Feb 19-March 1 | Easter Island | Adventure |
| March 20-29 | Morocco | Adventure |
| April 11-16 | Valley of Fire & Nelson Ghost Town | Adventure |
| April 21-26 | Great Smoky Mountains National Park | Passport |
| May 19-24 | Outer Banks & Cape Hatteras National Seashore | Adventure |
| June 9-14 | Bryce Canyon National Park | Passport |
| June 16-21 | Grand Canyon National Park South Rim | Passport |
| July 8-12 | Devils Tower National Monument | Adventure |
| August 5-10 | Shi Shi Beach Backcountry | Adventure |
| August 18-22 | Lassen Volcanic National Park | Passport |
| October 2-6 | Cape Cod and the Province Lands | Adventure |
| October 13-18 | Big Bend National Park | Passport |
| November 3-8 | Golden Gate NRA & San Francisco | Adventure |
| December 7-15 | Cuba | Adventure |
Passport Series
Great Smoky Mountains National Park

Join us for the gently moon-kissed cliffs, mountains, coves, riversides, preserved cabins and churches of this historically pivotal national park. From the rolling valley of Cades Cove to the peak of Clingman’s Dome, we’ll explore the mercurial and mystifying skies of Great Smoky Mountains National Park.
Dates: April 21-26, 2019
More Information: Great Smoky Mountains National Park
Bryce Canyon National Park

In the surreal and vast expanses of the Utah landscape, we will spend a magical week exploring the otherworldly hoodoos of Bryce Canyon National Park. The crimson, orange and yellow rock spires make the perfect foreground for our night photography.
Dates: June 9-14, 2019
More Information: Bryce Canyon National Park
Grand Canyon National Park South Rim

It’s one of the greatest natural spectacles in the world. Join us in our first year of exploring the many layers of the Grand Canyon. Our focus during the 100-year anniversary of the park will be the popular South Rim. Known for its spectacular sunrises and sunsets, this workshop will emphasize many ways we can interpret the rim—from long exposures to panoramic and time-lapse techniques. We will also prove that the Grand Canyon is much more than a “rim shot.” We will seek the many traces of humankind that can be found along the canyon: Native American ruins, historical buildings and woman-made structures.
Dates: June 16-21, 2019
More Information: Grand Canyon National Park South Rim
Lassen Volcanic National Park

Lassen Volcanic National Park is home to steaming fumaroles, meadows freckled with wildflowers, clear mountain lakes and all four different types of volcanos. Jagged peaks tell the story of its eruptive past while hot water continues to shape the land. Lassen Volcanic National Park offers opportunities to explore and photograph a majestic landscape that is distinctly a part of the American West.
Dates: August 18-22, 2019
More Information: Lassen Volcanic National Park
Big Bend National Park

Big Bend National Park is pretty raw country. It’s also pretty. Especially in the right light, and double especially at night. All the rock formations, all the canyons, all the mountains and valleys and dirt roads and ruins—all sit under some of the quietest and darkest night skies of North America. The landscape is at once harsh and beautiful, at once hard and delicate, at once tough and mesmerizing. And we’ll be there to capture it all under the October stars of Texas.
Dates: October 13-18, 2019
More Information: Big Bend National Park
Adventure Series
Easter Island

Few places on earth are as mysterious or compelling as Easter Island. The giant stone figures known as Moai oversee this remote island 2,200 miles off of the coast of Chile. Most of Rapa Nui, as it’s known to the locals, is a national park. Not only is it hard to get to here, but it is notoriously difficult to access the park at night. In February of 2019, National Parks at Night will be taking 10 lucky people to do just that.
Dates: February 19-March 1, 2019
More Information: Easter Island
Morocco

Morocco is a land of large bustling cities, tranquil seaside towns and remote mountain villages. Our photo tour avoids the major cities in favor of smaller, quiet places away from most of the tourists and tourist traps. The port city of Essaouira, the kasbah at Ait BenHaddou and glamping in the Sahara desert will be the highlights of our adventure.
Dates: March 20-29, 2019
More Information: Morocco
Valley of Fire & Nelson Ghost Town

Join us for the broad, red mountains, valleys and arches within Valley of Fire State Park and the abandoned wonderland of the Nelson ghost town. We’ll explore having fun with light and stars in these desert jewels of the American southwest.
Dates: April 11-16, 2019
More Information: Valley of Fire & Nelson Ghost Town
Outer Banks & Cape Hatteras National Seashore

The Outer Banks—what a name, and what a place! Home to tasty crab cakes, the honored ground of first flight, pristine national seashore and perhaps the most iconic lighthouse in the United States. And at night, when you look up, oh my! You take in the stars and the Milky Way in that incredible Atlantic darkness while the ocean breezes tousle your hair and bring salt to your lips. And beneath it all, a camera and a tripod, capturing the majesty of what this special place offers.
Dates: May 19-24, 2019
More Information: Outer Banks & Cape Hatteras National Seashore
Devils Tower National Monument

Join us to explore the strange stone mountain of America’s first national monument. Revered by Native Americans in folklore, shrouded in mystery, we’ll explore the mercurial skies of Devils Tower.
Dates: July 8-12, 2019
More Information: Devils Tower National Monument
Shi Shi Beach Backcountry

Shi Shi Beach is a remote photographer’s paradise, reachable by six miles of round-trip hiking, plus a little more to reach nearby Point of the Arches. We will hike first to Second Beach for a warm-up night of camping and photography, then to Shi Shi for a two-night, three-day, adventure among the stars and the starfish, the sand and the sea stacks. We will photograph ebbing and flowing ocean waters, tidal pools, Pacific sunsets, and of course the Milky Way and the beautiful Olympic night skies.
Dates: August 5-10, 2019
More Information: Shi Shi Beach Backcountry
Cape Cod and the Province Lands

Cape Cod’s Province Lands comprise a captivating collection of simple scenic wonders. Ponds. Beaches. Sandy dunes. Pine forests. Lighthouses. Old dune shacks. Cranberry bogs. Atlantic waves cascading onto the coast. These old shores hold countless treasures for the night photographer. We’ll explore them all, and more of what Cape Cod offers, during one of the peak of the region’s finest season: a New England autumn.
Dates: October 2-6, 2019
More Information: Cape Cod and the Province Lands
Golden Gate National Recreation Area & San Francisco

Like a beacon at the end of the world, San Francisco’s diverse land and skyscape will guide our exploration into our first urban workshop. We will focus our lenses on the winding streets and bright city lights, but also explore the coastline, bunkers, bridges and ruins that intersect the beautiful Bay Area. We will challenge you to re-interpret the city with a multitude of long exposure and processing techniques that will leave you with a unique and fresh view of The City by the Bay.
Dates: November 3-8, 2019
More Information: Golden Gate National Recreation Area & San Francisco
Cuba

On this photography and cultural tour you’ll experience the best of Cuban culture on an island with photo opportunities everywhere you look. In Havana we’ll explore life in the streets both day and night, plus the vibrant art and music scenes, architecture, people and cuisine. We’ll road-trip to Las Terrazas and Viñales Valley (a UNESCO World Heritage Site) to photograph Cuba’s magical landscapes. This boutique tour will give you access to Cuban experiences you’d never be able to create on your own. All you’ll need is an adventurous spirit and flexible mindset (it’s Cuba!).
Dates: December 7-15, 2019
More Information: Cuba
Skills Development
Post-Processing Intensive in the Catskills

You’ve spent a lot of time building your camera skills and honing your photographic vision. Now it’s time to take it to the next level. Post-processing has become an integral part of nearly every discipline of photography. Just as the black and white photographers of the 20th century were able to creatively interpret their work in the darkroom, we can now use modern technology to enhance our photos, and even to create images that were impossible only a few short years ago.
Dates: January 20-25, 2019
More Information: Post-Processing Intensive in the Catskills
But Wait, There’s More!
Don’t see the perfect fit for your schedule or location? In the coming months we will announce our 2019 Ambassador Series destinations with our partners at Atlas Obscura, Rocky Mountain School of Photography, and a brand new partner whose name we’re not yet mentioning. (Hint: It’s big.)
Also, remember to always monitor our Speaking Engagements page. We give lectures and photo walks in the New York City area and all over the country. And if you want us to come directly to your camera club or meet-up group, feel free to contact us. (Click here to see what we can offer.)
We also offer one-on-one tutoring in-person or via videoconference that can help you build your portfolio, organize your images or give you targeted, individualized education to elevate your photography skills.

Finally, we’d like to express a deep thanks to all our alumni—the 300 fine photographers who have accompanied us over the past 2.5 years to wonderful night photography locations such as Acadia, Biscayne, Capitol Reef, Dry Tortugas, Death Valley, Redwood, Zion, Great Sand Dunes, Cape Cod, Centennial Valley and more. We appreciate you so very much.
Do you want to see their work? Check out this playlist of all the workshop slideshows. Want to see some of their accomplishments? Check out our Alumni Spotlight.
Seize the Night
2019 will have 365 nights. Which will you be spending with us? Sign up today to #seizethenight!
UPCOMING WORKSHOPS FROM NATIONAL PARKS AT NIGHT


4 Ways to Remove Airplanes from Star Stacks
When I make a star stack sequence, I’m at a crossroads for my editing choices.
Do I remove the plane trails? If so, do I live with the tiny gaps in those star trails left behind by the removal process?
It’s a hard decision. On the one hand, the journalistic approach is, “That’s what happened in front of my camera—it’s the truth.” If that’s your creed ... you’re done! Make whatever levels and color adjustments you want and move on.
But when I desire to have a final image without plane trails, I spend some time to make sure it’s done right, and that I’m making a quality photograph.
Want to learn some techniques on how to do this? Is there a method—without having to be a professional photo retoucher—that doesn’t leave gaps? Read on, my fellow night photographer.
Note:
If you are unfamiliar with how to create a star stack, see these previous blog posts:
- “How I Got The Shot: Star Stacks and Sea Stacks in Olympic National Park,” by Chris Nicholson
- “How I Got the Shot: Waterfall and Clements Mountain in Glacier National Park,” by Tim Cooper
Prep: How to Find Which Layers Have Plane Trails
I used the same image stack for all the demos below. Shot in the Fruita Orchard of Capitol Reef National Park during our workshop in June 2018.
Gear:
Exposure details:
- 63 images shot at 30 seconds, f/5.6, ISO 6400
- total exposure duration: 31.5 minutes
I knew I wasn’t going for star points, so I chose a 30-second exposure to keep long exposure noise down in the high desert summer heat. The temps weren’t that bad, but I wasn’t taking any chances.
For expediency, I exported full-resolution JPGs from Lightroom to Photoshop. Stacking TIFFs straight from Lightroom with this many files can really choke a computer. As it was, the PSB file was 4.2 GB when saved.
Note:
Do not apply lens profile corrections before making a star stack. It can lead to irreparable moire in the final stacked image. If you want to do apply lens corrections, do so after stacking and flattening.
How to Find the Planes
- Create your image stack in Photoshop and save as a PSD or PSB file (the latter when the file is over 2 GB—don’t worry, Photoshop will prompt you if it’s needed).
- Identify which layers have plane trails. But how, you ask?
- I like to turn on all the layers and apply the Lighten blend mode to each so I can see everything.
- Then I click and hold on the eyeball icon at left of each layer and drag downward in groups of ten or so, while staring at the image. This gives me kind of a faux animated preview of the layers being added one by one. (See video below.)
- If I see plane trail (or a portion of one) disappear, then I click the eyeball on each layer, one by one, upward from the bottom until it disappears. That’s how I know I found the offending layer.
- I make that layer a color to identify it for further work later.
An alternative way to do this is by revealing only one layer at a time, from top to bottom. Which strategy to use is just personal preference. Unless you’re on a PC, apparently. Chris is a PC user, and the trick I detail above and in the video doesn't work for him. What he does is group the layers ten or so at a time, changes the blend mode of all the groups to Lighten, then hides each group one by one, which helps him narrow down the locations of trails more quickly. Finally, he goes into the offending groups and finds the offending planes.
Either way, this process is time-consuming. So be patient. Find those planes. For the photo in the video below, the process above took me about five minutes. (I made it faster for you to watch.)
Note:
You may also find meteors and satellites in there. We have another blog post coming soon on how to identify the differences between them.
4 ways to remove plane trails in a star stack with Layer Masks
- Remove plane trails in a flattened image in Lightroom.
- Use the black paint brush in Photoshop.
- Use the spot healing brush in Photoshop.
- Use layer masks in Photoshop.
Which one is best? I am going to explore all four and compare them, so you can decide which works best for you. And, you can bet that I will have an opinion about what works best for me, too. ;-)
Removing Plane Trails in a Flattened Image
This is the fastest method, but also the least likely to be effective in terms of quality. If you must have it fast, try this first. If you don’t like the results, try one of the options that follows.
- Open your flattened image with plane trails in Lightroom.
- Select the Spot Healing Brush.
- Click once at the beginning of the trail. (See note below.)
- Hold Shift on your keyboard.
- Click once again at the end of the plane trail.
- Repeat for every plane trail on every layer.
NOTE:
You can paint freehand with the trackpad on your laptop (most awkward), with your mouse (somewhat awkward) or with a tablet like a Wacom (hardly awkward at all). This applies to subsequent techniques too.
I find that using keyboard arrow keys to move the healing brush target around is easier to manage than just using a mouse or trackpad. But it causes “jaggies” (below) more often than not, no matter how precise you are.
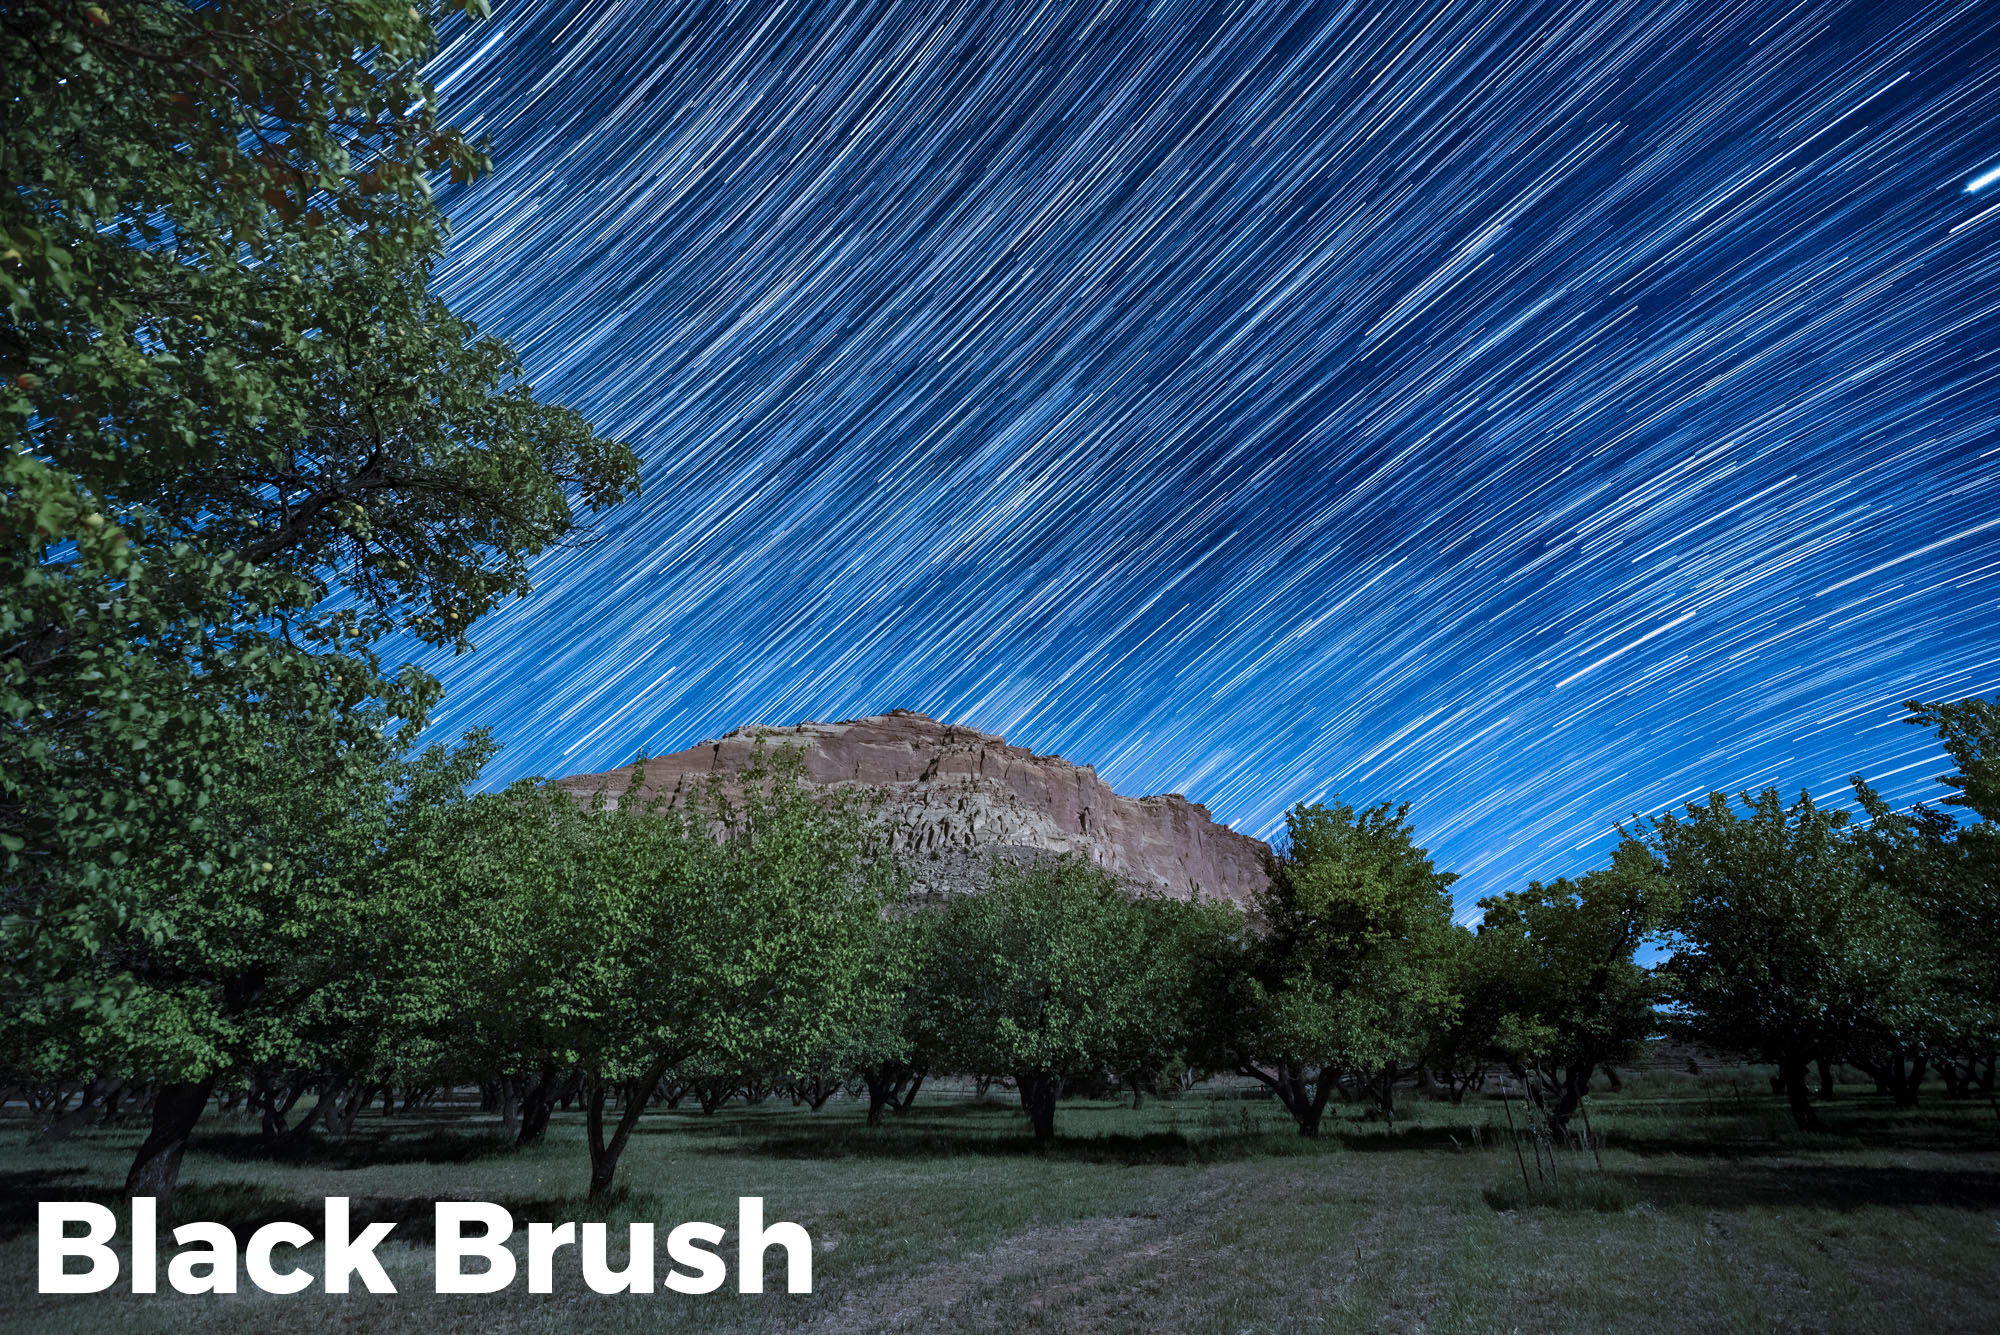
Using a Black Paint Brush in Photoshop
Since the Lighten blend mode for layers reveals the brightest pixels in a scene, painting with a black brush right on the image layer will make trails (which are bright) disappear.
- Select the Brush Tool with these settings: Opacity at 100 percent, Flow at 100 percent and Color at 100 percent black.
- Make your brush slightly larger than the width of your plane trail. (You may have to adjust this up and down, depending on the trail.)
- Paint over the plane trails. But only over the plane trails.
- Repeat for every plane trail on every layer.
- Merge layers or flatten when done with all.
Resulting image after using black brush to remove plane trails. Click to enlarge.
100 percent zoom crop to an area where a plane trail was removed.
In this video, I used the process of identifying layers first and then color-coding them before blacking out the trails. Even then, I discovered more along the way.
Note:
This is a destructive process. No going back. Unless you duplicate each layer you paint on and turn off the duplicate, but that increases your PSD/PSB size.
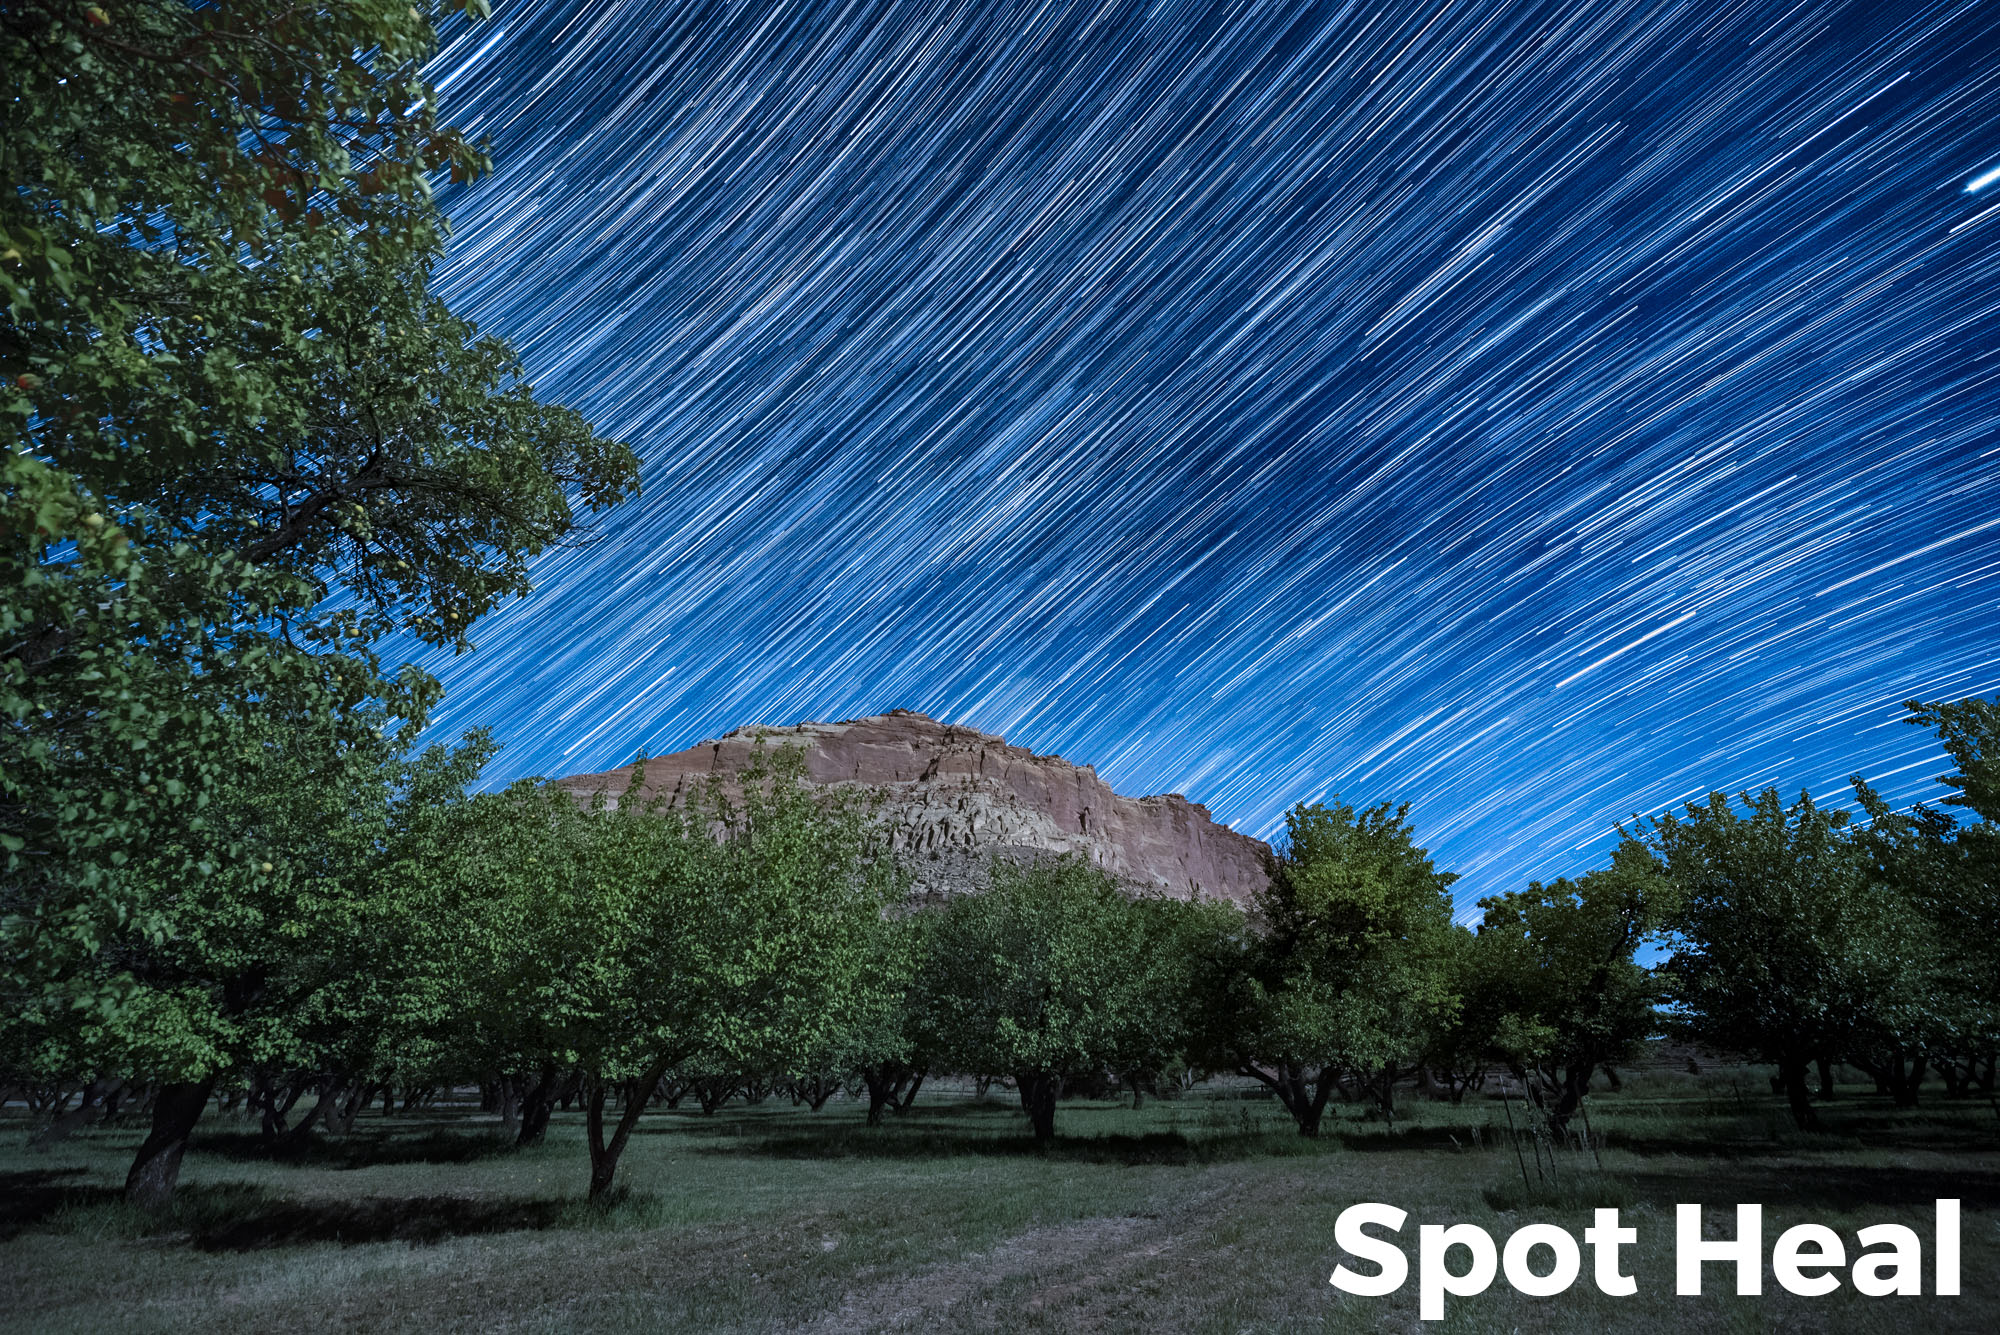
Using the Spot Healing Brush in Photoshop
I recently discovered this. While mucking about in Photoshop, editing my star stacks from Capitol Reef National Park earlier this year, I had a What If? moment. …
I asked myself, “What if I try using a different tool to remove star trails?” (I usually use layer masks, which we’ll get to in a little bit.)
- Select the Spot Healing Brush tool, and change the Type to Content-Aware.
- Make your brush slightly larger than the width of your plane trail.
- Click once at the beginning of the trail.
- Hold Shift on your keyboard.
- Click once again at the end of the plane trail.
- Repeat for every plane trail on every layer.
- Merge layers or flatten when done with all.
It works. I love this method, despite it being a destructive process.
Resulting image after using Spot Healing Brush to remove plane trails. Click to enlarge.
100 percent zoom crop to an area where a plane trail was removed.
In this video, I simply went from top to bottom to eliminate trails in each layer without color-coding them. I missed one plane trail, because I was kinda tired doing both back to back.
Note:
As mentioned, this is also a destructive process. No going back. Unless you duplicate each layer you paint on and turn off the duplicate, but that about doubles your PSD/PSB size.
Comparing the Methods
Let’s take a look at how the methods stack up against each other. (See what I did there?)
The edit in Lightroom of a completed, flattened stack? I immediately abandoned it. It was janky to complete, and undesirable:
And when your stars go the wrong way, it’s really hard to make it match:
So, all that’s left are the two competitors we’ve looked at so far. Below you can see the final images from each:
And here are some comparisons I made while viewing both simultaneously in Lightroom:
Above you can see that there isn’t really much difference between the two methods. At least in terms of image quality.
But … what did my time cost?
Painting Black
Pros: Easy to see if you covered a plane trail.
Using Spot Heal Brush
Pros: I just feel better seeing an image versus black lines all over. The trails are gone, and the layers still looks like a photograph.
Both methods have the same cons:
- destructive to pixels
- makes some gaps in the trails (thought remarkably few)
- no way to go back on edits unless you duplicate your PSD/PSB beforehand
To Identify or not to Identify
I spent eight minutes identifying layers with stuff to eliminate.
I spent 30 minutes using the black brush on those layers I identified.
I spent 27 minutes using the Spot Healing Brush, layer by layer, without color-coding or pre-identifying layers.
It’s up to you which method helps you get through the process better. I can operate without color-coding in the future. One-by-one is the way for me.
Conclusion: Which Method Wins?
Guess what? Both strategies are just as effective. Yay!
And here is the proof: When gaps appear, they do so in the same places using both methods.
The above were from testing my own hypothesis that Spot Healing would work better. Surprise! I’m delighted to discover that for this test, both techniques performed the same.
Both methods create gaps. But you can meticulously fill them in with Photoshop prior to flattening. Use the clone tool, if you have the extra hours. ;-)
The Fourth Way—Using Layer Masks in Photoshop
This is how I’d always done it before my recent discovery. This method is non-destructive—if you save your PSD/PSB, you can always roll back the edits or modify them. (The downside, of course, is that an unflattened, many-layered file could be downright huge. If you’re not planning to save an unflattened file, this doesn’t provide much benefit.)
- Add a mask to a layer with a plane trail.
- Select the Paint Brush tool with these settings: Opacity at 100 percent, Flow at 100 percent and Color at 100 percent black.
- Make your brush slightly larger than the width of your plane trail.
- Click once at the beginning of the trail.
- Hold Shift on your keyboard.
- Click once again at the end of the plane trail.
- Repeat for every plane trail on every layer.
- Make your final contrast, color and other finish adjustments.
Give it a shot. You may like this better, especially if you are already masking out other things in your scene.
Et al.
Here are some examples of other stacks I’ve done using these techniques:
So go forth and capture, my fellow lovers of the night sky. And fear not the airplanes arcing across the heavens, for you can make their presence just a memory.
